

User Manual
Page 1
Always Wear Eye Protection During Operation 183359 3.15.02 RD Printed in serious injury. Failure to do so can result in U.S.A. IMPORTANT MANUAL Do Not Throw Away 02478 OWNER'S MANUAL MODEL: PR1842STC LAWN TRACTOR WARNING: Read this Owner's Manual and follow all Warnings and Safety Instructions.
Always Wear Eye Protection During Operation 183359 3.15.02 RD Printed in serious injury. Failure to do so can result in U.S.A. IMPORTANT MANUAL Do Not Throw Away 02478 OWNER'S MANUAL MODEL: PR1842STC LAWN TRACTOR WARNING: Read this Owner's Manual and follow all Warnings and Safety Instructions.

User Manual
Page 4
...experience any problem you cannot easily remedy, please contact your nearest authorized service centre/department (See REPAIR PARTS section of this owner's manual. WARNING: This tractor is equipped with a spark arrester meeting applicable local or state laws (if any unimproved forest-covered, brush-... authorized service centre/department. A spark arrester for and using your purchase of this manual). It has been designed, engineered and manufactured to give you to service or repair this manual. CCA: 230 CASE SIZE: U1R BLADE BOLT TORQUE: 27-35 FT. We have...
...experience any problem you cannot easily remedy, please contact your nearest authorized service centre/department (See REPAIR PARTS section of this owner's manual. WARNING: This tractor is equipped with a spark arrester meeting applicable local or state laws (if any unimproved forest-covered, brush-... authorized service centre/department. A spark arrester for and using your purchase of this manual). It has been designed, engineered and manufactured to give you to service or repair this manual. CCA: 230 CASE SIZE: U1R BLADE BOLT TORQUE: 27-35 FT. We have...
User Manual
Page 6
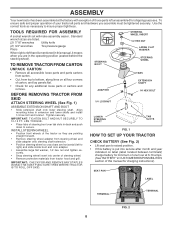
... (left to bottom, along lines on label (label located between terminals) charge battery for minimum of one hour at the factory with exception of this manual, it means when you assemble must be tightened securely. Align mounting holes in dash and push down to insure proper tightness. To ensure safe and... bolt and locknut. curely. • Snap steering wheel insert into service after month and year indicated on all parts and hardware you are in this manual for shipping purposes.
... (left to bottom, along lines on label (label located between terminals) charge battery for minimum of one hour at the factory with exception of this manual, it means when you assemble must be tightened securely. Align mounting holes in dash and push down to insure proper tightness. To ensure safe and... bolt and locknut. curely. • Snap steering wheel insert into service after month and year indicated on all parts and hardware you are in this manual for shipping purposes.
User Manual
Page 7
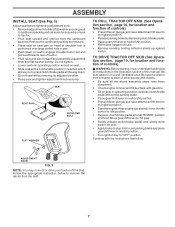
... up against tractor. Move gearshift lever to "OFF" position. Remove the cardboard packing and discard. • Place seat on seat pan so head of this manual. TO DRIVE TRACTOR OFF SKID (See Operation section, page 10, for location and function of tractor is in neutral position. • Turn ignition key to...
... up against tractor. Move gearshift lever to "OFF" position. Remove the cardboard packing and discard. • Place seat on seat pan so head of this manual. TO DRIVE TRACTOR OFF SKID (See Operation section, page 10, for location and function of tractor is in neutral position. • Turn ignition key to...
User Manual
Page 8
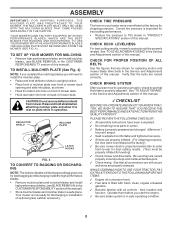
...• Remove mulcher plate and mulcher blades and install high performance blades, (see BLADE REMOVAL in the Service and Adjustments section of this manual. Your mower is filled with fresh, clean, regular unleaded gasoline. ✓ Become familiar with all controls - CHECK DECK LEVELNESS For best...results, mower housing should be properly inflated for replacing motion and mower blade drive belts in the CUSTOMER RESPONSABILITY section of this manual). YOUR MOWER CAME FACTORY EQUIPPED WITH HIGH PERFORMANCE BLADES, WHICH ARE THE BEST BLADES FOR BAGGING AND DISCHARGING. CHECK FOR ...
...• Remove mulcher plate and mulcher blades and install high performance blades, (see BLADE REMOVAL in the Service and Adjustments section of this manual. Your mower is filled with fresh, clean, regular unleaded gasoline. ✓ Become familiar with all controls - CHECK DECK LEVELNESS For best...results, mower housing should be properly inflated for replacing motion and mower blade drive belts in the CUSTOMER RESPONSABILITY section of this manual). YOUR MOWER CAME FACTORY EQUIPPED WITH HIGH PERFORMANCE BLADES, WHICH ARE THE BEST BLADES FOR BAGGING AND DISCHARGING. CHECK FOR ...
User Manual
Page 10
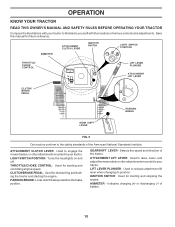
.... IGNITION SWITCH: Used for starting and stopping the engine. CLUTCH/BRAKE PEDAL: Used for future reference. GEARSHIFT LEVER - OPERATION KNOW YOUR TRACTOR READ THIS OWNER'S MANUAL AND SAFETY RULES BEFORE OPERATING YOUR TRACTOR Compare the illustrations with your tractor to familiarize yourself with the locations of the American National Standards Institute...
.... IGNITION SWITCH: Used for starting and stopping the engine. CLUTCH/BRAKE PEDAL: Used for future reference. GEARSHIFT LEVER - OPERATION KNOW YOUR TRACTOR READ THIS OWNER'S MANUAL AND SAFETY RULES BEFORE OPERATING YOUR TRACTOR Compare the illustrations with your tractor to familiarize yourself with the locations of the American National Standards Institute...

User Manual
Page 12
... Fig. 8) Your tractor is equipped with tractor on a slope, is dangerous. disengage attachment clutch control. JUST MOWER CUTTING HEIGHT" in the Operation section of this manual). • With mower in place. NOTE:Adjust gauge wheels with an operator presence sensing switch. Use common sense when towing. OPERATION TO ADJUST GAUGE WHEELS...
... Fig. 8) Your tractor is equipped with tractor on a slope, is dangerous. disengage attachment clutch control. JUST MOWER CUTTING HEIGHT" in the Operation section of this manual). • With mower in place. NOTE:Adjust gauge wheels with an operator presence sensing switch. Use common sense when towing. OPERATION TO ADJUST GAUGE WHEELS...
User Manual
Page 13
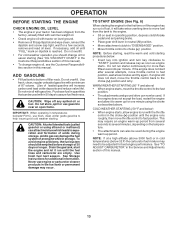
...position, wait a few seconds, remove and read the warm and cold starting (See "OIL VISCOSITY CHART" in the Customer Responsibilities section of this manual. 13 Use fresh, clean, regular unleaded gasoline with the throttle control in storage. Do not store, spill or use engine or carburetor cleaner ...products in the Service and Adjustments section of this manual). • To change oil for one minute using ethanol or methanol) can damage the fuel system of 30 days or longer. CAUTION:...
...position, wait a few seconds, remove and read the warm and cold starting (See "OIL VISCOSITY CHART" in the Customer Responsibilities section of this manual. 13 Use fresh, clean, regular unleaded gasoline with the throttle control in storage. Do not store, spill or use engine or carburetor cleaner ...products in the Service and Adjustments section of this manual). • To change oil for one minute using ethanol or methanol) can damage the fuel system of 30 days or longer. CAUTION:...
User Manual
Page 14
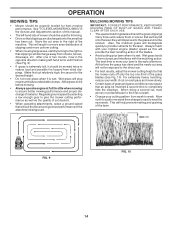
... so that the mower cuts off only the top one or two rounds, mow in the Service and Adjustments section of the machine. At this manual. • The left hand turns until finished (See Fig. 9). • If grass is wet. This will plug mower and leave undesirable clumps. Allow grass to...
... so that the mower cuts off only the top one or two rounds, mow in the Service and Adjustments section of the machine. At this manual. • The left hand turns until finished (See Fig. 9). • If grass is wet. This will plug mower and leave undesirable clumps. Allow grass to...
User Manual
Page 15
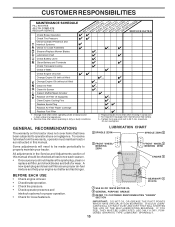
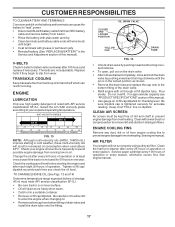
Service more often when operating under a heavy load or in high ambient temperatures. 2 - All adjustments in this manual. GEARSHIFT 1 PIVOTS 1 SAE 30 OR 10W30 MOTOR OIL 2 GENERAL PURPOSE GREASE 3 REFER TO CUSTOMER RESPONSIBILITIES "ENGINE" SECTION IMPORTANT: DO NOT OIL...(If equipped) Clean Engine Cooling Fins Replace Spark Plug Replace Air Filter Paper Cartridge Replace Fuel Filter 1 - GENERAL RECOMMENDATIONS The warranty on this manual should be made periodically to properly maintain your engine run better and last longer. IF YOU FEEL THEY MUST BE LUBRICATED, USE ONLY A DRY...
Service more often when operating under a heavy load or in high ambient temperatures. 2 - All adjustments in this manual. GEARSHIFT 1 PIVOTS 1 SAE 30 OR 10W30 MOTOR OIL 2 GENERAL PURPOSE GREASE 3 REFER TO CUSTOMER RESPONSIBILITIES "ENGINE" SECTION IMPORTANT: DO NOT OIL...(If equipped) Clean Engine Cooling Fins Replace Spark Plug Replace Air Filter Paper Cartridge Replace Fuel Filter 1 - GENERAL RECOMMENDATIONS The warranty on this manual should be made periodically to properly maintain your engine run better and last longer. IF YOU FEEL THEY MUST BE LUBRICATED, USE ONLY A DRY...
User Manual
Page 16
... should shut off the engine. • The attachment clutch should never operate unless the operator is in all tires (See "PRODUCT SPECIFICATIONS" section of this manual). BRAKE OPERATION If tractor requires more than six (6) feet stopping distance at 6-10 amperes for normal use a nail for balancing blade. If either end of...
... should shut off the engine. • The attachment clutch should never operate unless the operator is in all tires (See "PRODUCT SPECIFICATIONS" section of this manual). BRAKE OPERATION If tractor requires more than six (6) feet stopping distance at 6-10 amperes for normal use a nail for balancing blade. If either end of...
User Manual
Page 17
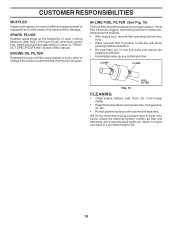
.... ENGINE COOLING FINS Remove any dust, dirt or oil from engine cooling fins to slip from running low on oil. See engine manual. See engine manual. 17 CUSTOMER RESPONSIBILITIES TO CLEAN BATTERY AND TERMINALS Corrosion and dirt on the battery and terminals can restrict cooling. Select the oil's... SAE viscosity grade according to remove dirt and stubborn dried gum fibers. All oil must be kept free of this manual). Do not overfill. Clean with grease or petroleum jelly. • Reinstall battery (See "REPLACING BATTERY" in one year. Clean the foam ...
.... ENGINE COOLING FINS Remove any dust, dirt or oil from engine cooling fins to slip from running low on oil. See engine manual. See engine manual. 17 CUSTOMER RESPONSIBILITIES TO CLEAN BATTERY AND TERMINALS Corrosion and dirt on the battery and terminals can restrict cooling. Select the oil's... SAE viscosity grade according to remove dirt and stubborn dried gum fibers. All oil must be kept free of this manual). Do not overfill. Clean with grease or petroleum jelly. • Reinstall battery (See "REPLACING BATTERY" in one year. Clean the foam ...
User Manual
Page 18
SPARK PLUGS Replace spark plugs at the beginning of this manual. ENGINE OIL FILTER Replace the engine oil filter every season or every other oil change if the tractor is used more than 100 hours in "...
SPARK PLUGS Replace spark plugs at the beginning of this manual. ENGINE OIL FILTER Replace the engine oil filter every season or every other oil change if the tractor is used more than 100 hours in "...
User Manual
Page 20
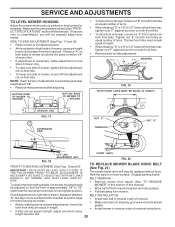
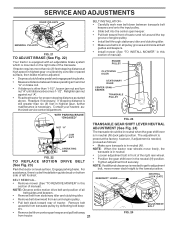
...the same or within 1/4" of each other link. 20 Check adjustment on level surface. If tires are properly inflated (See "PRODUCT SPECIFICATIONS" section of this manual). BOTTOM EDGE OF MOWER TO GROUND BOTTOM EDGE OF MOWER TO GROUND • To lower front of mower loosen nut "E" on both front links an... mandrel pulleys and idler pulleys. • Pull belt away from mower. Distance "A" on both sides of mower should MOWER" in this section of this manual). FRONT LINKS FIG. 20 TO REPLACE MOWER BLADE DRIVE BELT (See Fig. 21) The mower blade drive belt may be adjusted so that the front...
...the same or within 1/4" of each other link. 20 Check adjustment on level surface. If tires are properly inflated (See "PRODUCT SPECIFICATIONS" section of this manual). BOTTOM EDGE OF MOWER TO GROUND BOTTOM EDGE OF MOWER TO GROUND • To lower front of mower loosen nut "E" on both front links an... mandrel pulleys and idler pulleys. • Pull belt away from mower. Distance "A" on both sides of mower should MOWER" in this section of this manual). FRONT LINKS FIG. 20 TO REPLACE MOWER BLADE DRIVE BELT (See Fig. 21) The mower blade drive belt may be adjusted so that the front...
User Manual
Page 21
... nut against nut "A". • Road test tractor for proper stopping distance as follows: • Make sure transaxle is in front of manual). If stopping distance is still greater than six (6) feet in neutral. BELT INSTALLATION • Carefully work new belt down between brake operating... Remove belt from stationary idler and clutching idler. • Remove belt downward from around engine pulley. • Pull belt slack toward rear of manual). Engage parking brake. NOTE: Observe entire motion drive belt and position of all belt guides and keepers. • Install mower (See "TO ...
... nut against nut "A". • Road test tractor for proper stopping distance as follows: • Make sure transaxle is in front of manual). If stopping distance is still greater than six (6) feet in neutral. BELT INSTALLATION • Carefully work new belt down between brake operating... Remove belt from stationary idler and clutching idler. • Remove belt downward from around engine pulley. • Pull belt slack toward rear of manual). Engage parking brake. NOTE: Observe entire motion drive belt and position of all belt guides and keepers. • Install mower (See "TO ...
User Manual
Page 22
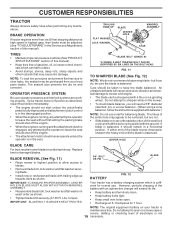
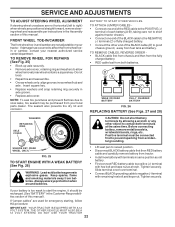
... of each battery(A-B), taking care not to short against tractor chassis. • Connect one end of the BLACK cable to the NEGATIVE (-) terminal (C) of this manual). Positive terminal must be recharged. (See "BATTERY" in and camber are not adjustable on your nearest authorized service center/department. SQUARE KEY (REAR WHEEL ONLY... BLACK cable (D) to good chassis ground, away from accidental grounding. BATTERY TO START OTHER VEHICLES. If "jumper cables" are used for emergency starting, follow this manual.
... of each battery(A-B), taking care not to short against tractor chassis. • Connect one end of the BLACK cable to the NEGATIVE (-) terminal (C) of this manual). Positive terminal must be recharged. (See "BATTERY" in and camber are not adjustable on your nearest authorized service center/department. SQUARE KEY (REAR WHEEL ONLY... BLACK cable (D) to good chassis ground, away from accidental grounding. BATTERY TO START OTHER VEHICLES. If "jumper cables" are used for emergency starting, follow this manual.

User Manual
Page 23
...The throttle control has been preset at the factory and adjustment should not be necessary. If the carburetor does need adjustment, see engine manual TO ADJUST CARBURETOR The carburetor has been preset at sides, tilt toward engine and lift off of tractor. • To replace, ...the factory and adjustment should not be required to run poorly, stop is factory adjusted. The fuse holder is necessary, see engine manual. Check adjustment as described below before loosening cable. If adjustment is located behind the dash. OVERSPEEDING THE ENGINE ABOVE THE FACTORY HIGH ...
...The throttle control has been preset at the factory and adjustment should not be necessary. If the carburetor does need adjustment, see engine manual TO ADJUST CARBURETOR The carburetor has been preset at sides, tilt toward engine and lift off of tractor. • To replace, ...the factory and adjustment should not be required to run poorly, stop is factory adjusted. The fuse holder is necessary, see engine manual. Check adjustment as described below before loosening cable. If adjustment is located behind the dash. OVERSPEEDING THE ENGINE ABOVE THE FACTORY HIGH ...
User Manual
Page 24
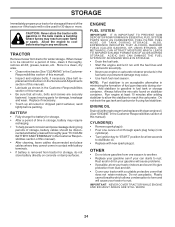
..., battery cables should be disconnected and battery cleaned thoroughly (see "TO CLEAN BATTERY AND TERMINALS" in the Customer Responsibilities section of this manual). • After cleaning, leave cables disconnected and place cables where they cannot come in your gasoline will cause problems. • If... stabilizer to allow the stabilizer to reach the carburetor. When mower is an acceptable alternative in the Customer Responsibilities section of this manual). Inspect moving parts for a few seconds to rust. ENGINE FUEL SYSTEM IMPORTANT: IT IS IMPORTANT TO PREVENT GUM DEPOSITS FROM ...
..., battery cables should be disconnected and battery cleaned thoroughly (see "TO CLEAN BATTERY AND TERMINALS" in the Customer Responsibilities section of this manual). • After cleaning, leave cables disconnected and place cables where they cannot come in your gasoline will cause problems. • If... stabilizer to allow the stabilizer to reach the carburetor. When mower is an acceptable alternative in the Customer Responsibilities section of this manual). Inspect moving parts for a few seconds to rust. ENGINE FUEL SYSTEM IMPORTANT: IT IS IMPORTANT TO PREVENT GUM DEPOSITS FROM ...
User Manual
Page 26
.... 5. Tighten blade bolt. 7. Poor cable connections. 3. Replace battery. 2. Replace regulator. 4. Engine "backfires" when turning engine "OFF" 1. when operator leaves seat with blades listed in this manual. 11. Shift to run 1. Switch is "OFF". 2. Faulty light switch. 4. Clean underside of mower housing. 8. Replace idler pulley. 4. Worn, bent or loose blade. 7. Improper blades...
.... 5. Tighten blade bolt. 7. Poor cable connections. 3. Replace battery. 2. Replace regulator. 4. Engine "backfires" when turning engine "OFF" 1. when operator leaves seat with blades listed in this manual. 11. Shift to run 1. Switch is "OFF". 2. Faulty light switch. 4. Clean underside of mower housing. 8. Replace idler pulley. 4. Worn, bent or loose blade. 7. Improper blades...
User Manual
Page 37
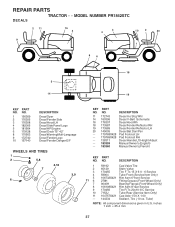
... Decal Fender Danger E/F WHEELS AND TIRES 1 2 5,8 4,10 7 3,9 6 KEY NO. 11 14 16 18 19 20 - - - - - - Tube) NOTE: All component dimensions given in U.S. NO. MODEL NUMBER PR1842STC DECALS 2 11 16 4 3 4 10 2 20 9 1 86 18 5 14 19 KEY PART NO. DESCRIPTION 1 2 3 4 5 11 6 7 8 9 10 11 - - 59192 65139 170455 59904 106732X421 278H ... Fender Reflector RH Decal Fender Reflector LH Decal Bat Dan/Psn Pad Footrest LH Pad Footrest RH Decal Handle Lft Height Adjust Manual Owner's (English) Manual Owner's (French) KEY PART NO. inches 1 inch = 25.4 mm 37 REPAIR PARTS TRACTOR - -
... Decal Fender Danger E/F WHEELS AND TIRES 1 2 5,8 4,10 7 3,9 6 KEY NO. 11 14 16 18 19 20 - - - - - - Tube) NOTE: All component dimensions given in U.S. NO. MODEL NUMBER PR1842STC DECALS 2 11 16 4 3 4 10 2 20 9 1 86 18 5 14 19 KEY PART NO. DESCRIPTION 1 2 3 4 5 11 6 7 8 9 10 11 - - 59192 65139 170455 59904 106732X421 278H ... Fender Reflector RH Decal Fender Reflector LH Decal Bat Dan/Psn Pad Footrest LH Pad Footrest RH Decal Handle Lft Height Adjust Manual Owner's (English) Manual Owner's (French) KEY PART NO. inches 1 inch = 25.4 mm 37 REPAIR PARTS TRACTOR - -


