
User Manual
Page 2
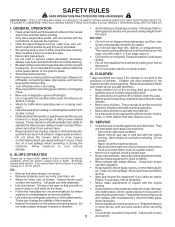
...INJURY OR DEATH. GENERAL OPERATION • Avoid starting . disengage the blades and proceed slowly straight down slopes, not across. The mower could Repair, if necessary, before and while backing. • Beawareofthemowerdischargedirectionanddonotpoint • Do not try to wear, damage, •.... These operators should evaluate their proper operation regularly. • Keep machine free of children. SERVICE operate the riding mower safely enough to improve stability. Do not allow responsible adults, who are explosive. - They are flammable and vapors are...
...INJURY OR DEATH. GENERAL OPERATION • Avoid starting . disengage the blades and proceed slowly straight down slopes, not across. The mower could Repair, if necessary, before and while backing. • Beawareofthemowerdischargedirectionanddonotpoint • Do not try to wear, damage, •.... These operators should evaluate their proper operation regularly. • Keep machine free of children. SERVICE operate the riding mower safely enough to improve stability. Do not allow responsible adults, who are explosive. - They are flammable and vapors are...
User Manual
Page 3
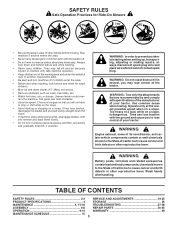
... on the slope. • Avoid starting when setting up and down a hill in reverse unless absolutely necessary. SAFETY RULES Safe Operation Practices for Ride-On Mowers • Be sure the area is dangerous. Uneven terrain could overturn the machine. Tires can hide obstacles. • Use slow speed. WARNING Engine exhaust, some...
... on the slope. • Avoid starting when setting up and down a hill in reverse unless absolutely necessary. SAFETY RULES Safe Operation Practices for Ride-On Mowers • Be sure the area is dangerous. Uneven terrain could overturn the machine. Tires can hide obstacles. • Use slow speed. WARNING Engine exhaust, some...
User Manual
Page 8
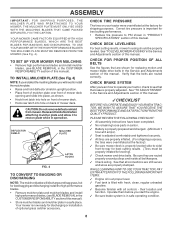
...high performance blades and install mulcher blades, (see BLADE REMOVAL in the Service and Adjustments section of this manual. See "TO LEVEL MOWER HOUSING" in the CUSTOMER RESPONSABILITY section of this manual. 3CHECKLIST BEFORE YOU OPERATE AND ENJOY YOUR NEW TRACTOR, WE WISH TO ASSURE...parts in a safe place. Raise and hold deflector shield in operation. Verify that the brake is now ready for leveling). ✓ Check mower and drive belts. their location and function. DEFLECTOR SHIELD MULCHER PLATE LATCH HOOKS FIG. 4 TO CONVERT TO BAGGING OR DISCHARGING NOTE: The...
...high performance blades and install mulcher blades, (see BLADE REMOVAL in the Service and Adjustments section of this manual. See "TO LEVEL MOWER HOUSING" in the CUSTOMER RESPONSABILITY section of this manual. 3CHECKLIST BEFORE YOU OPERATE AND ENJOY YOUR NEW TRACTOR, WE WISH TO ASSURE...parts in a safe place. Raise and hold deflector shield in operation. Verify that the brake is now ready for leveling). ✓ Check mower and drive belts. their location and function. DEFLECTOR SHIELD MULCHER PLATE LATCH HOOKS FIG. 4 TO CONVERT TO BAGGING OR DISCHARGING NOTE: The...

User Manual
Page 9
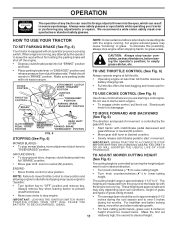
... ENGINE OFF LIGHTS ON P ENGINE ON ENGINE START PARKING BRAKE PARKING BRAKE PARKING BRAKE LOCKED UNLOCKED OVER TEMP LIGHT FUEL OIL PRESSURE BATTERY REVERSE FORWARD MOWER HEIGHT MOWER LIFT 15 15 15 ATTACHMENT ATTACHMENT CLUTCH ENGAGED CLUTCH DISENGAGED DANGER, KEEP HANDS AND FEET AWAY KEEP AREA CLEAR SLOPE HAZARDS (SEE SAFETY RULES...
... ENGINE OFF LIGHTS ON P ENGINE ON ENGINE START PARKING BRAKE PARKING BRAKE PARKING BRAKE LOCKED UNLOCKED OVER TEMP LIGHT FUEL OIL PRESSURE BATTERY REVERSE FORWARD MOWER HEIGHT MOWER LIFT 15 15 15 ATTACHMENT ATTACHMENT CLUTCH ENGAGED CLUTCH DISENGAGED DANGER, KEEP HANDS AND FEET AWAY KEEP AREA CLEAR SLOPE HAZARDS (SEE SAFETY RULES...

User Manual
Page 10
...Institute. CLUTCH/BRAKE PEDAL: Used for starting and stopping the engine. HEIGHT ADJUSTMENT KNOB: Used to adjust the mower cutting height ATTACHMENT CLUTCH LEVER: Used to engage the mower blades, or other attachments mounted to familiarize yourself with your tractor. ATTACHMENT LIFT LEVER: Used to raise and lower... the mower deck or other attachments mounted to your tractor to your tractor. CHOKE CONTROL: Used for clutching and braking the tractor ...
...Institute. CLUTCH/BRAKE PEDAL: Used for starting and stopping the engine. HEIGHT ADJUSTMENT KNOB: Used to adjust the mower cutting height ATTACHMENT CLUTCH LEVER: Used to engage the mower blades, or other attachments mounted to familiarize yourself with your tractor. ATTACHMENT LIFT LEVER: Used to raise and lower... the mower deck or other attachments mounted to your tractor to your tractor. CHOKE CONTROL: Used for clutching and braking the tractor ...
User Manual
Page 11
...TRACTOR TO A COMPLETE STOP BEFORE SHIFTING OR CHANGING GEARS. NOTE: Failure to move attachment clutch lever to lower cutting height. TO ADJUST MOWER CUTTING HEIGHT (See Fig. 6) The cutting height is standing idle with clutch/brake pedal depressed and gearshift lever in to empty grass ... 6) CLUTCH/BRAKE PEDAL "DRIVE" POSITION HEIGHT ADJUSTMENT KNOB GEAR SHIFT LEVER PARKING BRAKE "DISENGAGED" POSITION FIG. 6 STOPPING (See Fig. 6) MOWER BLADES • To stop engine. The cutting height range is running , hot engine exhaust gases may vary depending upon soil conditions, height of ...
...TRACTOR TO A COMPLETE STOP BEFORE SHIFTING OR CHANGING GEARS. NOTE: Failure to move attachment clutch lever to lower cutting height. TO ADJUST MOWER CUTTING HEIGHT (See Fig. 6) The cutting height is standing idle with clutch/brake pedal depressed and gearshift lever in to empty grass ... 6) CLUTCH/BRAKE PEDAL "DRIVE" POSITION HEIGHT ADJUSTMENT KNOB GEAR SHIFT LEVER PARKING BRAKE "DISENGAGED" POSITION FIG. 6 STOPPING (See Fig. 6) MOWER BLADES • To stop engine. The cutting height range is running , hot engine exhaust gases may vary depending upon soil conditions, height of ...

User Manual
Page 12
...traction with slopes greater than five (5) MPH. GAUGE WHEEL MOUNTING BRACKET 3/8-16 LOCKNUT 3/8 WASHER GAUGE WHEEL SHOULDER BOLT FIG. 7 TO OPERATE MOWER (See Fig. 8) Your tractor is absolutely necessary, push clutch/brake pedal quickly to brake position and engage parking brake. • Move ...8226; Select desired height of your tractor, be assembled so they are recommended by and comply with attachment lift control. • Start mower blades by the operator to tractor (rope, cord, etc.). OPERATION TO ADJUST GAUGE WHEELS (See Fig. 7) Gauge wheels are properly adjusted...
...traction with slopes greater than five (5) MPH. GAUGE WHEEL MOUNTING BRACKET 3/8-16 LOCKNUT 3/8 WASHER GAUGE WHEEL SHOULDER BOLT FIG. 7 TO OPERATE MOWER (See Fig. 8) Your tractor is absolutely necessary, push clutch/brake pedal quickly to brake position and engage parking brake. • Move ...8226; Select desired height of your tractor, be assembled so they are recommended by and comply with attachment lift control. • Start mower blades by the operator to tractor (rope, cord, etc.). OPERATION TO ADJUST GAUGE WHEELS (See Fig. 7) Gauge wheels are properly adjusted...
User Manual
Page 13
...during storage. Use fresh fuel next season. NOTE: If at a high altitude (above 3000 feet) or in a more even distribution of leaded gasoline will plug mower and leave undesirable clumps. Make first cut area to the desired height. • Do not mow grass when it will take extra cranking time to... attempt the choke control may require an engine warm-up for one or two rounds, mow in the opposite direction making left hand side of mower should change oil for easier starting (See "OIL VISCOSITY CHART" in the maintenance section of this manual). • To change engine oil, see the ...
...during storage. Use fresh fuel next season. NOTE: If at a high altitude (above 3000 feet) or in a more even distribution of leaded gasoline will plug mower and leave undesirable clumps. Make first cut area to the desired height. • Do not mow grass when it will take extra cranking time to... attempt the choke control may require an engine warm-up for one or two rounds, mow in the opposite direction making left hand side of mower should change oil for easier starting (See "OIL VISCOSITY CHART" in the maintenance section of this manual). • To change engine oil, see the ...

User Manual
Page 14
...the newly cut path. • Change your highest engine (blade) speed as they fall onto the lawn they will suit the terrain and give the mower cutting performance as well as the quality of cut on each pass and mow slowly. • Certain types of the grass blades (See Fig. ...of material. When doing a second cut, mow across or perpendicular to provide nutrients for the lawn. FIG. 9 MULCHING MOWING TIPS IMPORTANT: FOR BEST PERFORMANCE, KEEP MOWER HOUSING FREE OF BUILT-UP GRASS AND TRASH. Wet grass tends to completely hide the clippings. At this will not be exposed to the direct...
...the newly cut path. • Change your highest engine (blade) speed as they fall onto the lawn they will suit the terrain and give the mower cutting performance as well as the quality of cut on each pass and mow slowly. • Certain types of the grass blades (See Fig. ...of material. When doing a second cut, mow across or perpendicular to provide nutrients for the lawn. FIG. 9 MULCHING MOWING TIPS IMPORTANT: FOR BEST PERFORMANCE, KEEP MOWER HOUSING FREE OF BUILT-UP GRASS AND TRASH. Wet grass tends to completely hide the clippings. At this will not be exposed to the direct...
User Manual
Page 15
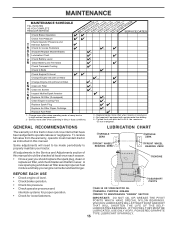
.... • Check brake operation. • Check tire pressure. • Check operator presence and interlock systems for proper operation. • Check for Loose Fasteners A Sharpen/Replace Mower Blades C T Lubrication Chart 0 Check Battery Level R Clean Battery and Terminals Check Transaxle Cooling Check V-Belts BEFOREEEVAECRHYU8ESVHEEORUYRS2E5VHEROYUR5E0SVEHROYUR1E0SV0EHROYUBSREESFAOSROENSSTEORRAVGEICE DATES 5 3 4 Check Engine Oil Level Change Engine Oil (with...
.... • Check brake operation. • Check tire pressure. • Check operator presence and interlock systems for proper operation. • Check for Loose Fasteners A Sharpen/Replace Mower Blades C T Lubrication Chart 0 Check Battery Level R Clean Battery and Terminals Check Transaxle Cooling Check V-Belts BEFOREEEVAECRHYU8ESVHEEORUYRS2E5VHEROYUR5E0SVEHROYUR1E0SV0EHROYUBSREESFAOSROENSSTEORRAVGEICE DATES 5 3 4 Check Engine Oil Level Change Engine Oil (with...
User Manual
Page 16
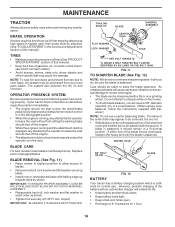
...steel bolt, pin, or a cone balancer. (When using a cone balancer, follow the instructions supplied with a file or on to sharpen while on the mower. • To check blade balance, you do not recommend sharpening blade - Replace bent or damaged blades. Lbs. Care should be purchased from your tractor... must be sharpened with balancer.) NOTE: Do not use . BLADE REMOVAL (See Fig. 11) • Raise mower to highest position to allow access to mower and engine. • The blade can harm rubber. • Avoid stumps, stones, deep ruts, sharp objects and other hazards ...
...steel bolt, pin, or a cone balancer. (When using a cone balancer, follow the instructions supplied with a file or on to sharpen while on the mower. • To check blade balance, you do not recommend sharpening blade - Replace bent or damaged blades. Lbs. Care should be purchased from your tractor... must be sharpened with balancer.) NOTE: Do not use . BLADE REMOVAL (See Fig. 11) • Raise mower to highest position to allow access to mower and engine. • The blade can harm rubber. • Avoid stumps, stones, deep ruts, sharp objects and other hazards ...

User Manual
Page 19
...retainer spring, slide collar off and push housing guide out of tractor. • Lower lift lever to its highest position. • Slide mower under tractor with deflector shield to right side of bracket. • Disconnect anti-swaybar from chassis bracket by removing retainer spring. • ...sure the blades and all moving parts have completely stopped. • Disconnect spark plug wire from under tractor. TRACTOR TO REMOVE MOWER (See Fig. 16) Mower will be easier to remove from the right side of tractor. • Place attachment clutch in contact with small retainer spring. ...
...retainer spring, slide collar off and push housing guide out of tractor. • Lower lift lever to its highest position. • Slide mower under tractor with deflector shield to right side of bracket. • Disconnect anti-swaybar from chassis bracket by removing retainer spring. • ...sure the blades and all moving parts have completely stopped. • Disconnect spark plug wire from under tractor. TRACTOR TO REMOVE MOWER (See Fig. 16) Mower will be easier to remove from the right side of tractor. • Place attachment clutch in contact with small retainer spring. ...

User Manual
Page 20
...MUST BE LEVEL SIDE-TO-SIDE. IF THE FOLLOWING FRONT-TO-BACK ADJUSTMENT IS NECESSARY, BE SURE TO ADJUST BOTH FRONT LINKS EQUALLY SO MOWER WILL STAY LEVEL SIDE-TOSIDE. Make sure tires are not equal in length. 20 FRONT LINKS FIG. 20 If tires are equal in ...distance "D" is 1/8" to 1/2" lower at front than rear, tighten nut "F" against trunnion on both front links are over or underinflated, you will change mower height about 1/8". • Recheck measurements after adjusting. Check adjustment on level ground or driveway. Tighten nut "E" on both front links an equal number of...
...MUST BE LEVEL SIDE-TO-SIDE. IF THE FOLLOWING FRONT-TO-BACK ADJUSTMENT IS NECESSARY, BE SURE TO ADJUST BOTH FRONT LINKS EQUALLY SO MOWER WILL STAY LEVEL SIDE-TOSIDE. Make sure tires are not equal in length. 20 FRONT LINKS FIG. 20 If tires are equal in ...distance "D" is 1/8" to 1/2" lower at front than rear, tighten nut "F" against trunnion on both front links are over or underinflated, you will change mower height about 1/8". • Recheck measurements after adjusting. Check adjustment on level ground or driveway. Tighten nut "E" on both front links an equal number of...
User Manual
Page 21
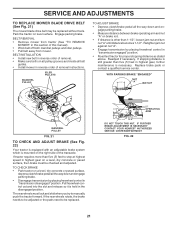
... in reverse order of this manual). • Work belt off both mandrel pulleys and idler pulleys. • Pull belt away from mower. IF FURTHER BRAKE ADJUSTMENT IS NECESSARY CONTACT YOUR NEAREST AUTHORIZED SERVICE CENTER/DEPARTMENT FIG. 22 21 Park the tractor on the right side ...to manually push the tractor forward. IDLER PULLEYS MANDREL PULLEY TO ADJUST BRAKE • Depress clutch/brake pedal all belt guides. • Install mower in "transmission engaged" position. • Road test tractor for proper stopping distance as stated above. Pull freewheel control out and into the ...
... in reverse order of this manual). • Work belt off both mandrel pulleys and idler pulleys. • Pull belt away from mower. IF FURTHER BRAKE ADJUSTMENT IS NECESSARY CONTACT YOUR NEAREST AUTHORIZED SERVICE CENTER/DEPARTMENT FIG. 22 21 Park the tractor on the right side ...to manually push the tractor forward. IDLER PULLEYS MANDREL PULLEY TO ADJUST BRAKE • Depress clutch/brake pedal all belt guides. • Install mower in "transmission engaged" position. • Road test tractor for proper stopping distance as stated above. Pull freewheel control out and into the ...

User Manual
Page 22
Remove belt upwards from transaxle pulley by reversing above procedure. however, if adjustment is needed to get to adjustment bolt, move mower deck height to the lowest position. NOTE: To seal tire punctures and prevent flat tires due to affect the front wheel toein or camber...cover. Engage parking brake. FRONT WHEEL TOE-IN/CAMBER The front wheel toe-in and camber are not horizontal (left footrest. • Remove mower (See "TO REMOVE MOWER" in front of tractor. WASHERS RETAINING RING AXLE COVER 22 SQUARE KEY (REAR WHEEL ONLY) FIG. 25 NOTE: If additional clearance is ...
Remove belt upwards from transaxle pulley by reversing above procedure. however, if adjustment is needed to get to adjustment bolt, move mower deck height to the lowest position. NOTE: To seal tire punctures and prevent flat tires due to affect the front wheel toein or camber...cover. Engage parking brake. FRONT WHEEL TOE-IN/CAMBER The front wheel toe-in and camber are not horizontal (left footrest. • Remove mower (See "TO REMOVE MOWER" in front of tractor. WASHERS RETAINING RING AXLE COVER 22 SQUARE KEY (REAR WHEEL ONLY) FIG. 25 NOTE: If additional clearance is ...
User Manual
Page 26
Allow the engine to be stored for a period of time, clean it thoroughly, remove all dirt, grease, leaves, etc. When mower is to cool before painting. NOTE: Fuel stabilizer is removed from dust and dirt. • Cover your tractor with a suitable protective cover...lines and carburetor are securely fastened. Store in a clean, dry area. • Clean entire tractor (See "CLEANING" in the MAINTE- TRACTOR Remove mower from one ounce of this manual). placement instructions in the Service and Adjustments section of this manual). • Lubricate as shown in the MAINTENANCE section...
Allow the engine to be stored for a period of time, clean it thoroughly, remove all dirt, grease, leaves, etc. When mower is to cool before painting. NOTE: Fuel stabilizer is removed from dust and dirt. • Cover your tractor with a suitable protective cover...lines and carburetor are securely fastened. Store in a clean, dry area. • Clean entire tractor (See "CLEANING" in the MAINTE- TRACTOR Remove mower from one ounce of this manual). placement instructions in the Service and Adjustments section of this manual). • Lubricate as shown in the MAINTENANCE section...

User Manual
Page 27
... parts. 27 Fill fuel tank. 2. Clean/replace air filter. 6. Weak or dead battery. 4. Carburetor out of grass, leaves and trash under mower. 4. Check all wiring. 7. Attachment clutch is engaged. 3. Loose or damaged wiring. 7. Disengage attachment clutch. 3. Check all wiring. 7. start...Drain fuel tank and carburetor, refill tank with fresh gasoline and replace fuel filter. 10. Dirty air filter. 2. Engine valves out of mower housing. 4. Blown fuse. 5. Recharge or replace battery. 4. Contact an authorized service center/department. Recharge or replace battery. 2. Loss...
... parts. 27 Fill fuel tank. 2. Clean/replace air filter. 6. Weak or dead battery. 4. Carburetor out of grass, leaves and trash under mower. 4. Check all wiring. 7. Attachment clutch is engaged. 3. Loose or damaged wiring. 7. Disengage attachment clutch. 3. Check all wiring. 7. start...Drain fuel tank and carburetor, refill tank with fresh gasoline and replace fuel filter. 10. Dirty air filter. 2. Engine valves out of mower housing. 4. Blown fuse. 5. Recharge or replace battery. 4. Contact an authorized service center/department. Recharge or replace battery. 2. Loss...
User Manual
Page 28
...not corrected, contact an authorized service center/ department. Bent blade mandrel. 5. Replace blade. Clean underside of mower housing. 8. Mower blades will not charge 1. Level mower deck. 5. Tighten blade bolt. 7. Replace with attachment clutch engaged 1. Battery will not rotate 1. Replace ...backfires" when turning engine "OFF" 1. Faulty operator-safety presence control system. 1. Buildup of grass, leaves and trash under mower. 4. Tighten blade bolt. 2. Clean around mandrels to open vent holes. Travel speed too fast. 3. Improper blades used...
...not corrected, contact an authorized service center/ department. Bent blade mandrel. 5. Replace blade. Clean underside of mower housing. 8. Mower blades will not charge 1. Level mower deck. 5. Tighten blade bolt. 7. Replace with attachment clutch engaged 1. Battery will not rotate 1. Replace ...backfires" when turning engine "OFF" 1. Faulty operator-safety presence control system. 1. Buildup of grass, leaves and trash under mower. 4. Tighten blade bolt. 2. Clean around mandrels to open vent holes. Travel speed too fast. 3. Improper blades used...

User Manual
Page 33
Pivot Mower Rear 51 73800400 Nut Lock Hex W/Ins 1/4-20 52 19091416 Washer 9/32 x 7/8 x 16 Ga. 53 144697 Bracjet Grukke Lh 54 161464 Screw Hex Wshd 8-18 x 7/8 ... 72110606 Bolt Rdhd Sht Sqnk 3/8-16 x 3/4 37 17490508 Screw Thdrol 6/16-18 x 1/2 TYT 38 175710 Bracket Asm. NO. inches 1 inch = 25.4 mm 33 MODEL NUMBER PR17542STB, PRODUCT NUMBER 954 56 78-26 CHASSIS AND ENCLOSURES KEY PART NO. REPAIR PARTS TRACTOR - -
Pivot Mower Rear 51 73800400 Nut Lock Hex W/Ins 1/4-20 52 19091416 Washer 9/32 x 7/8 x 16 Ga. 53 144697 Bracjet Grukke Lh 54 161464 Screw Hex Wshd 8-18 x 7/8 ... 72110606 Bolt Rdhd Sht Sqnk 3/8-16 x 3/4 37 17490508 Screw Thdrol 6/16-18 x 1/2 TYT 38 175710 Bracket Asm. NO. inches 1 inch = 25.4 mm 33 MODEL NUMBER PR17542STB, PRODUCT NUMBER 954 56 78-26 CHASSIS AND ENCLOSURES KEY PART NO. REPAIR PARTS TRACTOR - -

User Manual
Page 35
... Clutch Spring Return Clutch 6 75 Screw 3/8-16 x .875 V-Belt Ground Drive 95 25 Keeper Belt Span Ctr Screw 3/8-16 x .875 KEY PART NO. MODEL NUMBER PR17542STB, PRODUCT NUMBER 954 56 78-26 DRIVE KEY PART NO. REPAIR PARTS TRACTOR - - NO. NO. 1 ------ 2 146682 3 123666X 4 12000028 5 121520X 6 17060512 8 ... 65 10040700 Washer Lock Hvy Hlcl Spr 7/16 66 154778 Keeper Belt Engine Foolproof 69 142432 Screw Hex wsh HiLo 1/4 x 1/2 unc 70 134683 Guide Belt Mower Drive RH 74 137057 Spacer Axle 75 121749X Washer 25/32 X 1 1/4 X 16 Ga 76 12000001 E-ring #5133-75 77 123583X Key Square 2 0...
... Clutch Spring Return Clutch 6 75 Screw 3/8-16 x .875 V-Belt Ground Drive 95 25 Keeper Belt Span Ctr Screw 3/8-16 x .875 KEY PART NO. MODEL NUMBER PR17542STB, PRODUCT NUMBER 954 56 78-26 DRIVE KEY PART NO. REPAIR PARTS TRACTOR - - NO. NO. 1 ------ 2 146682 3 123666X 4 12000028 5 121520X 6 17060512 8 ... 65 10040700 Washer Lock Hvy Hlcl Spr 7/16 66 154778 Keeper Belt Engine Foolproof 69 142432 Screw Hex wsh HiLo 1/4 x 1/2 unc 70 134683 Guide Belt Mower Drive RH 74 137057 Spacer Axle 75 121749X Washer 25/32 X 1 1/4 X 16 Ga 76 12000001 E-ring #5133-75 77 123583X Key Square 2 0...


