
User Manual
Page 2
... be thrown. Use only an approved container. - Never refuel the machine indoors. - Clean oil or fuel spillage. Do not operate the mower without either the entire grass catcher or the guard in place. • Slow down the slope. Do not make adjustments or repairs with the...• Do not turn machine off and be seriously injured or interfere with safety devices. IV. Check their ability to operate the riding mower safely enough to occur. III. Do not allow responsible adults, who are subject to cool before refueling. All slopes require extra caution. Adjust...
... be thrown. Use only an approved container. - Never refuel the machine indoors. - Clean oil or fuel spillage. Do not operate the mower without either the entire grass catcher or the guard in place. • Slow down the slope. Do not make adjustments or repairs with the...• Do not turn machine off and be seriously injured or interfere with safety devices. IV. Check their ability to operate the riding mower safely enough to occur. III. Do not allow responsible adults, who are subject to cool before refueling. All slopes require extra caution. Adjust...
User Manual
Page 3
... the slope. • Avoid starting when setting up and down slowly. • Do not turn on a slope. SAFETY RULES Safe Operation Practices for Ride-On Mowers • Be sure the area is dangerous. They may lose control of another responsible adult. • Be alert and turn slowly and gradually downhill, if...
... the slope. • Avoid starting when setting up and down slowly. • Do not turn on a slope. SAFETY RULES Safe Operation Practices for Ride-On Mowers • Be sure the area is dangerous. They may lose control of another responsible adult. • Be alert and turn slowly and gradually downhill, if...
User Manual
Page 8
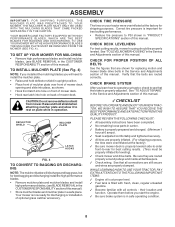
...completed. ✓ No remaining loose parts in safe operating condition. 8 Raise and hold deflector shield in operation. See "TO LEVEL MOWER HOUSING" in the Service and Adjustments section of this manual. 3CHECKLIST BEFORE YOU OPERATE AND ENJOY YOUR NEW TRACTOR, WE WISH TO ASSURE...8226; Remove mulcher plate and mulcher blades and install high performance blades, (see BLADE REMOVAL in the Service and Adjustments section of mower deck. Your mower is properly leveled side-to-side/ front-to operate your tractor were overinflated at 6 amps). ✓ Seat is adjusted comfortably ...
...completed. ✓ No remaining loose parts in safe operating condition. 8 Raise and hold deflector shield in operation. See "TO LEVEL MOWER HOUSING" in the Service and Adjustments section of this manual. 3CHECKLIST BEFORE YOU OPERATE AND ENJOY YOUR NEW TRACTOR, WE WISH TO ASSURE...8226; Remove mulcher plate and mulcher blades and install high performance blades, (see BLADE REMOVAL in the Service and Adjustments section of mower deck. Your mower is properly leveled side-to-side/ front-to operate your tractor were overinflated at 6 amps). ✓ Seat is adjusted comfortably ...

User Manual
Page 9
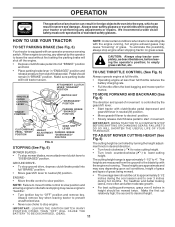
Learn and understand their meaning. BATTERY CAUTION OR WARNING REVERSE FORWARD FAST SLOW ENGINE ON ENGINE OFF OIL PRESSURE LIGHTS ON OVER TEMP LIGHT FUEL CHOKE MOWER HEIGHT PARKING BRAKE LOCKED UNLOCKED MOWER LIFT ATTACHMENT REVERSE CLUTCH ENGAGED NEUTRAL HIGH LOW P PARKING BRAKE 15 15 15 IGNITION ATTACHMENT CLUTCH DISENGAGED KEEP AREA CLEAR SLOPE HAZARDS (SEE SAFETY RULES SECTION) DANGER, KEEP HANDS AND FEET AWAY 9 FREE WHEEL (Automatic Models only) OPERATION These symbols may appear on your tractor or in literature supplied with the product.
Learn and understand their meaning. BATTERY CAUTION OR WARNING REVERSE FORWARD FAST SLOW ENGINE ON ENGINE OFF OIL PRESSURE LIGHTS ON OVER TEMP LIGHT FUEL CHOKE MOWER HEIGHT PARKING BRAKE LOCKED UNLOCKED MOWER LIFT ATTACHMENT REVERSE CLUTCH ENGAGED NEUTRAL HIGH LOW P PARKING BRAKE 15 15 15 IGNITION ATTACHMENT CLUTCH DISENGAGED KEEP AREA CLEAR SLOPE HAZARDS (SEE SAFETY RULES SECTION) DANGER, KEEP HANDS AND FEET AWAY 9 FREE WHEEL (Automatic Models only) OPERATION These symbols may appear on your tractor or in literature supplied with the product.

User Manual
Page 10
... lift lever when changing its position. LIFT LEVER PLUNGER: Used to adjust the mower cutting height. IGNITION SWITCH: Used for future reference. ATTACHMENT LIFT LEVER: Used to raise, lower, and adjust the mower deck or other attachments mounted to your tractor. HEIGHT ADJUSTMENT KNOB - AMMETER -... ATTACHMENT CLUTCH LEVER: Used to engage the mower blades, or other attachments mounted to your tractor. PARKING BRAKE: Locks clutch/brake pedal into the brake position. Indicates charging...
... lift lever when changing its position. LIFT LEVER PLUNGER: Used to adjust the mower cutting height. IGNITION SWITCH: Used for future reference. ATTACHMENT LIFT LEVER: Used to raise, lower, and adjust the mower deck or other attachments mounted to your tractor. HEIGHT ADJUSTMENT KNOB - AMMETER -... ATTACHMENT CLUTCH LEVER: Used to engage the mower blades, or other attachments mounted to your tractor. PARKING BRAKE: Locks clutch/brake pedal into the brake position. Indicates charging...
User Manual
Page 11
...4". mance. CLUTCH/BRAKE PEDAL "DRIVE" POSITION GEAR SHIFT HEIGHT LEVER ADJUSTMENT PARKING BRAKE KNOB "DISENGAGED" POSITION FIG. 6 STOPPING (See Fig. 6) MOWER BLADES • To stop engine. ENGINE • Move throttle control to empty grass catcher, etc. IMPORTANT: BRING TRACTOR TO A COMPLETE STOP BEFORE ...SHIFTING OR CHANGING GEARS. FAILURE TO DO SO WILL SHORTEN THE USEFUL LIFE OF YOUR TRANSAXLE. TO ADJUST MOWER CUTTING HEIGHT (See Fig. 6) The cutting height is approximately 1-1/2" to "OFF" position and remove key. Pedal should be cut relatively...
...4". mance. CLUTCH/BRAKE PEDAL "DRIVE" POSITION GEAR SHIFT HEIGHT LEVER ADJUSTMENT PARKING BRAKE KNOB "DISENGAGED" POSITION FIG. 6 STOPPING (See Fig. 6) MOWER BLADES • To stop engine. ENGINE • Move throttle control to empty grass catcher, etc. IMPORTANT: BRING TRACTOR TO A COMPLETE STOP BEFORE ...SHIFTING OR CHANGING GEARS. FAILURE TO DO SO WILL SHORTEN THE USEFUL LIFE OF YOUR TRANSAXLE. TO ADJUST MOWER CUTTING HEIGHT (See Fig. 6) The cutting height is approximately 1-1/2" to "OFF" position and remove key. Pedal should be cut relatively...

User Manual
Page 12
... 1st gear. Use an appropriate means of cut position, gauge wheels should be assembled so they are slightly off the ground when mower is closed and secured to highest position with attachment lift control. • When pushing or towing your tractor. 12 Tires can ...brake and clutch/brake pedal. • Make all turns slowly. GAUGE WHEEL MOUNTING BRACKET 3/8-16 LOCKNUT 3/8 WASHER GAUGE WHEEL SHOULDER BOLT FIG. 7 TO OPERATE MOWER (See Fig. 8) Your tractor is equipped with shoulder bolt, 3/8 washer, and 3/8-16 locknut and tighten securely. • Repeat for tractor to roll ...
... 1st gear. Use an appropriate means of cut position, gauge wheels should be assembled so they are slightly off the ground when mower is closed and secured to highest position with attachment lift control. • When pushing or towing your tractor. 12 Tires can ...brake and clutch/brake pedal. • Make all turns slowly. GAUGE WHEEL MOUNTING BRACKET 3/8-16 LOCKNUT 3/8 WASHER GAUGE WHEEL SHOULDER BOLT FIG. 7 TO OPERATE MOWER (See Fig. 8) Your tractor is equipped with shoulder bolt, 3/8 washer, and 3/8-16 locknut and tighten securely. • Repeat for tractor to roll ...
User Manual
Page 14
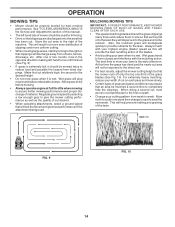
...speed by turning to reduce load and possible fire hazard from shrubs, fences, driveways, etc. MULCHING MOWING TIPS IMPORTANT: FOR BEST PERFORMANCE, KEEP MOWER HOUSING FREE OF BUILT-UP GRASS AND TRASH. Wet grass tends to completely hide the clippings. When doing a second cut, mow across or ...and proper discharge of clippings and more uniform cutting. • When mowing large areas, start by selecting a low enough gear to give the mower cutting performance as well as the quality of cut desired. • When operating attachments, select a ground speed that will suit the terrain and...
...speed by turning to reduce load and possible fire hazard from shrubs, fences, driveways, etc. MULCHING MOWING TIPS IMPORTANT: FOR BEST PERFORMANCE, KEEP MOWER HOUSING FREE OF BUILT-UP GRASS AND TRASH. Wet grass tends to completely hide the clippings. When doing a second cut, mow across or ...and proper discharge of clippings and more uniform cutting. • When mowing large areas, start by selecting a low enough gear to give the mower cutting performance as well as the quality of cut desired. • When operating attachments, select a ground speed that will suit the terrain and...
User Manual
Page 15
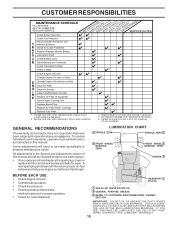
.... • Check brake operation. • Check tire pressure. • Check operator presence and interlock systems for proper operation. • Check for Loose Fasteners A Sharpen/Replace Mower Blades C T Lubrication Chart 0 Check Battery Level R Clean Battery and Terminals Check Transaxle Cooling Check V-Belts BEFOREEEVAECRHYU8ESVHEEORUYRS2E5VHEROYUR5E0SVEHROYUR1E0SV0EHROYUBSREESFAOSROEN STORAGE SERVICE DATES 5 3 4 Check Engine Oil Level Change Engine...
.... • Check brake operation. • Check tire pressure. • Check operator presence and interlock systems for proper operation. • Check for Loose Fasteners A Sharpen/Replace Mower Blades C T Lubrication Chart 0 Check Battery Level R Clean Battery and Terminals Check Transaxle Cooling Check V-Belts BEFOREEEVAECRHYU8ESVHEEORUYRS2E5VHEROYUR5E0SVEHROYUR1E0SV0EHROYUBSREESFAOSROEN STORAGE SERVICE DATES 5 3 4 Check Engine Oil Level Change Engine...
User Manual
Page 16
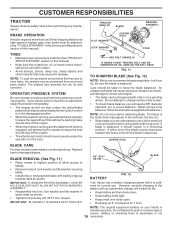
... HEAT TREATED. 5/8" BOLT OR PIN BLADE BATTERY FIG. 12 Your tractor has a battery charging system which can be sharpened with a file or on the mower. • To check blade balance, you do not recommend sharpening blade - Adding or checking level of the battery with balancer.) NOTE: Do not use ... securing blade. • Install new or resharpened blade with the ground. Tire sealant also prevents tire dry rot and corrosion. Do not attempt to mower and engine. • The blade can harm rubber. • Avoid stumps, stones, deep ruts, sharp objects and other hazards that may cause ...
... HEAT TREATED. 5/8" BOLT OR PIN BLADE BATTERY FIG. 12 Your tractor has a battery charging system which can be sharpened with a file or on the mower. • To check blade balance, you do not recommend sharpening blade - Adding or checking level of the battery with balancer.) NOTE: Do not use ... securing blade. • Install new or resharpened blade with the ground. Tire sealant also prevents tire dry rot and corrosion. Do not attempt to mower and engine. • The blade can harm rubber. • Avoid stumps, stones, deep ruts, sharp objects and other hazards that may cause ...

User Manual
Page 19
...removing retainer springs. • Disconnect front links from deck by removing retainer springs. • Raise lift lever to raise suspension arms. Slide mower out from spark plug and place wire where it cannot come in "DISENGAGED" position. • Move attachment lift lever forward to lower..., slide collar off and push housing guide out of tractor. • Lower lift lever to its lowest position. • Connect front links to mower deck and secure with retainer springs.. • Connect suspension arms to rear deck brackets and secure with retainer springs. • Connect anti-swaybar to...
...removing retainer springs. • Disconnect front links from deck by removing retainer springs. • Raise lift lever to raise suspension arms. Slide mower out from spark plug and place wire where it cannot come in "DISENGAGED" position. • Move attachment lift lever forward to lower..., slide collar off and push housing guide out of tractor. • Lower lift lever to its lowest position. • Connect front links to mower deck and secure with retainer springs.. • Connect suspension arms to rear deck brackets and secure with retainer springs. • Connect anti-swaybar to...
User Manual
Page 20
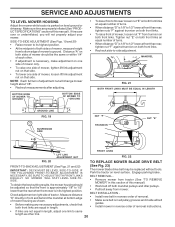
..."PRODUCT SPECIFICATIONS" section of this manual). • Work belt off both mandrel pulleys and idler pulleys. • Pull belt away from bottom edge of mower to 1/2" lower at front than rear, tighten nuts "F" against trunnion on both front links. • Recheck side-to its highest position. MANDREL "D" "D"...A GROUND LINE A FIG. 19 SUSPENSION ARM NUT "F" TRUNNION NUT "E" FRONT LINKS LIFT LINK ADJUSTMENT NUT FIG. 22 FIG. 20 TO REPLACE MOWER BLADE DRIVE BELT FRONT-TO-BACK ADJUSTMENT (See Figs. 21 and 22) IMPORTANT: DECK MUST BE LEVEL SIDE-TO-SIDE. Engage parking brake. ...
..."PRODUCT SPECIFICATIONS" section of this manual). • Work belt off both mandrel pulleys and idler pulleys. • Pull belt away from bottom edge of mower to 1/2" lower at front than rear, tighten nuts "F" against trunnion on both front links. • Recheck side-to its highest position. MANDREL "D" "D"...A GROUND LINE A FIG. 19 SUSPENSION ARM NUT "F" TRUNNION NUT "E" FRONT LINKS LIFT LINK ADJUSTMENT NUT FIG. 22 FIG. 20 TO REPLACE MOWER BLADE DRIVE BELT FRONT-TO-BACK ADJUSTMENT (See Figs. 21 and 22) IMPORTANT: DECK MUST BE LEVEL SIDE-TO-SIDE. Engage parking brake. ...

User Manual
Page 21
... is still greater than 1-1/2", loosen jam nut and turn nut "A" until distance becomes 1-1/2". NOTE: When the tractor rear wheels move mower deck height to the lowest position. ENGINE PULLEY CLUTCHING IDLER MANDREL PULLEYS FIG. 23 STATIONARY IDLER TO ADJUST BRAKE (See Fig. 24) ... engage parking brake. • Measure distance between brake operating arm and nut "A" on bottom side of left footrest. • Remove mower (See "TO REMOVE MOWER" in highest gear, further maintenance is in neutral (N) (lock gate) position. The adjustment is needed , proceed as stated above procedure...
... is still greater than 1-1/2", loosen jam nut and turn nut "A" until distance becomes 1-1/2". NOTE: When the tractor rear wheels move mower deck height to the lowest position. ENGINE PULLEY CLUTCHING IDLER MANDREL PULLEYS FIG. 23 STATIONARY IDLER TO ADJUST BRAKE (See Fig. 24) ... engage parking brake. • Measure distance between brake operating arm and nut "A" on bottom side of left footrest. • Remove mower (See "TO REMOVE MOWER" in highest gear, further maintenance is in neutral (N) (lock gate) position. The adjustment is needed , proceed as stated above procedure...
User Manual
Page 24
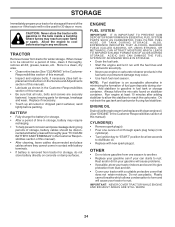
TRACTOR Remove mower from dust and dirt. • Cover your tractor with new spark plug(s). Store in a clean, dry area. • Clean entire tractor (See "CLEANING" in the ... of time in contact with battery terminals. • If battery is removed from tractor for storage, do not store battery directly on stabilizer container. When mower is an acceptable alternative in minimizing the formation of fuel gum deposits during long periods of storage, battery cables should be disconnected and battery cleaned...
TRACTOR Remove mower from dust and dirt. • Cover your tractor with new spark plug(s). Store in a clean, dry area. • Clean entire tractor (See "CLEANING" in the ... of time in contact with battery terminals. • If battery is removed from tractor for storage, do not store battery directly on stabilizer container. When mower is an acceptable alternative in minimizing the formation of fuel gum deposits during long periods of storage, battery cables should be disconnected and battery cleaned...

User Manual
Page 25
...Contact an authorized service center/department. Weak or dead battery. 2. Recharge or replace battery. 2. Loss of grass, leaves and trash under mower. 4. Dirty air filter. 5. Stale or dirty fuel. 9. Spark plug wire loose. 11. Clean underside of adjustment. 8. Connect and...filter. 6. Water in Operation section. 3. See "To Adjust Carburetor" in Service Adjustments section. 8. Stale or dirty fuel. 6. Carburetor out of mower housing. 4. Blown fuse. 5. Recharge or replace battery. 4. Corroded battery terminals. 3. Dirty engine air screen/fins. 12. Engine valves out ...
...Contact an authorized service center/department. Weak or dead battery. 2. Recharge or replace battery. 2. Loss of grass, leaves and trash under mower. 4. Dirty air filter. 5. Stale or dirty fuel. 9. Spark plug wire loose. 11. Clean underside of adjustment. 8. Connect and...filter. 6. Water in Operation section. 3. See "To Adjust Carburetor" in Service Adjustments section. 8. Stale or dirty fuel. 6. Carburetor out of mower housing. 4. Blown fuse. 5. Recharge or replace battery. 4. Corroded battery terminals. 3. Dirty engine air screen/fins. 12. Engine valves out ...
User Manual
Page 26
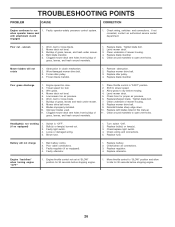
...5. Blown fuse. 1. PROBLEM TROUBLESHOOTING POINTS CAUSE CORRECTION Engine continues to open vent holes. Buildup of grass, leaves and trash under mower. 4. Replace blade mandrel. 5. Low/uneven tire air pressure. 6. Improper blades used. 11. Check tires for 30 seconds before... air pressure. 6. Tighten blade bolt. 2. Replace idler pulley. 4. Poor cut - Frozen idler pulley. 4. Poor grass discharge 1. Level mower deck. 5. Faulty operator-safety presence control system. Worn, bent or loose blade. 2. Place throttle control in "FAST" position. 2. Replace...
...5. Blown fuse. 1. PROBLEM TROUBLESHOOTING POINTS CAUSE CORRECTION Engine continues to open vent holes. Buildup of grass, leaves and trash under mower. 4. Replace blade mandrel. 5. Low/uneven tire air pressure. 6. Improper blades used. 11. Check tires for 30 seconds before... air pressure. 6. Tighten blade bolt. 2. Replace idler pulley. 4. Poor cut - Frozen idler pulley. 4. Poor grass discharge 1. Level mower deck. 5. Faulty operator-safety presence control system. Worn, bent or loose blade. 2. Place throttle control in "FAST" position. 2. Replace...

User Manual
Page 31
MODEL NUMBER PR1742STE, PRODUCT NO. 954 56 64-92 CHASSIS AND ENCLOSURES KEY PART NO. NO. DESCRIPTION 1 174619 Chassis 2 176554 Drawbar 3 17060612 Screw 3/8-16x.75 5 155272 Bumper Hood/... Bolt Rdhd Sht Sqnk 3/8-16 x 3/4 37 17490508 Screw Thdrol 6/16-18 x 1/2 TYT 38 175710 Bracket Asm. REPAIR PARTS TRACTOR - - inches 1 inch = 25.4 mm 31 Pivot Mower Rear 51 73800400 Nut Lock Hex W/Ins 1/4-20 52 19091416 Washer 9/32 x 7/8 x 16 Ga. 53 144697 Bracjet Grukke Lh 54 161464 Screw Hex Wshd 8-18...
MODEL NUMBER PR1742STE, PRODUCT NO. 954 56 64-92 CHASSIS AND ENCLOSURES KEY PART NO. NO. DESCRIPTION 1 174619 Chassis 2 176554 Drawbar 3 17060612 Screw 3/8-16x.75 5 155272 Bumper Hood/... Bolt Rdhd Sht Sqnk 3/8-16 x 3/4 37 17490508 Screw Thdrol 6/16-18 x 1/2 TYT 38 175710 Bracket Asm. REPAIR PARTS TRACTOR - - inches 1 inch = 25.4 mm 31 Pivot Mower Rear 51 73800400 Nut Lock Hex W/Ins 1/4-20 52 19091416 Washer 9/32 x 7/8 x 16 Ga. 53 144697 Bracjet Grukke Lh 54 161464 Screw Hex Wshd 8-18...

User Manual
Page 33
... 10040700 Washer Lock Hvy Hlcl Spr 7/16 66 154778 Keeper Belt Engine Foolproof 69 142432 Screw Hex wsh HiLo 1/4 x 1/2 unc 70 134683 Guide Belt Mower Drive RH 74 137057 Spacer Axle 75 121749X Washer 25/32 X 1 1/4 X 16 Ga 76 12000001 E-ring #5133-75 77 123583X Key Square 2... 198 169593 Washer Nyliner 202 72110612 Bolt Carr Sh 3/8-16 x 1-1/2 Gr. 5 212 145212 Nut Hexflange Lock NOTE: All component dimensions given in U.S. MODEL NUMBER PR1742STE, PRODUCT NO. 954 56 64-92 DRIVE KEY PART NO. NO. 1 ------ 2 146682 3 123666X 4 12000028 5 121520X 6 17060512 8 165619 10 76020416 11...
... 10040700 Washer Lock Hvy Hlcl Spr 7/16 66 154778 Keeper Belt Engine Foolproof 69 142432 Screw Hex wsh HiLo 1/4 x 1/2 unc 70 134683 Guide Belt Mower Drive RH 74 137057 Spacer Axle 75 121749X Washer 25/32 X 1 1/4 X 16 Ga 76 12000001 E-ring #5133-75 77 123583X Key Square 2... 198 169593 Washer Nyliner 202 72110612 Bolt Carr Sh 3/8-16 x 1-1/2 Gr. 5 212 145212 Nut Hexflange Lock NOTE: All component dimensions given in U.S. MODEL NUMBER PR1742STE, PRODUCT NO. 954 56 64-92 DRIVE KEY PART NO. NO. 1 ------ 2 146682 3 123666X 4 12000028 5 121520X 6 17060512 8 165619 10 76020416 11...

User Manual
Page 41
... 8 850857 Bolt 3/8-24 x 25 Grade 8 patched 9 10030600 Washer, Lock 10 140296 Washer, Hardened 11 134149 Blade, Mulching 42" 138498 Blade Mower 42" Hi-Lift 13 137645 Shaft Assembly, Mandrel, Vented 14 128774 Housing, Mandrel, Vented 15 110485X Bearing, Ball, Mandrel 16 174493 Stripper, Mandrel...180533 Bracket Asm. inches 1 inch = 25.4 mm 41 NO. NO. DESCRIPTION 91 180532 Bracket Asm. MODEL NUMBER PR1742STE, PRODUCT NO. 954 56 64-92 MOWER DECK KEY PART NO. Noseroller RH 101 136420 Mulcher Cover 102 71081010 Screw 103 19061216 Washer, Flat 104 10071000 Washer, ...
... 8 850857 Bolt 3/8-24 x 25 Grade 8 patched 9 10030600 Washer, Lock 10 140296 Washer, Hardened 11 134149 Blade, Mulching 42" 138498 Blade Mower 42" Hi-Lift 13 137645 Shaft Assembly, Mandrel, Vented 14 128774 Housing, Mandrel, Vented 15 110485X Bearing, Ball, Mandrel 16 174493 Stripper, Mandrel...180533 Bracket Asm. inches 1 inch = 25.4 mm 41 NO. NO. DESCRIPTION 91 180532 Bracket Asm. MODEL NUMBER PR1742STE, PRODUCT NO. 954 56 64-92 MOWER DECK KEY PART NO. Noseroller RH 101 136420 Mulcher Cover 102 71081010 Screw 103 19061216 Washer, Flat 104 10071000 Washer, ...

User Manual
Page 43
... Nut Crownlock 3/8 - 24 Pointer Height Indicator Plug Hole Blk 1.485/1.515 Dia. inches 1 inch = 25.4 mm 43 REPAIR PARTS TRACTOR - - MODEL NUMBER PR1742STE, PRODUCT NO. 954 56 64-92 MOWER LIFT KEY PART NO. NO. Screw Thdrol 5/16-18 x 1 Washer 11/32 x 1-1/2 10 Ga. Indicator Height STLT Nut Hex Flange Lock Nut...
... Nut Crownlock 3/8 - 24 Pointer Height Indicator Plug Hole Blk 1.485/1.515 Dia. inches 1 inch = 25.4 mm 43 REPAIR PARTS TRACTOR - - MODEL NUMBER PR1742STE, PRODUCT NO. 954 56 64-92 MOWER LIFT KEY PART NO. NO. Screw Thdrol 5/16-18 x 1 Washer 11/32 x 1-1/2 10 Ga. Indicator Height STLT Nut Hex Flange Lock Nut...


