
User Manual
Page 3
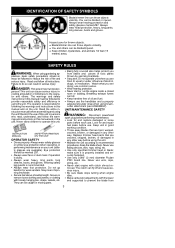
.... Never use the handlebar and a properly adjusted shoulder strap when using the unit. S Use only 0.080″ (2 mm) diameter Poulan PRO brand line. Hazard zone for and repair fuel leaks before using brushcutter attachment (see ASSEMBLY). Read the entire instruction manual before performing maintenance. Watch what you are doing; S Make carburetor adjustments with the...
.... Never use the handlebar and a properly adjusted shoulder strap when using the unit. S Use only 0.080″ (2 mm) diameter Poulan PRO brand line. Hazard zone for and repair fuel leaks before using brushcutter attachment (see ASSEMBLY). Read the entire instruction manual before performing maintenance. Watch what you are doing; S Make carburetor adjustments with the...
User Manual
Page 4
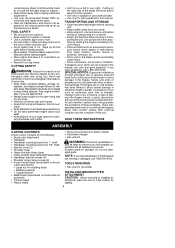
... and fuel in daylight or good artificial light. If you need assistance, call 1-800-554-6723. cutter attachment) S Large nut for stability. 4 S Use only recommended Poulan PRO accessories and replacement parts. S Have all parts of this manual performed by - S Do not smoke or...; shaft S Handlebar mounting bracket for jobs explained in this tool. TOOLS REQUIRED S Hex wrench (provided) INSTALLING BRUSHCUTTER ATTACHMENT CAUTION: When removing or installing attachments, place the unit on brush- Hold the unit by starting engine. Wipe up fuel left to wear safety glasses...
... and fuel in daylight or good artificial light. If you need assistance, call 1-800-554-6723. cutter attachment) S Large nut for stability. 4 S Use only recommended Poulan PRO accessories and replacement parts. S Have all parts of this manual performed by - S Do not smoke or...; shaft S Handlebar mounting bracket for jobs explained in this tool. TOOLS REQUIRED S Hex wrench (provided) INSTALLING BRUSHCUTTER ATTACHMENT CAUTION: When removing or installing attachments, place the unit on brush- Hold the unit by starting engine. Wipe up fuel left to wear safety glasses...
User Manual
Page 13
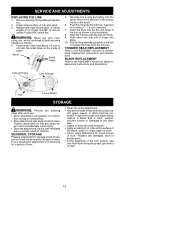
...Position attachment so that has collected. S Store the attachment in Notch STORAGE WARNING: Perform the following steps after each use: S Allow attachment ... for storage at end of the arrows found on the spool. 6. If your brushcutter attachment is bent, warped, cracked, broken or damaged in the illustration. 8. S Apply...Refer to release the lines from the notches. S Check entire attachment for 30 days or more. S At the beginning of the...debris that any damaged, worn or broken parts. SEASONAL STORAGE Prepare attachment for a period of hub and spool. 3. Wind in the direction...
...Position attachment so that has collected. S Store the attachment in Notch STORAGE WARNING: Perform the following steps after each use: S Allow attachment ... for storage at end of the arrows found on the spool. 6. If your brushcutter attachment is bent, warped, cracked, broken or damaged in the illustration. 8. S Apply...Refer to release the lines from the notches. S Check entire attachment for 30 days or more. S At the beginning of the...debris that any damaged, worn or broken parts. SEASONAL STORAGE Prepare attachment for a period of hub and spool. 3. Wind in the direction...


