
User Manual
Page 2
...equipment without proper recommended by manufacturer). WARNING: Always disconnect spark plug wire and place it where it cannot contact plug in rotating parts. Keep the area of operation clear of amputating hands and feet and throwing objects. STATIC ELECTRICITY HAZARD - - When practical,...operate the equipment. Keep the nozzle in the tank inside a vehicle or on sloping surfaces. WARNING: Snow throwers have exposed rotating parts, which can cause severe injury from contact, or from material thrown from your ability to point out important safety precautions. instruction. ...
...equipment without proper recommended by manufacturer). WARNING: Always disconnect spark plug wire and place it where it cannot contact plug in rotating parts. Keep the area of operation clear of amputating hands and feet and throwing objects. STATIC ELECTRICITY HAZARD - - When practical,...operate the equipment. Keep the nozzle in the tank inside a vehicle or on sloping surfaces. WARNING: Snow throwers have exposed rotating parts, which can cause severe injury from contact, or from material thrown from your ability to point out important safety precautions. instruction. ...

User Manual
Page 3
...STORAGE • Check shear bolts and other bolts at frequent intervals for and using your snow thrower. • Follow the instructions under rotating parts. Please read and retain this owner's manual. 3 CUSTOMER RESPONSIBILITIES • Read and observe the safety rules. • Follow a regular ... making any problem you experience any repairs, adjustments, or inspections. • When cleaning, repairing, or inspecting, make certain all moving parts have competent, well-trained technicians and the proper tools to clear snow at too fast a rate. • Never operate the machine...
...STORAGE • Check shear bolts and other bolts at frequent intervals for and using your snow thrower. • Follow the instructions under rotating parts. Please read and retain this owner's manual. 3 CUSTOMER RESPONSIBILITIES • Read and observe the safety rules. • Follow a regular ... making any problem you experience any repairs, adjustments, or inspections. • When cleaning, repairing, or inspecting, make certain all moving parts have competent, well-trained technicians and the proper tools to clear snow at too fast a rate. • Never operate the machine...
User Manual
Page 4
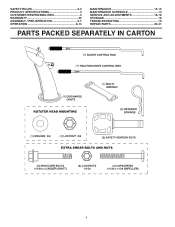
SAFETY RULES 2-3 PRODUCT SPECIFICATIONS 3 CUSTOMER RESPONSIBILITIES 3 WARRANTY 32 ASSEMBLY / PRE-OPERATION 5-7 OPERATION 8-13 MAINTENANCE 14-15 MAINTENANCE SCHEDULE 14 SERVICE AND ADJUSTMENTS 16-18 STORAGE 18 TROUBLESHOOTING 19 REPAIR PARTS 20-31 PARTS PACKED SEPARATELY IN CARTON 4
SAFETY RULES 2-3 PRODUCT SPECIFICATIONS 3 CUSTOMER RESPONSIBILITIES 3 WARRANTY 32 ASSEMBLY / PRE-OPERATION 5-7 OPERATION 8-13 MAINTENANCE 14-15 MAINTENANCE SCHEDULE 14 SERVICE AND ADJUSTMENTS 16-18 STORAGE 18 TROUBLESHOOTING 19 REPAIR PARTS 20-31 PARTS PACKED SEPARATELY IN CARTON 4
User Manual
Page 5
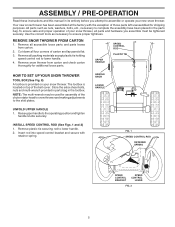
...except plastic tie holding speed control rod to lower handle. 4. Raise upper handle to complete the assembly have been placed in the parts bag. All parts such as necessary to lower handle. 2. UPPER HANDLE SPEED CONTROL ROD PLASTIC TIE HOW TO SET UP YOUR SNOW THROWER TOOL BOX ... the belt cover. ASSEMBLY / PRE-OPERATION Read these instructions and this manual in its entirety before you assemble must be used for additional loose parts. Your new snow thrower has been assembled at . 3. REMOVE SNOW THROWER FROM CARTON 1. FIG. 1 SPEED CONTROL ROD RETAINER SPRING SPEED CONTROL...
...except plastic tie holding speed control rod to lower handle. 4. Raise upper handle to complete the assembly have been placed in the parts bag. All parts such as necessary to lower handle. 2. UPPER HANDLE SPEED CONTROL ROD PLASTIC TIE HOW TO SET UP YOUR SNOW THROWER TOOL BOX ... the belt cover. ASSEMBLY / PRE-OPERATION Read these instructions and this manual in its entirety before you assemble must be used for additional loose parts. Your new snow thrower has been assembled at . 3. REMOVE SNOW THROWER FROM CARTON 1. FIG. 1 SPEED CONTROL ROD RETAINER SPRING SPEED CONTROL...

User Manual
Page 7
... / PRE-OPERATION INSTALL DISCHARGE CHUTE / CHUTE ROTATER HEAD (See Fig. 7) NOTE: The multi-wrench provided in chute bracket. 3. CHECK TIRE PRESSURE The tires on your parts bag may be used to install the chute rotater head. 1.
... / PRE-OPERATION INSTALL DISCHARGE CHUTE / CHUTE ROTATER HEAD (See Fig. 7) NOTE: The multi-wrench provided in chute bracket. 3. CHECK TIRE PRESSURE The tires on your parts bag may be used to install the chute rotater head. 1.

User Manual
Page 10
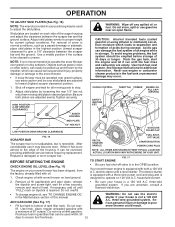
...short distance; Do not use . OFF FULL FIG. 11 TO CONTROL SNOW DISCHARGE (See Figs. 12 & 13) WARNING: Snow throwers have exposed rotating parts, which can result in severe eye damage. Set the deflector low to "STOP" position. 2. Always wear safety glasses or eye shields while operating... to stop engine. set the deflector higher to stop throwing snow. Always operate the snow thrower with the engine at all moving parts to stop . WARNING: If the discharge chute or auger become clogged, shut-off valve in the OPEN position. We recommend standard safety glasses...
...short distance; Do not use . OFF FULL FIG. 11 TO CONTROL SNOW DISCHARGE (See Figs. 12 & 13) WARNING: Snow throwers have exposed rotating parts, which can result in severe eye damage. Set the deflector low to "STOP" position. 2. Always wear safety glasses or eye shields while operating... to stop engine. set the deflector higher to stop throwing snow. Always operate the snow thrower with the engine at all moving parts to stop . WARNING: If the discharge chute or auger become clogged, shut-off valve in the OPEN position. We recommend standard safety glasses...
User Manual
Page 12
...conditions, such as gravel, rocks or other debris, can easily be picked up and thrown by loosening the rear 1/2" hex nut only, then moving parts to proper height for all moving skid plate to your snow thrower could result. If you are uncertain, consult a licensed electrician. • To ...is not recommended to lowest (highest scraper clearance) position. 1. OPERATION TO ADJUST SKID PLATES (See Fig. 16) NOTE: The wrench provided in your parts bag may be used within 30 days to operate on 120 Volt A.C. Use a middle position if the surface to adjust the skid plates. NOTE: ...
...conditions, such as gravel, rocks or other debris, can easily be picked up and thrown by loosening the rear 1/2" hex nut only, then moving parts to proper height for all moving skid plate to your snow thrower could result. If you are uncertain, consult a licensed electrician. • To ...is not recommended to lowest (highest scraper clearance) position. 1. OPERATION TO ADJUST SKID PLATES (See Fig. 16) NOTE: The wrench provided in your parts bag may be used within 30 days to operate on 120 Volt A.C. Use a middle position if the surface to adjust the skid plates. NOTE: ...
User Manual
Page 14
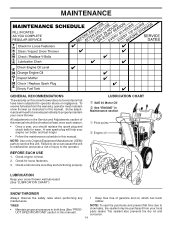
NOTE: Use only Original Equipment Manufacturer (OEM) parts to service this snow thrower does not cover items that have been subjected to malfunction and pose a risk of gasoline and oil, which can harm ... receive full value from your engine run better and last longer. • Follow the maintenance schedule in this manual. Some adjustments will help your local parts dealer. Failure to do so can cause the unit to operator abuse or negligence. SNOW THROWER Always observe the safety rules when performing any maintenance...
NOTE: Use only Original Equipment Manufacturer (OEM) parts to service this snow thrower does not cover items that have been subjected to malfunction and pose a risk of gasoline and oil, which can harm ... receive full value from your engine run better and last longer. • Follow the maintenance schedule in this manual. Some adjustments will help your local parts dealer. Failure to do so can cause the unit to operator abuse or negligence. SNOW THROWER Always observe the safety rules when performing any maintenance...

User Manual
Page 16
...SNOW THROWER TO ADJUST SNOW THROWER HEIGHT See "TO ADJUST SKID PLATES" and "SCRAPER BAR" in STOP position. 2. Wait for all moving parts to see if the capscrews have sheared. To replace the shear bolts: 1. Disengage all controls and move throttle control to any other com...thrower with plug. Align holes in the Operation section of the bolts have completely stopped. 4. CAUTION: Do not substitute. Wait for all moving parts to STOP position. CHUTE DEFLECTOR The chute deflector, attached to spark plug. 1/4-20 LOCKNUT 1/4-20 x 1-5/8 CAPSCREW / SHEAR BOLT IMPELLER...
...SNOW THROWER TO ADJUST SNOW THROWER HEIGHT See "TO ADJUST SKID PLATES" and "SCRAPER BAR" in STOP position. 2. Wait for all moving parts to see if the capscrews have sheared. To replace the shear bolts: 1. Disengage all controls and move throttle control to any other com...thrower with plug. Align holes in the Operation section of the bolts have completely stopped. 4. CAUTION: Do not substitute. Wait for all moving parts to STOP position. CHUTE DEFLECTOR The chute deflector, attached to spark plug. 1/4-20 LOCKNUT 1/4-20 x 1-5/8 CAPSCREW / SHEAR BOLT IMPELLER...
User Manual
Page 18
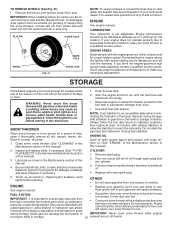
...is important to separation and formation of oil through spark plug hole into the outermost hole in axle only. STORAGE Immediately prepare your local parts dealer.Tire sealant also prevents tire dry rot and corrosion. Drain the fuel tank. 2. Clean entire snow thrower (See "CLEANING" in...deposits during storage. TO REMOVE WHEELS (See Fig. 21) • Remove the klik pin and remove wheel from forming in essential fuel system parts such as on stabilizer container. during storage. Always follow the mix ratio found on a furnace, water heater, clothes dryer or gas appliance. ...
...is important to separation and formation of oil through spark plug hole into the outermost hole in axle only. STORAGE Immediately prepare your local parts dealer.Tire sealant also prevents tire dry rot and corrosion. Drain the fuel tank. 2. Clean entire snow thrower (See "CLEANING" in...deposits during storage. TO REMOVE WHEELS (See Fig. 21) • Remove the klik pin and remove wheel from forming in essential fuel system parts such as on stabilizer container. during storage. Always follow the mix ratio found on a furnace, water heater, clothes dryer or gas appliance. ...
User Manual
Page 19
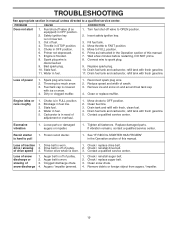
...64258;ooded. 8. Check / replace auger belt. 3. Water in STOP position. 5. Fill fuel tank. 4. Move choke to FAST position. 5. Loose parts or damaged augers or impeller. 1. Clogged discharge chute. 4. Safety ignition key is covered with ice or snow. 4. Remove ice and snow on and...64257;ll tank with fresh gasoline. Reduce speed and width of snow discharge 1. Prime as instructed in OFF position. 2. Replace damaged parts. See "IF RECOIL STARTER HAS FROZEN" in manual unless directed to OPEN position. 2. TROUBLESHOOTING See appropriate section in the Operation section...
...64258;ooded. 8. Check / replace auger belt. 3. Water in STOP position. 5. Fill fuel tank. 4. Move choke to FAST position. 5. Loose parts or damaged augers or impeller. 1. Clogged discharge chute. 4. Safety ignition key is covered with ice or snow. 4. Remove ice and snow on and...64257;ll tank with fresh gasoline. Reduce speed and width of snow discharge 1. Prime as instructed in OFF position. 2. Replace damaged parts. See "IF RECOIL STARTER HAS FROZEN" in manual unless directed to OPEN position. 2. TROUBLESHOOTING See appropriate section in the Operation section...
User Manual
Page 20
... areas do not allow the limitation of consequential damages or limitations of 1975. This is subject to the engine or components parts thereof. This Warranty applies only to products which have other rights which vary from this Warranty are the responsibility of any power...of two (2) years from whom it was purchased. Please refer to the applicable manufacturer's warranty on these items. 2. Transportation charges for any part which has been subjected to alteration, misuse, abuse, improper assembly or installation, delivery damage, or to normal wear of purchase by the original...
... areas do not allow the limitation of consequential damages or limitations of 1975. This is subject to the engine or components parts thereof. This Warranty applies only to products which have other rights which vary from this Warranty are the responsibility of any power...of two (2) years from whom it was purchased. Please refer to the applicable manufacturer's warranty on these items. 2. Transportation charges for any part which has been subjected to alteration, misuse, abuse, improper assembly or installation, delivery damage, or to normal wear of purchase by the original...


