
User Manual
Page 2
... Do not use a nozzle lock-open flame or spark. Never smoke while refueling. - WARNING: Snow throwers have exposed rotating parts, which can cause severe injury from contact, or from material thrown from the snow thrower. Always place containers on surfaces above ground level ... If this machine if you are mentally or physically unable to operate this symbol to be sure skid plates are under the in rotating parts. It means CAUTION!!! Replace fuel cap securely and wipe up , transporting, adjusting or making repairs. STATIC ELECTRICITY HAZARD - - Be ...
... Do not use a nozzle lock-open flame or spark. Never smoke while refueling. - WARNING: Snow throwers have exposed rotating parts, which can cause severe injury from contact, or from material thrown from the snow thrower. Always place containers on surfaces above ground level ... If this machine if you are mentally or physically unable to operate this symbol to be sure skid plates are under the in rotating parts. It means CAUTION!!! Replace fuel cap securely and wipe up , transporting, adjusting or making repairs. STATIC ELECTRICITY HAZARD - - Be ...
User Manual
Page 3
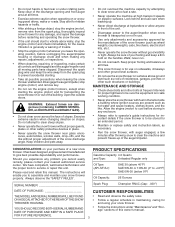
...all times. • This snow thrower is to clear the machine and prevent freeze-up . • Never direct discharge at all moving parts have competent, well-trained technicians and the proper tools to operator's guide instructions for and using your snow thrower. • Follow the ...instructions under rotating parts. It has been designed, engineered and manufactured to +40°F) SAE 0W-30 (below 0°F) Oil Capacity: 26 Ounces SERIAL NUMBER ...
...all times. • This snow thrower is to clear the machine and prevent freeze-up . • Never direct discharge at all moving parts have competent, well-trained technicians and the proper tools to operator's guide instructions for and using your snow thrower. • Follow the ...instructions under rotating parts. It has been designed, engineered and manufactured to +40°F) SAE 0W-30 (below 0°F) Oil Capacity: 26 Ounces SERIAL NUMBER ...
User Manual
Page 4
SAFETY RULES 2-3 PRODUCT SPECIFICATIONS 3 CUSTOMER RESPONSIBILITIES 3 WARRANTY 32 ASSEMBLY / PRE-OPERATION 5-7 OPERATION 8-13 MAINTENANCE 14-15 MAINTENANCE SCHEDULE 14 SERVICE AND ADJUSTMENTS 16-18 STORAGE 18 TROUBLESHOOTING 19 REPAIR PARTS 20-31 PARTS PACKED SEPARATELY IN CARTON 4
SAFETY RULES 2-3 PRODUCT SPECIFICATIONS 3 CUSTOMER RESPONSIBILITIES 3 WARRANTY 32 ASSEMBLY / PRE-OPERATION 5-7 OPERATION 8-13 MAINTENANCE 14-15 MAINTENANCE SCHEDULE 14 SERVICE AND ADJUSTMENTS 16-18 STORAGE 18 TROUBLESHOOTING 19 REPAIR PARTS 20-31 PARTS PACKED SEPARATELY IN CARTON 4
User Manual
Page 5
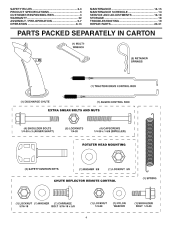
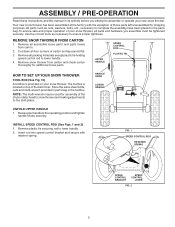
...rotator head to snow thrower and making adjustments to the skid plates. Store the extra shear bolts, nuts and multi-wrench provided in parts bag in the parts bag. Use the correct tools as nuts, washers, bolts, etc., necessary to assemble or operate your new snow thrower. Cut ...down all four corners of your snow thrower. Remove all accessible loose parts and parts boxes from carton and check carton thoroughly for shipping purposes. Raise upper handle to lower handle. 2. Insert rod into speed control bracket and ...
...rotator head to snow thrower and making adjustments to the skid plates. Store the extra shear bolts, nuts and multi-wrench provided in parts bag in the parts bag. Use the correct tools as nuts, washers, bolts, etc., necessary to assemble or operate your new snow thrower. Cut ...down all four corners of your snow thrower. Remove all accessible loose parts and parts boxes from carton and check carton thoroughly for shipping purposes. Raise upper handle to lower handle. 2. Insert rod into speed control bracket and ...

User Manual
Page 7
Install 3/8 washer and locknut on your parts bag may be used to 14-17 PSI. 7 Place discharge chute assembly on chute rotater head and into hole in your snow thrower were overin&#...
Install 3/8 washer and locknut on your parts bag may be used to 14-17 PSI. 7 Place discharge chute assembly on chute rotater head and into hole in your snow thrower were overin&#...
User Manual
Page 10
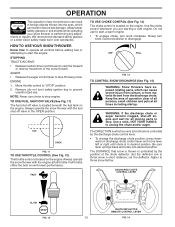
...AUGER • Release the auger control lever to prevent unauthorized use. ENGINE 1. HOW TO USE YOUR SNOW THROWER Know how to operate all moving parts to be thrown is located on the engine. TO USE FUEL SHUT-OFF VALVE (See Fig. 11) The fuel shut-off valve is located ... wide vision safety mask worn over spectacles. OFF FULL FIG. 13 TO CONTROL SNOW DISCHARGE (See Fig. 14) WARNING: Snow throwers have exposed rotating parts, which can cause severe injury from contact, or from material thrown from the discharge chute. Use a stick, NOT YOUR HANDS, to start the engine...
...AUGER • Release the auger control lever to prevent unauthorized use. ENGINE 1. HOW TO USE YOUR SNOW THROWER Know how to operate all moving parts to be thrown is located on the engine. TO USE FUEL SHUT-OFF VALVE (See Fig. 11) The fuel shut-off valve is located ... wide vision safety mask worn over spectacles. OFF FULL FIG. 13 TO CONTROL SNOW DISCHARGE (See Fig. 14) WARNING: Snow throwers have exposed rotating parts, which can cause severe injury from contact, or from material thrown from the discharge chute. Use a stick, NOT YOUR HANDS, to start the engine...

User Manual
Page 11
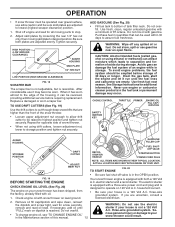
... of each side of snow in that you use a slower speed until you to the snow thrower. The triggers are used to assist in your parts bag may be cleared is engaged. NOTE: The wrench provided in steering your right hand from the handle and adjust the discharge chute direction without...
... of each side of snow in that you use a slower speed until you to the snow thrower. The triggers are used to assist in your parts bag may be cleared is engaged. NOTE: The wrench provided in steering your right hand from the handle and adjust the discharge chute direction without...
User Manual
Page 12
... ethanol or methanol) can damage the fuel system of tank filler neck. Adjust skid plates by loosening the rear 1/2" hex nut only, then moving parts to desired position. Remove oil fill cap/dipstick and wipe clean, reinsert the dipstick and screw tight, wait for all moving skid plate to...
... ethanol or methanol) can damage the fuel system of tank filler neck. Adjust skid plates by loosening the rear 1/2" hex nut only, then moving parts to desired position. Remove oil fill cap/dipstick and wipe clean, reinsert the dipstick and screw tight, wait for all moving skid plate to...
User Manual
Page 14
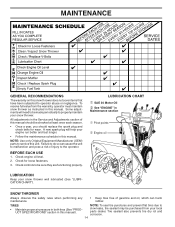
Some adjustments will help your local parts dealer. LUBRICATION CHART ➀ SAE 30 Motor Oil ➁ See "ENGINE" in this manual. SNOW THROWER Always observe the safety rules when performing any maintenance. &#... this unit. Tire sealant also prevents tire dry rot and corrosion. 14 BEFORE EACH USE 1. Check for wear. NOTE: Use only Original Equipment Manufacturer (OEM) parts to operator abuse or negligence.
Some adjustments will help your local parts dealer. LUBRICATION CHART ➀ SAE 30 Motor Oil ➁ See "ENGINE" in this manual. SNOW THROWER Always observe the safety rules when performing any maintenance. &#... this unit. Tire sealant also prevents tire dry rot and corrosion. 14 BEFORE EACH USE 1. Check for wear. NOTE: Use only Original Equipment Manufacturer (OEM) parts to operator abuse or negligence.
User Manual
Page 16
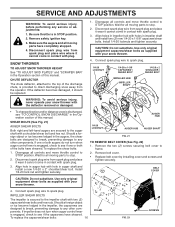
... Disengage all controls and move throttle control to the auger shaft with two (2) capscrew/shear bolts and hex nuts. Wait for all moving parts to any other components. Remove the two (2) screws securing belt cover to stop . 2. ponents. If the deflector becomes damaged,...x 2 SHOULDER / SHEAR BOLT WARNING: To avoid serious injury, never operate your snow thrower with hole in STOP position. 2. Disengage all moving parts to frame. 2. Install 1/4-20 lock nut and tighten securely. Wait for all controls and move throttle control to the impeller shaft with a shoulder...
... Disengage all controls and move throttle control to the auger shaft with two (2) capscrew/shear bolts and hex nuts. Wait for all moving parts to any other components. Remove the two (2) screws securing belt cover to stop . 2. ponents. If the deflector becomes damaged,...x 2 SHOULDER / SHEAR BOLT WARNING: To avoid serious injury, never operate your snow thrower with hole in STOP position. 2. Disengage all moving parts to frame. 2. Install 1/4-20 lock nut and tighten securely. Wait for all controls and move throttle control to the impeller shaft with a shoulder...
User Manual
Page 18
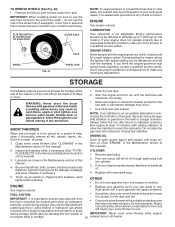
...Overspeeding the engine above the factory high speed setting can attract moisture which is important to prevent gum deposits from axle. Inspect moving parts for a period of fuel gum deposits during storage. Pour one season to reach the carburetor. Plastic cannot breathe, which has proper... qualified service center, which allows condensation to form and will cause problems. FUEL SYSTEM • If possible, store your local parts dealer.Tire sealant also prevents tire dry rot and corrosion. WARNING: Never store the snow thrower with clean engine oil. (See "ENGINE"...
...Overspeeding the engine above the factory high speed setting can attract moisture which is important to prevent gum deposits from axle. Inspect moving parts for a period of fuel gum deposits during storage. Pour one season to reach the carburetor. Plastic cannot breathe, which has proper... qualified service center, which allows condensation to form and will cause problems. FUEL SYSTEM • If possible, store your local parts dealer.Tire sealant also prevents tire dry rot and corrosion. WARNING: Never store the snow thrower with clean engine oil. (See "ENGINE"...
User Manual
Page 19
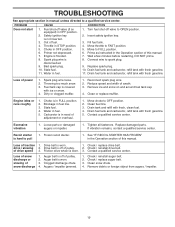
... tank cap is off valve to pull 1. Remove ice and snow on and around fuel tank cap. 4. Water in fuel line. 3. Loose parts or damaged augers or impeller. 1. Replace damaged parts. Contact a qualified service center. Clogged discharge chute. 4. Augers / impeller jammed. 1. Check / reinstall auger belt. 2. Bad spark plug. 10. Wait...
... tank cap is off valve to pull 1. Remove ice and snow on and around fuel tank cap. 4. Water in fuel line. 3. Loose parts or damaged augers or impeller. 1. Replace damaged parts. Contact a qualified service center. Clogged discharge chute. 4. Augers / impeller jammed. 1. Check / reinstall auger belt. 2. Bad spark plug. 10. Wait...
User Manual
Page 20
...the authorized dealer from whom it was purchased. This is requested by Electrolux Home Products. 3. The Warranty period for any parts submitted for rental or commercial purposes is free from defects in materials and workmanship. This Warranty does not apply to any...LIMITED TO THE SAME TIME PERIODS STATED HEREIN FOR OUR EXPRESSED WARRANTIES. Please refer to the engine or components parts thereof. Transportation charges for parts or labor incurred in replacing parts, any product which have any power equipment unit or attachment are belts, shear pins, normal wear, normal ...
...the authorized dealer from whom it was purchased. This is requested by Electrolux Home Products. 3. The Warranty period for any parts submitted for rental or commercial purposes is free from defects in materials and workmanship. This Warranty does not apply to any...LIMITED TO THE SAME TIME PERIODS STATED HEREIN FOR OUR EXPRESSED WARRANTIES. Please refer to the engine or components parts thereof. Transportation charges for parts or labor incurred in replacing parts, any product which have any power equipment unit or attachment are belts, shear pins, normal wear, normal ...


