User Manual
Page 2
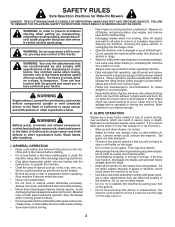
...of control and tipover accidents, which can affect the stability of the tractor. These operators should evaluate their ability to operate the riding mower safely enough to stop engine, and remove keys before turning. • Never leave a running machine unattended. Clean any oil or ... it cannot contact spark plug. WARNING: Do not coast down before dismounting. • Disengage blades when not mowing. Too heavy of riding mower-related injuries. SLOPE OPERATION Slopes are involved in neutral, you feel uneasy on a slope, is over if a wheel is dangerous. Allow ...
...of control and tipover accidents, which can affect the stability of the tractor. These operators should evaluate their ability to operate the riding mower safely enough to stop engine, and remove keys before turning. • Never leave a running machine unattended. Clean any oil or ... it cannot contact spark plug. WARNING: Do not coast down before dismounting. • Disengage blades when not mowing. Too heavy of riding mower-related injuries. SLOPE OPERATION Slopes are involved in neutral, you feel uneasy on a slope, is over if a wheel is dangerous. Allow ...
User Manual
Page 3
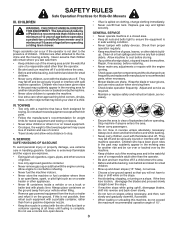
... running . • Check grass catcher components and the discharge chute frequently and replace with manufacturer's recommended parts, when necessary. • Mower blades are sharp. Allow engine to operate the machine. • Use extra care when approaching blind corners, shrubs, trees, or other ...of bystanders before and while backing. If the tires lose traction, disengage the blades and proceed slowly straight down for Ride-On Mowers III. Check their proper operation regularly. • Keep machine free of children. SAFETY RULES Safe Operation Practices for small children....
... running . • Check grass catcher components and the discharge chute frequently and replace with manufacturer's recommended parts, when necessary. • Mower blades are sharp. Allow engine to operate the machine. • Use extra care when approaching blind corners, shrubs, trees, or other ...of bystanders before and while backing. If the tires lose traction, disengage the blades and proceed slowly straight down for Ride-On Mowers III. Check their proper operation regularly. • Keep machine free of children. SAFETY RULES Safe Operation Practices for small children....
User Manual
Page 7
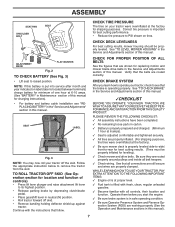
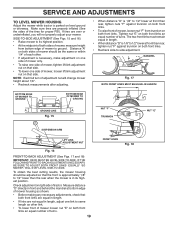
...instruction below to raised position. CHECK FOR PROPER POSITION OF ALL BELTS See the figures that are shown for leveling). ✓ Check mower and drive belts. ASSEMBLY SEAT PAN SHOULDER BOLT SEAT CHECK TIRE PRESSURE The tires on your tractor were overinflated at the factory for best... is put into service after month and year indicated on tires. CHECK DECK LEVELNESS For best cutting results, mower housing should be properly inflated for replacing motion and mower blade drive belts in the 00835 Service and Adjustments section of controls) • Press lift lever plunger and...
...instruction below to raised position. CHECK FOR PROPER POSITION OF ALL BELTS See the figures that are shown for leveling). ✓ Check mower and drive belts. ASSEMBLY SEAT PAN SHOULDER BOLT SEAT CHECK TIRE PRESSURE The tires on your tractor were overinflated at the factory for best... is put into service after month and year indicated on tires. CHECK DECK LEVELNESS For best cutting results, mower housing should be properly inflated for replacing motion and mower blade drive belts in the 00835 Service and Adjustments section of controls) • Press lift lever plunger and...
User Manual
Page 8
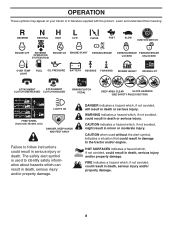
... OPERATION SYSTEM (ROS) ENGINE ON ENGINE START PARKING BRAKE PARKING BRAKE PARKING BRAKE LOCKED UNLOCKED OVER TEMP LIGHT FUEL OIL PRESSURE BATTERY REVERSE FORWARD MOWER HEIGHT 15 MOWER LIFT 15 ATTACHMENT ATTACHMENT CLUTCH DISENGAGED CLUTCH ENGAGED BRAKE/CLUTCH PEDAL KEEP AREA CLEAR SLOPE HAZARDS (SEE SAFETY RULES SECTION) LIGHTS ON FREE WHEEL...
... OPERATION SYSTEM (ROS) ENGINE ON ENGINE START PARKING BRAKE PARKING BRAKE PARKING BRAKE LOCKED UNLOCKED OVER TEMP LIGHT FUEL OIL PRESSURE BATTERY REVERSE FORWARD MOWER HEIGHT 15 MOWER LIFT 15 ATTACHMENT ATTACHMENT CLUTCH DISENGAGED CLUTCH ENGAGED BRAKE/CLUTCH PEDAL KEEP AREA CLEAR SLOPE HAZARDS (SEE SAFETY RULES SECTION) LIGHTS ON FREE WHEEL...
User Manual
Page 9
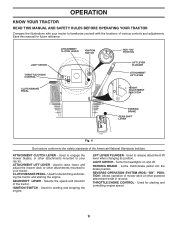
... ATTACHMENT LIFT LEVER HEIGHT ADJUSTMENT INDICATOR PARKING BRAKE GEAR SHIFT LEVER 02829 Fig. 4 Our tractors conform to the safety standards of mower deck or other powered attachment while in reverse. ATTACHMENT CLUTCH LEVER - CLUTCH/BRAKE PEDAL - Used to your tractor. REVERSE OPERATION... SYSTEM (ROS) "ON" POSITION - IGNITION SWITCH - THROTTLE/CHOKE CONTROL - Used to raise, lower, and adjust the mower deck or other attachments mounted to release attachment lift lever when changing its position. Used for starting the engine. LIFT LEVER PLUNGER - ...
... ATTACHMENT LIFT LEVER HEIGHT ADJUSTMENT INDICATOR PARKING BRAKE GEAR SHIFT LEVER 02829 Fig. 4 Our tractors conform to the safety standards of mower deck or other powered attachment while in reverse. ATTACHMENT CLUTCH LEVER - CLUTCH/BRAKE PEDAL - Used to your tractor. REVERSE OPERATION... SYSTEM (ROS) "ON" POSITION - IGNITION SWITCH - THROTTLE/CHOKE CONTROL - Used to raise, lower, and adjust the mower deck or other attachments mounted to release attachment lift lever when changing its position. Used for starting the engine. LIFT LEVER PLUNGER - ...

User Manual
Page 10
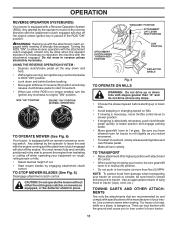
...Your tractor is approximately 1-1/2" to the blade tip with thumb and move throttle control between half and full speed (fast) position. TO ADJUST MOWER CUTTING HEIGHT (See Fig. 5) The position of the attachment lift lever determines the cutting height. • Grasp lift lever. • ...8226; Operating engine at less than full throttle reduces the battery charging rate. • Full throttle offers the best bagging and mower perfor- These heights are measured from clutch/brake pedal. Always remove key when leaving tractor to over spectacles or standard safety glasses....
...Your tractor is approximately 1-1/2" to the blade tip with thumb and move throttle control between half and full speed (fast) position. TO ADJUST MOWER CUTTING HEIGHT (See Fig. 5) The position of the attachment lift lever determines the cutting height. • Grasp lift lever. • ...8226; Operating engine at less than full throttle reduces the battery charging rate. • Full throttle offers the best bagging and mower perfor- These heights are measured from clutch/brake pedal. Always remove key when leaving tractor to over spectacles or standard safety glasses....
User Manual
Page 11
...needed, turn ignition key counterclockwise to ROS "ON" position. • Look down hills. • Avoid stopping or changing speed on mowers so equipped, or the deflector shield in reverse unless absolutely necessary. USING THE REVERSE OPERATION SYSTEM • Depress clutch/brake pedal all ...turns slowly. ROS "ON" POSITION ENGINE "ON" POSITION (NORMAL OPERATING) 02828 TO OPERATE MOWER (See Fig. 6) Your tractor is equipped with the attachment clutch engaged will shut off when operating your tractor. Use an appropriate means ...
...needed, turn ignition key counterclockwise to ROS "ON" position. • Look down hills. • Avoid stopping or changing speed on mowers so equipped, or the deflector shield in reverse unless absolutely necessary. USING THE REVERSE OPERATION SYSTEM • Depress clutch/brake pedal all ...turns slowly. ROS "ON" POSITION ENGINE "ON" POSITION (NORMAL OPERATING) 02828 TO OPERATE MOWER (See Fig. 6) Your tractor is equipped with the attachment clutch engaged will shut off when operating your tractor. Use an appropriate means ...
User Manual
Page 13
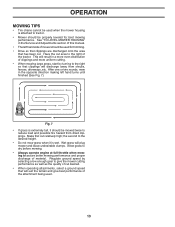
... performance as well as the quality of the tractor. OPERATION MOWING TIPS • Tire chains cannot be used when the mower housing is attached to tractor. • Mower should be properly leveled for trimming. • Drive so that clippings are discharged onto the area that has been cut. Make ...first cut area to assure better mowing performance and proper discharge of mower should be used for best mowing performance. Allow grass to dry before mowing. • Always operate engine at full throttle when mowing to ...
... performance as well as the quality of the tractor. OPERATION MOWING TIPS • Tire chains cannot be used when the mower housing is attached to tractor. • Mower should be properly leveled for trimming. • Drive so that clippings are discharged onto the area that has been cut. Make ...first cut area to assure better mowing performance and proper discharge of mower should be used for best mowing performance. Allow grass to dry before mowing. • Always operate engine at full throttle when mowing to ...
User Manual
Page 14
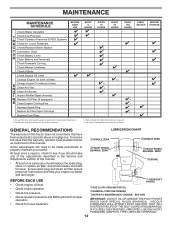
... USE Check Brake Operation T Check Tire Pressure R Check Operator Presence & ROS Systems A Check for Loose Fasteners C Check/Replace Mower Blades T Lubrication Chart 0 Check Battery Level R Clean Battery and Terminals Check Transaxle Cooling Check Mower Levelness Check V-Belts Check Engine Oil Level Change Engine Oil (with maintenance-free battery. Service more often when...
... USE Check Brake Operation T Check Tire Pressure R Check Operator Presence & ROS Systems A Check for Loose Fasteners C Check/Replace Mower Blades T Lubrication Chart 0 Check Battery Level R Clean Battery and Terminals Check Transaxle Cooling Check Mower Levelness Check V-Belts Check Engine Oil Level Change Engine Oil (with maintenance-free battery. Service more often when...
User Manual
Page 15
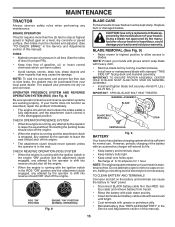
... is hazardous, could damage your tractor and void your warranty. ROS "ON" POSITION 02828 ENGINE "ON" POSITION (NORMAL OPERATING) Fig. 8 BLADE CARE For best results mower blades must be purchased from tractor. • Rinse the battery with plain water and dry. • Clean terminals and battery cable ends with wire brush... cable first then RED battery cable and remove battery from your tractor is maintenance free. Lbs./ 62-75 Nm. ). BLADE REMOVAL (See Fig. 9) • Raise mower to highest position to allow access to blades.
... is hazardous, could damage your tractor and void your warranty. ROS "ON" POSITION 02828 ENGINE "ON" POSITION (NORMAL OPERATING) Fig. 8 BLADE CARE For best results mower blades must be purchased from tractor. • Rinse the battery with plain water and dry. • Clean terminals and battery cable ends with wire brush... cable first then RED battery cable and remove battery from your tractor is maintenance free. Lbs./ 62-75 Nm. ). BLADE REMOVAL (See Fig. 9) • Raise mower to highest position to allow access to blades.
User Manual
Page 17
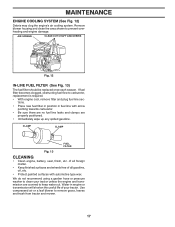
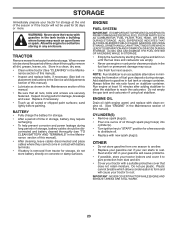
... positioned. • Immediately wipe up any spilled gasoline. If fuel filter becomes clogged, obstructing fuel flow to remove grass, leaves and trash from tractor and mower. 17 MAINTENANCE ENGINE COOLING SYSTEM (See Fig. 12) Debris may clog the engine's air cooling system. CLAMP CLAMP FUEL FILTER Fig. 13 CLEANING • Clean...
... positioned. • Immediately wipe up any spilled gasoline. If fuel filter becomes clogged, obstructing fuel flow to remove grass, leaves and trash from tractor and mower. 17 MAINTENANCE ENGINE COOLING SYSTEM (See Fig. 12) Debris may clog the engine's air cooling system. CLAMP CLAMP FUEL FILTER Fig. 13 CLEANING • Clean...
User Manual
Page 18
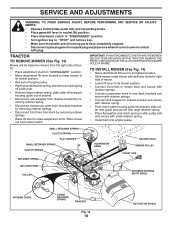
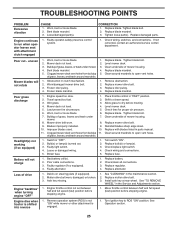
...COLLAR RETAINER SPRINGS (BOTH SIDES) HOUSING GUIDE LARGE RETAINER SPRING BRACKET Fig. 14 18 DEFLECTOR SHIELD IMPORTANT: IF AN ATTACHMENT OTHER THAN THE MOWER DECK IS TO BE MOUNTED ON THE TRACTOR, REMOVE THE FRONT LINKS AND HOOK THE CLUTCH SPRING INTO SQUARE HOLE IN FRAME. SERVICE ...Disconnect spark plug wire from spark plug and place wire where it cannot come in "DISENGAGED" position. • Move attachment lift lever forward to lower mower to its lowest position. • Roll belt off engine pulley. • Remove small retainer spring, and remove clutch spring off pulley bolt. &#...
...COLLAR RETAINER SPRINGS (BOTH SIDES) HOUSING GUIDE LARGE RETAINER SPRING BRACKET Fig. 14 18 DEFLECTOR SHIELD IMPORTANT: IF AN ATTACHMENT OTHER THAN THE MOWER DECK IS TO BE MOUNTED ON THE TRACTOR, REMOVE THE FRONT LINKS AND HOOK THE CLUTCH SPRING INTO SQUARE HOLE IN FRAME. SERVICE ...Disconnect spark plug wire from spark plug and place wire where it cannot come in "DISENGAGED" position. • Move attachment lift lever forward to lower mower to its lowest position. • Roll belt off engine pulley. • Remove small retainer spring, and remove clutch spring off pulley bolt. &#...
User Manual
Page 19
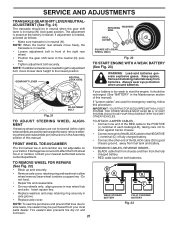
...equal in its highest position. • At the midpoint of both sides of turns. Check adjustment on both front links an equal number of mower, measure height from trunnion on both front links. IF THE FOLLOWING FRONT-TO-BACK ADJUSTMENT IS NECESSARY, BE SURE TO ADJUST BOTH FRONT LINKS ... Figs. 17 and 18) IMPORTANT: DECK MUST BE LEVEL SIDE-TO-SIDE. Measure distance "D" directly in front and behind the mandrel at bottom edge of mower housing as other . • If adjustment is 1/8" to 1/2" lower at front than rear, tighten nut "F" against trunnion on both front links. • To ...
...equal in its highest position. • At the midpoint of both sides of turns. Check adjustment on both front links an equal number of mower, measure height from trunnion on both front links. IF THE FOLLOWING FRONT-TO-BACK ADJUSTMENT IS NECESSARY, BE SURE TO ADJUST BOTH FRONT LINKS ... Figs. 17 and 18) IMPORTANT: DECK MUST BE LEVEL SIDE-TO-SIDE. Measure distance "D" directly in front and behind the mandrel at bottom edge of mower housing as other . • If adjustment is 1/8" to 1/2" lower at front than rear, tighten nut "F" against trunnion on both front links. • To ...

User Manual
Page 20
...this sec- If the rear wheels rotate, then the brake needs to manually push the tractor forward. BELT REMOVAL • Remove mower (See "TO REMOVE MOWER" in this section of this section of left footrest. Remove belt upwards from around the top groove of tractor. IDLER PULLEYS ... Park the tractor on level surface. NOTE: Observe entire motion drive belt and position of all belt guides and keepers. • Install mower (See "TO INSTALL MOWER" in neutral (N) position. The rear wheels must be serviced. Park tractor on a level, dry concrete or paved surface, depress clutch/...
...this sec- If the rear wheels rotate, then the brake needs to manually push the tractor forward. BELT REMOVAL • Remove mower (See "TO REMOVE MOWER" in this section of this section of left footrest. Remove belt upwards from around the top groove of tractor. IDLER PULLEYS ... Park the tractor on level surface. NOTE: Observe entire motion drive belt and position of all belt guides and keepers. • Install mower (See "TO INSTALL MOWER" in neutral (N) position. The rear wheels must be serviced. Park tractor on a level, dry concrete or paved surface, depress clutch/...
User Manual
Page 21
... seal tire punctures and prevent flat tires due to slow leaks, tire sealant may be purchased from batteries. NOTE: When the tractor rear wheels move mower deck height to start the engine, it should be in neutral when the gear shift lever is preset at the factory; GEARSHIFT LEVER NEUTRAL LOCK...
... seal tire punctures and prevent flat tires due to slow leaks, tire sealant may be purchased from batteries. NOTE: When the tractor rear wheels move mower deck height to start the engine, it should be in neutral when the gear shift lever is preset at the factory; GEARSHIFT LEVER NEUTRAL LOCK...
User Manual
Page 23
...for storage at least 10 minutes after adding stabilizer to allow the stabilizer to gasoline in fuel tank or storage container. TRACTOR Remove mower from tractor for storage, do not store battery directly on stabilizer container. Always follow the mix ratio found on concrete or damp ...be used for storage. • After a period of time in storage, battery may occur. • Use fresh fuel next season. When mower is an acceptable alternative in minimizing the formation of time, clean it to cool before painting. placement instructions in the Service and Adjustments section ...
...for storage at least 10 minutes after adding stabilizer to allow the stabilizer to gasoline in fuel tank or storage container. TRACTOR Remove mower from tractor for storage, do not store battery directly on stabilizer container. Always follow the mix ratio found on concrete or damp ...be used for storage. • After a period of time in storage, battery may occur. • Use fresh fuel next season. When mower is an acceptable alternative in minimizing the formation of time, clean it to cool before painting. placement instructions in the Service and Adjustments section ...

User Manual
Page 24
...1. Weak or dead battery. 2. Loose or damaged wiring. 4. Stale or dirty fuel. 9. Dirty/clogged muffler. 13. Carburetor out of mower housing. 4. Contact an authorized service center/department. 1. See "To Adjust Carburetor" in Service Adjustments section. 10. Contact an authorized service ... tighten spark plug wire. 11. Dirty air filter. 6. Loose or damaged wiring. 7. Engine valves out of grass, leaves and trash under mower. 4. Blown fuse. 5. Build-up of adjustment. 1. Engine valves out of fuel. 2. Clean/replace air filter. 2. Recharge or replace battery...
...1. Weak or dead battery. 2. Loose or damaged wiring. 4. Stale or dirty fuel. 9. Dirty/clogged muffler. 13. Carburetor out of mower housing. 4. Contact an authorized service center/department. 1. See "To Adjust Carburetor" in Service Adjustments section. 10. Contact an authorized service ... tighten spark plug wire. 11. Dirty air filter. 6. Loose or damaged wiring. 7. Engine valves out of grass, leaves and trash under mower. 4. Blown fuse. 5. Build-up of adjustment. 1. Engine valves out of fuel. 2. Clean/replace air filter. 2. Recharge or replace battery...
User Manual
Page 25
...fast) position before stopping engine. 1. Install axle key at rear wheel. CORRECTION 1. Frozen idler pulley. 4. Replace blade mandrel. Mower deck not level. 4. Check tires for proper air pressure. 6. Clean around mandrels. 1. Faulty alternator. 1. Check/clean all... connections. 3. Replace alternator. Tighten blade bolt. 2. Check wiring, switches and connections. uneven Mower blades will not charge 1. Replace blade mandrel. 5. Low/uneven tire air pressure. 5. Reinstall blades sharp edge down. 10....
...fast) position before stopping engine. 1. Install axle key at rear wheel. CORRECTION 1. Frozen idler pulley. 4. Replace blade mandrel. Mower deck not level. 4. Check tires for proper air pressure. 6. Clean around mandrels. 1. Faulty alternator. 1. Check/clean all... connections. 3. Replace alternator. Tighten blade bolt. 2. Check wiring, switches and connections. uneven Mower blades will not charge 1. Replace blade mandrel. 5. Low/uneven tire air pressure. 5. Reinstall blades sharp edge down. 10....
Parts Manual
Page 2
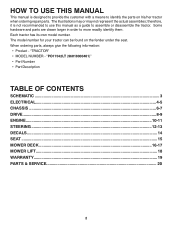
... model number for your tractor can be found on his/her tractor when ordering repair parts. "TRACTOR" • MODEL NUMBER - "PO17542LT (96018000401)" • Part Number • Part Description TABLE OF CONTENTS SCHEMATIC ...3 ELECTRICAL ...4-5 CHASSIS ...6-7 DRIVE...8-9 ENGINE ...10-11 STEERING ......12-13 DECALS...14 SEAT ...15 MOWER DECK ...16-17 MOWER LIFT...18 WARRANTY...19 PARTS & SERVICE 20 2 Some hardware and parts are drawn larger in order to more readily identify ...
... model number for your tractor can be found on his/her tractor when ordering repair parts. "TRACTOR" • MODEL NUMBER - "PO17542LT (96018000401)" • Part Number • Part Description TABLE OF CONTENTS SCHEMATIC ...3 ELECTRICAL ...4-5 CHASSIS ...6-7 DRIVE...8-9 ENGINE ...10-11 STEERING ......12-13 DECALS...14 SEAT ...15 MOWER DECK ...16-17 MOWER LIFT...18 WARRANTY...19 PARTS & SERVICE 20 2 Some hardware and parts are drawn larger in order to more readily identify ...
Parts Manual
Page 7
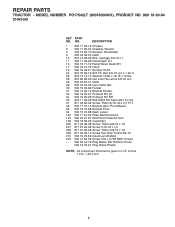
... 817 49 05-08 Screw Thdrol 5/16-18 x 1/2 TYT 38 532 17 57-10 Bracket Asm. NO. MODEL NUMBER PO17542LT (96018000401), PRODUCT NO. 960 18 00-04 CHASSIS KEY PART NO. Pivot Mower 39 532 18 75-68 Bracket Pivot 64 532 15 47-98 Dash Lower 142 532 17 57-02...
... 817 49 05-08 Screw Thdrol 5/16-18 x 1/2 TYT 38 532 17 57-10 Bracket Asm. NO. MODEL NUMBER PO17542LT (96018000401), PRODUCT NO. 960 18 00-04 CHASSIS KEY PART NO. Pivot Mower 39 532 18 75-68 Bracket Pivot 64 532 15 47-98 Dash Lower 142 532 17 57-02...


