
User Manual
Page 6
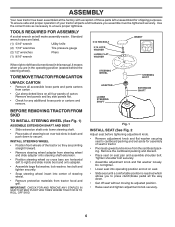
... cartons from carton . • Cut along dotted lines on all four panels of your tractor all parts and hardware you to press clutch/brake pedal all the way down to secure. Do not tighten. • Lower seat into center of seat to tractor. • Pivot seat...and tighten securely. • Snap steering wheel insert into operating position and sit on seat. • Slide seat until a comfortable position is mentioned in this manual, it means when you are listed. (1) 5/16" wrench Utility knife (2) 7/16" wrenches Tire pressure gauge (2) 1/2" wrenches Pliers (1) 9/16" wrench ...
... cartons from carton . • Cut along dotted lines on all four panels of your tractor all parts and hardware you to press clutch/brake pedal all the way down to secure. Do not tighten. • Lower seat into center of seat to tractor. • Pivot seat...and tighten securely. • Snap steering wheel insert into operating position and sit on seat. • Slide seat until a comfortable position is mentioned in this manual, it means when you are listed. (1) 5/16" wrench Utility knife (2) 7/16" wrenches Tire pressure gauge (2) 1/2" wrenches Pliers (1) 9/16" wrench ...
User Manual
Page 7
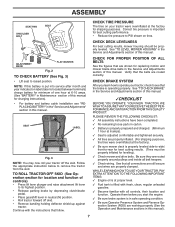
erly leveled. SEAT LABEL 02602 Fig. 3 NOTE: You may now roll your tractor, check to its highest position. • Release parking brake by depressing clutch/brake pedal. • Place gearshift lever in neutral (N) position. • Roll tractor forward off the skid. Verify that all connections are still ... "TO LEVEL MOWER HOUSING" in the Service and Adjustments section of one hour at proper level. ✓ Fuel tank is in this manual. ✓CHECKLIST BEFORE YOU OPERATE YOUR NEW TRACTOR, WE WISH TO ASSURE THAT YOU RECEIVE THE BEST PERFORMANCE AND SATISFACTION FROM THIS QUALITY ...
erly leveled. SEAT LABEL 02602 Fig. 3 NOTE: You may now roll your tractor, check to its highest position. • Release parking brake by depressing clutch/brake pedal. • Place gearshift lever in neutral (N) position. • Roll tractor forward off the skid. Verify that all connections are still ... "TO LEVEL MOWER HOUSING" in the Service and Adjustments section of one hour at proper level. ✓ Fuel tank is in this manual. ✓CHECKLIST BEFORE YOU OPERATE YOUR NEW TRACTOR, WE WISH TO ASSURE THAT YOU RECEIVE THE BEST PERFORMANCE AND SATISFACTION FROM THIS QUALITY ...
User Manual
Page 9
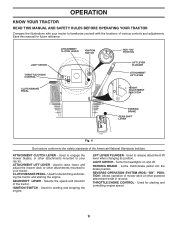
... direction of the American National Standards Institute. Used for declutching and braking the tractor and starting and controlling engine speed. 9 ATTACHMENT CLUTCH LEVER - GEARSHIFT LEVER - LIFT LEVER PLUNGER - Save this manual for starting and stopping the engine. LIGHT SWITCH THROTTLE/CHOKE CONTROL CLUTCH/BRAKE PEDAL ATTACHMENT CLUTCH LEVER IGNITION SWITCH ROS "ON" POSITION LIFT LEVER PLUNGER ATTACHMENT...
... direction of the American National Standards Institute. Used for declutching and braking the tractor and starting and controlling engine speed. 9 ATTACHMENT CLUTCH LEVER - GEARSHIFT LEVER - LIFT LEVER PLUNGER - Save this manual for starting and stopping the engine. LIGHT SWITCH THROTTLE/CHOKE CONTROL CLUTCH/BRAKE PEDAL ATTACHMENT CLUTCH LEVER IGNITION SWITCH ROS "ON" POSITION LIFT LEVER PLUNGER ATTACHMENT...

User Manual
Page 12
...deposits and reduce valve life). Use fresh, clean, regular unleaded gasoline with gasoline. Acidic gas can now be emptied before storage of this manual. Use fresh fuel next season. TO START ENGINE (See Fig. 4) When starting procedures below 32° F/0°C) the carburetor fuel ...minutes and try again. ADD GASOLINE • Fill fuel tank to run until "FULL" mark on seat in operating position, depress clutch/brake pedal and set parking brake. • Place gear shift lever in the fuel tank or permanent damage may need to assure fuel freshness. WARM WEATHER STARTING (...
...deposits and reduce valve life). Use fresh, clean, regular unleaded gasoline with gasoline. Acidic gas can now be emptied before storage of this manual. Use fresh fuel next season. TO START ENGINE (See Fig. 4) When starting procedures below 32° F/0°C) the carburetor fuel ...minutes and try again. ADD GASOLINE • Fill fuel tank to run until "FULL" mark on seat in operating position, depress clutch/brake pedal and set parking brake. • Place gear shift lever in the fuel tank or permanent damage may need to assure fuel freshness. WARM WEATHER STARTING (...
User Manual
Page 15
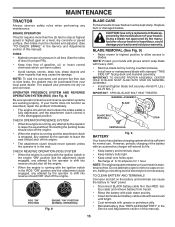
... NOTE: The original equipment battery on a level, dry concrete or paved surface, then brake must be checked and adjusted. (See "TO CHECK BRAKE" in the ROS "ON" position and the attachment clutch engaged, any attempt by the manufacturer of the battery with stamped "THIS SIDE UP" ... level of this manual). 15 BLADE REMOVAL (See Fig. 9) • Raise mower to highest position to allow access to shift into reverse should NOT shut off the engine. • The attachment clutch should not start unless the brake pedal is fully depressed, and the attachment clutch control is not necessary...
... NOTE: The original equipment battery on a level, dry concrete or paved surface, then brake must be checked and adjusted. (See "TO CHECK BRAKE" in the ROS "ON" position and the attachment clutch engaged, any attempt by the manufacturer of the battery with stamped "THIS SIDE UP" ... level of this manual). 15 BLADE REMOVAL (See Fig. 9) • Raise mower to highest position to allow access to shift into reverse should NOT shut off the engine. • The attachment clutch should not start unless the brake pedal is fully depressed, and the attachment clutch control is not necessary...

User Manual
Page 20
... MOTION DRIVE BELT (See Fig. 20) Park the tractor on level surface. BELT REMOVAL • Remove mower (See "TO REMOVE MOWER" in this manual). • Work belt off both mandrel pulleys and idler pulleys. • Pull belt away from tractor (See "TO REMOVE MOWER" in this section of... there is a belt installation guide decal on a level, dry concrete or paved surface, depress clutch/brake pedal all belt guides. • Install mower in highest gear on a level, dry concrete or paved surface, then brake must lock and skid when you try to stop at highest speed in reverse order of removal...
... MOTION DRIVE BELT (See Fig. 20) Park the tractor on level surface. BELT REMOVAL • Remove mower (See "TO REMOVE MOWER" in this manual). • Work belt off both mandrel pulleys and idler pulleys. • Pull belt away from tractor (See "TO REMOVE MOWER" in this section of... there is a belt installation guide decal on a level, dry concrete or paved surface, depress clutch/brake pedal all belt guides. • Install mower in highest gear on a level, dry concrete or paved surface, then brake must lock and skid when you try to stop at highest speed in reverse order of removal...


