

User Manual
Page 8
... YOUR TRACTOR, PAY EXTRA ATTENTION TO THE FOLLOWING IMPORTANT ITEMS: ✓ Engine oil is at the factory for replacing motion and mower blade drive belts in carton. ✓ Battery is properly prepared and charged. (Minimum 1 hour at 6 amps). ✓ Seat is adjusted comfortably and tightened ...CHECK BRAKE SYSTEM After you start the engine. ✓ Be sure brake system is important for leveling). ✓ Check mower and drive belts. CHECK DECK LEVELNESS For best cutting results, mower housing should be properly inflated for best cutting performance. • Reduce tire pressure to ...
... YOUR TRACTOR, PAY EXTRA ATTENTION TO THE FOLLOWING IMPORTANT ITEMS: ✓ Engine oil is at the factory for replacing motion and mower blade drive belts in carton. ✓ Battery is properly prepared and charged. (Minimum 1 hour at 6 amps). ✓ Seat is adjusted comfortably and tightened ...CHECK BRAKE SYSTEM After you start the engine. ✓ Be sure brake system is important for leveling). ✓ Check mower and drive belts. CHECK DECK LEVELNESS For best cutting results, mower housing should be properly inflated for best cutting performance. • Reduce tire pressure to ...

User Manual
Page 15
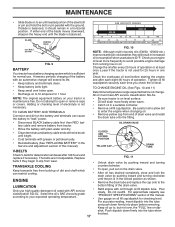
...a year you should replace the spark plug, clean or replace air filter, and check blades and belts for wear. LUBRICATION CHART dSPINDLE ZERK dSPINDLE ZERK dFRONT WHEEL BEARING ZERK dFRONT WHEEL BEARING ZERK At least...Fasteners A Sharpen/Replace Mower Blades C T Lubrication Chart 0 Check Battery Level R Clean Battery and Terminals Check Transaxle Cooling Check V-Belts BEFOREEEVAECRHYU8ESVHEEORUYRS2E5VHEROYUR5E0SVEHROYUR1E0SV0EHROYUBSREESFAOSROENSSTEORRAVGEICE DATES 5 3 4 Check Engine Oil Level Change Engine Oil (with maintenance-free battery. 5 - Replace blades more often when...
...a year you should replace the spark plug, clean or replace air filter, and check blades and belts for wear. LUBRICATION CHART dSPINDLE ZERK dSPINDLE ZERK dFRONT WHEEL BEARING ZERK dFRONT WHEEL BEARING ZERK At least...Fasteners A Sharpen/Replace Mower Blades C T Lubrication Chart 0 Check Battery Level R Clean Battery and Terminals Check Transaxle Cooling Check V-Belts BEFOREEEVAECRHYU8ESVHEEORUYRS2E5VHEROYUR5E0SVEHROYUR1E0SV0EHROYUBSREESFAOSROENSSTEORRAVGEICE DATES 5 3 4 Check Engine Oil Level Change Engine Oil (with maintenance-free battery. 5 - Replace blades more often when...
User Manual
Page 17
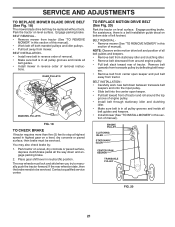
...of drain valve and install the drain tube onto the fitting. OIL DRAIN VALVE CLOSED AND LOCKED POSITION YELLOW CAP DRAIN TUBE V-BELTS Check V-belts for deterioration and wear after each time you check the oil level. Do not overfill. TO CLEAN BATTERY AND TERMINALS Corrosion and... original equipment battery on dipstick. Tighten oil fill cap/dipstick securely each eight (8) hours of dirt and chaff which is balanced. The belts are not adjustable. Select the oil's SAE viscosity grade according to the bottom fitting of operation or at 6-10 amperes for normal use...
...of drain valve and install the drain tube onto the fitting. OIL DRAIN VALVE CLOSED AND LOCKED POSITION YELLOW CAP DRAIN TUBE V-BELTS Check V-belts for deterioration and wear after each time you check the oil level. Do not overfill. TO CLEAN BATTERY AND TERMINALS Corrosion and... original equipment battery on dipstick. Tighten oil fill cap/dipstick securely each eight (8) hours of dirt and chaff which is balanced. The belts are not adjustable. Select the oil's SAE viscosity grade according to the bottom fitting of operation or at 6-10 amperes for normal use...

User Manual
Page 19
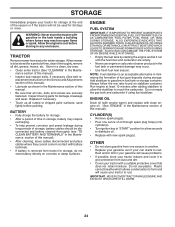
... and place wire where it cannot come in "DISENGAGED" position. • Move attachment lift lever forward to lower mower to its lowest position. • Roll belt off engine pulley. • Remove small retainer spring, and remove clutch spring off pulley bolt. • Remove large retainer spring, slide collar off and push.... 13) Mower will be easier to remove from the right side of tractor. • Place attachment clutch in contact with small retainer spring. • Install belt onto engine pulley.
... and place wire where it cannot come in "DISENGAGED" position. • Move attachment lift lever forward to lower mower to its lowest position. • Roll belt off engine pulley. • Remove small retainer spring, and remove clutch spring off pulley bolt. • Remove large retainer spring, slide collar off and push.... 13) Mower will be easier to remove from the right side of tractor. • Place attachment clutch in contact with small retainer spring. • Install belt onto engine pulley.
User Manual
Page 21
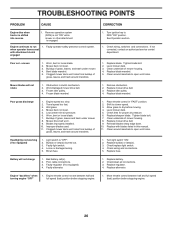
... REPLACE MOWER BLADE DRIVE BELT (See Fig. 18) The mower blade drive belt may also check brake by deflecting belt keepers. • Remove belt from center span keeper and pull belt away from mower. BELT INSTALLATION • Install new belt in reverse order of removal. • Make sure belt is in all pulley ...more than five (5) feet to stop at highest speed in highest gear on a level, dry concrete or paved surface, depress clutch/brake pedal all belt guides and keepers. • Install mower (See "TO INSTALL MOWER" in this section of this section of tractor. tion of left footrest. ...
... REPLACE MOWER BLADE DRIVE BELT (See Fig. 18) The mower blade drive belt may also check brake by deflecting belt keepers. • Remove belt from center span keeper and pull belt away from mower. BELT INSTALLATION • Install new belt in reverse order of removal. • Make sure belt is in all pulley ...more than five (5) feet to stop at highest speed in highest gear on a level, dry concrete or paved surface, depress clutch/brake pedal all belt guides and keepers. • Install mower (See "TO INSTALL MOWER" in this section of this section of tractor. tion of left footrest. ...
User Manual
Page 24
... be disconnected and battery cleaned thoroughly (see "TO CLEAN BATTERY AND TERMINALS" in minimizing the formation of this manual). • Inspect and replace belts, if necessary (See belt re- Do not empty the gas tank and carburetor if using fuel stabilizer. OTHER • Do not store gasoline from tractor for storage, do...
... be disconnected and battery cleaned thoroughly (see "TO CLEAN BATTERY AND TERMINALS" in minimizing the formation of this manual). • Inspect and replace belts, if necessary (See belt re- Do not empty the gas tank and carburetor if using fuel stabilizer. OTHER • Do not store gasoline from tractor for storage, do...
User Manual
Page 26
...Operation section. 1. Worn, bent or loose blade. 2. Mower deck not level. 3. Mower blades will not charge 1. Worn/damaged mower drive belt. 3. Travel speed too fast. 3. Place throttle control in clutch mechanism. 2. Level mower deck. 5. Tighten blade bolt. 7. Reinstall blades ... "OFF" full speed (fast) position before stopping engine. 26 uneven 1. Replace blade mandrel. 5. Replace idler pulley. 4. Replace mower drive belt. 9. Loose or damaged wiring. 5. Poor cable connections. 3. Replace regulator. 4. Poor cut - Engine speed too slow. 2. Allow grass to...
...Operation section. 1. Worn, bent or loose blade. 2. Mower deck not level. 3. Mower blades will not charge 1. Worn/damaged mower drive belt. 3. Travel speed too fast. 3. Place throttle control in clutch mechanism. 2. Level mower deck. 5. Tighten blade bolt. 7. Reinstall blades ... "OFF" full speed (fast) position before stopping engine. 26 uneven 1. Replace blade mandrel. 5. Replace idler pulley. 4. Replace mower drive belt. 9. Loose or damaged wiring. 5. Poor cable connections. 3. Replace regulator. 4. Poor cut - Engine speed too slow. 2. Allow grass to...
User Manual
Page 27
... of how long an implied Warranty may last, so the above limitations or exclusions may have any power equipment unit or attachment are belts, blades, blade adapters, normal wear, normal adjustments, standard hardware and normal maintenance. 7. This Warranty is limited to 90 days from... the date of original purchase. 5. Exclusions: Excluded from this Warranty, please contact: POULAN Outdoor Products Customer Service Dept. 1030 Stevens Creek Road Augusta, GA 30907 USA In Canada contact: POULAN 5855 Terry Fox Way Mississauga, Ontario L5V 3E4 giving the model number, serial number ...
... of how long an implied Warranty may last, so the above limitations or exclusions may have any power equipment unit or attachment are belts, blades, blade adapters, normal wear, normal adjustments, standard hardware and normal maintenance. 7. This Warranty is limited to 90 days from... the date of original purchase. 5. Exclusions: Excluded from this Warranty, please contact: POULAN Outdoor Products Customer Service Dept. 1030 Stevens Creek Road Augusta, GA 30907 USA In Canada contact: POULAN 5855 Terry Fox Way Mississauga, Ontario L5V 3E4 giving the model number, serial number ...
Parts List
Page 2
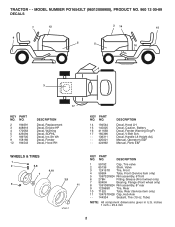
...Operator's E&F Manual, Parts E&F WHEELS & TIRES 1 2 5,8 7 6 4,10 3,9 11 wheel_1 KEY PART NO. inches 1 inch = 25.4 mm 2 MODEL NUMBER PO16542LT (96012008900), PRODUCT NO. 960 12 00-89 DECALS 7 12 9 2 14 15 5 5 16 4 3 17 KEY PART NO. Decal, Handle Lft Height Adj. ... 145005 16 411658 17 160396 - - 138311 - - 425001 - - 424992 DESCRIPTION Decal, Hood LH Decal, Caution, Battery Decal, Fender Warning Eng/Fr Decal, V-Belt Sch. DESCRIPTION 1 59192 Cap, Tire valve 2 65139 Stem, Valve 3 124157X Tire, Front 4 59904 Tube, Front (Service item only) 5 106732X624 Rim assembly, ...
...Operator's E&F Manual, Parts E&F WHEELS & TIRES 1 2 5,8 7 6 4,10 3,9 11 wheel_1 KEY PART NO. inches 1 inch = 25.4 mm 2 MODEL NUMBER PO16542LT (96012008900), PRODUCT NO. 960 12 00-89 DECALS 7 12 9 2 14 15 5 5 16 4 3 17 KEY PART NO. Decal, Handle Lft Height Adj. ... 145005 16 411658 17 160396 - - 138311 - - 425001 - - 424992 DESCRIPTION Decal, Hood LH Decal, Caution, Battery Decal, Fender Warning Eng/Fr Decal, V-Belt Sch. DESCRIPTION 1 59192 Cap, Tire valve 2 65139 Stem, Valve 3 124157X Tire, Front 4 59904 Tube, Front (Service item only) 5 106732X624 Rim assembly, ...
Parts List
Page 9
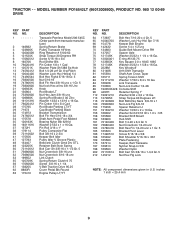
... Gr. 5 165 165623 Bracket Pivot Lever 166 17490510 Screw 5/16-18 x 5/8 168 165492 Bolt Shoulder 5/16-18 x .561 169 165580 Plate Fastening 170 187414 Keeper, Belt Transaxle 197 169613 Nyliner Snap-In 5/8 198 169593 Washer Nylon 202 72110614 Bolt Carr Sh 3/8-16 x 1-3/4 Gr. 5 212 145212 Nut Hex Flg Lock NOTE: All...16 Unc Knob Rod Brake LT Nut Hex Jam 3/8-16 unc Spring Rod Brake 2 00 Zinc Washer 13/32 x 13/16 x 16 Ga. MODEL NUMBER PO16542LT (96012008900), PRODUCT NO. 960 12 00-89 DRIVE KEY PART NO. Pin Cotter 1/8 x 3/4 Cad Rod Brake Parking LT/YT Cap Brake Parking Black Bracket ...
... Gr. 5 165 165623 Bracket Pivot Lever 166 17490510 Screw 5/16-18 x 5/8 168 165492 Bolt Shoulder 5/16-18 x .561 169 165580 Plate Fastening 170 187414 Keeper, Belt Transaxle 197 169613 Nyliner Snap-In 5/8 198 169593 Washer Nylon 202 72110614 Bolt Carr Sh 3/8-16 x 1-3/4 Gr. 5 212 145212 Nut Hex Flg Lock NOTE: All...16 Unc Knob Rod Brake LT Nut Hex Jam 3/8-16 unc Spring Rod Brake 2 00 Zinc Washer 13/32 x 13/16 x 16 Ga. MODEL NUMBER PO16542LT (96012008900), PRODUCT NO. 960 12 00-89 DRIVE KEY PART NO. Pin Cotter 1/8 x 3/4 Cad Rod Brake Parking LT/YT Cap Brake Parking Black Bracket ...

Parts List
Page 17
...unc Arm Assembly, Pad, Brake Washer, Hardened Arm, Idler Spacer, Retainer Guard TUV Idler Knob Round V-Belt, 42" Mower Anchor Spring Brake Mower Bracket Arm Idler 42" Keeper Belt 42" Clutch Cable Pulley Idler Flat Bolt Carriage Idler Spring Extension Spring Return Idler Retainer Spring Yellow Washer... 9/32 x 3/4 x 10 Ga. inches 1 inch = 25.4 mm 17 ging and discharging) - - 134149 Blade, Mulching 42" Std (for bag- MODEL NUMBER PO16542LT (96012008900), ...
...unc Arm Assembly, Pad, Brake Washer, Hardened Arm, Idler Spacer, Retainer Guard TUV Idler Knob Round V-Belt, 42" Mower Anchor Spring Brake Mower Bracket Arm Idler 42" Keeper Belt 42" Clutch Cable Pulley Idler Flat Bolt Carriage Idler Spring Extension Spring Return Idler Retainer Spring Yellow Washer... 9/32 x 3/4 x 10 Ga. inches 1 inch = 25.4 mm 17 ging and discharging) - - 134149 Blade, Mulching 42" Std (for bag- MODEL NUMBER PO16542LT (96012008900), ...

