
User Manual
Page 2
... or other debris build-up the slope or if you may lose control of riding mower-related injuries. These operators should evaluate their ability to operate the riding mower safely enough to cool before operat- Wash hands tip-over accidents, which could cause ...Allow machine to protect themselves and others from serious injury. • Follow the manufacturer's recommendation for all times. • Only allow the mower deck to a complete stop engine, and remove keys before and while back- The machine could overturn the machine. after handling. • Mow...
... or other debris build-up the slope or if you may lose control of riding mower-related injuries. These operators should evaluate their ability to operate the riding mower safely enough to cool before operat- Wash hands tip-over accidents, which could cause ...Allow machine to protect themselves and others from serious injury. • Follow the manufacturer's recommendation for all times. • Only allow the mower deck to a complete stop engine, and remove keys before and while back- The machine could overturn the machine. after handling. • Mow...
User Manual
Page 3
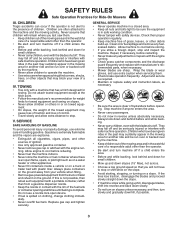
...suddenly appear in the mowing area for small children. • Never carry children, even with manufacturer's recommended parts, when necessary. • Mower blades are often attracted to stop and inspect the machine. SAFETY RULES Safe Operation Practices for towed equipment and towing on slopes. • ... of the fuel tank or container opening at the hitch point. • Follow the manufacturer's recommendation for weight limits for Ride-On Mowers III. Children are sharp. CHILDREN Tragic accidents can occur if the operator is spilled on a truck or trailer bed with the blades ...
...suddenly appear in the mowing area for small children. • Never carry children, even with manufacturer's recommended parts, when necessary. • Mower blades are often attracted to stop and inspect the machine. SAFETY RULES Safe Operation Practices for towed equipment and towing on slopes. • ... of the fuel tank or container opening at the hitch point. • Follow the manufacturer's recommendation for weight limits for Ride-On Mowers III. Children are sharp. CHILDREN Tragic accidents can occur if the operator is spilled on a truck or trailer bed with the blades ...

User Manual
Page 8
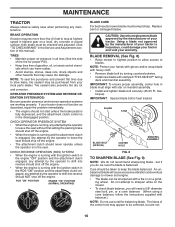
...belts are routed correctly. Operate them before you learn how to operate your tractor were overinflated at the factory for leveling). ✓ Check mower and drive belts. PLEASE REVIEW THE FOLLOWING CHECKLIST: ✓ All assembly instructions have been completed. ✓ No remaining loose parts in ...USE YOUR TRACTOR, PAY EXTRA ATTENTION TO THE FOLLOWING IMPORTANT ITEMS: ✓ Engine oil is at the factory). ✓ Be sure mower deck is operating properly. Correct tire pressure is important for best cutting performance. • Reduce tire pressure to PSI shown on your tractor...
...belts are routed correctly. Operate them before you learn how to operate your tractor were overinflated at the factory for leveling). ✓ Check mower and drive belts. PLEASE REVIEW THE FOLLOWING CHECKLIST: ✓ All assembly instructions have been completed. ✓ No remaining loose parts in ...USE YOUR TRACTOR, PAY EXTRA ATTENTION TO THE FOLLOWING IMPORTANT ITEMS: ✓ Engine oil is at the factory). ✓ Be sure mower deck is operating properly. Correct tire pressure is important for best cutting performance. • Reduce tire pressure to PSI shown on your tractor...

User Manual
Page 9
... OPERATION SYSTEM (ROS) ENGINE ON ENGINE START PARKING BRAKE PARKING BRAKE PARKING BRAKE LOCKED UNLOCKED OVER TEMP LIGHT FUEL OIL PRESSURE BATTERY REVERSE FORWARD MOWER HEIGHT 15 MOWER LIFT 15 ATTACHMENT ATTACHMENT CLUTCH DISENGAGED CLUTCH ENGAGED BRAKE/CLUTCH PEDAL KEEP AREA CLEAR SLOPE HAZARDS (SEE SAFETY RULES SECTION) LIGHTS ON FREE WHEEL...
... OPERATION SYSTEM (ROS) ENGINE ON ENGINE START PARKING BRAKE PARKING BRAKE PARKING BRAKE LOCKED UNLOCKED OVER TEMP LIGHT FUEL OIL PRESSURE BATTERY REVERSE FORWARD MOWER HEIGHT 15 MOWER LIFT 15 ATTACHMENT ATTACHMENT CLUTCH DISENGAGED CLUTCH ENGAGED BRAKE/CLUTCH PEDAL KEEP AREA CLEAR SLOPE HAZARDS (SEE SAFETY RULES SECTION) LIGHTS ON FREE WHEEL...

User Manual
Page 10
... BEFORE OPERATING YOUR TRACTOR Compare the illustrations with your tractor. ATTACHMENT CLUTCH LEVER - Used to raise, lower, and adjust the mower deck or other attachments mounted to your tractor to familiarize yourself with the locations of the American National Standards Institute. Locks clutch/brake... tractor and starting the engine. CLUTCH/BRAKE PEDAL - LIFT LEVER PLUNGER - Selects the speed and direction of mower deck or other attachments mounted to engage the mower blades, or other powered attachment while in reverse. Turns the headlights on and off. THROTTLE/CHOKE CONTROL - ...
... BEFORE OPERATING YOUR TRACTOR Compare the illustrations with your tractor. ATTACHMENT CLUTCH LEVER - Used to raise, lower, and adjust the mower deck or other attachments mounted to your tractor to familiarize yourself with the locations of the American National Standards Institute. Locks clutch/brake... tractor and starting the engine. CLUTCH/BRAKE PEDAL - LIFT LEVER PLUNGER - Selects the speed and direction of mower deck or other attachments mounted to engage the mower blades, or other powered attachment while in reverse. Turns the headlights on and off. THROTTLE/CHOKE CONTROL - ...

User Manual
Page 11
..., grass over spectacles or standard safety glasses. When engine is approximately 1-1/2 to "DISENGAGED" position. FIG. 5 STOPPING (See Fig. 5) MOWER BLADES • To stop engine when stopping tractor on grass areas. IMPORTANT: LEAVING THE IGNITION SWITCH IN ANY POSITION OTHER THAN "OFF" WILL... recommend a wide vision safety mask over 6 inches in "ENGAGED" position and release pressure from the ground to desired position. TO ADJUST MOWER CUTTING HEIGHT (See Fig. 5) The position of grass. Make sure parking brake will shut off the engine. • Depress clutch/brake...
..., grass over spectacles or standard safety glasses. When engine is approximately 1-1/2 to "DISENGAGED" position. FIG. 5 STOPPING (See Fig. 5) MOWER BLADES • To stop engine when stopping tractor on grass areas. IMPORTANT: LEAVING THE IGNITION SWITCH IN ANY POSITION OTHER THAN "OFF" WILL... recommend a wide vision safety mask over 6 inches in "ENGAGED" position and release pressure from the ground to desired position. TO ADJUST MOWER CUTTING HEIGHT (See Fig. 5) The position of grass. Make sure parking brake will shut off the engine. • Depress clutch/brake...

User Manual
Page 12
...is dangerous. TOWING CARTS AND OTHER ATTACHMENTS Tow only the attachments that are recommended by engaging attachment clutch control. • TO STOP MOWER BLADES - Any attempt by the operator to engine "ON" position. USING THE REVERSE OPERATION SYSTEM • Depress clutch/brake pedal...• Move gearshift lever to 1st gear. WARNING: Backing up or down hills. • Avoid stopping or changing speed on mowers so equipped, or the deflector shield in reverse unless absolutely necessary. Too heavy of tying hood to tractor. ATTACHMENT CLUTCH LEVER "...
...is dangerous. TOWING CARTS AND OTHER ATTACHMENTS Tow only the attachments that are recommended by engaging attachment clutch control. • TO STOP MOWER BLADES - Any attempt by the operator to engine "ON" position. USING THE REVERSE OPERATION SYSTEM • Depress clutch/brake pedal...• Move gearshift lever to 1st gear. WARNING: Backing up or down hills. • Avoid stopping or changing speed on mowers so equipped, or the deflector shield in reverse unless absolutely necessary. Too heavy of tying hood to tractor. ATTACHMENT CLUTCH LEVER "...
User Manual
Page 14
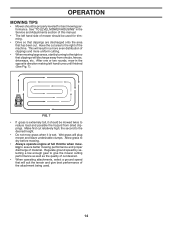
... rounds, mow in the opposite direction making left hand side of the machine. Regulate ground speed by turning to the right so that will plug mower and leave undesirable clumps. FIG. 7 • If grass is wet. Have the cut relatively high; Make first cut area to the right of... mower should be used . 14 Wet grass will suit the terrain and give the mower cutting performance as well as the quality of material. the second to assure better mowing performance and proper discharge...
... rounds, mow in the opposite direction making left hand side of the machine. Regulate ground speed by turning to the right so that will plug mower and leave undesirable clumps. FIG. 7 • If grass is wet. Have the cut relatively high; Make first cut area to the right of... mower should be used . 14 Wet grass will suit the terrain and give the mower cutting performance as well as the quality of material. the second to assure better mowing performance and proper discharge...

User Manual
Page 15
... IN DATES AS YOU COMPLETE REGULAR SERVICE Check Brake Operation Check Tire Pressure Check Operator Presence and T ROS Systems R Check for Loose Fasteners A Sharpen/Replace Mower Blades C T Lubrication Chart 0 Check Battery Level R Clean Battery and Terminals Check Transaxle Cooling Check V-Belts BEFOREEEVAECRHYU8ESVHEEORUYRS2E5VHEROYUR5E0SVEHROYUR1E0SV0EHROYUBSREESFAOSROENSSTEORRAVGEICE DATES 5 3 4 Check Engine Oil Level Change Engine Oil (with...
... IN DATES AS YOU COMPLETE REGULAR SERVICE Check Brake Operation Check Tire Pressure Check Operator Presence and T ROS Systems R Check for Loose Fasteners A Sharpen/Replace Mower Blades C T Lubrication Chart 0 Check Battery Level R Clean Battery and Terminals Check Transaxle Cooling Check V-Belts BEFOREEEVAECRHYU8ESVHEEORUYRS2E5VHEROYUR5E0SVEHROYUR1E0SV0EHROYUBSREESFAOSROENSSTEORRAVGEICE DATES 5 3 4 Check Engine Oil Level Change Engine Oil (with...
User Manual
Page 16
...THIS SIDE UP" facing deck and mandrel assembly. ROS "ON" POSITION ENGINE "ON" POSITION (NORMAL OPERATING) BLADE CARE For best results mower blades must be kept sharp. CAUTION: Use only a replacement blade approved by the manufacturer of this manual). Using a blade not approved by...will need a 5/8" diameter steel bolt, pin, or a cone balancer. (When using a cone balancer, follow the instructions supplied with star on the mower. • To check blade balance, you do not recommend sharpening blade - BLADE STAR 02545 BLADE BOLT (SPECIAL) CENTER HOLE MANDREL ASSEMBLY FIG. 8...
...THIS SIDE UP" facing deck and mandrel assembly. ROS "ON" POSITION ENGINE "ON" POSITION (NORMAL OPERATING) BLADE CARE For best results mower blades must be kept sharp. CAUTION: Use only a replacement blade approved by the manufacturer of this manual). Using a blade not approved by...will need a 5/8" diameter steel bolt, pin, or a cone balancer. (When using a cone balancer, follow the instructions supplied with star on the mower. • To check blade balance, you do not recommend sharpening blade - BLADE STAR 02545 BLADE BOLT (SPECIAL) CENTER HOLE MANDREL ASSEMBLY FIG. 8...

User Manual
Page 18
... are properly positioned. • Immediately wipe up any spilled gasoline. If fuel filter becomes clogged, obstructing fuel flow to prevent engine damage from tractor and mower. 18 CLAMP CLAMP FUEL FILTER FIG. 12 CLEANING • Clean engine, battery, seat, finish, etc. of all foreign matter. • Keep finished surfaces and wheels...
... are properly positioned. • Immediately wipe up any spilled gasoline. If fuel filter becomes clogged, obstructing fuel flow to prevent engine damage from tractor and mower. 18 CLAMP CLAMP FUEL FILTER FIG. 12 CLEANING • Clean engine, battery, seat, finish, etc. of all foreign matter. • Keep finished surfaces and wheels...

User Manual
Page 19
... suspension arms to rear deck brackets and secure with small retainer spring. • Install belt onto engine pulley. TRACTOR TO REMOVE MOWER (See Fig. 13) Mower will be easier to remove from the right side of tractor. • Place attachment clutch in "DISENGAGED" position. • Move...retainer spring, slide collar off and push housing guide out of tractor. • Lower lift lever to its highest position. • Slide mower under tractor with deflector shield to right side of bracket. • Disconnect anti-swaybar from chassis bracket by removing retainer spring. • Disconnect...
... suspension arms to rear deck brackets and secure with small retainer spring. • Install belt onto engine pulley. TRACTOR TO REMOVE MOWER (See Fig. 13) Mower will be easier to remove from the right side of tractor. • Place attachment clutch in "DISENGAGED" position. • Move...retainer spring, slide collar off and push housing guide out of tractor. • Lower lift lever to its highest position. • Slide mower under tractor with deflector shield to right side of bracket. • Disconnect anti-swaybar from chassis bracket by removing retainer spring. • Disconnect...

User Manual
Page 20
...midpoint of both sides of adjustment nut will not properly adjust your mower. To obtain the best cutting results, the mower housing should be adjusted so that side. BOTTOM EDGE OF MOWER TO GROUND BOTTOM EDGE OF MOWER TO GROUND • When distance "D" is necessary, make adjustment on...THE FOLLOWING FRONT-TO-BACK ADJUSTMENT IS NECESSARY, BE SURE TO ADJUST BOTH FRONT LINKS EQUALLY SO MOWER WILL STAY LEVEL SIDE-TO-SIDE. SERVICE AND ADJUSTMENTS TO LEVEL MOWER HOUSING Adjust the mower while tractor is approximately 1/8" to 1/2" lower than rear, tighten nut "F" against trunnion on ...
...midpoint of both sides of adjustment nut will not properly adjust your mower. To obtain the best cutting results, the mower housing should be adjusted so that side. BOTTOM EDGE OF MOWER TO GROUND BOTTOM EDGE OF MOWER TO GROUND • When distance "D" is necessary, make adjustment on...THE FOLLOWING FRONT-TO-BACK ADJUSTMENT IS NECESSARY, BE SURE TO ADJUST BOTH FRONT LINKS EQUALLY SO MOWER WILL STAY LEVEL SIDE-TO-SIDE. SERVICE AND ADJUSTMENTS TO LEVEL MOWER HOUSING Adjust the mower while tractor is approximately 1/8" to 1/2" lower than rear, tighten nut "F" against trunnion on ...
User Manual
Page 21
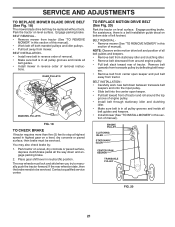
... top groove of this manual). • Work belt off both mandrel pulleys and idler pulleys. • Pull belt away from tractor (See "TO REMOVE MOWER" in this section of manual). BELT INSTALLATION • Install new belt in reverse order of removal. • Make sure belt is in all pulley grooves... and inside all belt guides. • Install mower in reverse order of left footrest. IDLER PULLEYS MANDREL PULLEYS FIG. 18 TO CHECK BRAKE If tractor requires more than five (5) feet to be serviced...
... top groove of this manual). • Work belt off both mandrel pulleys and idler pulleys. • Pull belt away from tractor (See "TO REMOVE MOWER" in this section of manual). BELT INSTALLATION • Install new belt in reverse order of removal. • Make sure belt is in all pulley grooves... and inside all belt guides. • Install mower in reverse order of left footrest. IDLER PULLEYS MANDREL PULLEYS FIG. 18 TO CHECK BRAKE If tractor requires more than five (5) feet to be serviced...

User Manual
Page 22
.... 22) • Block up axle securely. • Remove axle cover, retaining ring and washers to the lowest position. NOTE: When the tractor rear wheels move mower deck height to allow wheel removal (rear wheel contains a square key - Always wear eye protection when around batteries. DO NOT USE YOUR TRACTOR BATTERY TO...
.... 22) • Block up axle securely. • Remove axle cover, retaining ring and washers to the lowest position. NOTE: When the tractor rear wheels move mower deck height to allow wheel removal (rear wheel contains a square key - Always wear eye protection when around batteries. DO NOT USE YOUR TRACTOR BATTERY TO...
User Manual
Page 24
When mower is to be disconnected and battery cleaned thoroughly (see "TO CLEAN BATTERY AND TERMINALS" in the Maintenance section of this manual). nance section of time ... ALCOHOL BLENDED FUELS (CALLED GASOHOL OR USING ETHANOL OR METHANOL) CAN ATTRACT MOISTURE WHICH LEADS TO SEPARATION AND FORMATION OF ACIDS DURING STORAGE. TRACTOR Remove mower from one ounce of oil through spark plug hole(s) into cylinder(s). • Turn ignition key to "START" position for a few seconds to distribute oil. •...
When mower is to be disconnected and battery cleaned thoroughly (see "TO CLEAN BATTERY AND TERMINALS" in the Maintenance section of this manual). nance section of time ... ALCOHOL BLENDED FUELS (CALLED GASOHOL OR USING ETHANOL OR METHANOL) CAN ATTRACT MOISTURE WHICH LEADS TO SEPARATION AND FORMATION OF ACIDS DURING STORAGE. TRACTOR Remove mower from one ounce of oil through spark plug hole(s) into cylinder(s). • Turn ignition key to "START" position for a few seconds to distribute oil. •...

User Manual
Page 25
.... 4. Faulty ignition switch. 8. Depress clutch/brake pedal. 2. Check/replace ignition switch. 8. Engine clicks but will not turn over 1. Loss of grass, leaves and trash under mower. 4. Dirty air filter. 5. Dirty fuel filter. 8. Dirty/clogged muffler. 13. Replace fuel filter. 8. Tighten loose part(s). Dirty air filter. 6. Weak or dead battery. 4. Loose ... or starter. 9. Weak or dead battery. 2. Recharge or replace battery. 2. Cutting too much grass/too fast. 2. Loose or damaged wiring. 14. Carburetor out of mower housing. 4. Clean underside of adjustment. 15.
.... 4. Faulty ignition switch. 8. Depress clutch/brake pedal. 2. Check/replace ignition switch. 8. Engine clicks but will not turn over 1. Loss of grass, leaves and trash under mower. 4. Dirty air filter. 5. Dirty fuel filter. 8. Dirty/clogged muffler. 13. Replace fuel filter. 8. Tighten loose part(s). Dirty air filter. 6. Weak or dead battery. 4. Loose ... or starter. 9. Weak or dead battery. 2. Recharge or replace battery. 2. Cutting too much grass/too fast. 2. Loose or damaged wiring. 14. Carburetor out of mower housing. 4. Clean underside of adjustment. 15.
User Manual
Page 26
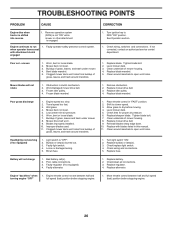
...TROUBLESHOOTING POINTS PROBLEM CAUSE Engine dies when tractor is "OFF". 2. when operator leaves seat with blades listed in this manual. 11. Level mower deck. 3. Replace blade mandrel. 5. Clean around mandrels to open vent holes. Frozen idler pulley. 4. Frozen blade mandrel. 1. Shift ...down. 10. Light switch is shifted into reverse 1. Check/replace light switch. 4. Buildup of grass, leaves and trash under mower. 4. Clogged mower deck vent holes from buildup of grass, leaves, and trash around mandrels. 1. Place throttle control in clutch mechanism. 2. ...
...TROUBLESHOOTING POINTS PROBLEM CAUSE Engine dies when tractor is "OFF". 2. when operator leaves seat with blades listed in this manual. 11. Level mower deck. 3. Replace blade mandrel. 5. Clean around mandrels to open vent holes. Frozen idler pulley. 4. Frozen blade mandrel. 1. Shift ...down. 10. Light switch is shifted into reverse 1. Check/replace light switch. 4. Buildup of grass, leaves and trash under mower. 4. Clogged mower deck vent holes from buildup of grass, leaves, and trash around mandrels. 1. Place throttle control in clutch mechanism. 2. ...
Parts List
Page 7
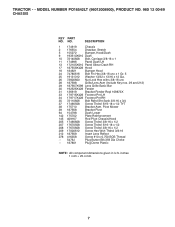
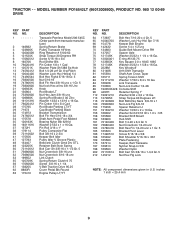
TRACTOR - - NO. MODEL NUMBER PO16542LT (96012008900), PRODUCT NO. 960 12 00-89 CHASSIS KEY PART NO. inches 1 inch = 25.4 mm. 7 DESCRIPTION 1 174619 Chassis 2 176554 Drawbar, Stretch 5 155272 Bumper, Hood/Dash 9 ... LH 34 179717X428 Footrest Pnt RH 35 72110606 Bolt Rdhd Sht Sqnk 3/8-16 x 3/4 37 17490508 Screw Thdrol 5/16-18 x 1/2 TYT 38 175710 Bracket Asm. Pivot Mower 39 187568 Bracket Pivot 64 154798 Dash Lower 142 175702 Plate Reinforcement 145 409167 Rod Pivot Chassis/Hood 205 17490608 Screw Thdrol 3/8-16 x 1/2 207 17670508...
TRACTOR - - NO. MODEL NUMBER PO16542LT (96012008900), PRODUCT NO. 960 12 00-89 CHASSIS KEY PART NO. inches 1 inch = 25.4 mm. 7 DESCRIPTION 1 174619 Chassis 2 176554 Drawbar, Stretch 5 155272 Bumper, Hood/Dash 9 ... LH 34 179717X428 Footrest Pnt RH 35 72110606 Bolt Rdhd Sht Sqnk 3/8-16 x 3/4 37 17490508 Screw Thdrol 5/16-18 x 1/2 TYT 38 175710 Bracket Asm. Pivot Mower 39 187568 Bracket Pivot 64 154798 Dash Lower 142 175702 Plate Reinforcement 145 409167 Rod Pivot Chassis/Hood 205 17490608 Screw Thdrol 3/8-16 x 1/2 207 17670508...
Parts List
Page 9
... x 4 Gr. 5 65 10040700 Washer Lock Hvy Hlcl Spr 7/16 66 154778 Keeper Belt Engine 69 142432 Screw 1/4 x 1/2 unc 70 134683 Guide Belt Mower Drive RH 74 137057 Spacer Axle 75 121749X Washer 25/32 x 1 1/4 x 16 Ga. 76 12000001 E-ring #5133-75 77 123583X Key Square 2 0... Washer Nylon 202 72110614 Bolt Carr Sh 3/8-16 x 1-3/4 Gr. 5 212 145212 Nut Hex Flg Lock NOTE: All component dimensions given in U.S. TRACTOR - - MODEL NUMBER PO16542LT (96012008900), PRODUCT NO. 960 12 00-89 DRIVE KEY PART NO. inches 1 inch = 25.4 mm 9 NO. 1 ------- 2 146682 3 123666X 4 12000028 5 121520X...
... x 4 Gr. 5 65 10040700 Washer Lock Hvy Hlcl Spr 7/16 66 154778 Keeper Belt Engine 69 142432 Screw 1/4 x 1/2 unc 70 134683 Guide Belt Mower Drive RH 74 137057 Spacer Axle 75 121749X Washer 25/32 x 1 1/4 x 16 Ga. 76 12000001 E-ring #5133-75 77 123583X Key Square 2 0... Washer Nylon 202 72110614 Bolt Carr Sh 3/8-16 x 1-3/4 Gr. 5 212 145212 Nut Hex Flg Lock NOTE: All component dimensions given in U.S. TRACTOR - - MODEL NUMBER PO16542LT (96012008900), PRODUCT NO. 960 12 00-89 DRIVE KEY PART NO. inches 1 inch = 25.4 mm 9 NO. 1 ------- 2 146682 3 123666X 4 12000028 5 121520X...


