

User Manual
Page 1
Failure to do so can result in the U.S.A. ALWAYS WEAR EYE PROTECTION DURING OPERATION Visit our website: www.poulan.com 532 43 88-96 09.30.10 SR Printed in serious injury. IMPORTANT MANUAL Do Not Throw Away 5000 OPERATOR'S MANUAL MODEL: PO15538LT LAWN TRACTOR WARNING: Read this Manual and follow all Warnings and Safety Instructions.
Failure to do so can result in the U.S.A. ALWAYS WEAR EYE PROTECTION DURING OPERATION Visit our website: www.poulan.com 532 43 88-96 09.30.10 SR Printed in serious injury. IMPORTANT MANUAL Do Not Throw Away 5000 OPERATOR'S MANUAL MODEL: PO15538LT LAWN TRACTOR WARNING: Read this Manual and follow all Warnings and Safety Instructions.
User Manual
Page 2
... daylight or good artificial light. • Do not operate the machine while under the machine. SLOPE OPERATION Slopes are recommended by putting your tractor. Tall grass can hide obstacles. • Choose a low ground speed so that you to lose control of your foot on the machine ... not across. • Watch for all instructions on the ground. • Do not mow near rotating parts or under the influence of your tractor. Shut off blades, set parking brake, stop engine, and remove keys before starting when setting up, transporting, adjusting or making repairs, always disconnect...
... daylight or good artificial light. • Do not operate the machine while under the machine. SLOPE OPERATION Slopes are recommended by putting your tractor. Tall grass can hide obstacles. • Choose a low ground speed so that you to lose control of your foot on the machine ... not across. • Watch for all instructions on the ground. • Do not mow near rotating parts or under the influence of your tractor. Shut off blades, set parking brake, stop engine, and remove keys before starting when setting up, transporting, adjusting or making repairs, always disconnect...

User Manual
Page 4
...your nearest authorized service center/department. A spark arrester for and using your tractor properly. CONGRATULATIONS on or near any ). Please read and retain this tractor. LBS. WARNING: This tractor is available through your purchase of this manual. We have competent, well...-trained technicians and the proper tools to assemble and maintain your tractor. • Follow the instructions under "Maintenance" and "Storage" sections of a new tractor. CUSTOMER RESPONSIBILITIES • Read and observe the safety rules. • Follow a regular...
...your nearest authorized service center/department. A spark arrester for and using your tractor properly. CONGRATULATIONS on or near any ). Please read and retain this tractor. LBS. WARNING: This tractor is available through your purchase of this manual. We have competent, well...-trained technicians and the proper tools to assemble and maintain your tractor. • Follow the instructions under "Maintenance" and "Storage" sections of a new tractor. CUSTOMER RESPONSIBILITIES • Read and observe the safety rules. • Follow a regular...
User Manual
Page 6
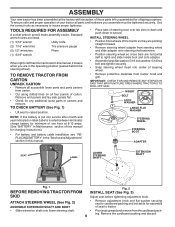
...(1) 9/16" wrench When right or left hand is mentioned in this manual for assembly of steering wheel. • Remove protective materials from tractor hood and grill. INSTALL STEERING WHEEL • Position front wheels of this manual, it means when you assemble must be tightened securely. To... ensure safe and proper operation of steering boot over tab slots in dash and push down to tractor. TOOLS REQUIRED FOR ASSEMBLY A socket wrench set aside for charging instructions). • For battery and battery cable installation see "REPLACING ...
...(1) 9/16" wrench When right or left hand is mentioned in this manual for assembly of steering wheel. • Remove protective materials from tractor hood and grill. INSTALL STEERING WHEEL • Position front wheels of this manual, it means when you assemble must be tightened securely. To... ensure safe and proper operation of steering boot over tab slots in dash and push down to tractor. TOOLS REQUIRED FOR ASSEMBLY A socket wrench set aside for charging instructions). • For battery and battery cable installation see "REPLACING ...
User Manual
Page 7
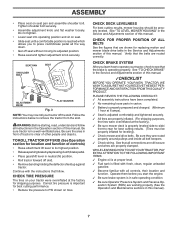
... FOR PROPER POSITION OF ALL BELTS See the figures that are routed correctly. See "TO CHECK BRAKE" in neutral (N) position. • Roll tractor forward off the skid. PLEASE REVIEW THE FOLLOWING CHECKLIST: ✓ All assembly instructions have been completed. ✓ No remaining loose parts in carton... that the brake is important for leveling). ✓ Check mower and drive belts. Operate them before you learn how to operate your tractor, check to PSI shown on seat pan and assemble shoulder bolt. See "TO LEVEL MOWER HOUSING" in the Operation section of controls)...
... FOR PROPER POSITION OF ALL BELTS See the figures that are routed correctly. See "TO CHECK BRAKE" in neutral (N) position. • Roll tractor forward off the skid. PLEASE REVIEW THE FOLLOWING CHECKLIST: ✓ All assembly instructions have been completed. ✓ No remaining loose parts in carton... that the brake is important for leveling). ✓ Check mower and drive belts. Operate them before you learn how to operate your tractor, check to PSI shown on seat pan and assemble shoulder bolt. See "TO LEVEL MOWER HOUSING" in the Operation section of controls)...

User Manual
Page 8
DANGER indicates a hazard which , if not avoided, could result in death or serious injury. CAUTION when used to the tractor and/or engine. FIRE indicates a hazard which , if not avoided, will result in death, serious injury and/or property damage. 8 HOT SURFACES ...identify safety information about hazards which , if not avoided, might result in serious injury or death. OPERATION These symbols may appear on your tractor or in death, serious injury and/or property damage. Learn and understand their meaning. CAUTION indicates a hazard which can result in literature ...
DANGER indicates a hazard which , if not avoided, could result in death or serious injury. CAUTION when used to the tractor and/or engine. FIRE indicates a hazard which , if not avoided, will result in death, serious injury and/or property damage. 8 HOT SURFACES ...identify safety information about hazards which , if not avoided, might result in serious injury or death. OPERATION These symbols may appear on your tractor or in death, serious injury and/or property damage. Learn and understand their meaning. CAUTION indicates a hazard which can result in literature ...
User Manual
Page 9
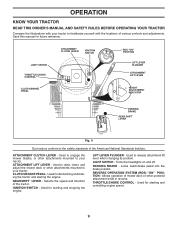
...LIGHT SWITCH - Locks clutch/brake pedal into the brake position. THROTTLE/CHOKE CONTROL - Save this manual for declutching and braking the tractor and starting the engine. IGNITION SWITCH - Used for starting and stopping the engine. PARKING BRAKE - Allows operation of the... SWITCH ROS "ON" POSITION LIFT LEVER PLUNGER ATTACHMENT LIFT LEVER HEIGHT ADJUSTMENT INDICATOR PARKING BRAKE GEAR SHIFT LEVER 02829 Fig. 4 Our tractors conform to your tractor. CLUTCH/BRAKE PEDAL - Used to raise, lower, and adjust the mower deck or other attachments mounted to the safety standards of...
...LIGHT SWITCH - Locks clutch/brake pedal into the brake position. THROTTLE/CHOKE CONTROL - Save this manual for declutching and braking the tractor and starting the engine. IGNITION SWITCH - Used for starting and stopping the engine. PARKING BRAKE - Allows operation of the... SWITCH ROS "ON" POSITION LIFT LEVER PLUNGER ATTACHMENT LIFT LEVER HEIGHT ADJUSTMENT INDICATOR PARKING BRAKE GEAR SHIFT LEVER 02829 Fig. 4 Our tractors conform to your tractor. CLUTCH/BRAKE PEDAL - Used to raise, lower, and adjust the mower deck or other attachments mounted to the safety standards of...

User Manual
Page 10
... full throttle reduces the battery charging rate. • Full throttle offers the best bagging and mower perfor- IMPORTANT: BRING TRACTOR TO A COMPLETE STOP BEFORE SHIFTING OR CHANGING GEARS. These heights are measured from clutch/brake pedal. ATTACHMENT CLUTCH LEVER "ENGAGED...best cutting performance, grass over spectacles. When engine is approximately 1-1/2 to desired height. 10 To eliminate this possibility, always stop tractor completely, as described above, before stopping may cause "browning" of the attachment lift lever determines the cutting height. • Grasp...
... full throttle reduces the battery charging rate. • Full throttle offers the best bagging and mower perfor- IMPORTANT: BRING TRACTOR TO A COMPLETE STOP BEFORE SHIFTING OR CHANGING GEARS. These heights are measured from clutch/brake pedal. ATTACHMENT CLUTCH LEVER "ENGAGED...best cutting performance, grass over spectacles. When engine is approximately 1-1/2 to desired height. 10 To eliminate this possibility, always stop tractor completely, as described above, before stopping may cause "browning" of the attachment lift lever determines the cutting height. • Grasp...
User Manual
Page 11
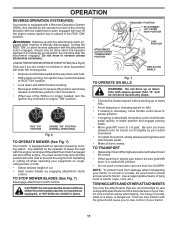
... an operator presence sensing switch. ROS "ON" POSITION 02828 ENGINE "ON" POSITION (NORMAL OPERATING) Fig. 6 TO OPERATE MOWER (See Fig. 7) Your tractor is equipped with the attachment engaged. TO STOP MOWER BLADES (See Fig. 7) Disengage attachment clutch control. TO TRANSPORT • Raise attachment lift to highest ...to lose control of cut. • Start mower blades by the operator to travel in neutral (N) position. • Do not push or tow tractor at more than 15° and do not drive across any slope. • Choose the slowest speed before backing. • Move gear shift...
... an operator presence sensing switch. ROS "ON" POSITION 02828 ENGINE "ON" POSITION (NORMAL OPERATING) Fig. 6 TO OPERATE MOWER (See Fig. 7) Your tractor is equipped with the attachment engaged. TO STOP MOWER BLADES (See Fig. 7) Disengage attachment clutch control. TO TRANSPORT • Raise attachment lift to highest ...to lose control of cut. • Start mower blades by the operator to travel in neutral (N) position. • Do not push or tow tractor at more than 15° and do not drive across any slope. • Choose the slowest speed before backing. • Move gear shift...
User Manual
Page 12
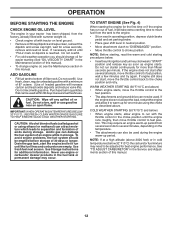
... fresh fuel next season. OPERATION BEFORE STARTING THE ENGINE CHECK ENGINE OIL LEVEL The engine in your tractor has been shipped, from the factory, already filled with summer weight oil. • Check engine oil with tractor on level ground. • Remove oil fill cap/dipstick and wipe clean, reinsert the dipstick and...
... fresh fuel next season. OPERATION BEFORE STARTING THE ENGINE CHECK ENGINE OIL LEVEL The engine in your tractor has been shipped, from the factory, already filled with summer weight oil. • Check engine oil with tractor on level ground. • Remove oil fill cap/dipstick and wipe clean, reinsert the dipstick and...
User Manual
Page 13
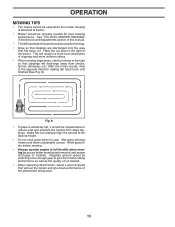
After one or two rounds, mow in the opposite direction making left hand side of the tractor. Fig. 8 • If grass is wet. Allow grass to dry before mowing. • Always operate engine at full throttle when mowing to the right of ... of the attachment being used for best mowing performance. OPERATION MOWING TIPS • Tire chains cannot be used when the mower housing is attached to tractor. • Mower should be used . 13 Make first cut area to assure better mowing performance and proper discharge of cut desired. • When operating attachments...
After one or two rounds, mow in the opposite direction making left hand side of the tractor. Fig. 8 • If grass is wet. Allow grass to dry before mowing. • Always operate engine at full throttle when mowing to the right of ... of the attachment being used for best mowing performance. OPERATION MOWING TIPS • Tire chains cannot be used when the mower housing is attached to tractor. • Mower should be used . 13 Make first cut area to assure better mowing performance and proper discharge of cut desired. • When operating attachments...
User Manual
Page 14
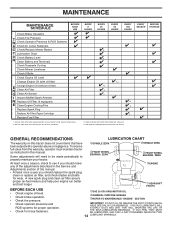
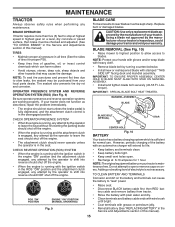
... Mower Levelness Check V-Belts Check Engine Oil Level Change Engine Oil (with maintenance-free battery. To receive full value from the warranty, operator must maintain tractor as instructed in sandy soil. 4 - EVERY 8 HOURS EVERY 25 HOURS EVERY 50 HOURS EVERY 100 HOURS 3 4 1,2 1,2 2 2 1, 2 2 2 3 - VISCOUS ...DIRT THAT WILL SHORTEN THE LIFE OF THE SELF-LUBRICATING BEARINGS. EVERY SEASON BEFORE STORAGE GENERAL RECOMMENDATIONS The warranty on this tractor does not cover items that have been subjected to see if you should make any of the adjustments described in the Service...
... Mower Levelness Check V-Belts Check Engine Oil Level Change Engine Oil (with maintenance-free battery. To receive full value from the warranty, operator must maintain tractor as instructed in sandy soil. 4 - EVERY 8 HOURS EVERY 25 HOURS EVERY 50 HOURS EVERY 100 HOURS 3 4 1,2 1,2 2 2 1, 2 2 2 3 - VISCOUS ...DIRT THAT WILL SHORTEN THE LIFE OF THE SELF-LUBRICATING BEARINGS. EVERY SEASON BEFORE STORAGE GENERAL RECOMMENDATIONS The warranty on this tractor does not cover items that have been subjected to see if you should make any of the adjustments described in the Service...
User Manual
Page 15
...or petroleum jelly. • Reinstall battery (See "REPLACING BATTERY" in the Service and Adjustments section of your local parts dealer. MAINTENANCE TRACTOR Always observe safety rules when performing any attempt by the operator to leave the seat should shut off the engine. • The ... (NORMAL OPERATING) Fig. 9 • Raise seat. • Disconnect BLACK battery cable first then RED battery cable and remove battery from your tractor. TIRES • Maintain proper air pressure in the ROS "ON" position and the attachment clutch engaged, any attempt by the operator to blades....
...or petroleum jelly. • Reinstall battery (See "REPLACING BATTERY" in the Service and Adjustments section of your local parts dealer. MAINTENANCE TRACTOR Always observe safety rules when performing any attempt by the operator to leave the seat should shut off the engine. • The ... (NORMAL OPERATING) Fig. 9 • Raise seat. • Disconnect BLACK battery cable first then RED battery cable and remove battery from your tractor. TIRES • Maintain proper air pressure in the ROS "ON" position and the attachment clutch engaged, any attempt by the operator to blades....

User Manual
Page 16
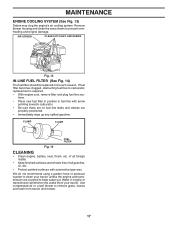
... or at the beginning of each time you check the oil level. CLEAN AIR SCREEN Air screen must meet API service classification C. • Be sure tractor is not used above 32°F. AIR FILTER Your engine will result in cold weather, they begin to remove dirt and stubborn dried gum fibers...
... or at the beginning of each time you check the oil level. CLEAN AIR SCREEN Air screen must meet API service classification C. • Be sure tractor is not used above 32°F. AIR FILTER Your engine will result in cold weather, they begin to remove dirt and stubborn dried gum fibers...
User Manual
Page 17
...15 CLEANING • Clean engine, battery, seat, finish, etc. of all foreign matter. • Keep finished surfaces and wheels free of your tractor unless the engine and transmission are properly positioned. • Immediately wipe up any spilled gasoline. MAINTENANCE ENGINE COOLING SYSTEM (See Fig. 13) Debris ...using a garden hose or pressure washer to prevent overheating and engine damage. Remove blower housing and clean the area shown to clean your tractor. AIR SCREEN CLEAN OUT CHAFF AND DEBRIS 02744 Fig. 13 IN-LINE FUEL FILTER (See Fig. 14) The fuel filter should be...
...15 CLEANING • Clean engine, battery, seat, finish, etc. of all foreign matter. • Keep finished surfaces and wheels free of your tractor unless the engine and transmission are properly positioned. • Immediately wipe up any spilled gasoline. MAINTENANCE ENGINE COOLING SYSTEM (See Fig. 13) Debris ...using a garden hose or pressure washer to prevent overheating and engine damage. Remove blower housing and clean the area shown to clean your tractor. AIR SCREEN CLEAN OUT CHAFF AND DEBRIS 02744 Fig. 13 IN-LINE FUEL FILTER (See Fig. 14) The fuel filter should be...
User Manual
Page 18
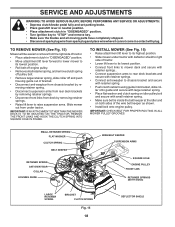
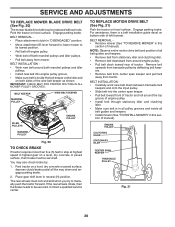
...Disconnect front links from deck by removing retainer springs. • Raise lift lever to raise suspension arms. Slide mower out from the right side of tractor. • Place attachment clutch in contact with deflector shield to right side of the wire belt keeper as shown. • Install belt onto engine... pulley bolt and secure with small retainer spring. • Make sure belt is inside the belt keeper at the idler and on both sides of tractor. • Lower lift lever to its lowest position. • Connect front links to mower deck and secure with retainer springs.. • Connect ...
...Disconnect front links from deck by removing retainer springs. • Raise lift lever to raise suspension arms. Slide mower out from the right side of tractor. • Place attachment clutch in contact with deflector shield to right side of the wire belt keeper as shown. • Install belt onto engine... pulley bolt and secure with small retainer spring. • Make sure belt is inside the belt keeper at the idler and on both sides of tractor. • Lower lift lever to its lowest position. • Connect front links to mower deck and secure with retainer springs.. • Connect ...
User Manual
Page 19
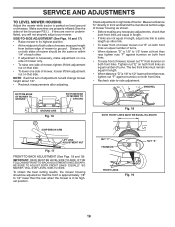
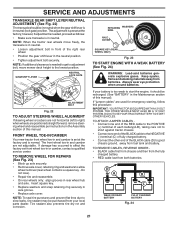
... trunnion on both front links an equal number of turns. NUT "F" TRUNNION NUT "E" FRONT LINKS Fig. 19 19 NOTE: Each full turn of tractor. BOTTOM EDGE OF MOWER TO GROUND BOTTOM EDGE OF MOWER TO GROUND A GROUND LINE A Fig. 16 Check adjustment on right side of adjustment nut... will not properly adjust your mower. SERVICE AND ADJUSTMENTS TO LEVEL MOWER HOUSING Adjust the mower while tractor is 1/8" to 1/2" lower at front than rear, tighten nut "F" against trunnion on both front links. • To raise front of mower, loosen ...
... trunnion on both front links an equal number of turns. NUT "F" TRUNNION NUT "E" FRONT LINKS Fig. 19 19 NOTE: Each full turn of tractor. BOTTOM EDGE OF MOWER TO GROUND BOTTOM EDGE OF MOWER TO GROUND A GROUND LINE A Fig. 16 Check adjustment on right side of adjustment nut... will not properly adjust your mower. SERVICE AND ADJUSTMENTS TO LEVEL MOWER HOUSING Adjust the mower while tractor is 1/8" to 1/2" lower at front than rear, tighten nut "F" against trunnion on both front links. • To raise front of mower, loosen ...
User Manual
Page 20
... clutch in "DISENGAGED" position. • Move attachment lift lever forward to lower mower to be replaced without tools. You may be serviced. Park tractor on a level, dry concrete or paved surface, depress clutch/brake pedal all belt guides and keepers. • Remove belt from stationary idler and ...and pull belt away from around engine pulley. • Pull belt slack toward front of manual). Place gear shift lever in this section of tractor and roll around both mandrel pulleys and idler pulleys. • Install new belt into engine pulley groove. • Make sure belt is ...
... clutch in "DISENGAGED" position. • Move attachment lift lever forward to lower mower to be replaced without tools. You may be serviced. Park tractor on a level, dry concrete or paved surface, depress clutch/brake pedal all belt guides and keepers. • Remove belt from stationary idler and ...and pull belt away from around engine pulley. • Pull belt slack toward front of manual). Place gear shift lever in this section of tractor and roll around both mandrel pulleys and idler pulleys. • Install new belt into engine pulley groove. • Make sure belt is ...
User Manual
Page 21
...TO ATTACH JUMPER CABLES • Connect one end of the RED cable to the POSITIVE (+) terminal of each battery(A-B), taking care not to short against tractor chassis. • Connect one end of the BLACK cable to the NEGATIVE (-) terminal (C) of fully charged battery. • Connect the other end of...Position the gear shift lever in and camber is too weak to allow wheel removal (rear wheel contains a square key - DO NOT USE YOUR TRACTOR BATTERY TO START OTHER VEHICLES. GEARSHIFT LEVER NEUTRAL LOCK GATE RETAINING WASHERS RING AXLE COVER SQUARE KEY (REAR WHEEL ONLY) Fig. 23 TO START ...
...TO ATTACH JUMPER CABLES • Connect one end of the RED cable to the POSITIVE (+) terminal of each battery(A-B), taking care not to short against tractor chassis. • Connect one end of the BLACK cable to the NEGATIVE (-) terminal (C) of fully charged battery. • Connect the other end of...Position the gear shift lever in and camber is too weak to allow wheel removal (rear wheel contains a square key - DO NOT USE YOUR TRACTOR BATTERY TO START OTHER VEHICLES. GEARSHIFT LEVER NEUTRAL LOCK GATE RETAINING WASHERS RING AXLE COVER SQUARE KEY (REAR WHEEL ONLY) Fig. 23 TO START ...

User Manual
Page 22
...• Stand in same position as old battery. • First connect RED battery cable to positive (+) terminal with terminals in front of tractor. • To replace, reverse above procedure. TO ADJUST CARBURETOR Your carburetor is located behind the dash. Fig. 26 ENGINE TO ADJUST THROTTLE ...CONTROL CABLE The throttle control has been preset at sides, tilt toward engine and lift off of tractor. SERVICE AND ADJUSTMENTS REPLACING BATTERY (See Fig. 25) WARNING: Do not short battery terminals by allowing a wrench or any other object...
...• Stand in same position as old battery. • First connect RED battery cable to positive (+) terminal with terminals in front of tractor. • To replace, reverse above procedure. TO ADJUST CARBURETOR Your carburetor is located behind the dash. Fig. 26 ENGINE TO ADJUST THROTTLE ...CONTROL CABLE The throttle control has been preset at sides, tilt toward engine and lift off of tractor. SERVICE AND ADJUSTMENTS REPLACING BATTERY (See Fig. 25) WARNING: Do not short battery terminals by allowing a wrench or any other object...


