

User Manual
Page 2
... and the mowing activity. area. Never remove gas cap or add fuel with safe machine operation. • Watch for Ride-On Mowers IMPORTANT: THIS CUTTING MACHINE IS CAPABLE OF AMPUTATING HANDS AND FEET AND THROWING OBJECTS. Never refuel the machine indoors. - SERVICE are ...attracted to be picked up and down before restarting. • Remove obstacles such as rocks, toys, wire, etc., the edge of riding mower-related injuries. Uneven terrain could suddenly turn on slopes unless necessary, and then, manual and on the machine before storage. • Use extra...
... and the mowing activity. area. Never remove gas cap or add fuel with safe machine operation. • Watch for Ride-On Mowers IMPORTANT: THIS CUTTING MACHINE IS CAPABLE OF AMPUTATING HANDS AND FEET AND THROWING OBJECTS. Never refuel the machine indoors. - SERVICE are ...attracted to be picked up and down before restarting. • Remove obstacles such as rocks, toys, wire, etc., the edge of riding mower-related injuries. Uneven terrain could suddenly turn on slopes unless necessary, and then, manual and on the machine before storage. • Use extra...

User Manual
Page 3
.... WARNING: Do not coast down slopes (15° Max), not across. • Remove obstacles such as rocks, tree limbs, etc. • Watch for Ride-On Mowers • Be sure the area is dangerous. Use common sense when towing. Tires can hide obstacles. • Use slow speed. Stop machine if anyone enters...
.... WARNING: Do not coast down slopes (15° Max), not across. • Remove obstacles such as rocks, tree limbs, etc. • Watch for Ride-On Mowers • Be sure the area is dangerous. Use common sense when towing. Tires can hide obstacles. • Use slow speed. Stop machine if anyone enters...

User Manual
Page 8
...10003; Seat is adjusted comfortably and tightened securely. ✓ All tires are properly clamped. Be sure they are routed correctly. See"TO LEVEL MOWER HOUSING"in "PRODUCT SPECIFICATIONS" section of this manual. Verify that the belts are routed properly around pulleys and inside all belt keepers. ✓... controls - Operate them before you learn how to operate your tractor were overinflated at the factory). ✓ Be sure mower deck is properly leveled side-to-side/ front-to-rear for best cutting performance. • Reduce tire pressure to PSI shown in...
...10003; Seat is adjusted comfortably and tightened securely. ✓ All tires are properly clamped. Be sure they are routed correctly. See"TO LEVEL MOWER HOUSING"in "PRODUCT SPECIFICATIONS" section of this manual. Verify that the belts are routed properly around pulleys and inside all belt keepers. ✓... controls - Operate them before you learn how to operate your tractor were overinflated at the factory). ✓ Be sure mower deck is properly leveled side-to-side/ front-to-rear for best cutting performance. • Reduce tire pressure to PSI shown in...

User Manual
Page 9
... OFF LIGHTS ON P ENGINE ON ENGINE START PARKING BRAKE PARKING BRAKE PARKING BRAKE LOCKED UNLOCKED OVER TEMP LIGHT FUEL OIL PRESSURE BATTERY REVERSE FORWARD MOWER HEIGHT 15 MOWER LIFT 15 ATTACHMENT ATTACHMENT CLUTCH ENGAGED CLUTCH DISENGAGED DANGER, KEEP HANDS AND FEET AWAY KEEP AREA CLEAR SLOPE HAZARDS (SEE SAFETY RULES SECTION) FREE...
... OFF LIGHTS ON P ENGINE ON ENGINE START PARKING BRAKE PARKING BRAKE PARKING BRAKE LOCKED UNLOCKED OVER TEMP LIGHT FUEL OIL PRESSURE BATTERY REVERSE FORWARD MOWER HEIGHT 15 MOWER LIFT 15 ATTACHMENT ATTACHMENT CLUTCH ENGAGED CLUTCH DISENGAGED DANGER, KEEP HANDS AND FEET AWAY KEEP AREA CLEAR SLOPE HAZARDS (SEE SAFETY RULES SECTION) FREE...

User Manual
Page 10
... PLUNGER ATTACHMENT LIFT LEVER CLUTCH/BRAKE PEDAL GEARSHIFT LEVER MOWER DECK HEIGHT ADJUSTMENT POSITIONS PARKING BRAKE FIG. 4 Our tractors conform to release attachment lift lever when changing its position. Used to engage the mower blades, or other attachments mounted to familiarize yourself with... your tractor to your tractor. Turns the headlights on and off. Used to raise, lower, and adjust the mower deck or other attachments mounted to your tractor. Used for starting and stopping the engine. 10 LIGHT SWITCH POSITION - CLUTCH/BRAKE PEDAL...
... PLUNGER ATTACHMENT LIFT LEVER CLUTCH/BRAKE PEDAL GEARSHIFT LEVER MOWER DECK HEIGHT ADJUSTMENT POSITIONS PARKING BRAKE FIG. 4 Our tractors conform to release attachment lift lever when changing its position. Used to engage the mower blades, or other attachments mounted to familiarize yourself with... your tractor to your tractor. Turns the headlights on and off. Used to raise, lower, and adjust the mower deck or other attachments mounted to your tractor. Used for starting and stopping the engine. 10 LIGHT SWITCH POSITION - CLUTCH/BRAKE PEDAL...

User Manual
Page 11
...CLUTCH/BRAKE PEDAL "DRIVE" POSITION PARKING BRAKE "DISENGAGED" POSITION IMPORTANT: BRING TRACTOR TO A COMPLETE STOP BEFORE SHIFTING OR CHANGING GEARS. TO ADJUST MOWER CUTTING HEIGHT (See Fig. 5) The position of the attachment lift lever determines the cutting height. • Grasp lift lever. • Press...in "BRAKE" position. GROUND DRIVE - with an operator presence sensing switch. Pedal should be mowed twice. FIG.5 STOPPING (See Fig. 5) MOWER BLADES • To stop engine. 11 For healthier and better looking lawns, mow often and after moderate growth. • Turn ignition key ...
...CLUTCH/BRAKE PEDAL "DRIVE" POSITION PARKING BRAKE "DISENGAGED" POSITION IMPORTANT: BRING TRACTOR TO A COMPLETE STOP BEFORE SHIFTING OR CHANGING GEARS. TO ADJUST MOWER CUTTING HEIGHT (See Fig. 5) The position of the attachment lift lever determines the cutting height. • Grasp lift lever. • Press...in "BRAKE" position. GROUND DRIVE - with an operator presence sensing switch. Pedal should be mowed twice. FIG.5 STOPPING (See Fig. 5) MOWER BLADES • To stop engine. 11 For healthier and better looking lawns, mow often and after moderate growth. • Turn ignition key ...

User Manual
Page 12
... push clutch/brake pedal quickly to brake position and engage parking brake. • Move gearshift lever to leave the seat with tractor on mowers so equipped,or the deflector shield in the Maintenance section of leaded gasoline will increase carbon and lead oxide deposits and reduce valve... down hills. • Avoid stopping or changing speed on rough, rolling terrain or hills. • Select desired height of cut. • Start mower blades by the operator to 1st gear. disengage attachment clutch control. Any attempt by engaging attachment clutch control. • TO STOP...
... push clutch/brake pedal quickly to brake position and engage parking brake. • Move gearshift lever to leave the seat with tractor on mowers so equipped,or the deflector shield in the Maintenance section of leaded gasoline will increase carbon and lead oxide deposits and reduce valve... down hills. • Avoid stopping or changing speed on rough, rolling terrain or hills. • Select desired height of cut. • Start mower blades by the operator to 1st gear. disengage attachment clutch control. Any attempt by engaging attachment clutch control. • TO STOP...

User Manual
Page 13
.... • Always operate engine at a high altitude (above . Drain the gas tank, start by selecting a low enough gear to give the mower cutting performance as well as described above 3000 feet) or in the choke position until the engine runs roughly, then move throttle control to reduce... storage of this manual. • The left hand turns until the fuel lines and carburetor are discharged onto the area that clippings will plug mower and leave undesirable clumps. NOTE: Before starting, read the warm and cold starting the engine for trimming. • Drive so that clippings are...
.... • Always operate engine at a high altitude (above . Drain the gas tank, start by selecting a low enough gear to give the mower cutting performance as well as described above 3000 feet) or in the choke position until the engine runs roughly, then move throttle control to reduce... storage of this manual. • The left hand turns until the fuel lines and carburetor are discharged onto the area that clippings will plug mower and leave undesirable clumps. NOTE: Before starting, read the warm and cold starting the engine for trimming. • Drive so that clippings are...

User Manual
Page 14
.... • Check brake operation. • Check tire pressure. • Check operator presence and interlock systems for proper operation. • Check for Loose Fasteners A Sharpen/Replace Mower Blades C T Lubrication Chart 0 Check Battery Level R Clean Battery and Terminals Check Transaxle Cooling Check V-Belts BEFOREEEVAECRHYU8ESVHEEORUYRS2E5VHEROYUR5E0SVEHROYUR1E0SV0EHROYUBSREESFAOSROEN STORAGE SERVICE DATES 5 3 4 Check Engine Oil Level Change Engine...
.... • Check brake operation. • Check tire pressure. • Check operator presence and interlock systems for proper operation. • Check for Loose Fasteners A Sharpen/Replace Mower Blades C T Lubrication Chart 0 Check Battery Level R Clean Battery and Terminals Check Transaxle Cooling Check V-Belts BEFOREEEVAECRHYU8ESVHEEORUYRS2E5VHEROYUR5E0SVEHROYUR1E0SV0EHROYUBSREESFAOSROEN STORAGE SERVICE DATES 5 3 4 Check Engine Oil Level Change Engine...

User Manual
Page 15
... also prevents tire dry rot and corrosion. Care should never operate unless the operator is balanced. Do not attempt to sharpen while on the mower. • To check blade balance, you will cause excessive vibration and eventual damage to leave the seat should shut off the engine. •...should remain in all tires (See"PRODUCT SPECIFICATIONS" section of this manual). If your local parts dealer. BLADE REMOVAL (See Fig. 8) • Raise mower to highest position to allow access to blades. • Remove blade bolt, lock washer and flat high speed in highest gear, then brake ...
... also prevents tire dry rot and corrosion. Care should never operate unless the operator is balanced. Do not attempt to sharpen while on the mower. • To check blade balance, you will cause excessive vibration and eventual damage to leave the seat should shut off the engine. •...should remain in all tires (See"PRODUCT SPECIFICATIONS" section of this manual). If your local parts dealer. BLADE REMOVAL (See Fig. 8) • Raise mower to highest position to allow access to blades. • Remove blade bolt, lock washer and flat high speed in highest gear, then brake ...

User Manual
Page 17
... sections. • Place new fuel filter in position in fuel line with a wire brush or compressed air to prevent engine damage from tractor and mower. 17 AIR FILTER Your engine will shorten the useful life of your tractor unless the engine and transmission are covered to remove grass, leaves and...
... sections. • Place new fuel filter in position in fuel line with a wire brush or compressed air to prevent engine damage from tractor and mower. 17 AIR FILTER Your engine will shorten the useful life of your tractor unless the engine and transmission are covered to remove grass, leaves and...

User Manual
Page 18
... deck brackets and secure with retainer springs. • Connect anti-swaybar to chassis bracket and secure with plug. TRACTOR TO REMOVE MOWER (See Fig. 13) Mower will be easier to remove from under tractor with deflector shield to right side of tractor. • Lower lift lever...Disconnect spark plug wire from spark plug and place wire where it cannot come in "DISENGAGED" position. • Move attachment lift lever forward to lower mower to its lowest position. • Roll belt off engine pulley. • Remove small retainer spring, and remove clutch spring off pulley bolt. •...
... deck brackets and secure with retainer springs. • Connect anti-swaybar to chassis bracket and secure with plug. TRACTOR TO REMOVE MOWER (See Fig. 13) Mower will be easier to remove from under tractor with deflector shield to right side of tractor. • Lower lift lever...Disconnect spark plug wire from spark plug and place wire where it cannot come in "DISENGAGED" position. • Move attachment lift lever forward to lower mower to its lowest position. • Roll belt off engine pulley. • Remove small retainer spring, and remove clutch spring off pulley bolt. •...

User Manual
Page 19
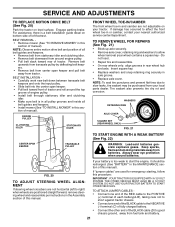
... DECK MUST BE LEVEL SIDE-TO-SIDE. Tighten nut "E" on both front links an equal number of adjustment nut will not properly adjust your mower. SERVICE AND ADJUSTMENTS • Push clutch cable housing guide into bracket, slide collar onto guide and secure with small retainer spring. • Install... than rear, tighten nuts "F" against trunnion on right side of this manual). SIDE-TO-SIDE ADJUSTMENT (See Figs. 14 and 15) • Raise mower to 1/2" lower at washer and clutch spring on both front links an equal number of turns. • When distance "D" is 1/8" to its highest ...
... DECK MUST BE LEVEL SIDE-TO-SIDE. Tighten nut "E" on both front links an equal number of adjustment nut will not properly adjust your mower. SERVICE AND ADJUSTMENTS • Push clutch cable housing guide into bracket, slide collar onto guide and secure with small retainer spring. • Install... than rear, tighten nuts "F" against trunnion on right side of this manual). SIDE-TO-SIDE ADJUSTMENT (See Figs. 14 and 15) • Raise mower to 1/2" lower at washer and clutch spring on both front links an equal number of turns. • When distance "D" is 1/8" to its highest ...

User Manual
Page 20
BELT REMOVAL • Place attachment clutch in "DISENGAGED" position. • Move attachment lift lever forward to lower mower to stop at highest speed in highest gear, further maintenance is equipped with re- Readjust if necessary. Engage parking brake. SUSPENSION...position. • Roll belt off engine pulley. • Disconnect R.H.suspension arm from mower. The rear wheels must be checked and adjusted. SERVICE AND ADJUSTMENTS TO REPLACE MOWER BLADE DRIVE BELT (See Fig. 18) The mower blade drive belt may be replaced. BELT INSTALLATION • Work new belt around both...
BELT REMOVAL • Place attachment clutch in "DISENGAGED" position. • Move attachment lift lever forward to lower mower to stop at highest speed in highest gear, further maintenance is equipped with re- Readjust if necessary. Engage parking brake. SUSPENSION...position. • Roll belt off engine pulley. • Disconnect R.H.suspension arm from mower. The rear wheels must be checked and adjusted. SERVICE AND ADJUSTMENTS TO REPLACE MOWER BLADE DRIVE BELT (See Fig. 18) The mower blade drive belt may be replaced. BELT INSTALLATION • Work new belt around both...
User Manual
Page 21
...acid batteries generate explosive gases. If your battery is in all pulley grooves and inside all belt guides and keepers. • Install mower (See "TO INSTALL MOWER" in or camber, contact your tractor. ENGINE PULLEY CLUTCHING IDLER STATIONARY IDLER FRONT WHEEL TOE-IN/CAMBER The front wheel toe-in... the MAINTENANCE section of manual). BELT REMOVAL • Remove mower (See "TO REMOVE MOWER" in the Assembly section of this section of this sec- TO REMOVE WHEEL FOR REPAIRS (See Fig. 21) • Block ...
...acid batteries generate explosive gases. If your battery is in all pulley grooves and inside all belt guides and keepers. • Install mower (See "TO INSTALL MOWER" in or camber, contact your tractor. ENGINE PULLEY CLUTCHING IDLER STATIONARY IDLER FRONT WHEEL TOE-IN/CAMBER The front wheel toe-in... the MAINTENANCE section of manual). BELT REMOVAL • Remove mower (See "TO REMOVE MOWER" in the Assembly section of this section of this sec- TO REMOVE WHEEL FOR REPAIRS (See Fig. 21) • Block ...

User Manual
Page 24
...from tractor for storage, do not store battery directly on stabilizer container. Do not use engine or carburetor cleaner products in any enclosure. When mower is to be disconnected and battery cleaned thoroughly (see "TO CLEAN BATTERY AND TERMINALS" in the Maintenance section of this manual). •...: Never store the tractor with a suitable protective cover that all nuts, bolts and screws are empty. • Never use plastic. TRACTOR Remove mower from one ounce of the season or if the tractor will not be used for a period of this manual). • Inspect and replace belts...
...from tractor for storage, do not store battery directly on stabilizer container. Do not use engine or carburetor cleaner products in any enclosure. When mower is to be disconnected and battery cleaned thoroughly (see "TO CLEAN BATTERY AND TERMINALS" in the Maintenance section of this manual). •...: Never store the tractor with a suitable protective cover that all nuts, bolts and screws are empty. • Never use plastic. TRACTOR Remove mower from one ounce of the season or if the tractor will not be used for a period of this manual). • Inspect and replace belts...

User Manual
Page 25
...solenoid or starter. 1. Water in Operation section. 3. Clean engine air screen/fins. 12. Engine not "CHOKED" properly. 3. Engine valves out of mower housing. 4. See "TO START ENGINE" in fuel. 10. Replace spark plug. 5. Check all wiring. 14. See "To Adjust Carburetor" in Service.... 15. Stale or dirty fuel. 9. Dirty engine air screen/fins. 12. Engine valves out of grass, leaves and trash under mower. 4. Adjust throttle control. 3. Empty fuel tank and refill tank with fresh gasoline and replace fuel filter. 8. Excessive vibration...
...solenoid or starter. 1. Water in Operation section. 3. Clean engine air screen/fins. 12. Engine not "CHOKED" properly. 3. Engine valves out of mower housing. 4. See "TO START ENGINE" in fuel. 10. Replace spark plug. 5. Check all wiring. 14. See "To Adjust Carburetor" in Service.... 15. Stale or dirty fuel. 9. Dirty engine air screen/fins. 12. Engine valves out of grass, leaves and trash under mower. 4. Adjust throttle control. 3. Empty fuel tank and refill tank with fresh gasoline and replace fuel filter. 8. Excessive vibration...

User Manual
Page 26
...1. Faulty operator-safety presence control system. CORRECTION 1. Obstruction in "FAST" position. 2. Replace mower drive belt. 3. Replace idler pulley. 4. Replace blade mandrel. Mower deck not level. 5. Improper blades used. 11. Check tires for 30 seconds before stopping engine... (if so equipped) 1. Poor cable connections. 3. Poor cut - Poor grass discharge 1. Mower drive belt worn. 9. Replace mower drive belt. 9. Clogged mower deck vent holes from buildup of mower housing. 4. Worn, bent or loose blade. 7. Replace battery. 2. Check wiring, switches ...
...1. Faulty operator-safety presence control system. CORRECTION 1. Obstruction in "FAST" position. 2. Replace mower drive belt. 3. Replace idler pulley. 4. Replace blade mandrel. Mower deck not level. 5. Improper blades used. 11. Check tires for 30 seconds before stopping engine... (if so equipped) 1. Poor cable connections. 3. Poor cut - Poor grass discharge 1. Mower drive belt worn. 9. Replace mower drive belt. 9. Clogged mower deck vent holes from buildup of mower housing. 4. Worn, bent or loose blade. 7. Replace battery. 2. Check wiring, switches ...

User Manual
Page 31
... Pnt RH 35 72110606 Bolt Rdhd Sht Sqnk 3/8-16 x 3/4 37 17490508 Screw Thdrol 5/16-18 x 1/2 TYT 38 175710 Bracket Asm. MODEL NUMBER PO15538B CHASSIS KEY PART NO. NO. Pivot Mower 39 174714 Bracket Pivot 145 156524 Rod Pivot Chassis/Hood 166 171875 Screw Hwhd Hi-Lo #13-16 x 5/8 205 17490608 Screw Thdrol...
... Pnt RH 35 72110606 Bolt Rdhd Sht Sqnk 3/8-16 x 3/4 37 17490508 Screw Thdrol 5/16-18 x 1/2 TYT 38 175710 Bracket Asm. MODEL NUMBER PO15538B CHASSIS KEY PART NO. NO. Pivot Mower 39 174714 Bracket Pivot 145 156524 Rod Pivot Chassis/Hood 166 171875 Screw Hwhd Hi-Lo #13-16 x 5/8 205 17490608 Screw Thdrol...

User Manual
Page 33
... x .875 Cover Pedal Blk Round Engine Pulley LT/YT Bolt Hex 7/16-20 x 4 Gr. 5 Washer Lock Hvy Hlcl Spr 7/16 Keeper Belt Engine Guide Belt Mower Drive RH Spacer Axle Washer 25/32 x 1 1/4 x 16 Ga. MODEL NUMBER PO15538B DRIVE KEY PART NO.
... x .875 Cover Pedal Blk Round Engine Pulley LT/YT Bolt Hex 7/16-20 x 4 Gr. 5 Washer Lock Hvy Hlcl Spr 7/16 Keeper Belt Engine Guide Belt Mower Drive RH Spacer Axle Washer 25/32 x 1 1/4 x 16 Ga. MODEL NUMBER PO15538B DRIVE KEY PART NO.


