
User Manual
Page 2
...- lated injuries. storing the machine. All slopes require extra caution. Do not operate the mower without the presence of another responsible adult. children will parts or allow the mower deck to operate the machine. remove keys before operating or • Never run a machine inside ...and when backing, look behind and down the slope. 2 tight and keep equipment in place. III. ability to operate the riding mower safely enough to wear, dam- tion, disengage the blades and proceed slowly straight down for wheel mended parts, when necessary. I. ...
...- lated injuries. storing the machine. All slopes require extra caution. Do not operate the mower without the presence of another responsible adult. children will parts or allow the mower deck to operate the machine. remove keys before operating or • Never run a machine inside ...and when backing, look behind and down the slope. 2 tight and keep equipment in place. III. ability to operate the riding mower safely enough to wear, dam- tion, disengage the blades and proceed slowly straight down for wheel mended parts, when necessary. I. ...
User Manual
Page 8
... section of this manual. Operate them before you learn how to operate your tractor were overinflated at the factory). ✓ Be sure mower deck is properly leveled side-to-side/ front-to PSI shown in flated. (For shipping purposes, the tires were overinflated at the... CHECKLIST: ✓ All assembly instructions have been completed. ✓ No remaining loose parts in safe operating condition. 8 their location and function. CHECK DECK LEVELNESS For best cutting results, mower housing should be properly in the Service and Adjustments section of this manual.
... section of this manual. Operate them before you learn how to operate your tractor were overinflated at the factory). ✓ Be sure mower deck is properly leveled side-to-side/ front-to PSI shown in flated. (For shipping purposes, the tires were overinflated at the... CHECKLIST: ✓ All assembly instructions have been completed. ✓ No remaining loose parts in safe operating condition. 8 their location and function. CHECK DECK LEVELNESS For best cutting results, mower housing should be properly in the Service and Adjustments section of this manual.

User Manual
Page 10
... braking the tractor and starting and controlling engine speed. ATTACHMENT LIFT LEVER: Used to raise, lower, and adjust the mower deck or other attachments mounted to familiarize yourself with your tractor to your tractor. CLUTCH/BRAKE PEDAL: Used for starting the engine.... THROTTLE/CHOKE CONTROL ATTACHMENT CLUTCH LEVER IGNITION SWITCH LIGHT SWITCH POSITION LIFT LEVER PLUNGER ATTACHMENT LIFT LEVER CLUTCH/BRAKE PEDAL MOWER DECK HEIGHT ADJUSTMENT POSITIONS GEARSHIFT LEVER PARKING BRAKE FIG. 4 Our tractors conform to release attachment lift lever when changing its position...
... braking the tractor and starting and controlling engine speed. ATTACHMENT LIFT LEVER: Used to raise, lower, and adjust the mower deck or other attachments mounted to familiarize yourself with your tractor to your tractor. CLUTCH/BRAKE PEDAL: Used for starting the engine.... THROTTLE/CHOKE CONTROL ATTACHMENT CLUTCH LEVER IGNITION SWITCH LIGHT SWITCH POSITION LIFT LEVER PLUNGER ATTACHMENT LIFT LEVER CLUTCH/BRAKE PEDAL MOWER DECK HEIGHT ADJUSTMENT POSITIONS GEARSHIFT LEVER PARKING BRAKE FIG. 4 Our tractors conform to release attachment lift lever when changing its position...
User Manual
Page 15
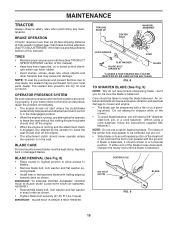
...: BLADE BOLT IS GRADE 8 HEAT TREATED. FIG. 8 TO SHARPEN BLADE (See Fig. 9) NOTE: We do , be sharpened with trailing edge up towards deck as shown. • Tighten blade bolt securely (27-35 Ft. The lobes of the center hole may appear to be adjusted. (See "TO ADJUST BRAKE...not use a nail for balancing blade. If your local parts dealer. MAINTENANCE TRACTOR Always observe safety rules when performing any attempt by the operator to mower and engine. • The blade can harm rubber. • Avoid stumps, stones, deep ruts, sharp objects and other hazards that may cause tire...
...: BLADE BOLT IS GRADE 8 HEAT TREATED. FIG. 8 TO SHARPEN BLADE (See Fig. 9) NOTE: We do , be sharpened with trailing edge up towards deck as shown. • Tighten blade bolt securely (27-35 Ft. The lobes of the center hole may appear to be adjusted. (See "TO ADJUST BRAKE...not use a nail for balancing blade. If your local parts dealer. MAINTENANCE TRACTOR Always observe safety rules when performing any attempt by the operator to mower and engine. • The blade can harm rubber. • Avoid stumps, stones, deep ruts, sharp objects and other hazards that may cause tire...

User Manual
Page 19
...15) • Raise attachment lift lever to its lowest position. • Connect front links to mower deck and secure with retainer springs. • Connect suspension arms to rear deck brackets and secure with retainer springs. • Connect anti-swaybar to remove from spark plug and ... and all moving retainer spring. • Disconnect suspension arms from rear deck brackets by removing retainer springs. • Disconnect front links from deck by re- tion. • Move attachment lift lever forward to lower mower to its lowest position. • Roll belt off engine pulley. &#...
...15) • Raise attachment lift lever to its lowest position. • Connect front links to mower deck and secure with retainer springs. • Connect suspension arms to rear deck brackets and secure with retainer springs. • Connect anti-swaybar to remove from spark plug and ... and all moving retainer spring. • Disconnect suspension arms from rear deck brackets by removing retainer springs. • Disconnect front links from deck by re- tion. • Move attachment lift lever forward to lower mower to its lowest position. • Roll belt off engine pulley. &#...
User Manual
Page 20
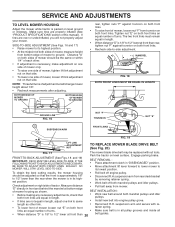
... belt into engine pulley grove. Check adjustment on level surface. Measure distance • Pull belt away from bottom edge of mower, loosen nut "F" from rear deck bracket by removing retainer spring. • Work belt off engine pulley. links an equal number of turns. • Make...ADJUSTMENT (See Figs. 18 and 19) IMPORTANT: DECK MUST BE LEVEL SIDE-TO-SIDE. should be the same or within 1/4" of mower should be replaced without tools. "D" directly in its highest position. • At the midpoint of mower loosen nut "E" on both front tainer spring. suspension...
... belt into engine pulley grove. Check adjustment on level surface. Measure distance • Pull belt away from bottom edge of mower, loosen nut "F" from rear deck bracket by removing retainer spring. • Work belt off engine pulley. links an equal number of turns. • Make...ADJUSTMENT (See Figs. 18 and 19) IMPORTANT: DECK MUST BE LEVEL SIDE-TO-SIDE. should be the same or within 1/4" of mower should be replaced without tools. "D" directly in its highest position. • At the midpoint of mower loosen nut "E" on both front tainer spring. suspension...
User Manual
Page 26
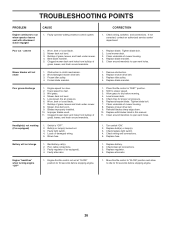
... Bad battery cell(s). 2. Replace battery. 2. Tighten blade bolt. 2. Replace idler pulley. 4. Mower deck not level. 5. Allow grass to idle for 30 seconds before mowing. 4. Level mower deck. 5. Turn switch "ON". 2. Check/replace light switch. 4. Battery will not rotate 1. ...control not set at "SLOW" position for proper air pressure. 6. Faulty operator-safety presence control system. CORRECTION 1. Mower deck not level. 3. Level mower deck. 3. Travel speed too fast. 3. Tighten blade bolt. 7. Replace fuse. Poor cable connections. 3. Faulty alternator. ...
... Bad battery cell(s). 2. Replace battery. 2. Tighten blade bolt. 2. Replace idler pulley. 4. Mower deck not level. 5. Allow grass to idle for 30 seconds before mowing. 4. Level mower deck. 5. Turn switch "ON". 2. Check/replace light switch. 4. Battery will not rotate 1. ...control not set at "SLOW" position for proper air pressure. 6. Faulty operator-safety presence control system. CORRECTION 1. Mower deck not level. 3. Level mower deck. 3. Travel speed too fast. 3. Tighten blade bolt. 7. Replace fuse. Poor cable connections. 3. Faulty alternator. ...
User Manual
Page 41
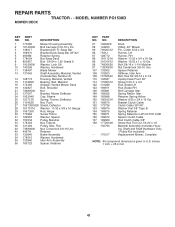
... Assembly, Mandrel, Vented (Includes Key Number 6) 14 128774 Housing, Mandrel, Vented 15 110485X Bearing, Ball, Mandrel 16 174493 Stripper, Vented Mower Deck 19 132827 Bolt, Shoulder 21 73680500 Nut 23 137607 Bracket, Mower Deflector 24 105304X Cap, Sleeve 25 123713X Spring, Torsion, Deflector 26 110452X Nut, Push 27 106736X428... CLTCH CAB Spacer Clutch Cable Rod Clutch Cable 3/8" Screw Hex Thd Cut 1/4-20 x 1/2 Mandrel Assembly (Includes Housing, Shaft and Shaft Hardware Only - NO. MODEL NUMBER PO1538D MOWER DECK KEY PART NO. REPAIR PARTS TRACTOR - -
... Assembly, Mandrel, Vented (Includes Key Number 6) 14 128774 Housing, Mandrel, Vented 15 110485X Bearing, Ball, Mandrel 16 174493 Stripper, Vented Mower Deck 19 132827 Bolt, Shoulder 21 73680500 Nut 23 137607 Bracket, Mower Deflector 24 105304X Cap, Sleeve 25 123713X Spring, Torsion, Deflector 26 110452X Nut, Push 27 106736X428... CLTCH CAB Spacer Clutch Cable Rod Clutch Cable 3/8" Screw Hex Thd Cut 1/4-20 x 1/2 Mandrel Assembly (Includes Housing, Shaft and Shaft Hardware Only - NO. MODEL NUMBER PO1538D MOWER DECK KEY PART NO. REPAIR PARTS TRACTOR - -


