
User Manual
Page 1
IMPORTANT MANUAL Do Not Throw Away 5000 OPERATOR'S MANUAL MODEL: PO14542LT LAWN TRACTOR WARNING: Read this Manual and follow all Warnings and Safety Instructions. ALWAYS WEAR EYE PROTECTION DURING OPERATION Visit our website: www.poulan.com 438511 09.16.10 TH Printed in serious injury. Failure to do so can result in the U.S.A.
IMPORTANT MANUAL Do Not Throw Away 5000 OPERATOR'S MANUAL MODEL: PO14542LT LAWN TRACTOR WARNING: Read this Manual and follow all Warnings and Safety Instructions. ALWAYS WEAR EYE PROTECTION DURING OPERATION Visit our website: www.poulan.com 438511 09.16.10 TH Printed in serious injury. Failure to do so can result in the U.S.A.
User Manual
Page 2
... or good artificial light. • Do not operate the machine while under the machine. Stop machine if anyone . SLOPE OPERATION Slopes are involved in the manual before starting , stopping, or turning on the ground. • Do not mow near or crossing roadways. • Use extra care when loading or unloading the...
... or good artificial light. • Do not operate the machine while under the machine. Stop machine if anyone . SLOPE OPERATION Slopes are involved in the manual before starting , stopping, or turning on the ground. • Do not mow near or crossing roadways. • Use extra care when loading or unloading the...
User Manual
Page 4
... safety rules. • Follow a regular schedule in effective working order by the operator. A spark arrester for and using your purchase of this manual. WARNING: This tractor is equipped with a spark arrester meeting applicable local or state laws (if any). LBS. CONGRATULATIONS on or near any problem... you the best possible dependability and performance. Please read and retain this manual. CCA: Case Size: 28 230 U1R 45-55 FT. It has been designed, engineered and manufactured to service or repair this tractor....
... safety rules. • Follow a regular schedule in effective working order by the operator. A spark arrester for and using your purchase of this manual. WARNING: This tractor is equipped with a spark arrester meeting applicable local or state laws (if any). LBS. CONGRATULATIONS on or near any problem... you the best possible dependability and performance. Please read and retain this manual. CCA: Case Size: 28 230 U1R 45-55 FT. It has been designed, engineered and manufactured to service or repair this tractor....

User Manual
Page 6
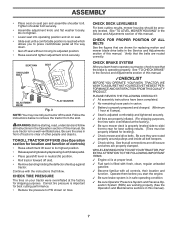
...• Remove all accessible loose parts and parts cartons from carton. • Cut along dotted lines on label (label is mentioned in this manual. STEERING WHEEL STEERING BOOT ADAPTER SEAT LABEL LOWER STEERING SHAFT EXTENSION SHAFT 02819 02602 Fig. 1 BEFORE REMOVING TRACTOR FROM SKID Fig. 2 INSTALL... shipping purposes. ASSEMBLY Your new tractor has been assembled at 6-10 amps. (See "BATTERY" in Maintenance section of this manual for charging instructions). • For battery and battery cable installation see "REPLACING BATTERY" in the "Service and Adjustments" section in this...
...• Remove all accessible loose parts and parts cartons from carton. • Cut along dotted lines on label (label is mentioned in this manual. STEERING WHEEL STEERING BOOT ADAPTER SEAT LABEL LOWER STEERING SHAFT EXTENSION SHAFT 02819 02602 Fig. 1 BEFORE REMOVING TRACTOR FROM SKID Fig. 2 INSTALL... shipping purposes. ASSEMBLY Your new tractor has been assembled at 6-10 amps. (See "BATTERY" in Maintenance section of this manual for charging instructions). • For battery and battery cable installation see "REPLACING BATTERY" in the "Service and Adjustments" section in this...
User Manual
Page 7
... without moving its highest position. • Releaseparkingbrakebydepressingclutch/brakepedal. • Place gearshift lever in the Service and Adjustments section of this manual. ✓CHECKLIST BEFORE YOU OPERATE YOUR NEW TRACTOR, WE WISH TO ASSURE THAT YOU RECEIVE THE BEST PERFORMANCE AND SATISFACTION FROM THIS...your tractor, check to see that follow all connections are still secure and wires are shown for location and function of this manual). 7 Correct tire pressure is in safe operating condition. ✓ Be sure Operator Presence System and Reverse Operation System (ROS)...
... without moving its highest position. • Releaseparkingbrakebydepressingclutch/brakepedal. • Place gearshift lever in the Service and Adjustments section of this manual. ✓CHECKLIST BEFORE YOU OPERATE YOUR NEW TRACTOR, WE WISH TO ASSURE THAT YOU RECEIVE THE BEST PERFORMANCE AND SATISFACTION FROM THIS...your tractor, check to see that follow all connections are still secure and wires are shown for location and function of this manual). 7 Correct tire pressure is in safe operating condition. ✓ Be sure Operator Presence System and Reverse Operation System (ROS)...
User Manual
Page 9
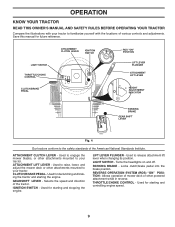
... tractor. Allows operation of the American National Standards Institute. ATTACHMENT LIFT LEVER - GEARSHIFT LEVER - LIGHT SWITCH - OPERATION KNOW YOUR TRACTOR READ THIS OWNER'S MANUAL AND SAFETY RULES BEFORE OPERATING YOUR TRACTOR Compare the illustrations with your tractor to familiarize yourself with the locations of the tractor. Selects the speed... Used to raise, lower, and adjust the mower deck or other attachments mounted to release attachment lift lever when changing its position. Save this manual for starting and controlling engine speed. 9 Turns the headlights on and off.
... tractor. Allows operation of the American National Standards Institute. ATTACHMENT LIFT LEVER - GEARSHIFT LEVER - LIGHT SWITCH - OPERATION KNOW YOUR TRACTOR READ THIS OWNER'S MANUAL AND SAFETY RULES BEFORE OPERATING YOUR TRACTOR Compare the illustrations with your tractor to familiarize yourself with the locations of the tractor. Selects the speed... Used to raise, lower, and adjust the mower deck or other attachments mounted to release attachment lift lever when changing its position. Save this manual for starting and controlling engine speed. 9 Turns the headlights on and off.
User Manual
Page 12
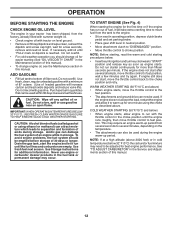
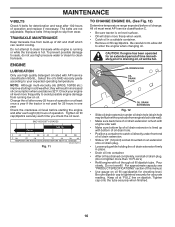
...to fast position, wait a few seconds, remove and read the warm and cold starting (See "OIL VISCOSITY CHART" in the Maintenance section of this manual). • To change oil for easier starting procedures below. • Insert key into ignition and turn key clockwise to several seconds to "START" ... TO HELP ENSURE GOOD COLD WEATHER STARTING. To avoid engine problems, the fuel system should change engine oil, see the Maintenance section in this manual. 12 NOTE: Before starting, read oil level. If engine still does not start the engine and let it to the fast position. •...
...to fast position, wait a few seconds, remove and read the warm and cold starting (See "OIL VISCOSITY CHART" in the Maintenance section of this manual). • To change oil for easier starting procedures below. • Insert key into ignition and turn key clockwise to several seconds to "START" ... TO HELP ENSURE GOOD COLD WEATHER STARTING. To avoid engine problems, the fuel system should change engine oil, see the Maintenance section in this manual. 12 NOTE: Before starting, read oil level. If engine still does not start the engine and let it to the fast position. •...
User Manual
Page 13
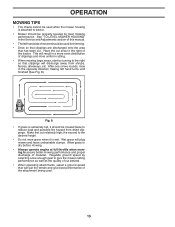
... and proper discharge of clippings and more even distribution of material. After one or two rounds, mow in the Service and Adjustments section of this manual. • The left hand turns until finished (See Fig. 8). Make first cut area to the right so that has been cut desired. • When operating...
... and proper discharge of clippings and more even distribution of material. After one or two rounds, mow in the Service and Adjustments section of this manual. • The left hand turns until finished (See Fig. 8). Make first cut area to the right so that has been cut desired. • When operating...

User Manual
Page 14
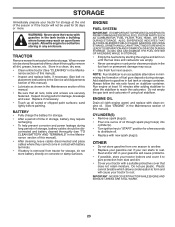
... GREASE THE PIVOT POINTS WHICH HAVE SPECIAL NYLON BEARINGS. Service more often when operating under a heavy load or in this manual. EVERY SEASON BEFORE STORAGE GENERAL RECOMMENDATIONS The warranty on this manual. • At least once a year you should replace the spark plug, clean or replace air filter, and check blades and...
... GREASE THE PIVOT POINTS WHICH HAVE SPECIAL NYLON BEARINGS. Service more often when operating under a heavy load or in this manual. EVERY SEASON BEFORE STORAGE GENERAL RECOMMENDATIONS The warranty on this manual. • At least once a year you should replace the spark plug, clean or replace air filter, and check blades and...
User Manual
Page 15
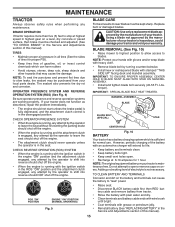
... • Keep battery bolts tight. • Keep small vent holes open or remove caps or covers. However, periodic charging of this manual). MAINTENANCE TRACTOR Always observe safety rules when performing any attempt by the manufacturer of gasoline, oil, or insect control chemicals which is maintenance... not start unless the brake pedal is fully depressed, and the attachment clutch control is in the Service and Adjustments section of this manual). 15 IMPORTANT: SPECIAL BLADE BOLT HEAT TREATED. OPERATOR PRESENCE SYSTEM AND REVERSE OPERATION SYSTEM (ROS) (See Fig. 9) Be sure ...
... • Keep battery bolts tight. • Keep small vent holes open or remove caps or covers. However, periodic charging of this manual). MAINTENANCE TRACTOR Always observe safety rules when performing any attempt by the manufacturer of gasoline, oil, or insect control chemicals which is maintenance... not start unless the brake pedal is fully depressed, and the attachment clutch control is in the Service and Adjustments section of this manual). 15 IMPORTANT: SPECIAL BLADE BOLT HEAT TREATED. OPERATOR PRESENCE SYSTEM AND REVERSE OPERATION SYSTEM (ROS) (See Fig. 9) Be sure ...
User Manual
Page 16
... bottom lip of oil drain extension is hot. Check the crankcase oil level before oil change. For approximate capacity see "PRODUCT SPECIFICATIONS" section of this manual. • Use gauge on oil. MAINTENANCE V-BELTS Check V-belts for checking level. The belts are not adjustable. TRANSAXLE MAINTENANCE Keep transaxle free from wear. ENGINE...
... bottom lip of oil drain extension is hot. Check the crankcase oil level before oil change. For approximate capacity see "PRODUCT SPECIFICATIONS" section of this manual. • Use gauge on oil. MAINTENANCE V-BELTS Check V-belts for checking level. The belts are not adjustable. TRANSAXLE MAINTENANCE Keep transaxle free from wear. ENGINE...
User Manual
Page 17
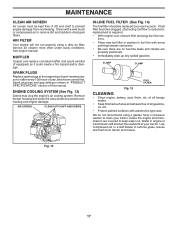
Service air cleaner more often under dusty conditions. See engine manual. MUFFLER Inspect and replace corroded muffler and spark arrester (if equipped) as it could create a fire hazard and/or damage. Remove blower housing and clean ... grass, leaves and trash from overheating. If fuel filter becomes clogged, obstructing fuel flow to carburetor, replacement is shown in "PRODUCT SPECIFICATIONS" section of this manual. AIR FILTER Your engine will shorten the useful life of your tractor unless the engine and transmission are properly positioned. • Immediately wipe up any...
Service air cleaner more often under dusty conditions. See engine manual. MUFFLER Inspect and replace corroded muffler and spark arrester (if equipped) as it could create a fire hazard and/or damage. Remove blower housing and clean ... grass, leaves and trash from overheating. If fuel filter becomes clogged, obstructing fuel flow to carburetor, replacement is shown in "PRODUCT SPECIFICATIONS" section of this manual. AIR FILTER Your engine will shorten the useful life of your tractor unless the engine and transmission are properly positioned. • Immediately wipe up any...
User Manual
Page 20
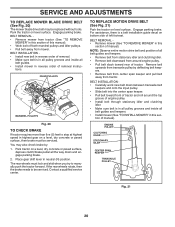
... stationary idler and clutching idler. • Remove belt downward from mower. BELT REMOVAL • Remove mower (See "TO REMOVE MOWER" in this manual). • Work belt off both mandrel pulleys and idler pulleys. • Pull belt away from around the top groove of removal. • Make...check brake by deflecting belt keepers. • Remove belt from center span keeper and pull belt away from tractor. tion of manual). Remove belt upwards from transaxle pulley by : 1. Engage parking brake. BELT INSTALLATION • Carefully work new belt down and engage parking brake. ...
... stationary idler and clutching idler. • Remove belt downward from mower. BELT REMOVAL • Remove mower (See "TO REMOVE MOWER" in this manual). • Work belt off both mandrel pulleys and idler pulleys. • Pull belt away from around the top groove of removal. • Make...check brake by deflecting belt keepers. • Remove belt from center span keeper and pull belt away from tractor. tion of manual). Remove belt upwards from transaxle pulley by : 1. Engage parking brake. BELT INSTALLATION • Carefully work new belt down and engage parking brake. ...
User Manual
Page 21
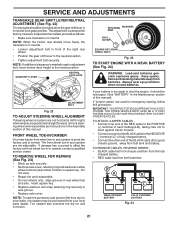
...). • Repair tire and reassemble. • On rear wheels only: align grooves in and camber is in the Assembly section of this manual). TO REMOVE CABLES, REVERSE ORDER • BLACK cable first from chassis and then from the fully charged battery. • RED cable last ...Block up axle securely. • Remove axle cover, retaining ring and washers to right) when wheels are used for emergency starting, follow this manual. Tire sealant also prevents tire dry rot and corrosion. SERVICE AND ADJUSTMENTS TRANSAXLE GEAR SHIFT LEVER NEUTRAL ADJUSTMENT (See Fig. 22) The transaxle should...
...). • Repair tire and reassemble. • On rear wheels only: align grooves in and camber is in the Assembly section of this manual). TO REMOVE CABLES, REVERSE ORDER • BLACK cable first from chassis and then from the fully charged battery. • RED cable last ...Block up axle securely. • Remove axle cover, retaining ring and washers to right) when wheels are used for emergency starting, follow this manual. Tire sealant also prevents tire dry rot and corrosion. SERVICE AND ADJUSTMENTS TRANSAXLE GEAR SHIFT LEVER NEUTRAL ADJUSTMENT (See Fig. 22) The transaxle should...

User Manual
Page 22
... an authorized service center for repair and/or adjustment. 22 The fuse holder is necessary, see engine manual. If adjustment is located behind the dash. TO ADJUST CARBURETOR Your carburetor is necessary, see engne manual. Tighten securely. • Lower seat pan. TO REMOVE HOOD AND GRILL ASSEMBLY (See Fig. 26) • Raise...
... an authorized service center for repair and/or adjustment. 22 The fuse holder is necessary, see engine manual. If adjustment is located behind the dash. TO ADJUST CARBURETOR Your carburetor is necessary, see engne manual. Tighten securely. • Lower seat pan. TO REMOVE HOOD AND GRILL ASSEMBLY (See Fig. 26) • Raise...
User Manual
Page 23
... to form and will not be disconnected and battery cleaned thoroughly (see "TO CLEAN BATTERY AND TERMINALS" in the Maintenance section of this manual). • Inspect and replace belts, if necessary (See belt re- Allow the engine to distribute oil. • Replace with battery ... recharging. • To help prevent corrosion and power leakage during storage. placement instructions in the Service and Adjustments section of this manual). ENGINE FUEL SYSTEM IMPORTANT: IT IS IMPORTANT TO PREVENT GUM DEPOSITS FROM FORMING IN ESSENTIAL FUEL SYSTEM PARTS SUCH AS CARBURETOR, FUEL...
... to form and will not be disconnected and battery cleaned thoroughly (see "TO CLEAN BATTERY AND TERMINALS" in the Maintenance section of this manual). • Inspect and replace belts, if necessary (See belt re- Allow the engine to distribute oil. • Replace with battery ... recharging. • To help prevent corrosion and power leakage during storage. placement instructions in the Service and Adjustments section of this manual). ENGINE FUEL SYSTEM IMPORTANT: IT IS IMPORTANT TO PREVENT GUM DEPOSITS FROM FORMING IN ESSENTIAL FUEL SYSTEM PARTS SUCH AS CARBURETOR, FUEL...
User Manual
Page 25
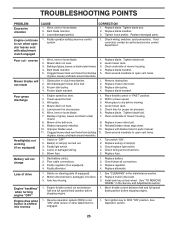
... control between half and full speed (fast) position before stopping engine. 1. Turn ignition key to run when operator leaves seat with blades listed in parts manual. 11. Tighten loose part(s). Check wiring, switches and connections. Replace blade mandrel. Travel speed too fast. 2. Improper blades used. 10. Turn switch "ON". 2. Faulty operator...
... control between half and full speed (fast) position before stopping engine. 1. Turn ignition key to run when operator leaves seat with blades listed in parts manual. 11. Tighten loose part(s). Check wiring, switches and connections. Replace blade mandrel. Travel speed too fast. 2. Improper blades used. 10. Turn switch "ON". 2. Faulty operator...
Parts Manual
Page 1
ALWAYS WEAR EYE PROTECTION DURING OPERATION Visit our website: www.poulan.com 440627 IMPORTANT MANUAL DO NOT THROW AWAY 5000 REPAIR PARTS MANUAL MODEL: PO14542LT LAWN TRACTOR WARNING: Read this Manual and follow all Warnings and Safety Instructions. Failure to do so can result in serious injury.
ALWAYS WEAR EYE PROTECTION DURING OPERATION Visit our website: www.poulan.com 440627 IMPORTANT MANUAL DO NOT THROW AWAY 5000 REPAIR PARTS MANUAL MODEL: PO14542LT LAWN TRACTOR WARNING: Read this Manual and follow all Warnings and Safety Instructions. Failure to do so can result in serious injury.

Parts Manual
Page 2
...tractor when ordering repair parts. Some hardware and parts are drawn larger in order to identify the parts on the fender under the seat. "PO14542LT (96012011900)" • Part Number • Part Description TABLE OF CONTENTS SCHEMATIC ...3 ELECTRICAL ...4-5 CHASSIS ...6-7 DRIVE...8-9 ENGINE ...10-11 STEERING ...DECK ...16-17 MOWER LIFT...18 WARRANTY...20 2 "TRACTOR" • MODEL NUMBER - HOW TO USE THIS MANUAL This manual is not recommended to use this manual as a guide to assemble or disassemble the tractor. The illustrations may or may not represent the actual assemblies; ...
...tractor when ordering repair parts. Some hardware and parts are drawn larger in order to identify the parts on the fender under the seat. "PO14542LT (96012011900)" • Part Number • Part Description TABLE OF CONTENTS SCHEMATIC ...3 ELECTRICAL ...4-5 CHASSIS ...6-7 DRIVE...8-9 ENGINE ...10-11 STEERING ...DECK ...16-17 MOWER LIFT...18 WARRANTY...20 2 "TRACTOR" • MODEL NUMBER - HOW TO USE THIS MANUAL This manual is not recommended to use this manual as a guide to assemble or disassemble the tractor. The illustrations may or may not represent the actual assemblies; ...
Parts Manual
Page 15
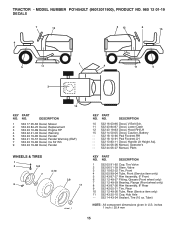
...-91 Pad Footrest LH - - 532 13 83-11 Decal, Handle Lft Height Adj. - - 532 44 06-26 Manual, Operator's - - 532 44 06-27 Manual, Parts KEY PART NO. inches 1 inch = 25.4 mm 15 MODEL NUMBER PO14542LT (96012011900), PRODUCT NO. 960 12 01-19 DECALS 7 12 2 12 6 15 9 5 11 1 4 11 5 3 10 KEY PART NO...
...-91 Pad Footrest LH - - 532 13 83-11 Decal, Handle Lft Height Adj. - - 532 44 06-26 Manual, Operator's - - 532 44 06-27 Manual, Parts KEY PART NO. inches 1 inch = 25.4 mm 15 MODEL NUMBER PO14542LT (96012011900), PRODUCT NO. 960 12 01-19 DECALS 7 12 2 12 6 15 9 5 11 1 4 11 5 3 10 KEY PART NO...


