
User Manual
Page 1
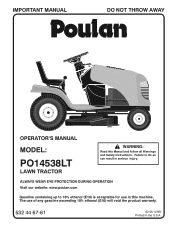
The use in this Manual and follow all Warnings and Safety Instructions. ALWAYS WEAR EYE PROTECTION DURING OPERATION Visit our website: www.poulan.com Gasoline containing up to do so can result in the U.S.A. Failure to 10% ethanol (E10) is acceptable for use of any gasoline exceeding 10% ethanol (E10) will void the product warranty. 532 44 67-61 02.06.12 BD Printed in serious injury. IMPORTANT MANUAL DO NOT THROW AWAY 5000 OPERATOR'S MANUAL MODEL: PO14538LT LAWN TRACTOR WARNING: Read this machine.
The use in this Manual and follow all Warnings and Safety Instructions. ALWAYS WEAR EYE PROTECTION DURING OPERATION Visit our website: www.poulan.com Gasoline containing up to do so can result in the U.S.A. Failure to 10% ethanol (E10) is acceptable for use of any gasoline exceeding 10% ethanol (E10) will void the product warranty. 532 44 67-61 02.06.12 BD Printed in serious injury. IMPORTANT MANUAL DO NOT THROW AWAY 5000 OPERATOR'S MANUAL MODEL: PO14538LT LAWN TRACTOR WARNING: Read this machine.
User Manual
Page 2
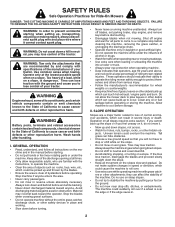
...: THIS CUTTING MACHINE IS CAPABLE OF AMPUTATING HANDS AND FEET AND THROWING OBJECTS. WARNING: Do not coast down slopes. Too heavy of the tractor. Wash hands after handling. Stop machine if anyone . Material may lose control of a load, while on wet grass. These operators should...good artificial light. • Do not operate the machine while under the machine. Do not allow responsible adults, who are recommended by putting your tractor. SLOPE OPERATION Slopes are involved in . 2 Do not shift to occur. GENERAL OPERATION • Read, understand, and follow all times. •...
...: THIS CUTTING MACHINE IS CAPABLE OF AMPUTATING HANDS AND FEET AND THROWING OBJECTS. WARNING: Do not coast down slopes. Too heavy of the tractor. Wash hands after handling. Stop machine if anyone . Material may lose control of a load, while on wet grass. These operators should...good artificial light. • Do not operate the machine while under the machine. Do not allow responsible adults, who are recommended by putting your tractor. SLOPE OPERATION Slopes are involved in . 2 Do not shift to occur. GENERAL OPERATION • Read, understand, and follow all times. •...
User Manual
Page 4
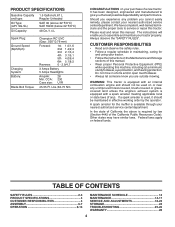
... for the muffler is equipped with a spark arrester meeting applicable local or state laws (if any). Please read and retain this tractor. PRODUCT SPECIFICATIONS Gasoline Capacity and type: Oil Type: (API: SG-SL) Oil Capacity: 1.5 Gallons/5,67 L Regular Unleaded SAE...; Follow a regular schedule in shorts and/or open toed footwear. • Always let someone know you to assemble and maintain your tractor properly. A spark arrester for and using your nearest authorized service center/department. TABLE OF CONTENTS SAFETY RULES 2-3 PRODUCT SPECIFICATIONS 4 CUSTOMER ...
... for the muffler is equipped with a spark arrester meeting applicable local or state laws (if any). Please read and retain this tractor. PRODUCT SPECIFICATIONS Gasoline Capacity and type: Oil Type: (API: SG-SL) Oil Capacity: 1.5 Gallons/5,67 L Regular Unleaded SAE...; Follow a regular schedule in shorts and/or open toed footwear. • Always let someone know you to assemble and maintain your tractor properly. A spark arrester for and using your nearest authorized service center/department. TABLE OF CONTENTS SAFETY RULES 2-3 PRODUCT SPECIFICATIONS 4 CUSTOMER ...

User Manual
Page 6
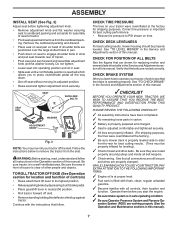
... (See Fig. 1) • Lift seat to insure proper tightness. Use the correct tools as necessary to raised position. BEFORE REMOVING TRACTOR FROM SKID TO INSTALL STEERING WHEEL (See Fig. 2) ASSEMBLE EXTENSION SHAFT AND BOOT • Slide extension shaft onto lower steering shaft.... 2 6 TOOLS REQUIRED FOR ASSEMBLY A socket wrench set will make assembly easier. INSTALL STEERING WHEEL • Position front wheels of the tractor so they are pointing straight forward. • Remove steering wheel adapter from steering wheel and slide adapter onto steering shaft extension. •...
... (See Fig. 1) • Lift seat to insure proper tightness. Use the correct tools as necessary to raised position. BEFORE REMOVING TRACTOR FROM SKID TO INSTALL STEERING WHEEL (See Fig. 2) ASSEMBLE EXTENSION SHAFT AND BOOT • Slide extension shaft onto lower steering shaft.... 2 6 TOOLS REQUIRED FOR ASSEMBLY A socket wrench set will make assembly easier. INSTALL STEERING WHEEL • Position front wheels of the tractor so they are pointing straight forward. • Remove steering wheel adapter from steering wheel and slide adapter onto steering shaft extension. •...
User Manual
Page 7
... off seat without moving its highest position. • Releaseparkingbrakebydepressingclutch/brakepedal. • Place gearshift lever in neutral (N) position. • Roll tractor forward off the skid. eration System (ROS) are working properly (See the Operation and Maintenance sections in this manual. SEAT SHOULDER BOLTS SEAT... seat. • Slide seat until a comfortable position is clear of this manual. CHECK TIRE PRESSURE The tires on your tractor were overinflated at the factory). ✓ Be sure mower deck is adjusted comfortably and tightened securely. ✓ All tires ...
... off seat without moving its highest position. • Releaseparkingbrakebydepressingclutch/brakepedal. • Place gearshift lever in neutral (N) position. • Roll tractor forward off the skid. eration System (ROS) are working properly (See the Operation and Maintenance sections in this manual. SEAT SHOULDER BOLTS SEAT... seat. • Slide seat until a comfortable position is clear of this manual. CHECK TIRE PRESSURE The tires on your tractor were overinflated at the factory). ✓ Be sure mower deck is adjusted comfortably and tightened securely. ✓ All tires ...

User Manual
Page 8
... KEEP HANDS AND FEET AWAY KEEP AREA CLEAR SLOPE HAZARDS (SEE SAFETY RULES SECTION) FREE WHEEL (Automatic Models only) Failure to the tractor and/or engine. The safety alert symbol is used without the alert symbol, indicates a situation that could result in literature supplied with ...the product. FIRE indicates a hazard which can result in serious injury or death. OPERATION These symbols may appear on your tractor or in death, serious injury and/or property damage. 8 CAUTION when used to identify safety information about hazards which , if not avoided...
... KEEP HANDS AND FEET AWAY KEEP AREA CLEAR SLOPE HAZARDS (SEE SAFETY RULES SECTION) FREE WHEEL (Automatic Models only) Failure to the tractor and/or engine. The safety alert symbol is used without the alert symbol, indicates a situation that could result in literature supplied with ...the product. FIRE indicates a hazard which can result in serious injury or death. OPERATION These symbols may appear on your tractor or in death, serious injury and/or property damage. 8 CAUTION when used to identify safety information about hazards which , if not avoided...
User Manual
Page 9
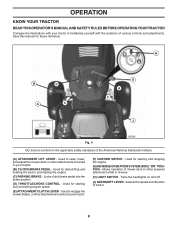
... applicable safety standards of various controls and adjustments. Allows operation of tractor. 9 OPERATION KNOW YOUR TRACTOR READ THIS OPERATOR'S MANUAL AND SAFETY RULES BEFORE OPERATING YOUR TRACTOR Compare the illustrations with your tractor to familiarize yourself with the locations of the American National Standards Institute... (ROS) "ON" POSITION - Used for starting the engine. (C) PARKING BRAKE - Used for declutching and braking the tractor and starting and controlling engine speed. (E) ATTACHMENT CLUTCH LEVER - Selects the speed and direction of mower deck or other attachments mounted ...
... applicable safety standards of various controls and adjustments. Allows operation of tractor. 9 OPERATION KNOW YOUR TRACTOR READ THIS OPERATOR'S MANUAL AND SAFETY RULES BEFORE OPERATING YOUR TRACTOR Compare the illustrations with your tractor to familiarize yourself with the locations of the American National Standards Institute... (ROS) "ON" POSITION - Used for starting the engine. (C) PARKING BRAKE - Used for declutching and braking the tractor and starting and controlling engine speed. (E) ATTACHMENT CLUTCH LEVER - Selects the speed and direction of mower deck or other attachments mounted ...
User Manual
Page 10
... and full speed (fast) position, before leaving the operator's position. To eliminate this possibility, always stop the engine. CAUTION: Always stop tractor completely, as described above, and set parking brake before stopping may cause "browning" of any adjustments or repairs. D F Fig. 7 10... damage. We recommend a wide vision safety mask over spectacles or standard safety glasses. NOTE: Failure to stop engine when stopping tractor on grass areas. IMPORTANT: LEAVING THE IGNITION SWITCH IN ANY POSITION OTHER THAN "STOP" WILL CAUSE THE BATTERY TO BE DISCHARGED...
... and full speed (fast) position, before leaving the operator's position. To eliminate this possibility, always stop the engine. CAUTION: Always stop tractor completely, as described above, and set parking brake before stopping may cause "browning" of any adjustments or repairs. D F Fig. 7 10... damage. We recommend a wide vision safety mask over spectacles or standard safety glasses. NOTE: Failure to stop engine when stopping tractor on grass areas. IMPORTANT: LEAVING THE IGNITION SWITCH IN ANY POSITION OTHER THAN "STOP" WILL CAUSE THE BATTERY TO BE DISCHARGED...
User Manual
Page 11
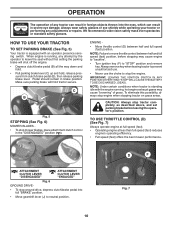
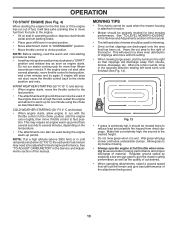
... cutting off the engine. ROS "ON" POSITION 02828 ENGINE "ON" POSITION (NORMAL OPERATING) Fig. 10 TO OPERATE MOWER Your tractor is strongly discouraged. Move gearshift lever to desired height. WARNING: Backing up with the attachment clutch engaged while mowing is equipped with... growth. • For best cutting performance, grass over 3" during the cool season and to approximately 2-1/2" during hot months. IMPORTANT: Bring tractor to a complete stop before backing. • Move gear shift lever to reverse (R) position and slowly release clutch/brake pedal to reposition the...
... cutting off the engine. ROS "ON" POSITION 02828 ENGINE "ON" POSITION (NORMAL OPERATING) Fig. 10 TO OPERATE MOWER Your tractor is strongly discouraged. Move gearshift lever to desired height. WARNING: Backing up with the attachment clutch engaged while mowing is equipped with... growth. • For best cutting performance, grass over 3" during the cool season and to approximately 2-1/2" during hot months. IMPORTANT: Bring tractor to a complete stop before backing. • Move gear shift lever to reverse (R) position and slowly release clutch/brake pedal to reposition the...
User Manual
Page 12
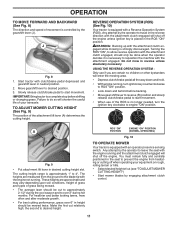
...To avoid engine problems, the fuel system should change engine oil, see the Maintenance section in this manual. See Storage Instructions for tractor to roll slightly as you to separation and formation of 30 days or longer. OPERATION TO STOP MOWER BLADES • Disengage attachment...To restart movement, slowly release parking brake and clutch/brake pedal. • Make all turns slowly. ADD GASOLINE • Fill fuel tank to tractor (rope, cord, etc.). IMPORTANT: WHEN OPERATING IN TEMPERATURES BELOW 32°F (0°C), USE FRESH, CLEAN WINTER GRADE GASOLINE TO HELP ENSURE GOOD...
...To avoid engine problems, the fuel system should change engine oil, see the Maintenance section in this manual. See Storage Instructions for tractor to roll slightly as you to separation and formation of 30 days or longer. OPERATION TO STOP MOWER BLADES • Disengage attachment...To restart movement, slowly release parking brake and clutch/brake pedal. • Make all turns slowly. ADD GASOLINE • Fill fuel tank to tractor (rope, cord, etc.). IMPORTANT: WHEN OPERATING IN TEMPERATURES BELOW 32°F (0°C), USE FRESH, CLEAN WINTER GRADE GASOLINE TO HELP ENSURE GOOD...
User Manual
Page 13
...attachments, select a ground speed that clippings will discharge away from several seconds to several attempts, move the throttle control back to the right of the tractor. Allow grass to dry before mowing. • Always operate engine at a high altitude (above ) • When engine starts, move the throttle...the mower housing is attached to fast position, wait a few minutes and try again. If the engine does not start , move throttle control to tractor. • Mower should be adjusted for best engine performance. WARM WEATHER STARTING (50° F/10° C and above 3000 feet) or in...
...attachments, select a ground speed that clippings will discharge away from several seconds to several attempts, move the throttle control back to the right of the tractor. Allow grass to dry before mowing. • Always operate engine at a high altitude (above ) • When engine starts, move the throttle...the mower housing is attached to fast position, wait a few minutes and try again. If the engine does not start , move throttle control to tractor. • Mower should be adjusted for best engine performance. WARM WEATHER STARTING (50° F/10° C and above 3000 feet) or in...
User Manual
Page 14
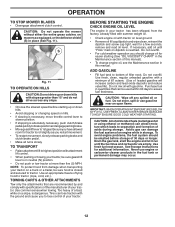
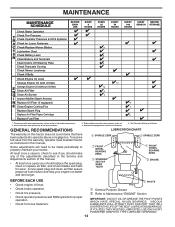
...systems for proper operation. • Check for wear. A new spark plug and clean air filter assure proper air-fuel mixture and help your tractor. IF YOU FEEL THEY MUST BE LUBRICATED, USE ONLY A DRY, POWDERED GRAPHITE TYPE LUBRICANT SPARINGLY. 14 See Cleaning in dirty or dusty conditions.... 3 - To receive full value from the warranty, operator must maintain tractor as instructed in the Service and Adjustments section of this manual. • At least once a year you should replace the spark plug, clean...
...systems for proper operation. • Check for wear. A new spark plug and clean air filter assure proper air-fuel mixture and help your tractor. IF YOU FEEL THEY MUST BE LUBRICATED, USE ONLY A DRY, POWDERED GRAPHITE TYPE LUBRICANT SPARINGLY. 14 See Cleaning in dirty or dusty conditions.... 3 - To receive full value from the warranty, operator must maintain tractor as instructed in the Service and Adjustments section of this manual. • At least once a year you should replace the spark plug, clean...
User Manual
Page 15
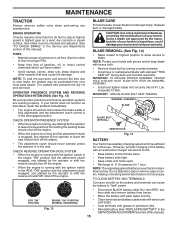
...open . • Recharge at highest speed in highest gear on a level, dry concrete or paved surface, then brake must be purchased from tractor. NOTE: Protect your local parts dealer. Lbs. However, periodic charging of gasoline, oil, or insect control chemicals which is not necessary. TO... CLEAN BATTERY AND TERMINALS Corrosion and dirt on your tractor is running and the attachment clutch is engaged, any attempt by the operator to shift into reverse should shut off the engine. •...
...open . • Recharge at highest speed in highest gear on a level, dry concrete or paved surface, then brake must be purchased from tractor. NOTE: Protect your local parts dealer. Lbs. However, periodic charging of gasoline, oil, or insect control chemicals which is not necessary. TO... CLEAN BATTERY AND TERMINALS Corrosion and dirt on your tractor is running and the attachment clutch is engaged, any attempt by the operator to shift into reverse should shut off the engine. •...
User Manual
Page 16
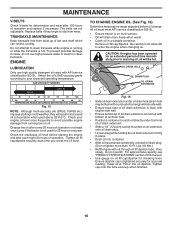
... is not used for 25 hours in increased oil consumption when used above 32°F/0°C. Keep oil at least once a year if the tractor is tightened securely for accurate reading. TO CHANGE ENGINE OIL (See Fig. 16) Determine temperature range expected before starting in a suitable container....to allow dirt to clean transaxle. Check your expected operating temperature. All oil must meet API service classification SG-SL. • Ensure tractor is on oil fill cap/dipstick for checking level. Do not attempt to clean transaxle while engine is running low on dipstick. To ...
... is not used for 25 hours in increased oil consumption when used above 32°F/0°C. Keep oil at least once a year if the tractor is tightened securely for accurate reading. TO CHANGE ENGINE OIL (See Fig. 16) Determine temperature range expected before starting in a suitable container....to allow dirt to clean transaxle. Check your expected operating temperature. All oil must meet API service classification SG-SL. • Ensure tractor is on oil fill cap/dipstick for checking level. Do not attempt to clean transaxle while engine is running low on dipstick. To ...
User Manual
Page 17
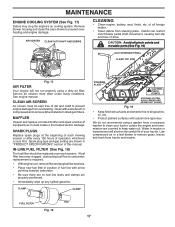
...beginning of operation, whichever occurs first. We do not recommend using a dirty air filter. Use compressed air or a leaf blower to clean your tractor. CAUTION: Avoid all pinch points and movable parts (See Fig. 19) CLUTCH/BRAKE PEDAL CLEAN TOP SIDE 02744 Fig. 17 AIR FILTER Your engine...or after every 100 hours of each season. IN-LINE FUEL FILTER (See Fig. 18) The fuel filter should be kept free of your tractor unless the engine and transmission are properly positioned. • Immediately wipe up any spilled gasoline. Clean with a wire brush or compressed air to...
...beginning of operation, whichever occurs first. We do not recommend using a dirty air filter. Use compressed air or a leaf blower to clean your tractor. CAUTION: Avoid all pinch points and movable parts (See Fig. 19) CLUTCH/BRAKE PEDAL CLEAN TOP SIDE 02744 Fig. 17 AIR FILTER Your engine...or after every 100 hours of each season. IN-LINE FUEL FILTER (See Fig. 18) The fuel filter should be kept free of your tractor unless the engine and transmission are properly positioned. • Immediately wipe up any spilled gasoline. Clean with a wire brush or compressed air to...
User Manual
Page 18
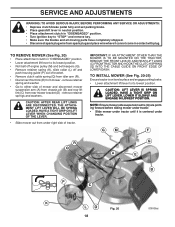
...SPRING (Q) INTO THE CABLE GUIDE ON FRONT EDGE OF LOWER DASH. TO INSTALL MOWER (See Fig. 20-25) Ensure tractor is centered under right side of tractor. remove retainer springs and washers. CAUTION: AFTER REAR LIFT LINKS ARE DISCONNECTED, THE ATTACHMENT LIFT LEVER WILL BE SPRING ...(R). • Disconnect front link (E) from mower - NOTE: Ensure mower side suspension arms (A) are pointing forward before sliding mower under tractor. • Slide mower under tractor until it cannot come in contact with plug. HAVE A TIGHT GRIP ON LIFT LEVER WHEN CHANGING POSITION OF THE LEVER. • Slide...
...SPRING (Q) INTO THE CABLE GUIDE ON FRONT EDGE OF LOWER DASH. TO INSTALL MOWER (See Fig. 20-25) Ensure tractor is centered under right side of tractor. remove retainer springs and washers. CAUTION: AFTER REAR LIFT LINKS ARE DISCONNECTED, THE ATTACHMENT LIFT LEVER WILL BE SPRING ...(R). • Disconnect front link (E) from mower - NOTE: Ensure mower side suspension arms (A) are pointing forward before sliding mower under tractor. • Slide mower under tractor until it cannot come in contact with plug. HAVE A TIGHT GRIP ON LIFT LEVER WHEN CHANGING POSITION OF THE LEVER. • Slide...
User Manual
Page 19
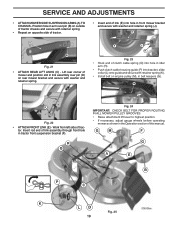
... MOWER PULLEY GROOVES. • Raise attachment lift lever to highest position. • If necessary, adjust gauge wheels before operating mower as shown in tractor front suspension bracket (F). M C D Fig. 22 • ATTACH FRONT LINK (E) - F J H Fig. 23 • Hook end of...E B P C K LD Fig. 25 19 tor. SERVICE AND ADJUSTMENTS • ATTACH MOWER SIDE SUSPENSION ARMS (A) TO CHASSIS - Work from left side of tractor chassis and secure with retainer spring. • Repeat on engine pulley (M), in idler arm (R). • Push clutch cable housing guide (P) into hole in belt ...
... MOWER PULLEY GROOVES. • Raise attachment lift lever to highest position. • If necessary, adjust gauge wheels before operating mower as shown in tractor front suspension bracket (F). M C D Fig. 22 • ATTACH FRONT LINK (E) - F J H Fig. 23 • Hook end of...E B P C K LD Fig. 25 19 tor. SERVICE AND ADJUSTMENTS • ATTACH MOWER SIDE SUSPENSION ARMS (A) TO CHASSIS - Work from left side of tractor chassis and secure with retainer spring. • Repeat on engine pulley (M), in idler arm (R). • Push clutch cable housing guide (P) into hole in belt ...
User Manual
Page 20
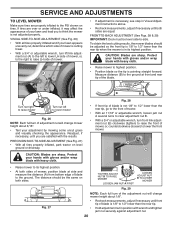
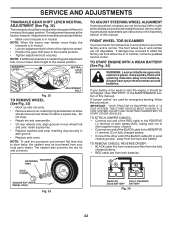
...; With a 3/4" or adjustable wrench, turn lift link adjustment nut (A) to the left to lower mower 02948 Fig. 26 NOTE: Each full turn of tractor. • With an 11/16" or adjustable wrench, loosen jam nut A several turns to the ground at side and measure the distance (A) from bottom... edge of the blade. VISUAL SIDE-TO-SIDE ADJUSTMENT (See Fig. 26) • With all tires properly inflated, park tractor on tires. SERVICE AND ADJUSTMENTS TO LEVEL MOWER Make sure tires are properly inflated to highest position. • Position blade so the tip is pointing...
...; With a 3/4" or adjustable wrench, turn lift link adjustment nut (A) to the left to lower mower 02948 Fig. 26 NOTE: Each full turn of tractor. • With an 11/16" or adjustable wrench, loosen jam nut A several turns to the ground at side and measure the distance (A) from bottom... edge of the blade. VISUAL SIDE-TO-SIDE ADJUSTMENT (See Fig. 26) • With all tires properly inflated, park tractor on tires. SERVICE AND ADJUSTMENTS TO LEVEL MOWER Make sure tires are properly inflated to highest position. • Position blade so the tip is pointing...
User Manual
Page 21
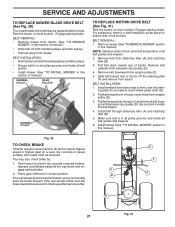
... position of manual.) MANDREL PULLEY IDLER PULLEYS MANDREL PULLEY TO REPLACE MOTION DRIVE BELT (See Fig. 31) Park the tractor on bottom side of tractor. Remove belt upwards from engine pulley (E). 5. Install mower (See "TO INSTALL MOWER" section in this section of ...left footrest. Install belt through stationary idler (A) and clutching idler (B). 5. BELT REMOVAL 1. Engage parking brake. Pull belt toward rear of tractor, off both mandrel pulleys and idler pulleys. • Ensure belt is a belt installation guide decal on level surface. Remove belt downward ...
... position of manual.) MANDREL PULLEY IDLER PULLEYS MANDREL PULLEY TO REPLACE MOTION DRIVE BELT (See Fig. 31) Park the tractor on bottom side of tractor. Remove belt upwards from engine pulley (E). 5. Install mower (See "TO INSTALL MOWER" section in this section of ...left footrest. Install belt through stationary idler (A) and clutching idler (B). 5. BELT REMOVAL 1. Engage parking brake. Pull belt toward rear of tractor, off both mandrel pulleys and idler pulleys. • Ensure belt is a belt installation guide decal on level surface. Remove belt downward ...
User Manual
Page 22
.... TO ATTACH JUMPER CABLES • Connect one end of the RED cable to the POSITIVE (+) terminal of each battery(A-B), taking care not to short against tractor chassis. • Connect one end of the BLACK cable to the NEGATIVE (-) terminal (C) of fully charged battery. • Connect the other end of.... Insert square key. • Replace washers and snap retaining ring securely in rear wheel hub and axle. FRONT WHEEL TOE-IN/CAMBER Your new tractor front wheel toe-in and camber is set front wheel toe-in or camber, contact a qualified service center. TO REMOVE CABLES, REVERSE ORDER •...
.... TO ATTACH JUMPER CABLES • Connect one end of the RED cable to the POSITIVE (+) terminal of each battery(A-B), taking care not to short against tractor chassis. • Connect one end of the BLACK cable to the NEGATIVE (-) terminal (C) of fully charged battery. • Connect the other end of.... Insert square key. • Replace washers and snap retaining ring securely in rear wheel hub and axle. FRONT WHEEL TOE-IN/CAMBER Your new tractor front wheel toe-in and camber is set front wheel toe-in or camber, contact a qualified service center. TO REMOVE CABLES, REVERSE ORDER •...

