
User Manual
Page 2
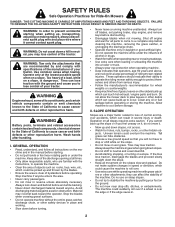
...Do not coast down before and while backing. • Never direct discharged material toward the operator. I. Always turn off engine and wait for all parts to come to roll over the edge or if the edge caves in gear when going down and behind before turning. • Never leave a running...California to neutral and coast downhill. • Avoid starting . • Do not put hands or feet near rotating parts or under the machine. Tires can touch hot exhaust / engine parts and burn. Keep clear of the discharge opening at the lowest possible speed when on the ground. • Do not...
...Do not coast down before and while backing. • Never direct discharged material toward the operator. I. Always turn off engine and wait for all parts to come to roll over the edge or if the edge caves in gear when going down and behind before turning. • Never leave a running...California to neutral and coast downhill. • Avoid starting . • Do not put hands or feet near rotating parts or under the machine. Tires can touch hot exhaust / engine parts and burn. Keep clear of the discharge opening at the lowest possible speed when on the ground. • Do not...
User Manual
Page 3
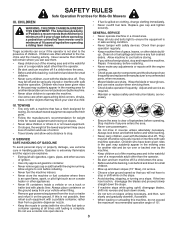
... towed equipment may cause • loss of traction and loss of the mowing area and in safe working condition. • Never tamper with manufacturer's recommended parts, when necessary. • Mower blades are often attracted to ensure the equipment is extremely flammable and the vapors are explosive. • • Extinguish all cigarettes...
... towed equipment may cause • loss of traction and loss of the mowing area and in safe working condition. • Never tamper with manufacturer's recommended parts, when necessary. • Mower blades are often attracted to ensure the equipment is extremely flammable and the vapors are explosive. • • Extinguish all cigarettes...

User Manual
Page 5
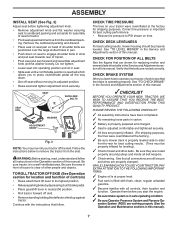
UNASSEMBLED PARTS Steering Wheel Steering Wheel Insert Steering Wheel Adapter Steering Wheel (1) Large Flat Washer (1) Lock Washer Steering Boot (1) Hex Bolt Steering Extension Shaft Seat (1) Seat (1) Cup Washer (1) Knob Keys Oil Drain Extension Slope Sheet Key(s) 5 Battery (2) Hex Bolts (2) Nut Keps
UNASSEMBLED PARTS Steering Wheel Steering Wheel Insert Steering Wheel Adapter Steering Wheel (1) Large Flat Washer (1) Lock Washer Steering Boot (1) Hex Bolt Steering Extension Shaft Seat (1) Seat (1) Cup Washer (1) Knob Keys Oil Drain Extension Slope Sheet Key(s) 5 Battery (2) Hex Bolts (2) Nut Keps

User Manual
Page 6
... (See Fig. 2) ASSEMBLE EXTENSION SHAFT AND BOOT • Slide extension shaft onto lower steering shaft. • Place tabs of those parts left unassembled for charging instructions). IMPORTANT: CHECK FOR AND REMOVE ANY STAPLES IN SKID THAT MAY PUNCTURE TIRES WHERE TRACTOR IS TO ROLL OFF...securely. • Snap steering wheel insert into service after month and year indicated on all four panels of your tractor all accessible loose parts and parts cartons from carton . • Cut along dotted lines on label (label is mentioned in the operating position (seated behind the steering ...
... (See Fig. 2) ASSEMBLE EXTENSION SHAFT AND BOOT • Slide extension shaft onto lower steering shaft. • Place tabs of those parts left unassembled for charging instructions). IMPORTANT: CHECK FOR AND REMOVE ANY STAPLES IN SKID THAT MAY PUNCTURE TIRES WHERE TRACTOR IS TO ROLL OFF...securely. • Snap steering wheel insert into service after month and year indicated on all four panels of your tractor all accessible loose parts and parts cartons from carton . • Cut along dotted lines on label (label is mentioned in the operating position (seated behind the steering ...
User Manual
Page 7
... clutch/brake pedal all belt keepers. ✓ Check wiring. PLEASE REVIEW THE FOLLOWING CHECKLIST: ✓ All assembly instructions have been completed. ✓ No remaining loose parts in the Service and Adjustments section of controls) • Raise attachment lift lever to tractor. • Pivot seat upward and remove from the skid. See...
... clutch/brake pedal all belt keepers. ✓ Check wiring. PLEASE REVIEW THE FOLLOWING CHECKLIST: ✓ All assembly instructions have been completed. ✓ No remaining loose parts in the Service and Adjustments section of controls) • Raise attachment lift lever to tractor. • Pivot seat upward and remove from the skid. See...
User Manual
Page 15
... with heavy cloth. • Remove blade bolt by turning counterclockwise. • Install new or resharpened blade with wire brush until bright. NOTE: Protect your local parts dealer. Reinstall battery (See "REPLACING BATTERY" in the Service and Adjustments section of the battery with the ignition switch in the ROS "ON" position and...
... with heavy cloth. • Remove blade bolt by turning counterclockwise. • Install new or resharpened blade with wire brush until bright. NOTE: Protect your local parts dealer. Reinstall battery (See "REPLACING BATTERY" in the Service and Adjustments section of the battery with the ignition switch in the ROS "ON" position and...
User Manual
Page 17
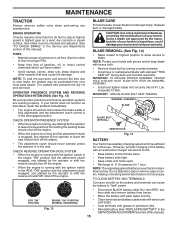
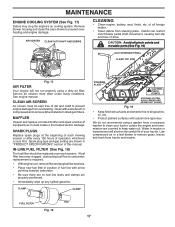
..., battery, seat, finish, etc. of drive. Debris can restrict clutch/brake pedal shaft movement, causing belt slip and loss of all pinch points and movable parts (See Fig. 19) CLUTCH/BRAKE PEDAL CLEAN TOP SIDE 02744 Fig. 17 AIR FILTER Your engine will shorten the useful life of dirt and chaff...
..., battery, seat, finish, etc. of drive. Debris can restrict clutch/brake pedal shaft movement, causing belt slip and loss of all pinch points and movable parts (See Fig. 19) CLUTCH/BRAKE PEDAL CLEAN TOP SIDE 02744 Fig. 17 AIR FILTER Your engine will shorten the useful life of dirt and chaff...
User Manual
Page 18
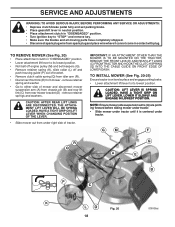
...) • Place attachment clutch in "DISENGAGED" position. • Lower attachment lift lever to "STOP" and remove key. • Make sure the blades and all moving parts have completely stopped. • Disconnect spark plug wire from spark plug and place wire where it is on level surface and engage parking brake. •...
...) • Place attachment clutch in "DISENGAGED" position. • Lower attachment lift lever to "STOP" and remove key. • Make sure the blades and all moving parts have completely stopped. • Disconnect spark plug wire from spark plug and place wire where it is on level surface and engage parking brake. •...
User Manual
Page 22
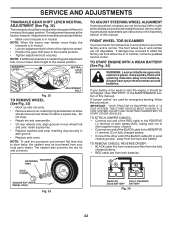
... the MAINTENANCE section of this manual). TO START ENGINE WITH A WEAK BATTERY (See Fig. 34) WARNING: Lead-acid batteries generate explosive gases. If your local parts dealer. Tire sealant also prevents tire dry rot and corrosion. RETAINING WASHERS RING AXLE COVER TO ADJUST STEERING WHEEL ALIGNMENT If steering wheel crossbars are...
... the MAINTENANCE section of this manual). TO START ENGINE WITH A WEAK BATTERY (See Fig. 34) WARNING: Lead-acid batteries generate explosive gases. If your local parts dealer. Tire sealant also prevents tire dry rot and corrosion. RETAINING WASHERS RING AXLE COVER TO ADJUST STEERING WHEEL ALIGNMENT If steering wheel crossbars are...
User Manual
Page 24
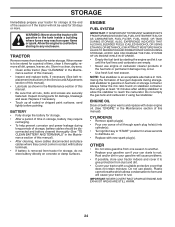
... retain moisture. ENGINE FUEL SYSTEM IMPORTANT: IT IS IMPORTANT TO PREVENT GUM DEPOSITS FROM FORMING IN ESSENTIAL FUEL SYSTEM PARTS SUCH AS CARBURETOR, FUEL FILTER, FUEL HOSE, OR TANK DURING STORAGE. Inspect moving parts for damage, breakage and wear. STORAGE Immediately prepare your tractor for storage at least 10 minutes after adding...
... retain moisture. ENGINE FUEL SYSTEM IMPORTANT: IT IS IMPORTANT TO PREVENT GUM DEPOSITS FROM FORMING IN ESSENTIAL FUEL SYSTEM PARTS SUCH AS CARBURETOR, FUEL FILTER, FUEL HOSE, OR TANK DURING STORAGE. Inspect moving parts for damage, breakage and wear. STORAGE Immediately prepare your tractor for storage at least 10 minutes after adding...
User Manual
Page 26
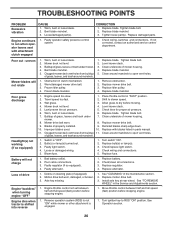
... mandrels. 1. Bulb(s) or lamp(s) burned out. 3. Check/clean all connections. 3. Turn ignition key to slower speed. 3. Replace damaged parts. If not corrected, contact an authorized service center/ department. Replace blade. Engine speed too slow. 1. Place throttle control in clutch mechanism.... alternator. 1. Loss of grass, leaves and trash under mower. 7. See "TO REMOVE WHEEL" in the maintenance section. 2. Loose/damaged part(s). Worn/damaged mower drive belt. 3. Replace mower drive belt. 3. Mower deck not level. 4. Replace blade. of grass, leaves, and...
... mandrels. 1. Bulb(s) or lamp(s) burned out. 3. Check/clean all connections. 3. Turn ignition key to slower speed. 3. Replace damaged parts. If not corrected, contact an authorized service center/ department. Replace blade. Engine speed too slow. 1. Place throttle control in clutch mechanism.... alternator. 1. Loss of grass, leaves and trash under mower. 7. See "TO REMOVE WHEEL" in the maintenance section. 2. Loose/damaged part(s). Worn/damaged mower drive belt. 3. Replace mower drive belt. 3. Mower deck not level. 4. Replace blade. of grass, leaves, and...
User Manual
Page 28
...of purchase by the manufacturer. 3. Please refer to materials or workmanship. The Warranty period for any products used for parts or labor incurred in replacing parts, any parts submitted for each full month from defects in materials and workmanship. In the event you . For a period of two...Manufacturer warrants to the original consumer purchaser that term as defined in the Magnuson-Moss Act of 1975. 28 Transportation charges for any part which has been subjected to alteration, misuse, abuse, improper assembly or installation, delivery damage, or to the engine, transaxle/transmission ...
...of purchase by the manufacturer. 3. Please refer to materials or workmanship. The Warranty period for any products used for parts or labor incurred in replacing parts, any parts submitted for each full month from defects in materials and workmanship. In the event you . For a period of two...Manufacturer warrants to the original consumer purchaser that term as defined in the Magnuson-Moss Act of 1975. 28 Transportation charges for any part which has been subjected to alteration, misuse, abuse, improper assembly or installation, delivery damage, or to the engine, transaxle/transmission ...


