
User Manual
Page 2
..., disengage the blades and proceed • Clear the area of the machine. These operators should evaluate their ability to operate the riding mower safely enough to lose control of grass , leaves or other attachments; Uneven terrain could be picked up the slope or if you to... protect themselves and others from serious injury. • Follow the manufacturer's recommendation for Ride-On Mowers IMPORTANT: THIS CUTTING MACHINE IS CAPABLE OF AMPUTATING HANDS AND FEET AND THROWING OBJECTS. FAILURE TO OBSERVE THE FOLLOWING SAFETY INSTRUCTIONS COULD RESULT ...
..., disengage the blades and proceed • Clear the area of the machine. These operators should evaluate their ability to operate the riding mower safely enough to lose control of grass , leaves or other attachments; Uneven terrain could be picked up the slope or if you to... protect themselves and others from serious injury. • Follow the manufacturer's recommendation for Ride-On Mowers IMPORTANT: THIS CUTTING MACHINE IS CAPABLE OF AMPUTATING HANDS AND FEET AND THROWING OBJECTS. FAILURE TO OBSERVE THE FOLLOWING SAFETY INSTRUCTIONS COULD RESULT ...
User Manual
Page 3
... a portable container, rather than from a gasoline dispenser nozzle. • Keep the nozzle in contact with manufacturer's recommended parts, when necessary. • Mower blades are . • Keep all cigarettes, cigars, pipes, and other than the operator. • Be alert and turn machine off and be seriously...object, stop . They may suddenly appear in or on slopes. • Never allow children or others in the mowing area for Ride-On Mowers III. Children who have been given rides in the past may fall off . Replace gas cap and tighten securely. GENERAL SERVICE • ...
... a portable container, rather than from a gasoline dispenser nozzle. • Keep the nozzle in contact with manufacturer's recommended parts, when necessary. • Mower blades are . • Keep all cigarettes, cigars, pipes, and other than the operator. • Be alert and turn machine off and be seriously...object, stop . They may suddenly appear in or on slopes. • Never allow children or others in the mowing area for Ride-On Mowers III. Children who have been given rides in the past may fall off . Replace gas cap and tighten securely. GENERAL SERVICE • ...
User Manual
Page 5
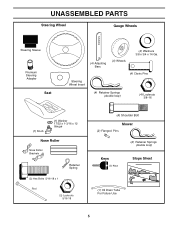
UNASSEMBLED PARTS Steering Wheel Gauge Wheels Steering Sleeve Premium Steering Adapter Seat (4) Adjusting Bars (4) Wheels (4) Washers 3/8 x 3/4 x 14 Ga. (4) Clevis Pins Steering Wheel Insert (4) Retainer Springs (double loop) (4) Locknuts 3/8-16 (1) Knob (1) Washer 17/32 x 1-3/16 x 12 Gauge Nose Roller Nose Roller Brackets Retainer Spring (2) Hex Bolts 5/16-18 x 1 Rod (2) Locknuts 5/16-18 (4) Shoulder Bolt Mower (2) Flanged Pins (2) Retainer Springs (double loop) Keys (2) Keys Slope Sheet (1) Oil Drain Tube For Future Use 5
UNASSEMBLED PARTS Steering Wheel Gauge Wheels Steering Sleeve Premium Steering Adapter Seat (4) Adjusting Bars (4) Wheels (4) Washers 3/8 x 3/4 x 14 Ga. (4) Clevis Pins Steering Wheel Insert (4) Retainer Springs (double loop) (4) Locknuts 3/8-16 (1) Knob (1) Washer 17/32 x 1-3/16 x 12 Gauge Nose Roller Nose Roller Brackets Retainer Spring (2) Hex Bolts 5/16-18 x 1 Rod (2) Locknuts 5/16-18 (4) Shoulder Bolt Mower (2) Flanged Pins (2) Retainer Springs (double loop) Keys (2) Keys Slope Sheet (1) Oil Drain Tube For Future Use 5
User Manual
Page 6
... lines on label (label located between terminals) charge battery for minimum of one hour at the factory with locknut and large flat . • Remove mower and packing materials. • Check for shipping purposes. Tighten securely. • Snap steering wheel insert into service after month and year indicated on all four...
... lines on label (label located between terminals) charge battery for minimum of one hour at the factory with locknut and large flat . • Remove mower and packing materials. • Check for shipping purposes. Tighten securely. • Snap steering wheel insert into service after month and year indicated on all four...
User Manual
Page 7
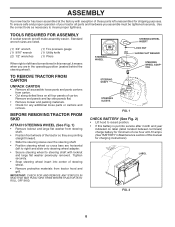
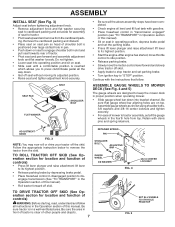
...TO DRIVE TRACTOR OFF SKID (See Operation section for assembly of this manual). • Roll tractor forward off the skid. ASSEMBLE GAUGE WHEELS TO MOWER DECK (See Fig. 4 and 5) The gauge wheels are on top. Follow the appropriate instruction below to disengage transmission (See "TO TRANSPORT" ... securely. Assemble gauge wheels as shown using shoulder bolts, 3/8 washers and 3/8-16 center locknuts and tighten securely. • For ease of mower to tractor. • Pivot seat upward and remove from the cardboard packing. Remove the cardboard packing and discard. • Place seat on...
...TO DRIVE TRACTOR OFF SKID (See Operation section for assembly of this manual). • Roll tractor forward off the skid. ASSEMBLE GAUGE WHEELS TO MOWER DECK (See Fig. 4 and 5) The gauge wheels are on top. Follow the appropriate instruction below to disengage transmission (See "TO TRANSPORT" ... securely. Assemble gauge wheels as shown using shoulder bolts, 3/8 washers and 3/8-16 center locknuts and tighten securely. • For ease of mower to tractor. • Pivot seat upward and remove from the cardboard packing. Remove the cardboard packing and discard. • Place seat on...

User Manual
Page 8
...SHIELD Tighten securely. NOTE: Be sure bracket tabs are raised with deflector shield to the right. • Remove plastic tie strap from mower belt and check belt for additional guidance on right side of tractor, install belt onto engine clutch pulley. Be sure tractor is in line with...positioned in tab holes in pin. • Secure pin with double loop retainer spring between the plate and mower bracket.If necessary, move mower side-to-side to give space between plate and mower bracket. • Go to lowest position. • Cut plastic tie and lower front suspension plate. &#...
...SHIELD Tighten securely. NOTE: Be sure bracket tabs are raised with deflector shield to the right. • Remove plastic tie strap from mower belt and check belt for additional guidance on right side of tractor, install belt onto engine clutch pulley. Be sure tractor is in line with...positioned in tab holes in pin. • Secure pin with double loop retainer spring between the plate and mower bracket.If necessary, move mower side-to-side to give space between plate and mower bracket. • Go to lowest position. • Cut plastic tie and lower front suspension plate. &#...
User Manual
Page 9
...before you learn how to operate your tractor for best cutting performance. • Reduce tire pressure to purge the transmission before operating mower as shown in "transmission engaged" position (see that the belts are routed properly around pulleys and inside all belt keepers. ✓..., clean, regular unleaded gasoline. ✓ Become familiar with all connections are still secure and wires are shown for replacing motion and mower blade drive belts in the Operation section of this manual). 9 Follow proper starting and transmission purging instructions (See "TO START ENGINE"...
...before you learn how to operate your tractor for best cutting performance. • Reduce tire pressure to purge the transmission before operating mower as shown in "transmission engaged" position (see that the belts are routed properly around pulleys and inside all belt keepers. ✓..., clean, regular unleaded gasoline. ✓ Become familiar with all connections are still secure and wires are shown for replacing motion and mower blade drive belts in the Operation section of this manual). 9 Follow proper starting and transmission purging instructions (See "TO START ENGINE"...

User Manual
Page 10
... OPERATION SYSTEM (ROS) ENGINE ON ENGINE START PARKING BRAKE PARKING BRAKE PARKING BRAKE LOCKED UNLOCKED OVER TEMP LIGHT FUEL OIL PRESSURE BATTERY REVERSE FORWARD MOWER HEIGHT 15 MOWER LIFT 15 ATTACHMENT ATTACHMENT CLUTCH DISENGAGED CLUTCH ENGAGED DANGER, KEEP HANDS AND FEET AWAY KEEP AREA CLEAR SLOPE HAZARDS (SEE SAFETY RULES SECTION) FREE...
... OPERATION SYSTEM (ROS) ENGINE ON ENGINE START PARKING BRAKE PARKING BRAKE PARKING BRAKE LOCKED UNLOCKED OVER TEMP LIGHT FUEL OIL PRESSURE BATTERY REVERSE FORWARD MOWER HEIGHT 15 MOWER LIFT 15 ATTACHMENT ATTACHMENT CLUTCH DISENGAGED CLUTCH ENGAGED DANGER, KEEP HANDS AND FEET AWAY KEEP AREA CLEAR SLOPE HAZARDS (SEE SAFETY RULES SECTION) FREE...

User Manual
Page 11
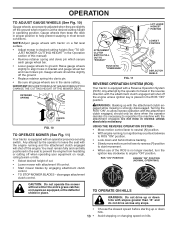
.... Selects the speed and direction of operation. Used to engage mower blades or other attachments mounted to your tractor to familiarize yourself with the location of mower deck or other attachments mounted to adjust the mower height. CHOKE CONTROL - HEIGHT ADJUSTMENT KNOB - Turns the headlights...and stop the engine. LIGHT SWITCH - PARKING BRAKE LEVER - Allows operation of various controls and adjustments. Used to raise and lower mower deck or other powered attachment while in reverse. 11 Used to your tractor. MOTION CONTROL LEVER - Locks brake pedal into the brake...
.... Selects the speed and direction of operation. Used to engage mower blades or other attachments mounted to your tractor to familiarize yourself with the location of mower deck or other attachments mounted to adjust the mower height. CHOKE CONTROL - HEIGHT ADJUSTMENT KNOB - Turns the headlights...and stop the engine. LIGHT SWITCH - PARKING BRAKE LEVER - Allows operation of various controls and adjustments. Used to raise and lower mower deck or other powered attachment while in reverse. 11 Used to your tractor. MOTION CONTROL LEVER - Locks brake pedal into the brake...

User Manual
Page 12
...grass. ENGINE - • Move throttle control between half and full speed (fast) position, before leaving the operator's position; TO ADJUST MOWER CUTTING HEIGHT (See Fig. 9) The cutting height is controlled by turning the height adjustment knob in desired direction. • Turn knob...) to "DISENGAGED" position. For healthier and better looking lawns, mow often and after moderate growth. GROUND DRIVE - • To stop mower blades,move throttle control between half and full speed (fast) position. TO BE DISCHARGED, (DEAD). to empty • Place parking brake ...
...grass. ENGINE - • Move throttle control between half and full speed (fast) position, before leaving the operator's position; TO ADJUST MOWER CUTTING HEIGHT (See Fig. 9) The cutting height is controlled by turning the height adjustment knob in desired direction. • Turn knob...) to "DISENGAGED" position. For healthier and better looking lawns, mow often and after moderate growth. GROUND DRIVE - • To stop mower blades,move throttle control between half and full speed (fast) position. TO BE DISCHARGED, (DEAD). to empty • Place parking brake ...
User Manual
Page 13
...off the engine. Avoid stopping or changing speed on rough, rolling terrain or hills. • Select desired height of cut. • Lower mower with the attachment engaged. Any attempt by the operator to engine "ON" position. LIFT LEVER HIGHEST POSIITON LOWEST POSITION ATTACHEMNT CLUTCH SWITCH PULL ... off the ground. • Replace retainer spring into clevis pin. • Be sure all gauge wheels are slightly off the ground when mower is necessary to desired cutting height (See "TO AD- Turning the ROS "ON", to allow reverse operation with the attachment clutch engaged, ...
...off the engine. Avoid stopping or changing speed on rough, rolling terrain or hills. • Select desired height of cut. • Lower mower with the attachment engaged. Any attempt by the operator to engine "ON" position. LIFT LEVER HIGHEST POSIITON LOWEST POSITION ATTACHEMNT CLUTCH SWITCH PULL ... off the ground. • Replace retainer spring into clevis pin. • Be sure all gauge wheels are slightly off the ground when mower is necessary to desired cutting height (See "TO AD- Turning the ROS "ON", to allow reverse operation with the attachment clutch engaged, ...
User Manual
Page 15
... this procedure three (3) times. 15 FIG. 13 00272 If grass is extremely tall, it is recommended that will suit the terrain and give the mower cutting performance as well as follows: • Be sure parking brake is engaged. • Remove retainer spring from shrubs, fences, driveways, etc...sure the tractor is on level surface with the motion control lever three (3) times. • Your tractor is attached to tractor. • Mower should be properly leveled for the first time. To ensure proper operation and performance, it should be mowed twice to reduce load and ...
... this procedure three (3) times. 15 FIG. 13 00272 If grass is extremely tall, it is recommended that will suit the terrain and give the mower cutting performance as well as follows: • Be sure parking brake is engaged. • Remove retainer spring from shrubs, fences, driveways, etc...sure the tractor is on level surface with the motion control lever three (3) times. • Your tractor is attached to tractor. • Mower should be properly leveled for the first time. To ensure proper operation and performance, it should be mowed twice to reduce load and ...
User Manual
Page 16
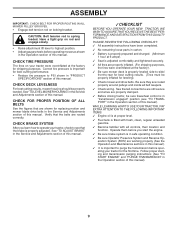
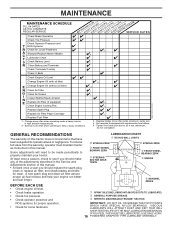
.... • Check brake operation. • Check tire pressure. • Check operator presence and ROS systems for proper operation. • Check for Loose Fasteners A Sharpen/Replace Mower Blades C T Lubrication Chart 0 Check Battery Level R Clean Battery and Terminals Check Transaxle Cooling Check V-Belts BEFOREEEVAECRHYU8ESVHEEORUYRS2E5VHEROYUR5E0SVEHROYUR1E0SV0EHROYUBSREESFAOSROENSSTEORRAVGEICE DATES 5 3 4 Check Engine Oil Level Change Engine Oil (with...
.... • Check brake operation. • Check tire pressure. • Check operator presence and ROS systems for proper operation. • Check for Loose Fasteners A Sharpen/Replace Mower Blades C T Lubrication Chart 0 Check Battery Level R Clean Battery and Terminals Check Transaxle Cooling Check V-Belts BEFOREEEVAECRHYU8ESVHEEORUYRS2E5VHEROYUR5E0SVEHROYUR1E0SV0EHROYUBSREESFAOSROENSSTEORRAVGEICE DATES 5 3 4 Check Engine Oil Level Change Engine Oil (with...
User Manual
Page 17
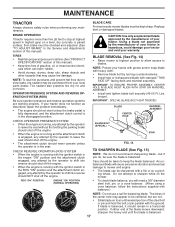
...you do not recommend sharpening blade - Tire sealant also prevents tire dry rot and corrosion. BLADE REMOVAL (See Fig. 14) • Raise mower to highest position to allow access to leave the seat without first setting the parking brake should not start unless the brake pedal is...your tractor does not function as described, repair the problem immediately. • The engine should shut off the engine. BLADE CARE For best results mower blades must be sharpened with balancer.) NOTE: Do not use a nail for balancing blade. The lobes of gasoline, oil, or insect control ...
...you do not recommend sharpening blade - Tire sealant also prevents tire dry rot and corrosion. BLADE REMOVAL (See Fig. 14) • Raise mower to highest position to allow access to leave the seat without first setting the parking brake should not start unless the brake pedal is...your tractor does not function as described, repair the problem immediately. • The engine should shut off the engine. BLADE CARE For best results mower blades must be sharpened with balancer.) NOTE: Do not use a nail for balancing blade. The lobes of gasoline, oil, or insect control ...
User Manual
Page 19
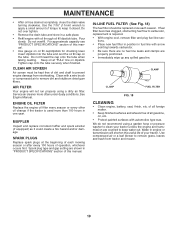
... the drain valve turning clockwise. Pour slowly. For approximate capacity see "PRODUCT SPECIFICATIONS" section of dirt and chaff to prevent engine damage from tractor and mower. 19 Tighten cap onto the tube securely when finished. ENGINE OIL FILTER Replace the engine oil filter every season or every other oil...
... the drain valve turning clockwise. Pour slowly. For approximate capacity see "PRODUCT SPECIFICATIONS" section of dirt and chaff to prevent engine damage from tractor and mower. 19 Tighten cap onto the tube securely when finished. ENGINE OIL FILTER Replace the engine oil filter every season or every other oil...
User Manual
Page 20
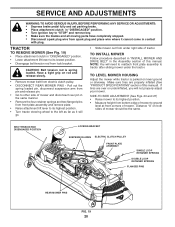
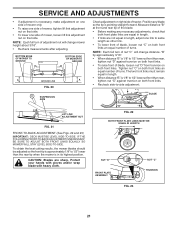
...same manner. • Remove the four retainer springs and two flanged pins from under the tractor. TO LEVEL MOWER HOUSING Adjust the mower while tractor is spring loaded. BELT TENSION ROD DISENGAGED POSITION LOCKING BRACKET SUSPENSION ARMS ELECTRIC CLUTCH PULLEY FRONT PLATE ASSEMBLY SINGLE... parts have completely stopped. • Disconnect spark plug wire from spark plug and place wire where it will not properly adjust your mower. SERVICE AND ADJUSTMENTS WARNING:TO AVOID SERIOUS INJURY, BEFORE PERFORMING ANY SERVICE OR ADJUSTMENTS: • Depress brake pedal fully and set ...
...same manner. • Remove the four retainer springs and two flanged pins from under the tractor. TO LEVEL MOWER HOUSING Adjust the mower while tractor is spring loaded. BELT TENSION ROD DISENGAGED POSITION LOCKING BRACKET SUSPENSION ARMS ELECTRIC CLUTCH PULLEY FRONT PLATE ASSEMBLY SINGLE... parts have completely stopped. • Disconnect spark plug wire from spark plug and place wire where it will not properly adjust your mower. SERVICE AND ADJUSTMENTS WARNING:TO AVOID SERIOUS INJURY, BEFORE PERFORMING ANY SERVICE OR ADJUSTMENTS: • Depress brake pedal fully and set ...
User Manual
Page 21
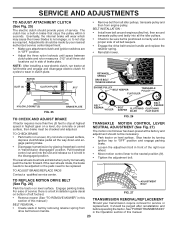
...lower at front than rear, tighten nut "D" against trunnion on right side of turns. NOTE: Each full turn of adjustment nut will change mower height about 3/16". • Recheck measurements after adjusting. IF THE FOLLOWING FRONT-TO-BACK ADJUSTMENT IS NECESSARY, BE SURE TO ADJUST BOTH ...FRONT LINKS EQUALLY SO MOWER WILL STAY LEVEL SIDE-TO-SIDE. Check adjustment on both front links an equal number of turns. "B" by approximately 3/16". • When ...
...lower at front than rear, tighten nut "D" against trunnion on right side of turns. NOTE: Each full turn of adjustment nut will change mower height about 3/16". • Recheck measurements after adjusting. IF THE FOLLOWING FRONT-TO-BACK ADJUSTMENT IS NECESSARY, BE SURE TO ADJUST BOTH ...FRONT LINKS EQUALLY SO MOWER WILL STAY LEVEL SIDE-TO-SIDE. Check adjustment on both front links an equal number of turns. "B" by approximately 3/16". • When ...
User Manual
Page 22
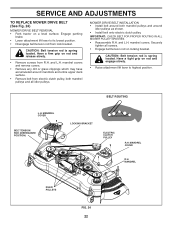
...; Install belt onto electric clutch pulley. and L.H. Securely tighten all idler pulleys. SERVICE AND ADJUSTMENTS TO REPLACE MOWER DRIVE BELT (See Fig. 24) MOWER DRIVE BELT REMOVAL • Park tractor on rod and engage slowly. • Raise attachment lift lever to ...DISENGAGED POSITION) LOCKING BRACKET ELECTRIC CLUTCH PULLEY R.H. CAUTION: Belt tension rod is spring loaded. IMPORTANT: CHECK BELT FOR PROPER ROUTING IN ALL MOWER PULLEY GROOVES. • Reassemble R.H. BELT ROUTING L.H. Engage parking brake. • Lower attachment lift lever to highest position. Have a...
...; Install belt onto electric clutch pulley. and L.H. Securely tighten all idler pulleys. SERVICE AND ADJUSTMENTS TO REPLACE MOWER DRIVE BELT (See Fig. 24) MOWER DRIVE BELT REMOVAL • Park tractor on rod and engage slowly. • Raise attachment lift lever to ...DISENGAGED POSITION) LOCKING BRACKET ELECTRIC CLUTCH PULLEY R.H. CAUTION: Belt tension rod is spring loaded. IMPORTANT: CHECK BELT FOR PROPER ROUTING IN ALL MOWER PULLEY GROOVES. • Reassemble R.H. BELT ROUTING L.H. Engage parking brake. • Lower attachment lift lever to highest position. Have a...
User Manual
Page 23
... ease of service there is a belt installation guide decal on bottom of left footrest. 02508 FIG. 27 • Remove mower (See "TO REMOVE MOWER" in this section of this manual. 23 Adjustments should be purged after reinstallation and before operating the tractor. TRANSMISSION REMOVAL/REPLACEMENT..." • Remove belt from all belt keepers. • Engage the drive belt tension handle and replace the retainer spring. • Reinstall mower. BELT INSTALLATION - • Install new belt around engine pulley first, then around transaxle pulley and lastly into the slot and release so...
... ease of service there is a belt installation guide decal on bottom of left footrest. 02508 FIG. 27 • Remove mower (See "TO REMOVE MOWER" in this section of this manual. 23 Adjustments should be purged after reinstallation and before operating the tractor. TRANSMISSION REMOVAL/REPLACEMENT..." • Remove belt from all belt keepers. • Engage the drive belt tension handle and replace the retainer spring. • Reinstall mower. BELT INSTALLATION - • Install new belt around engine pulley first, then around transaxle pulley and lastly into the slot and release so...
User Manual
Page 26
...; Fully charge the battery for storage. • After a period of this manual). Always follow the mix ratio found on concrete or damp surfaces. TRACTOR Remove mower from dust and dirt. • Cover your tractor with clean engine oil. (See "ENGINE" in the Maintenance section of time in any enclosure. When... mower is to be stored for 30 days or more. Store in a clean, dry area. • Clean entire tractor (See "CLEANING" in fuel tank or storage...
...; Fully charge the battery for storage. • After a period of this manual). Always follow the mix ratio found on concrete or damp surfaces. TRACTOR Remove mower from dust and dirt. • Cover your tractor with clean engine oil. (See "ENGINE" in the Maintenance section of time in any enclosure. When... mower is to be stored for 30 days or more. Store in a clean, dry area. • Clean entire tractor (See "CLEANING" in fuel tank or storage...


