
User Manual
Page 2
...operators should evaluate their ability to operate the riding mower safely enough to prevent accidental starting . • Do not put hands or feet near rotating parts or under the influence of a load, while on a slope. Wash hands tip-over . • Never carry passengers. • Use... slope, is clear of your tractor. after handling. • Mow up and thrown by putting your tractor. which can touch hot exhaust / engine parts and burn. Do not make sudden changes in . they can hide obstacles. • Choose a low ground speed so that are involved in reverse ...
...operators should evaluate their ability to operate the riding mower safely enough to prevent accidental starting . • Do not put hands or feet near rotating parts or under the influence of a load, while on a slope. Wash hands tip-over . • Never carry passengers. • Use... slope, is clear of your tractor. after handling. • Mow up and thrown by putting your tractor. which can touch hot exhaust / engine parts and burn. Do not make sudden changes in . they can hide obstacles. • Choose a low ground speed so that are involved in reverse ...

User Manual
Page 3
... and remove any adjustments or repairs with the engine running. • Check grass catcher components and the discharge guard frequently and replace with manufacturer's recommended parts, when necessary. • Mower blades are explosive. • Extinguish all times until fueling is clear of a responsible adult other objects that you will remain where...
... and remove any adjustments or repairs with the engine running. • Check grass catcher components and the discharge guard frequently and replace with manufacturer's recommended parts, when necessary. • Mower blades are explosive. • Extinguish all times until fueling is clear of a responsible adult other objects that you will remain where...

User Manual
Page 5
UNASSEMBLED PARTS Steering Wheel Seat Steering Wheel Adapter (1) Large Flat Washer (1) Washer 17/32 x 1-3/16 x 12 Gauge Steering Wheel Insert Steering Sleeve (1) Knob Key (2) Keys (1) Oil Drain Tube Slope Sheet (1) Hex nut 1/2-20 (1) Hex Bolt 1/4-28 x 1-1/4 (4) Retainer Springs Gauge Wheels (double loop) (4) Locknut 3/8-16 (4) Shoulder Bolt (4) Wheels (4) Adjusting Bar (4) Washers 3/8 x 3/4 x 14 Ga. (4) Clevis Pins 5
UNASSEMBLED PARTS Steering Wheel Seat Steering Wheel Adapter (1) Large Flat Washer (1) Washer 17/32 x 1-3/16 x 12 Gauge Steering Wheel Insert Steering Sleeve (1) Knob Key (2) Keys (1) Oil Drain Tube Slope Sheet (1) Hex nut 1/2-20 (1) Hex Bolt 1/4-28 x 1-1/4 (4) Retainer Springs Gauge Wheels (double loop) (4) Locknut 3/8-16 (4) Shoulder Bolt (4) Wheels (4) Adjusting Bar (4) Washers 3/8 x 3/4 x 14 Ga. (4) Clevis Pins 5

User Manual
Page 6
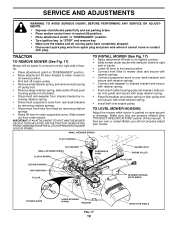
... you are horizontal (left unassembled for shipping purposes. Tighten securely. • Snap steering wheel insert into operating position and sit on all parts and hardware you to tractor. • Pivot seat upward and remove from tractor hood and grill. STEERING SHAFT STEERING SLEEVE 02818 FIG....securely. 6 TOOLS REQUIRED FOR ASSEMBLY A socket wrench set aside for assembly of seat to press clutch/brake pedal all accessible loose parts and parts cartons from steering shaft. • Position front wheels of carton. Remove end panels and lay side panels flat the ...
... you are horizontal (left unassembled for shipping purposes. Tighten securely. • Snap steering wheel insert into operating position and sit on all parts and hardware you to tractor. • Pivot seat upward and remove from tractor hood and grill. STEERING SHAFT STEERING SLEEVE 02818 FIG....securely. 6 TOOLS REQUIRED FOR ASSEMBLY A socket wrench set aside for assembly of seat to press clutch/brake pedal all accessible loose parts and parts cartons from steering shaft. • Position front wheels of carton. Remove end panels and lay side panels flat the ...

User Manual
Page 8
... pulleys and inside all controls, their location and function. PLEASE REVIEW THE FOLLOWING CHECKLIST: ✓ All assembly instructions have been completed. ✓ No remaining loose parts in carton. ✓ Battery is properly prepared and charged. (Minimum 1 hour at 6 amps). ✓ Seat is adjusted comfortably and tightened securely. ✓ All tires are...
... pulleys and inside all controls, their location and function. PLEASE REVIEW THE FOLLOWING CHECKLIST: ✓ All assembly instructions have been completed. ✓ No remaining loose parts in carton. ✓ Battery is properly prepared and charged. (Minimum 1 hour at 6 amps). ✓ Seat is adjusted comfortably and tightened securely. ✓ All tires are...

User Manual
Page 16
... operator is running with trailing edge up towards deck as shown. Lbs. IF BOLT NEEDS REPLACING, REPLACE ONLY WITH APPROVE BOLT SHOWN IN THE REPAIR PARTS. ing wheel. CAUTION: Use only a replacement blade approved by the manufacturer of your warranty. An unbalanced blade will need a 5/8" diameter steel bolt, pin, or a cone... engine. • The blade can harm rubber. • Avoid stumps, stones, deep ruts, sharp objects and other hazards that may be purchased from your local parts dealer. If your tractor. NOTE: Do not use a nail for balancing blade.
... operator is running with trailing edge up towards deck as shown. Lbs. IF BOLT NEEDS REPLACING, REPLACE ONLY WITH APPROVE BOLT SHOWN IN THE REPAIR PARTS. ing wheel. CAUTION: Use only a replacement blade approved by the manufacturer of your warranty. An unbalanced blade will need a 5/8" diameter steel bolt, pin, or a cone... engine. • The blade can harm rubber. • Avoid stumps, stones, deep ruts, sharp objects and other hazards that may be purchased from your local parts dealer. If your tractor. NOTE: Do not use a nail for balancing blade.
User Manual
Page 19
... in contact with plug. TO INSTALL MOWER (See Fig. 17) • Raise attachment lift lever to its highest position. • Slide mower under tractor. moving parts have completely stopped. • Disconnect spark plug wire from the right side of tractor. • Place attachment clutch in "DISENGAGED" position. • Move attachment lift...
... in contact with plug. TO INSTALL MOWER (See Fig. 17) • Raise attachment lift lever to its highest position. • Slide mower under tractor. moving parts have completely stopped. • Disconnect spark plug wire from the right side of tractor. • Place attachment clutch in "DISENGAGED" position. • Move attachment lift...

User Manual
Page 22
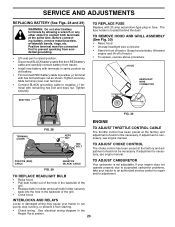
... damage has occurred to 1/2 inch in axle groove. • Replace axle cover. 22 WEAK OR DEAD BATTERY FULLY CHARGED BATTERY FIG. 27 If your local parts dealer. TO ATTACH JUMPER CABLES • Connect one end of the RED cable to the POSITIVE (+) terminal of each battery(A-B), taking care not to short...
... damage has occurred to 1/2 inch in axle groove. • Replace axle cover. 22 WEAK OR DEAD BATTERY FULLY CHARGED BATTERY FIG. 27 If your local parts dealer. TO ATTACH JUMPER CABLES • Connect one end of the RED cable to the POSITIVE (+) terminal of each battery(A-B), taking care not to short...
User Manual
Page 23
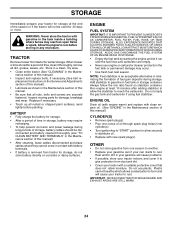
... nut. Tighten securely. TO REMOVE HOOD AND GRILL ASSEMBLY (See Fig. 30) • Raise hood. • Unsnap headlight wire connector. • Stand in the Repair Parts section. 23 Grasp hood at the factory and adjustment should not be necessary. POSITIVE (RED) CABLE NEGATIVE (BLACK) CABLE FIG. 29 TO REPLACE HEADLIGHT BULB...
... nut. Tighten securely. TO REMOVE HOOD AND GRILL ASSEMBLY (See Fig. 30) • Raise hood. • Unsnap headlight wire connector. • Stand in the Repair Parts section. 23 Grasp hood at the factory and adjustment should not be necessary. POSITIVE (RED) CABLE NEGATIVE (BLACK) CABLE FIG. 29 TO REPLACE HEADLIGHT BULB...
User Manual
Page 24
...Lubricate as shown in the Maintenance section of this manual). • Inspect and replace belts, if necessary (See belt re- Inspect moving parts for winter storage. STORAGE Immediately prepare your tractor for storage at least 10 minutes after adding stabilizer to allow the stabilizer to give protection ... they cannot come in any enclosure. ENGINE FUEL SYSTEM IMPORTANT: IT IS IMPORTANT TO PREVENT GUM DEPOSITS FROM FORMING IN ESSENTIAL FUEL SYSTEM PARTS SUCH AS CARBURETOR, FUEL FILTER, FUEL HOSE, OR TANK DURING STORAGE. ENGINE OIL Drain oil (with engine warm) and replace with...
...Lubricate as shown in the Maintenance section of this manual). • Inspect and replace belts, if necessary (See belt re- Inspect moving parts for winter storage. STORAGE Immediately prepare your tractor for storage at least 10 minutes after adding stabilizer to allow the stabilizer to give protection ... they cannot come in any enclosure. ENGINE FUEL SYSTEM IMPORTANT: IT IS IMPORTANT TO PREVENT GUM DEPOSITS FROM FORMING IN ESSENTIAL FUEL SYSTEM PARTS SUCH AS CARBURETOR, FUEL FILTER, FUEL HOSE, OR TANK DURING STORAGE. ENGINE OIL Drain oil (with engine warm) and replace with...

User Manual
Page 25
... 14. Empty fuel tank and carburetor, refill tank with fresh, clean gasoline. 9. Excessive vibration 1. Loose/damaged part(s). 1. Replace blade. Replace damaged parts. 25 Bad spark plug. 5. Carburetor out of power 1. Clean/replace air filter. 6. Hard to start 1....starter. 9. Clean battery terminals. 3. Low oil level/dirty oil. 6. Clean/replace air filter. 5. Tighten blade bolt. 2. Tighten loose part(s). Out of mower housing. 4. Loose or damaged wiring. 9. See "To Adjust Carburetor" in "CHOKE" position. 3. Dirty air filter...
... 14. Empty fuel tank and carburetor, refill tank with fresh, clean gasoline. 9. Excessive vibration 1. Loose/damaged part(s). 1. Replace blade. Replace damaged parts. 25 Bad spark plug. 5. Carburetor out of power 1. Clean/replace air filter. 6. Hard to start 1....starter. 9. Clean battery terminals. 3. Low oil level/dirty oil. 6. Clean/replace air filter. 5. Tighten blade bolt. 2. Tighten loose part(s). Out of mower housing. 4. Loose or damaged wiring. 9. See "To Adjust Carburetor" in "CHOKE" position. 3. Dirty air filter...

User Manual
Page 27
... warranty on these items. 2. LIMITED WARRANTY The Manufacturer warrants to the original consumer purchaser that term as noted below) or components parts thereof. This warranty does not apply to the engine, other rights which we will repair or replace, at our option, without charge... to you may not apply to you have been properly assembled, adjusted, operated, and maintained in replacing parts, any power equipment unit or attachment are belts, blades, blade adapters, normal wear, normal adjustments, standard hardware and normal maintenance. 7. ...
... warranty on these items. 2. LIMITED WARRANTY The Manufacturer warrants to the original consumer purchaser that term as noted below) or components parts thereof. This warranty does not apply to the engine, other rights which we will repair or replace, at our option, without charge... to you may not apply to you have been properly assembled, adjusted, operated, and maintained in replacing parts, any power equipment unit or attachment are belts, blades, blade adapters, normal wear, normal adjustments, standard hardware and normal maintenance. 7. ...

User Manual
Page 30
...please contact your local dealer for parts and service should be necessary during the life of Electrolux Home Products is to your unit. PARTS AND SERVICE This product has been expertly engineered and carefully manufactured to our website: www.poulan-pro.com/support.asp NOTE: ...Electrolux Home Products provides parts and service through its products. For Parts and service, contact our authorized distributor:...
...please contact your local dealer for parts and service should be necessary during the life of Electrolux Home Products is to your unit. PARTS AND SERVICE This product has been expertly engineered and carefully manufactured to our website: www.poulan-pro.com/support.asp NOTE: ...Electrolux Home Products provides parts and service through its products. For Parts and service, contact our authorized distributor:...


