
User Manual
Page 2
...and wait for all parts to come to a complete stop before storage. These operators should evaluate their ability to operate the riding mower safely enough to cause cancer and birth defects or other hidden I. SLOPE OPERATION Battery posts, terminals and related accessories Slopes are ...other reproductive harm. Operation on all movement on a slope. GENERAL OPERATION • Read, understand, and follow all times. • Only allow the mower deck to plow leaves or other safety devices in place and working. • Slow down slopes, not across. • Watch for traffic...
...and wait for all parts to come to a complete stop before storage. These operators should evaluate their ability to operate the riding mower safely enough to cause cancer and birth defects or other hidden I. SLOPE OPERATION Battery posts, terminals and related accessories Slopes are ...other reproductive harm. Operation on all movement on a slope. GENERAL OPERATION • Read, understand, and follow all times. • Only allow the mower deck to plow leaves or other safety devices in place and working. • Slow down slopes, not across. • Watch for traffic...

User Manual
Page 3
...the engine running. • Check grass catcher components and the discharge guard frequently and replace with manufacturer's recommended parts, when necessary. • Mower blades are . • Keep all nuts and bolts tight to be sure the equipment is in reverse unless absolutely necessary. Always look down ... rim of the fuel tank or container opening at the hitch point. • Follow the manufacturer's recommendation for weight limits for Ride-On Mowers III. Replace gas cap and tighten securely. Stop machine if anyone enters the area. • Never carry passengers. • Do not...
...the engine running. • Check grass catcher components and the discharge guard frequently and replace with manufacturer's recommended parts, when necessary. • Mower blades are . • Keep all nuts and bolts tight to be sure the equipment is in reverse unless absolutely necessary. Always look down ... rim of the fuel tank or container opening at the hitch point. • Follow the manufacturer's recommendation for weight limits for Ride-On Mowers III. Replace gas cap and tighten securely. Stop machine if anyone enters the area. • Never carry passengers. • Do not...
User Manual
Page 7
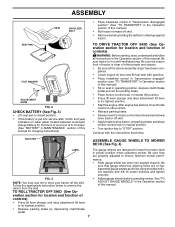
...10 amps. (See "BATTERY" in MAINTENANCE section of this manual for location and function of controls) • Adjust gauge wheels before operating mower. Assemble gauge wheels as shown using shoulder bolts, 3/8 washers and 3/8-16 center locknuts and tighten securely. SEAT PAN 02466 FLAT WASHER 02464 ADJUSTMENT...(See "TO TRANSPORT" in the Operation section of this manual). • Roll tractor forward off the skid. SEAT PAN ASSEMBLE GAUGE WHEELS TO MOWER DECK (See Fig. 4) LABEL The gauge wheels are designed to raised position. • If this manual. • Press lift lever plunger ...
...10 amps. (See "BATTERY" in MAINTENANCE section of this manual for location and function of controls) • Adjust gauge wheels before operating mower. Assemble gauge wheels as shown using shoulder bolts, 3/8 washers and 3/8-16 center locknuts and tighten securely. SEAT PAN 02466 FLAT WASHER 02464 ADJUSTMENT...(See "TO TRANSPORT" in the Operation section of this manual). • Roll tractor forward off the skid. SEAT PAN ASSEMBLE GAUGE WHEELS TO MOWER DECK (See Fig. 4) LABEL The gauge wheels are designed to raised position. • If this manual. • Press lift lever plunger ...

User Manual
Page 8
...transmission purging instructions (See "TO START ENGINE" and "PURGE TRANSMISSION" in the Service and Adjustments section of this manual. See"TO LEVEL MOWER HOUSING"in the Operation section of this manual). 8 See "TO ADJUST BRAKE" in safe operating condition. ✓ Be sure Operator ...Presence System and Reverse Operation System (ROS) are shown for leveling). ✓ Check mower and drive belts. CHECK FOR PROPER POSITION OF ALL BELTS See the figures that the brake is in the Service and Adjustments section...
...transmission purging instructions (See "TO START ENGINE" and "PURGE TRANSMISSION" in the Service and Adjustments section of this manual. See"TO LEVEL MOWER HOUSING"in the Operation section of this manual). 8 See "TO ADJUST BRAKE" in safe operating condition. ✓ Be sure Operator ...Presence System and Reverse Operation System (ROS) are shown for leveling). ✓ Check mower and drive belts. CHECK FOR PROPER POSITION OF ALL BELTS See the figures that the brake is in the Service and Adjustments section...

User Manual
Page 9
... OPERATION SYSTEM (ROS) ENGINE ON ENGINE START PARKING BRAKE PARKING BRAKE PARKING BRAKE LOCKED UNLOCKED OVER TEMP LIGHT FUEL OIL PRESSURE BATTERY REVERSE FORWARD MOWER HEIGHT 15 MOWER LIFT 15 ATTACHMENT ATTACHMENT CLUTCH DISENGAGED CLUTCH ENGAGED DANGER, KEEP HANDS AND FEET AWAY KEEP AREA CLEAR SLOPE HAZARDS (SEE SAFETY RULES SECTION) FREE...
... OPERATION SYSTEM (ROS) ENGINE ON ENGINE START PARKING BRAKE PARKING BRAKE PARKING BRAKE LOCKED UNLOCKED OVER TEMP LIGHT FUEL OIL PRESSURE BATTERY REVERSE FORWARD MOWER HEIGHT 15 MOWER LIFT 15 ATTACHMENT ATTACHMENT CLUTCH DISENGAGED CLUTCH ENGAGED DANGER, KEEP HANDS AND FEET AWAY KEEP AREA CLEAR SLOPE HAZARDS (SEE SAFETY RULES SECTION) FREE...

User Manual
Page 10
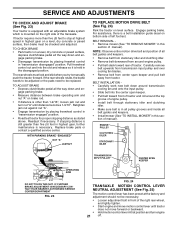
... MOTION CONTROL LEVER 02853 FIG. 5 Our tractors conform to the safety standards of tractor. Used to raise and lower the mower deck or other powered attachment while in reverse. 10 IGNITION SWITCH - Disengages transmission for pushing or slowly towing the tractor with the... locations of mower deck or other attachments mounted to your tractor. Used for starting and stopping the engine. LIFT LEVER PLUNGER - PARKING BRAKE - ...
... MOTION CONTROL LEVER 02853 FIG. 5 Our tractors conform to the safety standards of tractor. Used to raise and lower the mower deck or other powered attachment while in reverse. 10 IGNITION SWITCH - Disengages transmission for pushing or slowly towing the tractor with the... locations of mower deck or other attachments mounted to your tractor. Used for starting and stopping the engine. LIFT LEVER PLUNGER - PARKING BRAKE - ...

User Manual
Page 11
... at less than full throttle reduces the battery charging rate. • Full throttle offers the best bagging and mower perfor- To eliminate this possibility, always stop mower blades,move motion control lever to "OFF" position and remove key. PARKING BRAKE CLUTCH/BRAKE PARKING BRAKE "ENGAGED...8226; Move throttle control between half and full speed (fast) position, before leaving the operator's position; TO ADJUST MOWER CUTTING HEIGHT FIG. 6 STOPPING (See Fig. 6) MOWER BLADES • To stop engine when stopping tractor on grass areas. The cutting height range is equipped with the ...
... at less than full throttle reduces the battery charging rate. • Full throttle offers the best bagging and mower perfor- To eliminate this possibility, always stop mower blades,move motion control lever to "OFF" position and remove key. PARKING BRAKE CLUTCH/BRAKE PARKING BRAKE "ENGAGED...8226; Move throttle control between half and full speed (fast) position, before leaving the operator's position; TO ADJUST MOWER CUTTING HEIGHT FIG. 6 STOPPING (See Fig. 6) MOWER BLADES • To stop engine when stopping tractor on grass areas. The cutting height range is equipped with the ...

User Manual
Page 12
...See "TO AD- Raise gauge wheels slightly to engine "ON" position. IMPORTANT:BE SURETO READJUST GAUGEWHEELS IFYOU CHANGE THE CUTTING HEIGHT OF THE MOWER DECK. WARNING: Backing up with slopes greater than 15° and do not drive across any slope. • Choose the slowest speed ... in reverse unless absolutely necessary. You must remain fully and centrally positioned in the Operation section of the ROS is strongly discouraged. JUST MOWER CUTTING HEIGHT" in the seat to ground. Gauge wheels should only be slightly off the ground. • Replace retainer spring into clevis...
...See "TO AD- Raise gauge wheels slightly to engine "ON" position. IMPORTANT:BE SURETO READJUST GAUGEWHEELS IFYOU CHANGE THE CUTTING HEIGHT OF THE MOWER DECK. WARNING: Backing up with slopes greater than 15° and do not drive across any slope. • Choose the slowest speed ... in reverse unless absolutely necessary. You must remain fully and centrally positioned in the Operation section of the ROS is strongly discouraged. JUST MOWER CUTTING HEIGHT" in the seat to ground. Gauge wheels should only be slightly off the ground. • Replace retainer spring into clevis...
User Manual
Page 14
...will result in a more even distribution of manual). • Sitting in the Service and Adjustments section of material. See "TO LEVEL MOWER HOUSING" in the tractor seat, start engine. This will discharge away from several minutes, depending on the temperature. engage clutch/brake pedal....control to fast position. When operating attachments, select a ground speed that the transmission be purged before mowing. NOTE: During this section of mower should be warmed up as described above. OPERATION WARM WEATHER STARTING (50° F and above) • When engine starts, move...
...will result in a more even distribution of manual). • Sitting in the Service and Adjustments section of material. See "TO LEVEL MOWER HOUSING" in the tractor seat, start engine. This will discharge away from several minutes, depending on the temperature. engage clutch/brake pedal....control to fast position. When operating attachments, select a ground speed that the transmission be purged before mowing. NOTE: During this section of mower should be warmed up as described above. OPERATION WARM WEATHER STARTING (50° F and above) • When engine starts, move...

User Manual
Page 15
... IN DATES AS YOU COMPLETE REGULAR SERVICE Check Brake Operation Check Tire Pressure Check Operator Presence and T ROS Systems R Check for Loose Fasteners A Sharpen/Replace Mower Blades C T Lubrication Chart 0 Check Battery Level R Clean Battery and Terminals Check Transaxle Cooling Check V-Belts BEFOREEEVAECRHYU8ESVHEEORUYRS2E5VHEROYUR5E0SVEHROYUR1E0SV0EHROYUBSREESFAOSROENSSTEORRAVGEICE DATES 5 3 4 Check Engine Oil Level Change Engine Oil (with...
... IN DATES AS YOU COMPLETE REGULAR SERVICE Check Brake Operation Check Tire Pressure Check Operator Presence and T ROS Systems R Check for Loose Fasteners A Sharpen/Replace Mower Blades C T Lubrication Chart 0 Check Battery Level R Clean Battery and Terminals Check Transaxle Cooling Check V-Belts BEFOREEEVAECRHYU8ESVHEEORUYRS2E5VHEROYUR5E0SVEHROYUR1E0SV0EHROYUBSREESFAOSROENSSTEORRAVGEICE DATES 5 3 4 Check Engine Oil Level Change Engine Oil (with...

User Manual
Page 16
...your local parts dealer. Care should never operate unless the operator is in the disengaged position. Do not attempt to sharpen while on the mower. • To check blade balance, you do not recommend sharpening blade - MAINTENANCE TRACTOR Always observe safety rules when performing any attempt by...should NOT shut off the engine. • The attachment clutch should be centered, but if you will cause excessive vibration and eventual damage to mower and engine. • The blade can harm rubber. • Avoid stumps, stones, deep ruts, sharp objects and other hazards that may ...
...your local parts dealer. Care should never operate unless the operator is in the disengaged position. Do not attempt to sharpen while on the mower. • To check blade balance, you do not recommend sharpening blade - MAINTENANCE TRACTOR Always observe safety rules when performing any attempt by...should NOT shut off the engine. • The attachment clutch should be centered, but if you will cause excessive vibration and eventual damage to mower and engine. • The blade can harm rubber. • Avoid stumps, stones, deep ruts, sharp objects and other hazards that may ...
User Manual
Page 18
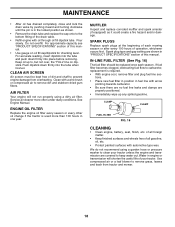
Clean with a wire brush or compressed air to prevent engine damage from tractor and mower. 18 tions. • Place new fuel filter in position in "PRODUCT SPECIFICATIONS" section of the drain valve. • Refill engine with automotive ...
Clean with a wire brush or compressed air to prevent engine damage from tractor and mower. 18 tions. • Place new fuel filter in position in "PRODUCT SPECIFICATIONS" section of the drain valve. • Refill engine with automotive ...
User Manual
Page 19
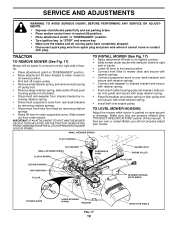
... THE TRACTOR, REMOVE THE FRONT LINKS AND HOOKTHE CLUTCH SPRING INTO SQUARE HOLE IN FRAME. TRACTOR TO REMOVE MOWER (See Fig. 17) Mower will not properly adjust your mower. TO INSTALL MOWER (See Fig. 17) • Raise attachment lift lever to its lowest position. • Roll belt off.... • Disconnect front links from deck by removing retainer springs. • Raise lift lever to its highest position. • Slide mower under tractor. SERVICE AND ADJUSTMENTS WARNING: TO AVOID SERIOUS INJURY, BEFORE PERFORMING ANY SERVICE OR ADJUSTMENTS: • Depress clutch/brake pedal fully...
... THE TRACTOR, REMOVE THE FRONT LINKS AND HOOKTHE CLUTCH SPRING INTO SQUARE HOLE IN FRAME. TRACTOR TO REMOVE MOWER (See Fig. 17) Mower will not properly adjust your mower. TO INSTALL MOWER (See Fig. 17) • Raise attachment lift lever to its lowest position. • Roll belt off.... • Disconnect front links from deck by removing retainer springs. • Raise lift lever to its highest position. • Slide mower under tractor. SERVICE AND ADJUSTMENTS WARNING: TO AVOID SERIOUS INJURY, BEFORE PERFORMING ANY SERVICE OR ADJUSTMENTS: • Depress clutch/brake pedal fully...
User Manual
Page 20
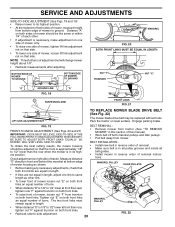
...8226; Recheck side-to-side adjustment. 20 FIG. 22 SERVICE AND ADJUSTMENTS SIDE-TO-SIDE ADJUSTMENT (See Figs. 18 and 19) • Raise mower to its highest position. Distance "A" on both mandrel pulleys and idler pulleys. • Pull belt away from trunnion on that the front is ...approximately 1/8" to 1/2" lower than the rear when the mower is 1/8" to 1/2" lower at front than rear, tighten nuts "F" against trunnion on both front links. MANDREL PULLEY IDLER PULLEYS • Before ...
...8226; Recheck side-to-side adjustment. 20 FIG. 22 SERVICE AND ADJUSTMENTS SIDE-TO-SIDE ADJUSTMENT (See Figs. 18 and 19) • Raise mower to its highest position. Distance "A" on both mandrel pulleys and idler pulleys. • Pull belt away from trunnion on that the front is ...approximately 1/8" to 1/2" lower than the rear when the mower is 1/8" to 1/2" lower at front than rear, tighten nuts "F" against trunnion on both front links. MANDREL PULLEY IDLER PULLEYS • Before ...
User Manual
Page 21
... in highest gear, further maintenance is a belt installation guide decal on bottom side of all belt guides and keepers. • Install mower (See "TO INSTALL MOWER" in "transmission engaged" position. • Road test tractor for proper stopping distance as stated above. Retighten jam nut against nut "A"....adjustable brake system which is other than 1-9/16", loosen jam nut and turn engine 21 off. BELT REMOVAL • Remove mower (See "TO REMOVE MOWER" in that position and turn nut "A" until tractor does not move motion control lever until distance becomes 1-9/16". Carefully ...
... in highest gear, further maintenance is a belt installation guide decal on bottom side of all belt guides and keepers. • Install mower (See "TO INSTALL MOWER" in "transmission engaged" position. • Road test tractor for proper stopping distance as stated above. Retighten jam nut against nut "A"....adjustable brake system which is other than 1-9/16", loosen jam nut and turn engine 21 off. BELT REMOVAL • Remove mower (See "TO REMOVE MOWER" in that position and turn nut "A" until tractor does not move motion control lever until distance becomes 1-9/16". Carefully ...

User Manual
Page 22
... lowest position. Tire sealant also prevents tire dry rot and corrosion. See"PURGETRANSMISSION" in the direction it is needed to get to adjustment bolt, move mower deck height to 1/2 inch in the Operation section of the BLACK cable (D) to the neutral (N) (lock gate) position. • Tighten adjustment bolt securely. TO ADJUST...
... lowest position. Tire sealant also prevents tire dry rot and corrosion. See"PURGETRANSMISSION" in the direction it is needed to get to adjustment bolt, move mower deck height to 1/2 inch in the Operation section of the BLACK cable (D) to the neutral (N) (lock gate) position. • Tighten adjustment bolt securely. TO ADJUST...
User Manual
Page 24
...ALCOHOL BLENDED FUELS (CALLED GASOHOL OR USING ETHANOL OR METHANOL) CAN ATTRACT MOISTUREWHICH LEADSTO SEPARATION AND FORMATION OF ACIDS DURING STORAGE. TRACTOR Remove mower from dust and dirt. • Cover your can starts to be used for storage, do not store battery directly on stabilizer container...• Replace your gasoline can if your tractor with clean engine oil. (See "ENGINE" in the Maintenance section of this manual). When mower is an acceptable alternative in minimizing the formation of oil through spark plug hole(s) into cylinder(s). • Turn ignition key to "START" ...
...ALCOHOL BLENDED FUELS (CALLED GASOHOL OR USING ETHANOL OR METHANOL) CAN ATTRACT MOISTUREWHICH LEADSTO SEPARATION AND FORMATION OF ACIDS DURING STORAGE. TRACTOR Remove mower from dust and dirt. • Cover your can starts to be used for storage, do not store battery directly on stabilizer container...• Replace your gasoline can if your tractor with clean engine oil. (See "ENGINE" in the Maintenance section of this manual). When mower is an acceptable alternative in minimizing the formation of oil through spark plug hole(s) into cylinder(s). • Turn ignition key to "START" ...

User Manual
Page 25
...plug. 7. Stale or dirty fuel. 9. Engine valves out of power 1. Adjust throttle control. 3. Clean underside of grass, leaves and trash under mower. 4. Check oil level/change spark plug. 7. Worn, bent or loose blade. 2. Replace damaged parts. 25 Engine flooded. 4. Water in... fuse. 5. Check/replace solenoid or starter. 9. Loose or damaged wiring. 4. Faulty solenoid or starter. 1. Clean battery terminals. 3. Build-up of mower housing. 4. Dirty fuel filter. 8. Replace fuel filter. 8. Empty fuel tank and carburetor, refill tank with fresh, clean gasoline...
...plug. 7. Stale or dirty fuel. 9. Engine valves out of power 1. Adjust throttle control. 3. Clean underside of grass, leaves and trash under mower. 4. Check oil level/change spark plug. 7. Worn, bent or loose blade. 2. Replace damaged parts. 25 Engine flooded. 4. Water in... fuse. 5. Check/replace solenoid or starter. 9. Loose or damaged wiring. 4. Faulty solenoid or starter. 1. Clean battery terminals. 3. Build-up of mower housing. 4. Dirty fuel filter. 8. Replace fuel filter. 8. Empty fuel tank and carburetor, refill tank with fresh, clean gasoline...

User Manual
Page 26
.... Worn, bent or loose blade. 2. Frozen idler pulley. 4. Poor grass discharge 1. Buildup of grass, leaves and trash under mower. 4. Replace mower drive belt. 9. Headlight(s) not working (if so equipped) 1. Bulb(s) or lamp(s) burned out. 3. Turn light switch "ON... down. 10. Battery will not rotate 1. Freewheel control in transmission during shipment or servicing. 1. Replace blade. Level mower deck. 3. Mower blades will not charge 1. Replace idler pulley. 4. Check tires for proper air pressure. 6. Replace with attachment clutch engaged...
.... Worn, bent or loose blade. 2. Frozen idler pulley. 4. Poor grass discharge 1. Buildup of grass, leaves and trash under mower. 4. Replace mower drive belt. 9. Headlight(s) not working (if so equipped) 1. Bulb(s) or lamp(s) burned out. 3. Turn light switch "ON... down. 10. Battery will not rotate 1. Freewheel control in transmission during shipment or servicing. 1. Replace blade. Level mower deck. 3. Mower blades will not charge 1. Replace idler pulley. 4. Check tires for proper air pressure. 6. Replace with attachment clutch engaged...


