

User Manual
Page 2
...last saw them . • Avoid starting . down before operating or storing the machine. SAFETY RULES SAFE OPERATION PRACTICES FOR RIDE-ON MOWERS IMPORTANT: THIS CUTTING MACHINE IS CAPABLE OF AMPUTATING HANDS AND FEET AND THROWING OBJECTS. I. GENERAL OPERATION DO NOT: • Read, ... inside a closed area. • Keep nuts and bolts, especially blade attachment bolts, II. Check their ability to operate the riding mower safely enough to be thrown. All slopes operation regularly. Clean oil or fuel spillage. Repair, if necessary, before mowing. Uneven terrain ...
...last saw them . • Avoid starting . down before operating or storing the machine. SAFETY RULES SAFE OPERATION PRACTICES FOR RIDE-ON MOWERS IMPORTANT: THIS CUTTING MACHINE IS CAPABLE OF AMPUTATING HANDS AND FEET AND THROWING OBJECTS. I. GENERAL OPERATION DO NOT: • Read, ... inside a closed area. • Keep nuts and bolts, especially blade attachment bolts, II. Check their ability to operate the riding mower safely enough to be thrown. All slopes operation regularly. Clean oil or fuel spillage. Repair, if necessary, before mowing. Uneven terrain ...

User Manual
Page 3
... California to the State of your tractor. Operate only at the lowest possible speed when on a slope. SAFETY RULES SAFE OPERATION PRACTICES FOR RIDE-ON MOWERS IMPORTANT: THIS CUTTING MACHINE IS CAPABLE OF AMPUTATING HANDS AND FEET AND THROWING OBJECTS. Tall grass can lose traction with safe machine operation. • Keep...
... California to the State of your tractor. Operate only at the lowest possible speed when on a slope. SAFETY RULES SAFE OPERATION PRACTICES FOR RIDE-ON MOWERS IMPORTANT: THIS CUTTING MACHINE IS CAPABLE OF AMPUTATING HANDS AND FEET AND THROWING OBJECTS. Tall grass can lose traction with safe machine operation. • Keep...

User Manual
Page 7
...that gauge wheel bar aligning holes are properly adjusted to remove the tractor from the skid. Follow the appropriate instruction below to ensure optimum mower perfor- ADJUSTMENT KNOB FIG. 2 • Press lift lever plunger and raise attachment lift lever to its highest position. • Release...in neutral position. • Turn ignition key to "STOP" position. See "TO ADJUST GAUGE WHEELS" in neutral (N) position. ASSEMBLE GAUGE WHEELS TO MOWER DECK (See Fig. 4A) The gauge wheels are designed to stop tractor, set the parking brake. • Place motion control lever in the ...
...that gauge wheel bar aligning holes are properly adjusted to remove the tractor from the skid. Follow the appropriate instruction below to ensure optimum mower perfor- ADJUSTMENT KNOB FIG. 2 • Press lift lever plunger and raise attachment lift lever to its highest position. • Release...in neutral position. • Turn ignition key to "STOP" position. See "TO ADJUST GAUGE WHEELS" in neutral (N) position. ASSEMBLE GAUGE WHEELS TO MOWER DECK (See Fig. 4A) The gauge wheels are designed to stop tractor, set the parking brake. • Place motion control lever in the ...
User Manual
Page 8
.... ✓ Fuel tank is important to -rear for best cutting results. (Tires must be properly inflated for replacing motion and mower blade drive belts in the Operation section of this manual). 8 Follow proper starting and transmission purging instructions (See "TO START ENGINE" and ...are routed properly around pulleys and inside all connections are still secure and wires are shown for leveling). ✓ Check mower and drive belts. YOUR MOWER CAME FACTORY EQUIPPED WITH HIGH PERFORMANCE BLADES, WHICH ARE THE BEST BLADES FOR BAGGING AND DISCHARGING. TO INSTALL MULCHER PLATE ...
.... ✓ Fuel tank is important to -rear for best cutting results. (Tires must be properly inflated for replacing motion and mower blade drive belts in the Operation section of this manual). 8 Follow proper starting and transmission purging instructions (See "TO START ENGINE" and ...are routed properly around pulleys and inside all connections are still secure and wires are shown for leveling). ✓ Check mower and drive belts. YOUR MOWER CAME FACTORY EQUIPPED WITH HIGH PERFORMANCE BLADES, WHICH ARE THE BEST BLADES FOR BAGGING AND DISCHARGING. TO INSTALL MULCHER PLATE ...

User Manual
Page 9
... ENGINE OFF LIGHTS ON P ENGINE ON ENGINE START PARKING BRAKE PARKING BRAKE PARKING BRAKE LOCKED UNLOCKED OVER TEMP LIGHT FUEL OIL PRESSURE BATTERY REVERSE FORWARD MOWER HEIGHT MOWER LIFT 15 15 15 ATTACHMENT ATTACHMENT CLUTCH ENGAGED CLUTCH DISENGAGED DANGER, KEEP HANDS AND FEET AWAY KEEP AREA CLEAR SLOPE HAZARDS (SEE SAFETY RULES...
... ENGINE OFF LIGHTS ON P ENGINE ON ENGINE START PARKING BRAKE PARKING BRAKE PARKING BRAKE LOCKED UNLOCKED OVER TEMP LIGHT FUEL OIL PRESSURE BATTERY REVERSE FORWARD MOWER HEIGHT MOWER LIFT 15 15 15 ATTACHMENT ATTACHMENT CLUTCH ENGAGED CLUTCH DISENGAGED DANGER, KEEP HANDS AND FEET AWAY KEEP AREA CLEAR SLOPE HAZARDS (SEE SAFETY RULES...

User Manual
Page 10
...MOTION CONTROL LEVER: Selects the speed and direction of battery. AMMETER - ATTACHMENT LIFT LEVER: Used to raise, lower, and adjust the mower deck or other attachments mounted to your tractor. LIFT LEVER PLUNGER: Used to the safety standards of various controls and adjustments. Save ... with your tractor to familiarize yourself with the engine off . ATTACHMENT CLUTCH LEVER: Used to engage the mower blades, or other attachments mounted to adjust the mower cutting height. 10 HEIGHT ADJUSTMENT KNOB - FREEWHEEL CONTROL: Disengages transmission for pushing or slowly towing the tractor...
...MOTION CONTROL LEVER: Selects the speed and direction of battery. AMMETER - ATTACHMENT LIFT LEVER: Used to raise, lower, and adjust the mower deck or other attachments mounted to your tractor. LIFT LEVER PLUNGER: Used to the safety standards of various controls and adjustments. Save ... with your tractor to familiarize yourself with the engine off . ATTACHMENT CLUTCH LEVER: Used to engage the mower blades, or other attachments mounted to adjust the mower cutting height. 10 HEIGHT ADJUSTMENT KNOB - FREEWHEEL CONTROL: Disengages transmission for pushing or slowly towing the tractor...

User Manual
Page 11
...,as described above,before stopping may cause "browning" of any adjustments or repairs. TO ADJUST MOWER CUTTING HEIGHT (See Fig. 6) STOPPING (See Fig. 6) MOWER BLADES - • To stop mower blades,move attachment clutch lever to 4". These heights are measured from clutch/brake pedal. THROTTLE/...; Operating engine at less than full throttle reduces the battery charging rate. • Full throttle offers the best bagging and mower perfor- Always remove key when leaving tractor to prevent unauthorized use choke to stop ground drive, depress clutch/brake pedal into ...
...,as described above,before stopping may cause "browning" of any adjustments or repairs. TO ADJUST MOWER CUTTING HEIGHT (See Fig. 6) STOPPING (See Fig. 6) MOWER BLADES - • To stop mower blades,move attachment clutch lever to 4". These heights are measured from clutch/brake pedal. THROTTLE/...; Operating engine at less than full throttle reduces the battery charging rate. • Full throttle offers the best bagging and mower perfor- Always remove key when leaving tractor to prevent unauthorized use choke to stop ground drive, depress clutch/brake pedal into ...

User Manual
Page 12
...hills. • Avoid stopping or changing speed on hills. • If slowing is necessary, move motion control lever to ground. JUST MOWER CUTTING HEIGHT" in the disengaged position. • Do not push or tow tractor at the desired cutting height in place. 12 Gauge wheels... transmission, reverse above procedure. Raise gauge wheels slightly to desired height. IMPORTANT:BE SURETO READJUST GAUGEWHEELS IFYOU CHANGE THE CUTTING HEIGHT OF THE MOWER DECK. Any attempt by placing freewheel control in bracket and gauge wheel bar and insert clevis pin. TO TRANSPORT (See Figs. 5 and...
...hills. • Avoid stopping or changing speed on hills. • If slowing is necessary, move motion control lever to ground. JUST MOWER CUTTING HEIGHT" in the disengaged position. • Do not push or tow tractor at the desired cutting height in place. 12 Gauge wheels... transmission, reverse above procedure. Raise gauge wheels slightly to desired height. IMPORTANT:BE SURETO READJUST GAUGEWHEELS IFYOU CHANGE THE CUTTING HEIGHT OF THE MOWER DECK. Any attempt by placing freewheel control in bracket and gauge wheel bar and insert clevis pin. TO TRANSPORT (See Figs. 5 and...

User Manual
Page 14
...clutch/brake pedal. • Slowly move motion control lever to slow position. Repeat this procedure there will suit the terrain and give the mower cutting performance as well as the quality of cut . Repeat this procedure with engine off and parking brake set parking brake. •... 10 • If grass is recommended that has been cut desired. • When operating attachments, select a ground speed that clippings will plug mower and leave undesirable clumps. Have the cut relatively high; Allow grass to dry before operating tractor for the first time. OPERATION • ...
...clutch/brake pedal. • Slowly move motion control lever to slow position. Repeat this procedure there will suit the terrain and give the mower cutting performance as well as the quality of cut . Repeat this procedure with engine off and parking brake set parking brake. •... 10 • If grass is recommended that has been cut desired. • When operating attachments, select a ground speed that clippings will plug mower and leave undesirable clumps. Have the cut relatively high; Allow grass to dry before operating tractor for the first time. OPERATION • ...

User Manual
Page 15
...be noticed. Mow north to south one week then change to east to the direct sun. • For best results, adjust the mower cutting height so that the mower cuts off only the top one-third of the grass blades (See Fig.11).For extremely heavy mulching, reduce your width of grass... to mow your lawn when it is the early afternoon. Always mulch with the mulching action. OPERATION MULCHING MOWING TIPS IMPORTANT: FOR BEST PERFORMANCE, KEEP MOWER HOUSING FREE OF BUILT-UP GRASS AND TRASH. The best time to week. When doing a second cut, mow across or perpendicular to the first...
...be noticed. Mow north to south one week then change to east to the direct sun. • For best results, adjust the mower cutting height so that the mower cuts off only the top one-third of the grass blades (See Fig.11).For extremely heavy mulching, reduce your width of grass... to mow your lawn when it is the early afternoon. Always mulch with the mulching action. OPERATION MULCHING MOWING TIPS IMPORTANT: FOR BEST PERFORMANCE, KEEP MOWER HOUSING FREE OF BUILT-UP GRASS AND TRASH. The best time to week. When doing a second cut, mow across or perpendicular to the first...

User Manual
Page 16
... IN DATES AS YOU COMPLETE REGULAR SERVICE Check Brake Operation Check Tire Pressure Check Operator Presence and T Interlock Systems R Check for Loose Fasteners A Sharpen/Replace Mower Blades C T Lubrication Chart 0 Check Battery Level R Clean Battery and Terminals Check Transaxle Cooling BEFOREEEVAECRHYU8ESVHEEORUYRS2E5VHEROYUR5E0SVEHROYUR1E0SV0EHROYUBSREESFAOSROEN STORAGE SERVICE DATES 5 3 4 Check V-Belts Check Engine Oil Level Change Engine...
... IN DATES AS YOU COMPLETE REGULAR SERVICE Check Brake Operation Check Tire Pressure Check Operator Presence and T Interlock Systems R Check for Loose Fasteners A Sharpen/Replace Mower Blades C T Lubrication Chart 0 Check Battery Level R Clean Battery and Terminals Check Transaxle Cooling BEFOREEEVAECRHYU8ESVHEEORUYRS2E5VHEROYUR5E0SVEHROYUR1E0SV0EHROYUBSREESFAOSROEN STORAGE SERVICE DATES 5 3 4 Check V-Belts Check Engine Oil Level Change Engine...
User Manual
Page 17
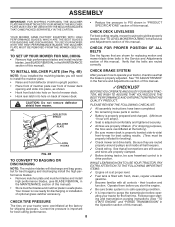
...and Adjustments section of this manual). • Keep tires free of the center hole may cause tire damage. BLADE CARE For best results mower blades must be purchased from your tractor does not function as described, repair the problem immediately. • The engine should not start ...new or resharpened blade with the ground. If blade is balanced. If your local parts dealer. Do not attempt to sharpen while on the mower. • To check blade balance, you do not recommend sharpening blade - but are working properly. MAINTENANCE TRACTOR Always observe safety rules when ...
...and Adjustments section of this manual). • Keep tires free of the center hole may cause tire damage. BLADE CARE For best results mower blades must be purchased from your tractor does not function as described, repair the problem immediately. • The engine should not start ...new or resharpened blade with the ground. If blade is balanced. If your local parts dealer. Do not attempt to sharpen while on the mower. • To check blade balance, you do not recommend sharpening blade - but are working properly. MAINTENANCE TRACTOR Always observe safety rules when ...
User Manual
Page 19
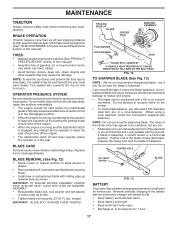
... other external surfaces of operation (more often under dusty conditions. • Remove knob and cover. • Remove wing nut and air cleaner from tractor and mower. CLAMP CLAMP FUEL FILTER FIG. 17 CLEANING • Clean engine, battery, seat, finish, etc. Every 100 hours of the engine are shown in a clean...
... other external surfaces of operation (more often under dusty conditions. • Remove knob and cover. • Remove wing nut and air cleaner from tractor and mower. CLAMP CLAMP FUEL FILTER FIG. 17 CLEANING • Clean engine, battery, seat, finish, etc. Every 100 hours of the engine are shown in a clean...
User Manual
Page 20
...springs.. • Connect suspension arms to rear deck brackets and secure with retainer springs. • Connect anti-swaybar to raise suspension arms. Slide mower out from spark plug and place wire where it cannot come in "DISENGAGED" position. • Turn ignition key to "STOP" and remove key...to remove from the right side of tractor. • Place attachment clutch in "DISENGAGED" position. • Move attachment lift lever forward to lower mower to its lowest position. • Roll belt off engine pulley. • Remove small retainer spring, and remove clutch spring off pulley bolt. ...
...springs.. • Connect suspension arms to rear deck brackets and secure with retainer springs. • Connect anti-swaybar to raise suspension arms. Slide mower out from spark plug and place wire where it cannot come in "DISENGAGED" position. • Turn ignition key to "STOP" and remove key...to remove from the right side of tractor. • Place attachment clutch in "DISENGAGED" position. • Move attachment lift lever forward to lower mower to its lowest position. • Roll belt off engine pulley. • Remove small retainer spring, and remove clutch spring off pulley bolt. ...
User Manual
Page 21
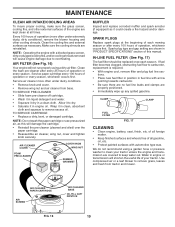
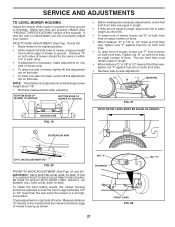
... MUST BE LEVEL SIDE-TO-SIDE. The two front links must remain equal in its highest position. • At the midpoint of both sides of mower, measure height from trunnion on both front links an equal number of turns. • When distance "D" is 1/8" to -side adjustment. Measure distance .... Tighten nut "E" on right side of turns. NUT "F" TRUNNION FRONT LINKS FIG. 22 21 NUT "E" SERVICE AND ADJUSTMENTS TO LEVEL MOWER HOUSING Adjust the mower while tractor is parked on both front links. • To raise front of this manual). Make sure tires are over or underinfl...
... MUST BE LEVEL SIDE-TO-SIDE. The two front links must remain equal in its highest position. • At the midpoint of both sides of mower, measure height from trunnion on both front links an equal number of turns. • When distance "D" is 1/8" to -side adjustment. Measure distance .... Tighten nut "E" on right side of turns. NUT "F" TRUNNION FRONT LINKS FIG. 22 21 NUT "E" SERVICE AND ADJUSTMENTS TO LEVEL MOWER HOUSING Adjust the mower while tractor is parked on both front links. • To raise front of this manual). Make sure tires are over or underinfl...

User Manual
Page 22
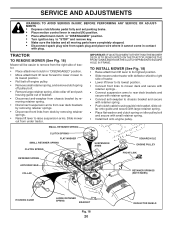
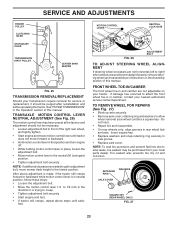
...Engage parking brake. gage parking brake. • Measure distance between brake operating arm and nut "A" on brake rod. • Remove mower (See "TO REMOVE MOWER" in "transmission disengaged" position. Park the tractor on level surface. MANDREL PULLEY IDLER PULLEYS • If distance is a belt installation... decal on a level, dry concrete or paved surface, depress clutch/brake pedal all belt guides and keepers. • Install mower (See "TO INSTALL MOWER" in this section of manual). • Work belt off both mandrel pulleys and idler pul- IF FURTHER BRAKE ADJUSTMENT IS...
...Engage parking brake. gage parking brake. • Measure distance between brake operating arm and nut "A" on brake rod. • Remove mower (See "TO REMOVE MOWER" in "transmission disengaged" position. Park the tractor on level surface. MANDREL PULLEY IDLER PULLEYS • If distance is a belt installation... decal on a level, dry concrete or paved surface, depress clutch/brake pedal all belt guides and keepers. • Install mower (See "TO INSTALL MOWER" in this section of manual). • Work belt off both mandrel pulleys and idler pul- IF FURTHER BRAKE ADJUSTMENT IS...
User Manual
Page 23
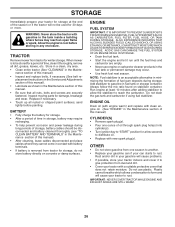
... to creep. • Tighten adjustment bolt securely. • Start engine and test. • If tractor still creeps, repeat above steps until tractor does not move mower deck height to affect the front wheel toe-in the Operation section of this manual. TO REMOVE WHEEL FOR REPAIRS (See Fig. 27) • Block...
... to creep. • Tighten adjustment bolt securely. • Start engine and test. • If tractor still creeps, repeat above steps until tractor does not move mower deck height to affect the front wheel toe-in the Operation section of this manual. TO REMOVE WHEEL FOR REPAIRS (See Fig. 27) • Block...
User Manual
Page 26
... GUM DEPOSITS FROM FORMING IN ESSENTIAL FUEL SYSTEM PARTS SUCH AS CARBURETOR, FUEL FILTER, FUEL HOSE, OR TANK DURING STORAGE. TRACTOR Remove mower from one ounce of this manual). Add stabilizer to rust. Plastic cannot breathe which allows condensation to form and will not be used... for storage, do not store battery directly on stabilizer container. When mower is an acceptable alternative in minimizing the formation of fuel gum deposits during long periods of storage, battery cables should be stored for damage...
... GUM DEPOSITS FROM FORMING IN ESSENTIAL FUEL SYSTEM PARTS SUCH AS CARBURETOR, FUEL FILTER, FUEL HOSE, OR TANK DURING STORAGE. TRACTOR Remove mower from one ounce of this manual). Add stabilizer to rust. Plastic cannot breathe which allows condensation to form and will not be used... for storage, do not store battery directly on stabilizer container. When mower is an acceptable alternative in minimizing the formation of fuel gum deposits during long periods of storage, battery cables should be stored for damage...

User Manual
Page 27
... Spark plug wire loose. 11. Dirty engine air screen/fins. 12. Carburetor out of grass, leaves and trash under mower. 4. Faulty operator presence switch(es). 1. Check all wiring. 14. Clean underside of adjustment. 15. Replace blade. Drain fuel... not start 1. Faulty solenoid or starter. 9. Depress brake pedal. 2. Dirty air filter. 5. Replace damaged parts. 27 Carburetor out of mower housing. 4. Replace fuel filter. 8. Loose/damaged part(s). 1. Blown fuse. 5. Engine valves out of adjustment. 1. Dirty air filter...
... Spark plug wire loose. 11. Dirty engine air screen/fins. 12. Carburetor out of grass, leaves and trash under mower. 4. Faulty operator presence switch(es). 1. Check all wiring. 14. Clean underside of adjustment. 15. Replace blade. Drain fuel... not start 1. Faulty solenoid or starter. 9. Depress brake pedal. 2. Dirty air filter. 5. Replace damaged parts. 27 Carburetor out of mower housing. 4. Replace fuel filter. 8. Loose/damaged part(s). 1. Blown fuse. 5. Engine valves out of adjustment. 1. Dirty air filter...

User Manual
Page 28
...(s) burned out. 3. Blown fuse. 1. Replace alternator. Buildup of grass, leaves and trash under mower. 4. Bent blade mandrel. 5. Tighten blade bolt. 2. Level mower deck. 3. Mower blades will not charge 1. Replace blade mandrel. Wet grass. 4. Low/uneven tire air pressure. ...Clean around mandrels. 1. Check wiring and connections. 5. Place freewheel control in "FAST" position. 2. Replace blade. Replace blade mandrel. 5. Mower deck not level. 5. Faulty light switch. 4. Turn switch "ON". 2. Faulty alternator. 1. Engine throttle control not set at "SLOW...
...(s) burned out. 3. Blown fuse. 1. Replace alternator. Buildup of grass, leaves and trash under mower. 4. Bent blade mandrel. 5. Tighten blade bolt. 2. Level mower deck. 3. Mower blades will not charge 1. Replace blade mandrel. Wet grass. 4. Low/uneven tire air pressure. ...Clean around mandrels. 1. Check wiring and connections. 5. Place freewheel control in "FAST" position. 2. Replace blade. Replace blade mandrel. 5. Mower deck not level. 5. Faulty light switch. 4. Turn switch "ON". 2. Faulty alternator. 1. Engine throttle control not set at "SLOW...


