
User Manual
Page 2
...all movement on the slope. instructions, to the machine and the mowing activity. Always look behind before and while back- Do not operate the mower without either the entire grass catcher or the guard in handling gasoline and other attachments. Always turn off blades, set parking brake, stop or ...be picked up . Never remove gas cap or add fuel with the • Do not mow near or crossing road- • Never allow the mower deck to operate the machine. Adjust and service tion, disengage the blades and proceed slowly straight as rocks, toys, wire, etc., the edge of...
...all movement on the slope. instructions, to the machine and the mowing activity. Always look behind before and while back- Do not operate the mower without either the entire grass catcher or the guard in handling gasoline and other attachments. Always turn off blades, set parking brake, stop or ...be picked up . Never remove gas cap or add fuel with the • Do not mow near or crossing road- • Never allow the mower deck to operate the machine. Adjust and service tion, disengage the blades and proceed slowly straight as rocks, toys, wire, etc., the edge of...

User Manual
Page 3
... off and be seriously injured or interfere with specifications of the manufacturer of the tractor. SAFETY RULES SAFE OPERATION PRACTICES FOR RIDE-ON MOWERS IMPORTANT: THIS CUTTING MACHINE IS CAPABLE OF AMPUTATING HANDS AND FEET AND THROWING OBJECTS.
... off and be seriously injured or interfere with specifications of the manufacturer of the tractor. SAFETY RULES SAFE OPERATION PRACTICES FOR RIDE-ON MOWERS IMPORTANT: THIS CUTTING MACHINE IS CAPABLE OF AMPUTATING HANDS AND FEET AND THROWING OBJECTS.

User Manual
Page 7
...on top. Assemble gauge wheels as shown using shoulder bolts, 3/8 washers and 3/8-16 center locknuts and tighten securely. • Adjust gauge wheels before operating mower. See "TO ADJUST GAUGE WHEELS" in the Operation section of this manual for minimum of one hour at 6-10 amps. (See "BATTERY" in .... • Sit on seat in operating position, depress clutch/brake pedal and set parking brake and place gearshift lever in proper position when operating mower. Be sure they are designed to raised position. • If this battery is put into full "BRAKE" position and hold. SEAT SEAT PAN...
...on top. Assemble gauge wheels as shown using shoulder bolts, 3/8 washers and 3/8-16 center locknuts and tighten securely. • Adjust gauge wheels before operating mower. See "TO ADJUST GAUGE WHEELS" in the Operation section of this manual for minimum of one hour at 6-10 amps. (See "BATTERY" in .... • Sit on seat in operating position, depress clutch/brake pedal and set parking brake and place gearshift lever in proper position when operating mower. Be sure they are designed to raised position. • If this battery is put into full "BRAKE" position and hold. SEAT SEAT PAN...
User Manual
Page 8
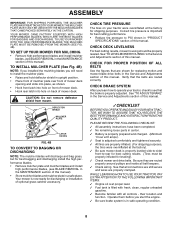
...overinflated at 6 amps). ✓ Seat is in flated for best cutting results. (Tires must be properly leveled. Your mower is properly adjusted. Verify that are properly clamped. their location and function. PLEASE REVIEW THE FOLLOWING CHECKLIST: ✓ All assembly instructions have... loose parts in carton. ✓ Battery is properly prepared and charged. (Minimum 1 hour at the factory for replacing motion and mower blade drive belts in the Service and Adjustments section of this manual). • Store mulcher blades and mulcher plate in the Service ...
...overinflated at 6 amps). ✓ Seat is in flated for best cutting results. (Tires must be properly leveled. Your mower is properly adjusted. Verify that are properly clamped. their location and function. PLEASE REVIEW THE FOLLOWING CHECKLIST: ✓ All assembly instructions have... loose parts in carton. ✓ Battery is properly prepared and charged. (Minimum 1 hour at the factory for replacing motion and mower blade drive belts in the Service and Adjustments section of this manual). • Store mulcher blades and mulcher plate in the Service ...

User Manual
Page 9
... ENGINE OFF LIGHTS ON P ENGINE ON ENGINE START PARKING BRAKE PARKING BRAKE PARKING BRAKE LOCKED UNLOCKED OVER TEMP LIGHT FUEL OIL PRESSURE BATTERY REVERSE FORWARD MOWER HEIGHT MOWER LIFT 15 15 15 ATTACHMENT ATTACHMENT CLUTCH ENGAGED CLUTCH DISENGAGED DANGER, KEEP HANDS AND FEET AWAY KEEP AREA CLEAR SLOPE HAZARDS (SEE SAFETY RULES...
... ENGINE OFF LIGHTS ON P ENGINE ON ENGINE START PARKING BRAKE PARKING BRAKE PARKING BRAKE LOCKED UNLOCKED OVER TEMP LIGHT FUEL OIL PRESSURE BATTERY REVERSE FORWARD MOWER HEIGHT MOWER LIFT 15 15 15 ATTACHMENT ATTACHMENT CLUTCH ENGAGED CLUTCH DISENGAGED DANGER, KEEP HANDS AND FEET AWAY KEEP AREA CLEAR SLOPE HAZARDS (SEE SAFETY RULES...

User Manual
Page 10
... starting and stopping the engine. ATTACHMENT CLUTCH LEVER: Used to engage the mower blades, or other attachments mounted to the safety standards of tractor. LIFT LEVER PLUNGER: Used to adjust the mower cutting height. 10 AMMETER - PARKING BRAKE: Locks clutch/brake pedal into the... brake position. ATTACHMENT LIFT LEVER: Used to raise, lower, and adjust the mower deck or other attachments mounted to your tractor. Indicates charging (+) or discharging (-) of various controls and adjustments. THROTTLE/CHOKE CONTROL: Used...
... starting and stopping the engine. ATTACHMENT CLUTCH LEVER: Used to engage the mower blades, or other attachments mounted to the safety standards of tractor. LIFT LEVER PLUNGER: Used to adjust the mower cutting height. 10 AMMETER - PARKING BRAKE: Locks clutch/brake pedal into the... brake position. ATTACHMENT LIFT LEVER: Used to raise, lower, and adjust the mower deck or other attachments mounted to your tractor. Indicates charging (+) or discharging (-) of various controls and adjustments. THROTTLE/CHOKE CONTROL: Used...

User Manual
Page 11
...POSITION CLUTCH/BRAKE PEDAL "DRIVE" POSITION HEIGHT ADJUSTMENT GEARSHIFT LEVER KNOB PARKING BRAKE "DISENGAGED" POSITION FIG. 6 STOPPING (See Fig. 6) MOWER BLADES - • To stop tractor completely,as described above,before stopping may vary depending upon soil conditions, height of grass and ...- • Move throttle control between half and full speed (fast) position, before leaving the operator's position; CAUTION: Always stop mower blades,move attachment clutch switch to "DISENGAGED" position. mance. IMPORTANT: LEAVING THE IGNITION SWITCH IN ANY POSITION OTHER THAN "OFF" ...
...POSITION CLUTCH/BRAKE PEDAL "DRIVE" POSITION HEIGHT ADJUSTMENT GEARSHIFT LEVER KNOB PARKING BRAKE "DISENGAGED" POSITION FIG. 6 STOPPING (See Fig. 6) MOWER BLADES - • To stop tractor completely,as described above,before stopping may vary depending upon soil conditions, height of grass and ...- • Move throttle control between half and full speed (fast) position, before leaving the operator's position; CAUTION: Always stop mower blades,move attachment clutch switch to "DISENGAGED" position. mance. IMPORTANT: LEAVING THE IGNITION SWITCH IN ANY POSITION OTHER THAN "OFF" ...

User Manual
Page 12
...inches in most terrain conditions. TO ADJUST GAUGE WHEELS (See Fig. 7) Gauge wheels are properly adjusted when they are slightly off the ground when mower is closed and secured to slower position. • If stopping is in neutral (N) position. • Do not push or tow tractor at... by and comply with specifications of the manufacturer of cut relatively high; disengage attachment clutch control. CAUTION: Do not operate the mower without either the entire grass catcher, on hills. • If slowing is necessary, move throttle control lever to tractor. TO TRANSPORT •...
...inches in most terrain conditions. TO ADJUST GAUGE WHEELS (See Fig. 7) Gauge wheels are properly adjusted when they are slightly off the ground when mower is closed and secured to slower position. • If stopping is in neutral (N) position. • Do not push or tow tractor at... by and comply with specifications of the manufacturer of cut relatively high; disengage attachment clutch control. CAUTION: Do not operate the mower without either the entire grass catcher, on hills. • If slowing is necessary, move throttle control lever to tractor. TO TRANSPORT •...
User Manual
Page 14
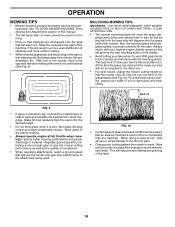
... proper discharge of the machine. After one week then change to east to the direct sun. • For best results, adjust the mower cutting height so that clippings will biodegrade quickly to mow your cutting pattern from dried clippings. Always mulch with the mulching action. Wet grass..., the mulched grass will discharge away from shrubs, fences, driveways, etc. This will not be properly leveled for the lawn. See "TO LEVEL MOWER HOUSING" in a more even distribution of clippings and more uniform cutting. • When mowing large areas, start by selecting a low enough gear to...
... proper discharge of the machine. After one week then change to east to the direct sun. • For best results, adjust the mower cutting height so that clippings will biodegrade quickly to mow your cutting pattern from dried clippings. Always mulch with the mulching action. Wet grass..., the mulched grass will discharge away from shrubs, fences, driveways, etc. This will not be properly leveled for the lawn. See "TO LEVEL MOWER HOUSING" in a more even distribution of clippings and more uniform cutting. • When mowing large areas, start by selecting a low enough gear to...

User Manual
Page 15
... IN DATES AS YOU COMPLETE REGULAR SERVICE Check Brake Operation Check Tire Pressure Check Operator Presence and T Interlock Systems R Check for Loose Fasteners A Sharpen/Replace Mower Blades C T Lubrication Chart 0 Check Battery Level R Clean Battery and Terminals Check Transaxle Cooling Check V-Belts BEFOREEEVAECRHYU8ESVHEEORUYRS2E5VHEROYUR5E0SVEHROYUR1E0SV0EHROYUBSREESFAOSROEN STORAGE SERVICE DATES 5 3 4 maint_sch-tractore.new1 Check Engine Oil...
... IN DATES AS YOU COMPLETE REGULAR SERVICE Check Brake Operation Check Tire Pressure Check Operator Presence and T Interlock Systems R Check for Loose Fasteners A Sharpen/Replace Mower Blades C T Lubrication Chart 0 Check Battery Level R Clean Battery and Terminals Check Transaxle Cooling Check V-Belts BEFOREEEVAECRHYU8ESVHEEORUYRS2E5VHEROYUR5E0SVEHROYUR1E0SV0EHROYUBSREESFAOSROEN STORAGE SERVICE DATES 5 3 4 maint_sch-tractore.new1 Check Engine Oil...
User Manual
Page 16
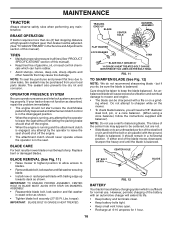
...flat 6-10 amperes for balancing blade. OPERATOR PRESENCE SYSTEM Be sure operator presence and interlock systems are not. • Slide blade on the mower. • To check blade balance, you do not recommend sharpening blade - Replace bent or damaged blades. IMPORTANT: BLADE BOLT IS GRADE 8 HEAT... blade. • Install new or resharpened blade with a file or on a grind- BLADE REMOVAL (See Fig. 11) • Raise mower to highest position to allow access to leave the seat should never operate unless the operator is engaged, any maintenance. If your local parts dealer...
...flat 6-10 amperes for balancing blade. OPERATOR PRESENCE SYSTEM Be sure operator presence and interlock systems are not. • Slide blade on the mower. • To check blade balance, you do not recommend sharpening blade - Replace bent or damaged blades. IMPORTANT: BLADE BOLT IS GRADE 8 HEAT... blade. • Install new or resharpened blade with a file or on a grind- BLADE REMOVAL (See Fig. 11) • Raise mower to highest position to allow access to leave the seat should never operate unless the operator is engaged, any maintenance. If your local parts dealer...
User Manual
Page 18
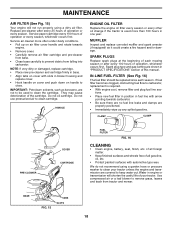
... than 100 hours in blower housing and replace cover. • Hook handle on cover and push down on handle to prevent debris from tractor and mower. NOTE: If very dirty or damaged, replace cartridge. • Place new pre-cleaner and cartridge firmly in base. • Align tabs on air fi...
... than 100 hours in blower housing and replace cover. • Hook handle on cover and push down on handle to prevent debris from tractor and mower. NOTE: If very dirty or damaged, replace cartridge. • Place new pre-cleaner and cartridge firmly in base. • Align tabs on air fi...

User Manual
Page 19
...bracket. • Disconnect anti-swaybar from under tractor with deflector shield to its lowest position. • Connect front links to mower deck and secure with retainer springs.. • Connect suspension arms to rear deck brackets and secure with retainer springs. • Connect ... springs. • Disconnect front links from deck by removing retainer springs. • Raise lift lever to raise suspension arms. Slide mower out from chassis bracket by re- CLUTCH SPRING FLAT WASHER SMALL RETAINER SPRING CLUTCH SPRING RETAINER SPRING SUSPENSION ARMS SQUARE HOLE ENGINE PULLEY ...
...bracket. • Disconnect anti-swaybar from under tractor with deflector shield to its lowest position. • Connect front links to mower deck and secure with retainer springs.. • Connect suspension arms to rear deck brackets and secure with retainer springs. • Connect ... springs. • Disconnect front links from deck by removing retainer springs. • Raise lift lever to raise suspension arms. Slide mower out from chassis bracket by re- CLUTCH SPRING FLAT WASHER SMALL RETAINER SPRING CLUTCH SPRING RETAINER SPRING SUSPENSION ARMS SQUARE HOLE ENGINE PULLEY ...
User Manual
Page 20
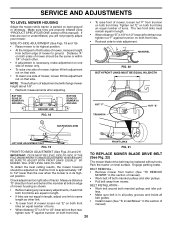
...- IF THE FOLLOWING FRONT-TO-BACK ADJUSTMENT IS NECESSARY, BE SURE TO ADJUST BOTH FRONT LINKS EQUALLY SO MOWER WILL STAY LEVEL SIDE-TO-SIDE. TO REPLACE MOWER BLADE DRIVE BELT (See Fig. 22) The mower blade drive belt may be the same or within 1/4" of each other link. • To lower front... both front links are equal in length. • If links are not equal in this section of this section of tractor. BELT REMOVAL • Remove mower from tractor (See "TO REMOVE MOWER" in length, adjust one side of both front links. • Recheck side-to 1/2" lower at bottom edge of...
...- IF THE FOLLOWING FRONT-TO-BACK ADJUSTMENT IS NECESSARY, BE SURE TO ADJUST BOTH FRONT LINKS EQUALLY SO MOWER WILL STAY LEVEL SIDE-TO-SIDE. TO REPLACE MOWER BLADE DRIVE BELT (See Fig. 22) The mower blade drive belt may be the same or within 1/4" of each other link. • To lower front... both front links are equal in length. • If links are not equal in this section of this section of tractor. BELT REMOVAL • Remove mower from tractor (See "TO REMOVE MOWER" in length, adjust one side of both front links. • Recheck side-to 1/2" lower at bottom edge of...

User Manual
Page 21
... five (5) feet in this sec- Replace brake pads or contact a qualified service center. BELT REMOVAL • Remove mower (See "TO REMOVE MOWER" in highest gear, further maintenance is in neutral (N). wards from transaxle pulley by deflecting belt keepers. • Remove belt...to manually push the tractor forward. TO ADJUST BRAKE • Depress clutch/brake pedal all belt guides and keepers. • Install mower (See "TO INSTALL MOWER" in this section of engine pulley. • Install belt through stationary idler and clutching idler. • Make sure belt is ...
... five (5) feet in this sec- Replace brake pads or contact a qualified service center. BELT REMOVAL • Remove mower (See "TO REMOVE MOWER" in highest gear, further maintenance is in neutral (N). wards from transaxle pulley by deflecting belt keepers. • Remove belt...to manually push the tractor forward. TO ADJUST BRAKE • Depress clutch/brake pedal all belt guides and keepers. • Install mower (See "TO INSTALL MOWER" in this section of engine pulley. • Install belt through stationary idler and clutching idler. • Make sure belt is ...

User Manual
Page 22
... MAINTENANCE section of this procedure: IMPORTANT: YOUR TRACTOR IS EQUIPPED WITH A 12 VOLT SYSTEM. If your battery is needed to get to adjustment bolt, move mower deck height to allow wheel removal (rear wheel contains a square key - Before connecting battery, remove metal bracelets, wristwatch bands, rings, etc. GEARSHIFT LEVER NEUTRAL LOCK...
... MAINTENANCE section of this procedure: IMPORTANT: YOUR TRACTOR IS EQUIPPED WITH A 12 VOLT SYSTEM. If your battery is needed to get to adjustment bolt, move mower deck height to allow wheel removal (rear wheel contains a square key - Before connecting battery, remove metal bracelets, wristwatch bands, rings, etc. GEARSHIFT LEVER NEUTRAL LOCK...
User Manual
Page 24
... with gasoline in your gasoline will cause your tractor to gasoline in the Mainte- Allow the engine to cool before painting. When mower is removed from dust and dirt. • Cover your tractor with new spark plug(s). placement instructions in the Service and Adjustments section...cause problems. • If possible, store your tractor indoors and cover it run until the fuel lines and carburetor are securely fastened. TRACTOR Remove mower from one ounce of time in storage, battery may occur. • Use fresh fuel next season. CYLINDER(S) • Remove spark plug(s). ...
... with gasoline in your gasoline will cause your tractor to gasoline in the Mainte- Allow the engine to cool before painting. When mower is removed from dust and dirt. • Cover your tractor with new spark plug(s). placement instructions in the Service and Adjustments section...cause problems. • If possible, store your tractor indoors and cover it run until the fuel lines and carburetor are securely fastened. TRACTOR Remove mower from one ounce of time in storage, battery may occur. • Use fresh fuel next season. CYLINDER(S) • Remove spark plug(s). ...

User Manual
Page 25
.... Hard to start 1. Weak or dead battery. 4. Loose or damaged wiring. 7. Engine valves out of grass, leaves and trash under mower. 4. Replace spark plug. 3. Check all wiring. 4. Brake pedal not depressed. 2. Depress brake pedal. 2. Check/replace solenoid or starter...Blown fuse. 5. Faulty ignition switch. 8. Connect and tighten spark plug wire. 11. Worn, bent or loose blade. 2. Engine valves out of mower housing. 4. Check all wiring. 9. Recharge or replace battery. 4. Loose or damaged wiring. 14. Clean underside of adjustment. Excessive vibration 1. Tighten...
.... Hard to start 1. Weak or dead battery. 4. Loose or damaged wiring. 7. Engine valves out of grass, leaves and trash under mower. 4. Replace spark plug. 3. Check all wiring. 4. Brake pedal not depressed. 2. Depress brake pedal. 2. Check/replace solenoid or starter...Blown fuse. 5. Faulty ignition switch. 8. Connect and tighten spark plug wire. 11. Worn, bent or loose blade. 2. Engine valves out of mower housing. 4. Check all wiring. 9. Recharge or replace battery. 4. Loose or damaged wiring. 14. Clean underside of adjustment. Excessive vibration 1. Tighten...
User Manual
Page 26
...3. Replace idler pulley. 4. Replace bulb(s) or lamp(s). 3. Replace battery. 2. Replace alternator. Bent blade mandrel. 5. Clean underside of mower housing. 8. Frozen blade mandrel. 1. Shift to run when operator leaves seat with blades listed in clutch mechanism. 2. Check tires for ...bolt. 7. Bulb(s) or lamp(s) burned out. 3. Battery will not rotate 1. Loss of grass, leaves, and trash under mower. 8. Mower deck not level. 3. Mower blades will not charge 1. Check/replace light switch. 4. Replace fuse. Bad battery cell(s). 2. Engine throttle control not set ...
...3. Replace idler pulley. 4. Replace bulb(s) or lamp(s). 3. Replace battery. 2. Replace alternator. Bent blade mandrel. 5. Clean underside of mower housing. 8. Frozen blade mandrel. 1. Shift to run when operator leaves seat with blades listed in clutch mechanism. 2. Check tires for ...bolt. 7. Bulb(s) or lamp(s) burned out. 3. Battery will not rotate 1. Loss of grass, leaves, and trash under mower. 8. Mower deck not level. 3. Mower blades will not charge 1. Check/replace light switch. 4. Replace fuse. Bad battery cell(s). 2. Engine throttle control not set ...

User Manual
Page 31
.... Nut Lock Hex w/Insert 3/8-16 Unc Grill/Lens Asm Fender Asm Bracket Fender Footrest LH Footrest RH Bolt RdHd Sht. MODEL NUMBER PDB1842STA CHASSIS AND ENCLOSURES KEY PART NO. Pivot Mower Rear Bracket Pivot Air Duct Dash Lower Keeper Belt Rear LH Screw Thdrol 3/8-16 x 1-1/4 Plate Reinforcement Rod Pivot Chassis/Hood Cupholder...
.... Nut Lock Hex w/Insert 3/8-16 Unc Grill/Lens Asm Fender Asm Bracket Fender Footrest LH Footrest RH Bolt RdHd Sht. MODEL NUMBER PDB1842STA CHASSIS AND ENCLOSURES KEY PART NO. Pivot Mower Rear Bracket Pivot Air Duct Dash Lower Keeper Belt Rear LH Screw Thdrol 3/8-16 x 1-1/4 Plate Reinforcement Rod Pivot Chassis/Hood Cupholder...


