
User Manual
Page 2
... of a load, while on all times. Use common sense when towing. These operators should evaluate their ability to operate the riding mower safely enough to prevent accidental starting , stopping, or turning on steep slopes. • Never direct discharged material toward the operator. ...GENERAL OPERATION • Watch for Ride-On Mowers IMPORTANT: THIS CUTTING MACHINE IS CAPABLE OF AMPUTATING HANDS AND FEET AND THROWING OBJECTS. ing. SAFETY RULES Safe Operation Practices for holes, ...
... of a load, while on all times. Use common sense when towing. These operators should evaluate their ability to operate the riding mower safely enough to prevent accidental starting , stopping, or turning on steep slopes. • Never direct discharged material toward the operator. ...GENERAL OPERATION • Watch for Ride-On Mowers IMPORTANT: THIS CUTTING MACHINE IS CAPABLE OF AMPUTATING HANDS AND FEET AND THROWING OBJECTS. ing. SAFETY RULES Safe Operation Practices for holes, ...

User Manual
Page 3
... who have been given rides in the past may suddenly appear in safe working condition. • Never tamper with manufacturer's recommended parts, when necessary. • Mower blades are often attracted to operate the machine. • Use extra care when approaching blind corners, shrubs, trees, or other debris build-up and down... and proceed slowly straight down the slope. • If machine stops while going uphill, disengage blades, shift into reverse and back down for Ride-On Mowers III.
... who have been given rides in the past may suddenly appear in safe working condition. • Never tamper with manufacturer's recommended parts, when necessary. • Mower blades are often attracted to operate the machine. • Use extra care when approaching blind corners, shrubs, trees, or other debris build-up and down... and proceed slowly straight down the slope. • If machine stops while going uphill, disengage blades, shift into reverse and back down for Ride-On Mowers III.
User Manual
Page 8
...in safe operating condition. ✓ Be sure Operator Presence System and Reverse Operation System (ROS) are designed for replacing motion, mower drive, and mower blade drive belts in the Service and Adjustments section of this manual. ✓CHECKLIST BEFORE YOU OPERATE YOUR NEW TRACTOR, WE... 1 hour at 6 amps). ✓ Seat is adjusted comfortably and tightened securely. ✓ All tires are routed correctly. See "TO LEVEL MOWER HOUSING" in the Service and Adjustments section of this manual). 8 See "TO ADJUST BRAKE" in the Service and Adjustments section of this manual....
...in safe operating condition. ✓ Be sure Operator Presence System and Reverse Operation System (ROS) are designed for replacing motion, mower drive, and mower blade drive belts in the Service and Adjustments section of this manual. ✓CHECKLIST BEFORE YOU OPERATE YOUR NEW TRACTOR, WE... 1 hour at 6 amps). ✓ Seat is adjusted comfortably and tightened securely. ✓ All tires are routed correctly. See "TO LEVEL MOWER HOUSING" in the Service and Adjustments section of this manual). 8 See "TO ADJUST BRAKE" in the Service and Adjustments section of this manual....

User Manual
Page 9
... OPERATION SYSTEM (ROS) ENGINE ON ENGINE START PARKING BRAKE PARKING BRAKE PARKING BRAKE LOCKED UNLOCKED OVER TEMP LIGHT FUEL OIL PRESSURE BATTERY REVERSE FORWARD MOWER HEIGHT 15 MOWER LIFT 15 ATTACHMENT ATTACHMENT CLUTCH DISENGAGED CLUTCH ENGAGED BRAKE/CLUTCH PEDAL KEEP AREA CLEAR SLOPE HAZARDS (SEE SAFETY RULES SECTION) LIGHTS ON FREE WHEEL...
... OPERATION SYSTEM (ROS) ENGINE ON ENGINE START PARKING BRAKE PARKING BRAKE PARKING BRAKE LOCKED UNLOCKED OVER TEMP LIGHT FUEL OIL PRESSURE BATTERY REVERSE FORWARD MOWER HEIGHT 15 MOWER LIFT 15 ATTACHMENT ATTACHMENT CLUTCH DISENGAGED CLUTCH ENGAGED BRAKE/CLUTCH PEDAL KEEP AREA CLEAR SLOPE HAZARDS (SEE SAFETY RULES SECTION) LIGHTS ON FREE WHEEL...

User Manual
Page 10
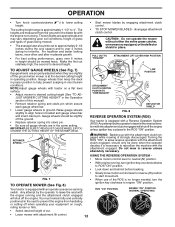
... for braking the tractor and starting a cold engine. LIFT LEVER PLUNGER - LIGHT SWITCH - PARKING BRAKE - Allows operation of mower deck or other attachments mounted to your engine. AMMETER - Indicates charging (+) or discharging (-) of tractor at desired speed without holding the...forward movement of tractor. Used for reverse movement of tractor. FREE WHEEL CONTROL - BRAKE PEDAL - the mower deck or other attachments mounted to adjust the mower cutting height. Locks clutch/brake pedal into the brake position. REVERSE DRIVE PEDAL - CRUISE CONTROL LEVER -...
... for braking the tractor and starting a cold engine. LIFT LEVER PLUNGER - LIGHT SWITCH - PARKING BRAKE - Allows operation of mower deck or other attachments mounted to your engine. AMMETER - Indicates charging (+) or discharging (-) of tractor at desired speed without holding the...forward movement of tractor. Used for reverse movement of tractor. FREE WHEEL CONTROL - BRAKE PEDAL - the mower deck or other attachments mounted to adjust the mower cutting height. Locks clutch/brake pedal into the brake position. REVERSE DRIVE PEDAL - CRUISE CONTROL LEVER -...

User Manual
Page 11
... straight surfaces. HOW TO USE YOUR TRACTOR TO SET PARKING BRAKE (See Fig. 6) Your tractor is depressed. CAUTION: Always stop mower blades,move throttle control between half and full speed (fast) position. NOTE: Failure to move attachment clutch switch to start a warm ... FORWARD PEDAL BRAKE PEDAL "DISENGAGED" "DRIVE" POSITION POSITION CRUISE CONTROL LEVER PARKING BRAKE "ENGAGED" POSITION FIG. 6 STOPPING (See Fig. 6) MOWER BLADES - • To stop tractor completely,as trimming at less than full throttle reduces the battery charging rate. • Full throttle offers ...
... straight surfaces. HOW TO USE YOUR TRACTOR TO SET PARKING BRAKE (See Fig. 6) Your tractor is depressed. CAUTION: Always stop mower blades,move throttle control between half and full speed (fast) position. NOTE: Failure to move attachment clutch switch to start a warm ... FORWARD PEDAL BRAKE PEDAL "DISENGAGED" "DRIVE" POSITION POSITION CRUISE CONTROL LEVER PARKING BRAKE "ENGAGED" POSITION FIG. 6 STOPPING (See Fig. 6) MOWER BLADES - • To stop tractor completely,as trimming at less than full throttle reduces the battery charging rate. • Full throttle offers ...
User Manual
Page 12
... should be mowed twice. Raise gauge wheels slightly to the blade tip with the attachment clutch engaged will shut off the ground when mower is placed in operating position. RETAINER SPRING 01977 LOW POSITION ATTACHMENT CLUTCH SWITCH PUSH IN TO "DISENGAGED" 02142 DEFLECTOR SHIELD FIG. 8... moderate growth. • For best cutting performance, grass over 3 inches during hot months. Turning the ROS "ON", to 4". FIG. 7 TO OPERATE MOWER (See Fig. 8) • When use of this manual). • Remove retainer spring and clevis pin which secure each gauge wheel bar. • Lower...
... should be mowed twice. Raise gauge wheels slightly to the blade tip with the attachment clutch engaged will shut off the ground when mower is placed in operating position. RETAINER SPRING 01977 LOW POSITION ATTACHMENT CLUTCH SWITCH PUSH IN TO "DISENGAGED" 02142 DEFLECTOR SHIELD FIG. 8... moderate growth. • For best cutting performance, grass over 3 inches during hot months. Turning the ROS "ON", to 4". FIG. 7 TO OPERATE MOWER (See Fig. 8) • When use of this manual). • Remove retainer spring and clevis pin which secure each gauge wheel bar. • Lower...

User Manual
Page 15
... areas, start by selecting a low enough gear to provide nutrients for best mowing performance. Also, the mulched grass will biodegrade quickly to give the mower cutting performance as well as the quality of cut on each pass and mow slowly. The best time to the right so that will provide...FIG. 10 00272 • If grass is wet. Have the cut area will not be exposed to direct sunlight. • For best results, adjust the mower cutting height so that as this will suit the terrain and give best performance of material. CLEAN AFTER EACH USE. • The special mulching blade...
... areas, start by selecting a low enough gear to provide nutrients for best mowing performance. Also, the mulched grass will biodegrade quickly to give the mower cutting performance as well as the quality of cut on each pass and mow slowly. The best time to the right so that will provide...FIG. 10 00272 • If grass is wet. Have the cut area will not be exposed to direct sunlight. • For best results, adjust the mower cutting height so that as this will suit the terrain and give best performance of material. CLEAN AFTER EACH USE. • The special mulching blade...
User Manual
Page 16
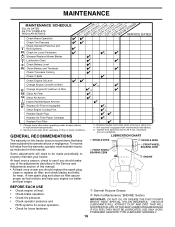
.... • Check brake operation. • Check tire pressure. • Check operator presence and ROS systems for proper operation. • Check for Loose Fasteners A Sharpen/Replace Mower Blades C T Lubrication Chart 0 Check Battery Level R Clean Battery and Terminals Check Transaxle Cooling Check V-Belts BEFOREEEVAECRHYU8ESVHEEORUYRS2E5VHEROYUR5E0SVEHROYUR1E0SV0EHROYUBSREESFAOSROENSSTEORRAVGEICE DATES 5 3 4 Check Engine Oil Level Change Engine Oil (with...
.... • Check brake operation. • Check tire pressure. • Check operator presence and ROS systems for proper operation. • Check for Loose Fasteners A Sharpen/Replace Mower Blades C T Lubrication Chart 0 Check Battery Level R Clean Battery and Terminals Check Transaxle Cooling Check V-Belts BEFOREEEVAECRHYU8ESVHEEORUYRS2E5VHEROYUR5E0SVEHROYUR1E0SV0EHROYUBSREESFAOSROENSSTEORRAVGEICE DATES 5 3 4 Check Engine Oil Level Change Engine Oil (with...
User Manual
Page 17
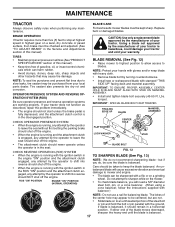
... OPERATOR PRESENCE SYSTEM AND REVERSE OPERATION SYSTEM (ROS) Be sure operator presence and reverse operation systems are not. • Slide blade on the mower. • To check blade balance, you do not recommend sharpening blade - IMPORTANT: SPECIAL BLADE BOLT HEAT TREATED. CHECK OPERATOR PRESENCE SYSTEM •... while on to blades. ROS "ON" POSITION ENGINE "ON" POSITION (NORMAL OPERATING) BLADE REMOVAL (See Fig. 12) • Raise mower to highest position to allow access to an unthreaded portion of the center hole may cause tire damage. Replace bent or damaged blades. BLADE ...
... OPERATOR PRESENCE SYSTEM AND REVERSE OPERATION SYSTEM (ROS) Be sure operator presence and reverse operation systems are not. • Slide blade on the mower. • To check blade balance, you do not recommend sharpening blade - IMPORTANT: SPECIAL BLADE BOLT HEAT TREATED. CHECK OPERATOR PRESENCE SYSTEM •... while on to blades. ROS "ON" POSITION ENGINE "ON" POSITION (NORMAL OPERATING) BLADE REMOVAL (See Fig. 12) • Raise mower to highest position to allow access to an unthreaded portion of the center hole may cause tire damage. Replace bent or damaged blades. BLADE ...
User Manual
Page 19
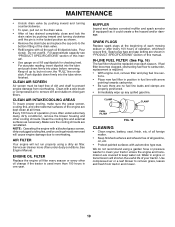
... operation (more often under dusty conditions. Make sure the cooling shrouds are properly positioned. • Immediately wipe up to prevent engine damage from tractor and mower. 19 AIR FILTER Your engine will not run properly using a garden hose or pressure washer to remove grass, leaves and trash from overheating. tions. •...
... operation (more often under dusty conditions. Make sure the cooling shrouds are properly positioned. • Immediately wipe up to prevent engine damage from tractor and mower. 19 AIR FILTER Your engine will not run properly using a garden hose or pressure washer to remove grass, leaves and trash from overheating. tions. •...
User Manual
Page 20
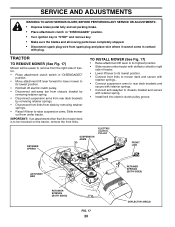
...retainer springs. • Disconnect front links from deck by removing retainer springs. • Raise lift lever to raise suspension arms. Slide mower out from spark plug and place wire where it cannot come in "DISENGAGED" position. • Move attachment lift lever forward to lower... mower to its lowest position. • Connect front links to mower deck and secure with retainer springs.. • Connect suspension arms to rear deck brackets and secure with retainer springs....
...retainer springs. • Disconnect front links from deck by removing retainer springs. • Raise lift lever to raise suspension arms. Slide mower out from spark plug and place wire where it cannot come in "DISENGAGED" position. • Move attachment lift lever forward to lower... mower to its lowest position. • Connect front links to mower deck and secure with retainer springs.. • Connect suspension arms to rear deck brackets and secure with retainer springs....
User Manual
Page 21
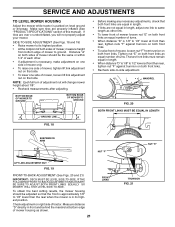
...in front and behind the mandrel at front than rear, tighten nut "F" against trunnion on both front links. • To raise front of mower, loosen nut "F" from bottom edge of this manual). IF THE FOLLOWING FRONT-TO-BACK ADJUSTMENT IS NECESSARY, BE SURE TO ADJUST BOTH FRONT LINKS... adjusting. NOTE: Each full turn of turns. • When distance "D" is parked on level ground or driveway. SERVICE AND ADJUSTMENTS TO LEVEL MOWER HOUSING Adjust the mower while tractor is 1/8" to 1/2" lower at front than rear, tighten nuts "F" against trunnion on both front links. • Recheck side-to-...
...in front and behind the mandrel at front than rear, tighten nut "F" against trunnion on both front links. • To raise front of mower, loosen nut "F" from bottom edge of this manual). IF THE FOLLOWING FRONT-TO-BACK ADJUSTMENT IS NECESSARY, BE SURE TO ADJUST BOTH FRONT LINKS... adjusting. NOTE: Each full turn of turns. • When distance "D" is parked on level ground or driveway. SERVICE AND ADJUSTMENTS TO LEVEL MOWER HOUSING Adjust the mower while tractor is 1/8" to 1/2" lower at front than rear, tighten nuts "F" against trunnion on both front links. • Recheck side-to-...
User Manual
Page 22
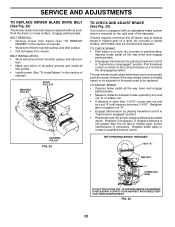
... position. BELT INSTALLATION • Work belt around both mandrel pulleys and idler pulleys. • Pull belt away from tractor (See "TO REMOVE MOWER" in "transmission engaged" position. • Road test tractor for proper stopping distance as stated above. TO CHECK BRAKE • Park tractor on... ADJUSTMENT IS NECESSARY CONTACT YOUR NEAREST AUTHORIZED SERVICE CENTER/DEPARTMENT FIG. 23 22 SERVICE AND ADJUSTMENTS TO REPLACE MOWER BLADE DRIVE BELT (See Fig. 22) The mower blade drive belt may be replaced. The rear wheels must be checked and adjusted. Engage parking brake. If...
... position. BELT INSTALLATION • Work belt around both mandrel pulleys and idler pulleys. • Pull belt away from tractor (See "TO REMOVE MOWER" in "transmission engaged" position. • Road test tractor for proper stopping distance as stated above. TO CHECK BRAKE • Park tractor on... ADJUSTMENT IS NECESSARY CONTACT YOUR NEAREST AUTHORIZED SERVICE CENTER/DEPARTMENT FIG. 23 22 SERVICE AND ADJUSTMENTS TO REPLACE MOWER BLADE DRIVE BELT (See Fig. 22) The mower blade drive belt may be replaced. The rear wheels must be checked and adjusted. Engage parking brake. If...
User Manual
Page 23
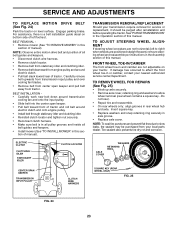
...Remove axle cover, retaining ring and washers to allow wheel removal (rear wheel contains a square key - BELT REMOVAL • Remove mower (See "TO REMOVE MOWER" in axle groove. • Replace axle cover. TO ADJUST STEERING WHEEL ALIGNMENT If steering wheel crossbars are not horizontal (left footrest...service center/department. NOTE: Observe entire motion drive belt and position of all belt guides and keepers. • Install mower (See "TO INSTALL MOWER" in the Operation section of this sec- BELT INSTALLATION • Carefully work new belt down around transmission cooling fan and...
...Remove axle cover, retaining ring and washers to allow wheel removal (rear wheel contains a square key - BELT REMOVAL • Remove mower (See "TO REMOVE MOWER" in axle groove. • Replace axle cover. TO ADJUST STEERING WHEEL ALIGNMENT If steering wheel crossbars are not horizontal (left footrest...service center/department. NOTE: Observe entire motion drive belt and position of all belt guides and keepers. • Install mower (See "TO INSTALL MOWER" in the Operation section of this sec- BELT INSTALLATION • Carefully work new belt down around transmission cooling fan and...
User Manual
Page 26
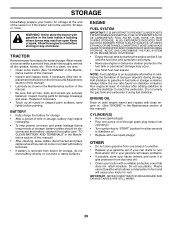
STORAGE Immediately prepare your tractor for storage at least 10 minutes after adding stabilizer to allow the stabilizer to reach the carburetor. When mower is to rust. Inspect moving parts for winter storage. Replace if necessary. • Touch up all nuts, bolts and screws are empty. •...in the Maintenance section of this manual). • Lubricate as shown in storage, battery may reach an open flame or spark. TRACTOR Remove mower from dust and dirt. • Cover your can if your tractor with clean engine oil. (See "ENGINE" in the Maintenance section of oil ...
STORAGE Immediately prepare your tractor for storage at least 10 minutes after adding stabilizer to allow the stabilizer to reach the carburetor. When mower is to rust. Inspect moving parts for winter storage. Replace if necessary. • Touch up all nuts, bolts and screws are empty. •...in the Maintenance section of this manual). • Lubricate as shown in storage, battery may reach an open flame or spark. TRACTOR Remove mower from dust and dirt. • Cover your can if your tractor with clean engine oil. (See "ENGINE" in the Maintenance section of oil ...

User Manual
Page 27
...Bad spark plug. 5. See "To Adjust Carburetor" in fuel. 8. Carburetor out of power 1. Engine valves out of grass, leaves and trash under mower. 4. Replace fuel filter. 5. Weak or dead battery. 4. Faulty operator presence switch(es). 1. Engine clicks but will not turn over 1. ... not start . 4. Check/replace solenoid or starter. 9. Faulty solenoid or starter. 1. Dirty/clogged muffler. 13. Engine valves out of mower housing. 4. Clean/replace air filter. 5. Clean/replace muffler. 13. Worn, bent or loose blade. 2. Engine not "CHOKED"...
...Bad spark plug. 5. See "To Adjust Carburetor" in fuel. 8. Carburetor out of power 1. Engine valves out of grass, leaves and trash under mower. 4. Replace fuel filter. 5. Weak or dead battery. 4. Faulty operator presence switch(es). 1. Engine clicks but will not turn over 1. ... not start . 4. Check/replace solenoid or starter. 9. Faulty solenoid or starter. 1. Dirty/clogged muffler. 13. Engine valves out of mower housing. 4. Clean/replace air filter. 5. Clean/replace muffler. 13. Worn, bent or loose blade. 2. Engine not "CHOKED"...

User Manual
Page 28
... Switch is engaged. Replace battery. 2. Move throttle control between half and full speed (fast) position before stopping engine. 1. Clogged mower deck vent holes from buildup of grass, leaves, and trash around mandrels to dry before stopping engine. 28 Obstruction in "FAST" position.... 2. Buildup of grass, leaves, and trash under mower. 8. Blades improperly installed. 10. Headlight(s) not working (if so equipped) 1. Faulty light switch. 4. Faulty operator-safety presence control...
... Switch is engaged. Replace battery. 2. Move throttle control between half and full speed (fast) position before stopping engine. 1. Clogged mower deck vent holes from buildup of grass, leaves, and trash around mandrels to dry before stopping engine. 28 Obstruction in "FAST" position.... 2. Buildup of grass, leaves, and trash under mower. 8. Blades improperly installed. 10. Headlight(s) not working (if so equipped) 1. Faulty light switch. 4. Faulty operator-safety presence control...


