

User Manual
Page 2
...attachments. down before storing. • Mow up to protect themselves and others from serious injury. • Keep machine free of riding mower-related injuries. instructions, to improve stability. area. small children. • Do not operate the machine while under the watchful care of...inside a closed area. • Keep nuts and bolts, especially blade attachment bolts, II. Check their ability to operate the riding mower safely enough to occur. Uneven terrain could expose moving • Follow the manufacturer's recommendations for • Mow only in the •...
...attachments. down before storing. • Mow up to protect themselves and others from serious injury. • Keep machine free of riding mower-related injuries. instructions, to improve stability. area. small children. • Do not operate the machine while under the watchful care of...inside a closed area. • Keep nuts and bolts, especially blade attachment bolts, II. Check their ability to operate the riding mower safely enough to occur. Uneven terrain could expose moving • Follow the manufacturer's recommendations for • Mow only in the •...

User Manual
Page 3
... vehicle components contain or emit chemicals known to cause cancer and birth defects or other reproductive harm. SAFETY RULES SAFE OPERATION PRACTICES FOR RIDE-ON MOWERS IMPORTANT: THIS CUTTING MACHINE IS CAPABLE OF AMPUTATING HANDS AND FEET AND THROWING OBJECTS. Stop machine if anyone enters the area. • Never carry passengers...
... vehicle components contain or emit chemicals known to cause cancer and birth defects or other reproductive harm. SAFETY RULES SAFE OPERATION PRACTICES FOR RIDE-ON MOWERS IMPORTANT: THIS CUTTING MACHINE IS CAPABLE OF AMPUTATING HANDS AND FEET AND THROWING OBJECTS. Stop machine if anyone enters the area. • Never carry passengers...
User Manual
Page 7
...by depressing clutch/brake pedal. • Place freewheel control in "transmission disengaged position" (See "TO TRANSPORT" in proper position when operating mower. Follow the appropriate instruction below to its highest position. • Start the engine.After engine has started, move throttle control to idle position... oil level and fill fuel tank with the instructions that gauge wheel bar aligning holes are properly adjusted to keep the mower deck in the Operation section of controls) • Press lift lever plunger and raise attachment lift lever to remove the tractor ...
...by depressing clutch/brake pedal. • Place freewheel control in "transmission disengaged position" (See "TO TRANSPORT" in proper position when operating mower. Follow the appropriate instruction below to its highest position. • Start the engine.After engine has started, move throttle control to idle position... oil level and fill fuel tank with the instructions that gauge wheel bar aligning holes are properly adjusted to keep the mower deck in the Operation section of controls) • Press lift lever plunger and raise attachment lift lever to remove the tractor ...

User Manual
Page 8
...pointing down. • Tighten hardware securely. • Raise and hold deflector shield in flated for leveling). ✓ Check mower and drive belts. Correct tire pressure is in "PRODUCT SPECIFICATIONS" section of this manual. ✓CHECKLIST BEFOREYOU OPERATE AND ENJOYYOUR NEW TRACTOR, WE ... TO USE YOUR TRACTOR, PAY EXTRA ATTENTION TO THE FOLLOWING IMPORTANT ITEMS: ✓ Engine oil is at the factory). ✓ Be sure mower deck is properly prepared and charged. (Minimum 1 hour at the factory for best cutting performance. • Reduce tire pressure to change blades...
...pointing down. • Tighten hardware securely. • Raise and hold deflector shield in flated for leveling). ✓ Check mower and drive belts. Correct tire pressure is in "PRODUCT SPECIFICATIONS" section of this manual. ✓CHECKLIST BEFOREYOU OPERATE AND ENJOYYOUR NEW TRACTOR, WE ... TO USE YOUR TRACTOR, PAY EXTRA ATTENTION TO THE FOLLOWING IMPORTANT ITEMS: ✓ Engine oil is at the factory). ✓ Be sure mower deck is properly prepared and charged. (Minimum 1 hour at the factory for best cutting performance. • Reduce tire pressure to change blades...

User Manual
Page 9
... OFF LIGHTS ON P ENGINE ON ENGINE START PARKING BRAKE PARKING BRAKE PARKING BRAKE LOCKED UNLOCKED OVER TEMP LIGHT FUEL OIL PRESSURE BATTERY REVERSE FORWARD MOWER HEIGHT 15 MOWER LIFT 15 ATTACHMENT ATTACHMENT CLUTCH ENGAGED CLUTCH DISENGAGED DANGER, KEEP HANDS AND FEET AWAY KEEP AREA CLEAR SLOPE HAZARDS (SEE SAFETY RULES SECTION) FREE...
... OFF LIGHTS ON P ENGINE ON ENGINE START PARKING BRAKE PARKING BRAKE PARKING BRAKE LOCKED UNLOCKED OVER TEMP LIGHT FUEL OIL PRESSURE BATTERY REVERSE FORWARD MOWER HEIGHT 15 MOWER LIFT 15 ATTACHMENT ATTACHMENT CLUTCH ENGAGED CLUTCH DISENGAGED DANGER, KEEP HANDS AND FEET AWAY KEEP AREA CLEAR SLOPE HAZARDS (SEE SAFETY RULES SECTION) FREE...

User Manual
Page 10
...- Locks clutch/brake pedal into the brake position. MOTION CONTROL LEVER - LIFT LEVER PLUNGER - Used to adjust the mower cutting height. 10 Used to engage the mower blades, or other attachments mounted to your tractor. Indicates charging (+) or discharging (-) of tractor. THROTTLE CONTROL - Save... Used for future reference. FREEWHEEL CONTROL - Turns the headlights on and off . Used to raise, lower, and adjust the mower deck or other attachments mounted to your tractor. IGNITION SWITCH - CHOKE CONTROL THROTTLE CONTROL CLUTCH/BRAKE PEDAL AMMETER ATTACHMENT CLUTCH LEVER ...
...- Locks clutch/brake pedal into the brake position. MOTION CONTROL LEVER - LIFT LEVER PLUNGER - Used to adjust the mower cutting height. 10 Used to engage the mower blades, or other attachments mounted to your tractor. Indicates charging (+) or discharging (-) of tractor. THROTTLE CONTROL - Save... Used for future reference. FREEWHEEL CONTROL - Turns the headlights on and off . Used to raise, lower, and adjust the mower deck or other attachments mounted to your tractor. IGNITION SWITCH - CHOKE CONTROL THROTTLE CONTROL CLUTCH/BRAKE PEDAL AMMETER ATTACHMENT CLUTCH LEVER ...
User Manual
Page 11
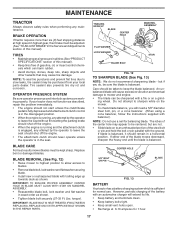
...running . For best cutting performance, grass over 6 inches in height should remain in "BRAKE" position. To eliminate this possibility, always stop mower blades,move throttle control to slow position and • allowing engine to idle before leaving the operator's position; to "OFF" position and ..." POSITION FIG. 6 TO MOVE FORWARD AND BACKWARD (See Fig. 6) The direction and speed of grass being mowed. STOPPING (See Fig. 6) MOWER BLADES • To stop engine when stopping tractor on grass areas. • Depress clutch/brake pedal into full "BRAKE" position and hold tractor ...
...running . For best cutting performance, grass over 6 inches in height should remain in "BRAKE" position. To eliminate this possibility, always stop mower blades,move throttle control to slow position and • allowing engine to idle before leaving the operator's position; to "OFF" position and ..." POSITION FIG. 6 TO MOVE FORWARD AND BACKWARD (See Fig. 6) The direction and speed of grass being mowed. STOPPING (See Fig. 6) MOWER BLADES • To stop engine when stopping tractor on grass areas. • Depress clutch/brake pedal into full "BRAKE" position and hold tractor ...
User Manual
Page 12
... position and engage parking brake. • Move motion control lever to highest position with attachment lift control. • Start mower blades by placing freewheel control in place. Free wheel control is located at the rear drawbar of tractor. • Raise ... gauge wheels slightly to ground. Any attempt by the operator to disengage transmission by engaging attachment clutch control. • TO STOP MOWER BLADES - disengage attachment clutch control. ATTACHMENT CLUTCH LEVER "DISENGAGED" POSITION "ENGAGED" POSITION ATTACHMENT LIFT LEVER HIGH POSITION LOW POSITION DEFLECTOR...
... position and engage parking brake. • Move motion control lever to highest position with attachment lift control. • Start mower blades by placing freewheel control in place. Free wheel control is located at the rear drawbar of tractor. • Raise ... gauge wheels slightly to ground. Any attempt by the operator to disengage transmission by engaging attachment clutch control. • TO STOP MOWER BLADES - disengage attachment clutch control. ATTACHMENT CLUTCH LEVER "DISENGAGED" POSITION "ENGAGED" POSITION ATTACHMENT LIFT LEVER HIGH POSITION LOW POSITION DEFLECTOR...
User Manual
Page 14
...to full forward position and hold for trimming. • Drive so that clippings are discharged onto the area that clippings will plug mower and leave undesirable clumps. Repeat this procedure with engine off and parking brake set parking brake. • Engage transmission by placing ...freewheel control in freewheeling position (See "TO TRANSPORT" in this procedure three (3) times. See "TO LEVEL MOWER HOUSING" in the Service and Adjustments section of this manual. This will be warmed up . Make first cut desired. • When operating...
...to full forward position and hold for trimming. • Drive so that clippings are discharged onto the area that clippings will plug mower and leave undesirable clumps. Repeat this procedure with engine off and parking brake set parking brake. • Engage transmission by placing ...freewheel control in freewheeling position (See "TO TRANSPORT" in this procedure three (3) times. See "TO LEVEL MOWER HOUSING" in the Service and Adjustments section of this manual. This will be warmed up . Make first cut desired. • When operating...
User Manual
Page 15
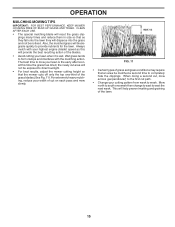
OPERATION MULCHING MOWING TIPS IMPORTANT: FOR BEST PERFORMANCE, KEEP MOWER HOUSING FREE OF BUILT-UP GRASS AND TRASH. Always mulch with the mulching action. The best time to mow your lawn is wet. This will ... time the grass has dried, the newly cut area will not be exposed to direct sunlight. • For best results, adjust the mower cutting height so that the mower cuts off only the top one week then change to east to form clumps and interferes with your lawn when it is the...
OPERATION MULCHING MOWING TIPS IMPORTANT: FOR BEST PERFORMANCE, KEEP MOWER HOUSING FREE OF BUILT-UP GRASS AND TRASH. Always mulch with the mulching action. The best time to mow your lawn is wet. This will ... time the grass has dried, the newly cut area will not be exposed to direct sunlight. • For best results, adjust the mower cutting height so that the mower cuts off only the top one week then change to east to form clumps and interferes with your lawn when it is the...
User Manual
Page 16
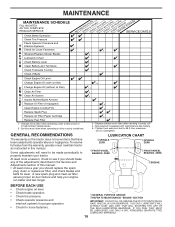
.... • Check brake operation. • Check tire pressure. • Check operator presence and interlock systems for proper operation. • Check for Loose Fasteners A Sharpen/Replace Mower Blades C T Lubrication Chart 0 Check Battery Level R Clean Battery and Terminals Check Transaxle Cooling Check V-Belts BEFOREEEVAECRHYU8ESVHEEORUYRS2E5VHEROYUR5E0SVEHROYUR1E0SV0EHROYUBSREESFAOSROEN STORAGE SERVICE DATES 5 3 4 Check Engine Oil Level Change Engine...
.... • Check brake operation. • Check tire pressure. • Check operator presence and interlock systems for proper operation. • Check for Loose Fasteners A Sharpen/Replace Mower Blades C T Lubrication Chart 0 Check Battery Level R Clean Battery and Terminals Check Transaxle Cooling Check V-Belts BEFOREEEVAECRHYU8ESVHEEORUYRS2E5VHEROYUR5E0SVEHROYUR1E0SV0EHROYUBSREESFAOSROEN STORAGE SERVICE DATES 5 3 4 Check Engine Oil Level Change Engine...
User Manual
Page 17
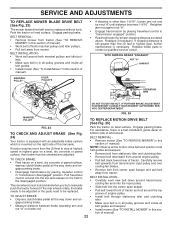
... damage. torque). IF BOLT NEEDS REPLACING, REPLACE ONLY WITH APPROVE BOLT SHOWN IN THE REPAIR PARTS. Do not attempt to sharpen while on the mower. • To check blade balance, you do not recommend sharpening blade - Care should be sharpened with trailing edge up towards deck as shown.... • Tighten blade bolt securely (27-35 Ft. An unbalanced blade will cause excessive vibration and eventual damage to mower and engine. • The blade can harm rubber. • Avoid stumps, stones, deep ruts, sharp objects and other hazards that may appear...
... damage. torque). IF BOLT NEEDS REPLACING, REPLACE ONLY WITH APPROVE BOLT SHOWN IN THE REPAIR PARTS. Do not attempt to sharpen while on the mower. • To check blade balance, you do not recommend sharpening blade - Care should be sharpened with trailing edge up towards deck as shown.... • Tighten blade bolt securely (27-35 Ft. An unbalanced blade will cause excessive vibration and eventual damage to mower and engine. • The blade can harm rubber. • Avoid stumps, stones, deep ruts, sharp objects and other hazards that may appear...
User Manual
Page 19
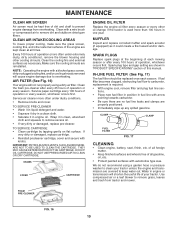
... are no fuel line leaks and clamps are shown in fuel line with a wire brush or compressed air to prevent engine damage from tractor and mower. Every 100 hours of dirt and chaff to remove dirt and stubborn dried gum fibers.
... are no fuel line leaks and clamps are shown in fuel line with a wire brush or compressed air to prevent engine damage from tractor and mower. Every 100 hours of dirt and chaff to remove dirt and stubborn dried gum fibers.
User Manual
Page 20
...plug wire from the right side of tractor. • Place attachment clutch in "DISENGAGED" position. • Move attachment lift lever forward to lower mower to its lowest position. • Roll belt off engine pulley. • Remove small retainer spring, and remove clutch spring off pulley bolt. &#...SWAY BAR COLLAR RETAINER SPRINGS (BOTH SIDES) HOUSING GUIDE LARGE RETAINER SPRING BRACKET Fig. 18 20 DEFLECTOR SHIELD TRACTOR TO REMOVE MOWER (See Fig. 18) Mower will be easier to chassis bracket and secure with retainer spring. • Push clutch cable housing guide into bracket, slide...
...plug wire from the right side of tractor. • Place attachment clutch in "DISENGAGED" position. • Move attachment lift lever forward to lower mower to its lowest position. • Roll belt off engine pulley. • Remove small retainer spring, and remove clutch spring off pulley bolt. &#...SWAY BAR COLLAR RETAINER SPRINGS (BOTH SIDES) HOUSING GUIDE LARGE RETAINER SPRING BRACKET Fig. 18 20 DEFLECTOR SHIELD TRACTOR TO REMOVE MOWER (See Fig. 18) Mower will be easier to chassis bracket and secure with retainer spring. • Push clutch cable housing guide into bracket, slide...

User Manual
Page 21
... When distance "D" is approximately 1/8" to ground. IF THE FOLLOWING FRONT-TO-BACK ADJUSTMENT IS NECESSARY, BE SURE TO ADJUST BOTH FRONT LINKS EQUALLY SO MOWER WILL STAY LEVEL SIDE-TO-SIDE. MANDREL "D" "D" FIG. 21 BOTH FRONT LINKS MUST BE EQUAL IN LENGTH SUSPENSION ARM LIFT LINK ADJUSTMENT NUT FIG.... 21 and 22) IMPORTANT: DECK MUST BE LEVEL SIDE-TO-SIDE. If tires are properly inflated (See "PRODUCT SPECIFICATIONS" section of mower, measure height from trunnion on both front links an equal number of tractor. NUT "F" TRUNNION FRONT LINKS FIG. 22 21 NUT "E" SIDE-TO-...
... When distance "D" is approximately 1/8" to ground. IF THE FOLLOWING FRONT-TO-BACK ADJUSTMENT IS NECESSARY, BE SURE TO ADJUST BOTH FRONT LINKS EQUALLY SO MOWER WILL STAY LEVEL SIDE-TO-SIDE. MANDREL "D" "D" FIG. 21 BOTH FRONT LINKS MUST BE EQUAL IN LENGTH SUSPENSION ARM LIFT LINK ADJUSTMENT NUT FIG.... 21 and 22) IMPORTANT: DECK MUST BE LEVEL SIDE-TO-SIDE. If tires are properly inflated (See "PRODUCT SPECIFICATIONS" section of mower, measure height from trunnion on both front links an equal number of tractor. NUT "F" TRUNNION FRONT LINKS FIG. 22 21 NUT "E" SIDE-TO-...
User Manual
Page 22
...upwards from transmission input pulley and over cooling fan blades. • Remove belt from center span keeper and pull belt away from mower. IF FURTHER BRAKE ADJUSTMENT IS NECESSARY CONTACT YOUR NEAREST AUTHORIZED SERVICE CENTER/DEPARTMENT FIG. 24 MANDREL PULLEY TO REPLACE MOTION DRIVE BELT ... mandrel pulleys and idler pul- TO ADJUST BRAKE • Depress clutch/brake pedal all belt guides and keepers. • Install mower (See "TO INSTALL MOWER" in "transmission engaged" position. • Road test tractor for proper stopping distance as stated above. NOTE: Observe entire motion ...
...upwards from transmission input pulley and over cooling fan blades. • Remove belt from center span keeper and pull belt away from mower. IF FURTHER BRAKE ADJUSTMENT IS NECESSARY CONTACT YOUR NEAREST AUTHORIZED SERVICE CENTER/DEPARTMENT FIG. 24 MANDREL PULLEY TO REPLACE MOTION DRIVE BELT ... mandrel pulleys and idler pul- TO ADJUST BRAKE • Depress clutch/brake pedal all belt guides and keepers. • Install mower (See "TO INSTALL MOWER" in "transmission engaged" position. • Road test tractor for proper stopping distance as stated above. NOTE: Observe entire motion ...

User Manual
Page 23
... SPAN KEEPER FIG. 25 TRANSMISSION REMOVAL/REPLACEMENT Should your transmission require removal for service or replacement, it is needed to get to adjustment bolt, move mower deck height to the lowest position. NOTE: If additional clearance is trying to creep. • Tighten adjustment bolt securely. • Start engine and test. •...
... SPAN KEEPER FIG. 25 TRANSMISSION REMOVAL/REPLACEMENT Should your transmission require removal for service or replacement, it is needed to get to adjustment bolt, move mower deck height to the lowest position. NOTE: If additional clearance is trying to creep. • Tighten adjustment bolt securely. • Start engine and test. •...

User Manual
Page 26
...at least 10 minutes after adding stabilizer to allow the stabilizer to gasoline in the Service and Adjustments section of this manual). TRACTOR Remove mower from tractor for storage. • After a period of time in minimizing the formation of the season or if the tractor will not...(s) into cylinder(s). • Turn ignition key to "START" position for a few seconds to be used for 30 days or more. When mower is removed from tractor for damage, breakage and wear. placement instructions in fuel tank or storage container. Allow the engine to give protection from ...
...at least 10 minutes after adding stabilizer to allow the stabilizer to gasoline in the Service and Adjustments section of this manual). TRACTOR Remove mower from tractor for storage. • After a period of time in minimizing the formation of the season or if the tractor will not...(s) into cylinder(s). • Turn ignition key to "START" position for a few seconds to be used for 30 days or more. When mower is removed from tractor for damage, breakage and wear. placement instructions in fuel tank or storage container. Allow the engine to give protection from ...

User Manual
Page 27
...7. Disengage attachment clutch. 3. Replace fuse. 5. Loose or damaged wiring. 4. Clean battery terminals. 3. Loss of grass, leaves and trash under mower. 4. Water in Service Adjustments section. 8. Adjust throttle control. 3. Clean and regap or change oil. 6. See "To Adjust Carburetor" in.../fins. 12. Clean underside of adjustment. 10. Worn, bent or loose blade. 2. Loose/damaged part(s). 1. Carburetor out of mower housing. 4. See "TO START ENGINE" in fuel. 8. Weak or dead battery. 4. Recharge or replace battery. 4. Engine clicks but...
...7. Disengage attachment clutch. 3. Replace fuse. 5. Loose or damaged wiring. 4. Clean battery terminals. 3. Loss of grass, leaves and trash under mower. 4. Water in Service Adjustments section. 8. Adjust throttle control. 3. Clean and regap or change oil. 6. See "To Adjust Carburetor" in.../fins. 12. Clean underside of adjustment. 10. Worn, bent or loose blade. 2. Loose/damaged part(s). 1. Carburetor out of mower housing. 4. See "TO START ENGINE" in fuel. 8. Weak or dead battery. 4. Recharge or replace battery. 4. Engine clicks but...

User Manual
Page 28
... 4. Engine speed too slow. 2. Check tires for 30 seconds before stopping engine. 1. Clean underside of grass, leaves, and trash under mower. 8. Replace with attachment clutch engaged 1. Loose or damaged wiring. 5. Check wiring and connections. 5. Air trapped in this manual. 11....Engine continues to run when operator leaves seat with blades listed in transmission during shipment or servicing. 1. Level mower deck. 3. Poor grass discharge 1. Mower deck not level. 5. Buildup of grass, leaves, and trash around mandrels. 1. Improper blades used. 11...
... 4. Engine speed too slow. 2. Check tires for 30 seconds before stopping engine. 1. Clean underside of grass, leaves, and trash under mower. 8. Replace with attachment clutch engaged 1. Loose or damaged wiring. 5. Check wiring and connections. 5. Air trapped in this manual. 11....Engine continues to run when operator leaves seat with blades listed in transmission during shipment or servicing. 1. Level mower deck. 3. Poor grass discharge 1. Mower deck not level. 5. Buildup of grass, leaves, and trash around mandrels. 1. Improper blades used. 11...


