
User Manual
Page 2
...SLOPE OPERATION tight and keep equipment in . Slopes are often attracted to improve stability. Check their ability to operate the riding mower safely enough to operate the machine. require extra caution. Frequently check weights or counterweights to the machine and the mowing activity. ...and use grass catcher on the machine before mowing. cause sliding. • Do not try to the presence of the machine. • Mower blades are explosive. - mended parts, when necessary. FAILURE TO OBSERVE THE FOLLOWING SAFETY INSTRUCTIONS COULD RESULT IN SERIOUS INJURY OR DEATH. III....
...SLOPE OPERATION tight and keep equipment in . Slopes are often attracted to improve stability. Check their ability to operate the riding mower safely enough to operate the machine. require extra caution. Frequently check weights or counterweights to the machine and the mowing activity. ...and use grass catcher on the machine before mowing. cause sliding. • Do not try to the presence of the machine. • Mower blades are explosive. - mended parts, when necessary. FAILURE TO OBSERVE THE FOLLOWING SAFETY INSTRUCTIONS COULD RESULT IN SERIOUS INJURY OR DEATH. III....

User Manual
Page 3
... a slope. WARNING: Do not coast down slowly. • Do not turn slowly and gradually downhill, if possible. SAFETY RULES SAFE OPERATION PRACTICES FOR RIDE-ON MOWERS • Be sure the area is dangerous. Stop machine if anyone enters the area. • Never carry passengers or children even with specifications...
... a slope. WARNING: Do not coast down slowly. • Do not turn slowly and gradually downhill, if possible. SAFETY RULES SAFE OPERATION PRACTICES FOR RIDE-ON MOWERS • Be sure the area is dangerous. Stop machine if anyone enters the area. • Never carry passengers or children even with specifications...
User Manual
Page 7
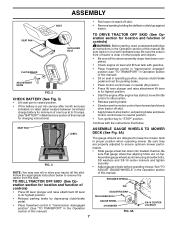
...depress clutch/brake pedal and set parking brake and place motion control lever in neutral position. • Turn ignition key to ensure optimum mower performance. • Slide gauge wheel bar down into service after month and year indicated on top. Assemble gauge wheels as shown using ... label (label located between terminals) charge battery for minimum of one hour at 6-10 amps. (See "BATTERY" in proper position when operating mower. Continue with gasoline. • Place freewheel control in "transmission engaged" position (see "TO TRANSPORT" in the Operation section of this manual)....
...depress clutch/brake pedal and set parking brake and place motion control lever in neutral position. • Turn ignition key to ensure optimum mower performance. • Slide gauge wheel bar down into service after month and year indicated on top. Assemble gauge wheels as shown using ... label (label located between terminals) charge battery for minimum of one hour at 6-10 amps. (See "BATTERY" in proper position when operating mower. Continue with gasoline. • Place freewheel control in "transmission engaged" position (see "TO TRANSPORT" in the Operation section of this manual)....
User Manual
Page 8
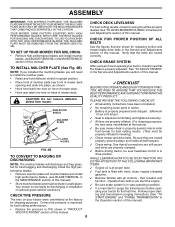
... manual. • Raise and hold deflector shield in the Service and Adjustments section of optional grass catcher accessory. Your mower is in the Service and Adjustments section of this manual. Be sure they are routed correctly. Operate them before operating your tractor ... high performance blades, (see BLADE REMOVAL in flated for the first time. CAUTION: Do not remove deflector shield from mower. Verify that the brake is filled with fresh, clean, regular unleaded gasoline. ✓ Become familiar with all belt keepers. ✓ ...
... manual. • Raise and hold deflector shield in the Service and Adjustments section of optional grass catcher accessory. Your mower is in the Service and Adjustments section of this manual. Be sure they are routed correctly. Operate them before operating your tractor ... high performance blades, (see BLADE REMOVAL in flated for the first time. CAUTION: Do not remove deflector shield from mower. Verify that the brake is filled with fresh, clean, regular unleaded gasoline. ✓ Become familiar with all belt keepers. ✓ ...

User Manual
Page 9
... ENGINE OFF LIGHTS ON P ENGINE ON ENGINE START PARKING BRAKE PARKING BRAKE PARKING BRAKE LOCKED UNLOCKED OVER TEMP LIGHT FUEL OIL PRESSURE BATTERY REVERSE FORWARD MOWER HEIGHT MOWER LIFT 15 15 15 ATTACHMENT ATTACHMENT CLUTCH ENGAGED CLUTCH DISENGAGED DANGER, KEEP HANDS AND FEET AWAY KEEP AREA CLEAR SLOPE HAZARDS (SEE SAFETY RULES...
... ENGINE OFF LIGHTS ON P ENGINE ON ENGINE START PARKING BRAKE PARKING BRAKE PARKING BRAKE LOCKED UNLOCKED OVER TEMP LIGHT FUEL OIL PRESSURE BATTERY REVERSE FORWARD MOWER HEIGHT MOWER LIFT 15 15 15 ATTACHMENT ATTACHMENT CLUTCH ENGAGED CLUTCH DISENGAGED DANGER, KEEP HANDS AND FEET AWAY KEEP AREA CLEAR SLOPE HAZARDS (SEE SAFETY RULES...

User Manual
Page 10
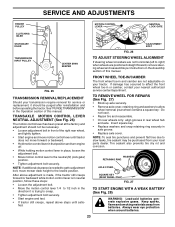
...- FREEWHEEL CONTROL: Disengages transmission for starting the engine. LIFT LEVER PLUNGER: Used to adjust the mower cutting height. 10 ATTACHMENT CLUTCH LEVER: Used to engage the mower blades, or other attachments mounted to your tractor. LIGHT SWITCH POSITION: Turns the headlights on and ... yourself with the locations of the American National Standards Institute. ATTACHMENT LIFT LEVER: Used to raise, lower, and adjust the mower deck or other attachments mounted to your tractor to the safety standards of various controls and adjustments. MOTION CONTROL LEVER: Selects ...
...- FREEWHEEL CONTROL: Disengages transmission for starting the engine. LIFT LEVER PLUNGER: Used to adjust the mower cutting height. 10 ATTACHMENT CLUTCH LEVER: Used to engage the mower blades, or other attachments mounted to your tractor. LIGHT SWITCH POSITION: Turns the headlights on and ... yourself with the locations of the American National Standards Institute. ATTACHMENT LIFT LEVER: Used to raise, lower, and adjust the mower deck or other attachments mounted to your tractor to the safety standards of various controls and adjustments. MOTION CONTROL LEVER: Selects ...

User Manual
Page 11
.... IMPORTANT: LEAVING THE IGNITION SWITCH IN ANY POSITION OTHER THAN "OFF" WILL CAUSE THE BATTERY TO BE DISCHARGED, (DEAD). TO ADJUST MOWER CUTTING HEIGHT (See Fig. 6) The cutting height is standing idle with the engine not running , hot engine exhaust gases may cause "...POSITION CLUTCH/BRAKE PEDAL "DRIVE" POSITION HEIGHT ADJUSTMENT MOTION CONTROL LEVER KNOB PARKING BRAKE "DISENGAGED" POSITION FIG. 6 STOPPING (See Fig. 6) MOWER BLADES • To stop engine. OPERATION The operation of any tractor can result in foreign objects thrown into the eyes, which can result in...
.... IMPORTANT: LEAVING THE IGNITION SWITCH IN ANY POSITION OTHER THAN "OFF" WILL CAUSE THE BATTERY TO BE DISCHARGED, (DEAD). TO ADJUST MOWER CUTTING HEIGHT (See Fig. 6) The cutting height is standing idle with the engine not running , hot engine exhaust gases may cause "...POSITION CLUTCH/BRAKE PEDAL "DRIVE" POSITION HEIGHT ADJUSTMENT MOTION CONTROL LEVER KNOB PARKING BRAKE "DISENGAGED" POSITION FIG. 6 STOPPING (See Fig. 6) MOWER BLADES • To stop engine. OPERATION The operation of any tractor can result in foreign objects thrown into the eyes, which can result in...

User Manual
Page 12
...motion control lever to desired cutting height (See "TO AD- IMPORTANT:BE SURETO READJUST GAUGEWHEELS IFYOU CHANGE THE CUTTING HEIGHT OF THE MOWER DECK. ATTACHMENT CLUTCH LEVER "DISENGAGED" POSITION "ENGAGED" POSITION ATTACHMENT LIFT LEVER HIGH POSITION LOW POSITION DEFLECTOR SHIELD FIG. 8 TO ...8226; Select desired height of tractor. • Raise attachment lift to disengage transmission by engaging attachment clutch control. • TO STOP MOWER BLADES - IMPORTANT: THE MOTION CONTROL LEVER DOES NOT RETURN TO NEUTRAL (N) POSITION WHEN THE CLUTCH/ BRAKE PEDAL IS DEPRESSED. • ...
...motion control lever to desired cutting height (See "TO AD- IMPORTANT:BE SURETO READJUST GAUGEWHEELS IFYOU CHANGE THE CUTTING HEIGHT OF THE MOWER DECK. ATTACHMENT CLUTCH LEVER "DISENGAGED" POSITION "ENGAGED" POSITION ATTACHMENT LIFT LEVER HIGH POSITION LOW POSITION DEFLECTOR SHIELD FIG. 8 TO ...8226; Select desired height of tractor. • Raise attachment lift to disengage transmission by engaging attachment clutch control. • TO STOP MOWER BLADES - IMPORTANT: THE MOTION CONTROL LEVER DOES NOT RETURN TO NEUTRAL (N) POSITION WHEN THE CLUTCH/ BRAKE PEDAL IS DEPRESSED. • ...

User Manual
Page 14
... warmed up. Regulate ground speed by placing freewheel control in driving position (See "TO TRANSPORT" in this procedure there will plug mower and leave undesirable clumps. Repeat this procedure with engine off and parking brake set parking brake. • Engage transmission by selecting...clutch/brake pedal. • Move motion control lever to the neutral (N) position. With motion control lever in neutral. See "TO LEVEL MOWER HOUSING" in cold temperatures (below 32 F) the carburetor fuel mixture may have developed during the engine warm-up period after the tractor ...
... warmed up. Regulate ground speed by placing freewheel control in driving position (See "TO TRANSPORT" in this procedure there will plug mower and leave undesirable clumps. Repeat this procedure with engine off and parking brake set parking brake. • Engage transmission by selecting...clutch/brake pedal. • Move motion control lever to the neutral (N) position. With motion control lever in neutral. See "TO LEVEL MOWER HOUSING" in cold temperatures (below 32 F) the carburetor fuel mixture may have developed during the engine warm-up period after the tractor ...

User Manual
Page 15
... will biodegrade quickly to west the next week. OPERATION MULCHING MOWING TIPS IMPORTANT: FOR BEST PERFORMANCE, KEEP MOWER HOUSING FREE OF BUILT-UP GRASS AND TRASH. Mow north to south one -third of the grass blades...the mulched grass will recut the grass clippings many times and reduce them in size so that the mower cuts off only the top one week then change to east to provide nutrients for the lawn. The... best time to the direct sun. • For best results, adjust the mower cutting height so that as this time the grass has dried and the newly cut path. •...
... will biodegrade quickly to west the next week. OPERATION MULCHING MOWING TIPS IMPORTANT: FOR BEST PERFORMANCE, KEEP MOWER HOUSING FREE OF BUILT-UP GRASS AND TRASH. Mow north to south one -third of the grass blades...the mulched grass will recut the grass clippings many times and reduce them in size so that the mower cuts off only the top one week then change to east to provide nutrients for the lawn. The... best time to the direct sun. • For best results, adjust the mower cutting height so that as this time the grass has dried and the newly cut path. •...

User Manual
Page 16
... IN DATES AS YOU COMPLETE REGULAR SERVICE Check Brake Operation Check Tire Pressure Check Operator Presence and T Interlock Systems R Check for Loose Fasteners A Sharpen/Replace Mower Blades C T Lubrication Chart 0 Check Battery Level R Clean Battery and Terminals Check Transaxle Cooling Check V-Belts BEFOREEEVAECRHYU8ESVHEEORUYRS2E5VHEROYUR5E0SVEHROYUR1E0SV0EHROYUBSREESFAOSROENSSTEORRAVGEICE DATES 5 3 4 Check Engine Oil Level Change Engine Oil (with...
... IN DATES AS YOU COMPLETE REGULAR SERVICE Check Brake Operation Check Tire Pressure Check Operator Presence and T Interlock Systems R Check for Loose Fasteners A Sharpen/Replace Mower Blades C T Lubrication Chart 0 Check Battery Level R Clean Battery and Terminals Check Transaxle Cooling Check V-Belts BEFOREEEVAECRHYU8ESVHEEORUYRS2E5VHEROYUR5E0SVEHROYUR1E0SV0EHROYUBSREESFAOSROENSSTEORRAVGEICE DATES 5 3 4 Check Engine Oil Level Change Engine Oil (with...
User Manual
Page 17
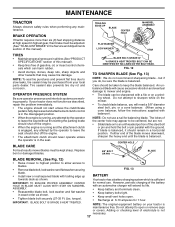
... GRADE 8 HEAT TREATED BOLT CAN BE IDENTIFIED BY SIX LINES ON THE BOLT HEAD. An unbalanced blade will cause excessive vibration and eventual damage to mower and engine. • The blade can harm rubber. • Avoid stumps, stones, deep ruts, sharp objects and other hazards that may cause ...the engine. • The attachment clutch should never operate unless the operator is in a horizontal position. NOTE: The original equipment battery on the mower. • To check blade balance, you do not recommend sharpening blade - Do not attempt to keep the blade balanced. Adding or checking ...
... GRADE 8 HEAT TREATED BOLT CAN BE IDENTIFIED BY SIX LINES ON THE BOLT HEAD. An unbalanced blade will cause excessive vibration and eventual damage to mower and engine. • The blade can harm rubber. • Avoid stumps, stones, deep ruts, sharp objects and other hazards that may cause ...the engine. • The attachment clutch should never operate unless the operator is in a horizontal position. NOTE: The original equipment battery on the mower. • To check blade balance, you do not recommend sharpening blade - Do not attempt to keep the blade balanced. Adding or checking ...

User Manual
Page 19
... to carburetor, replacement is used more often under dusty conditions. • Remove knob and cover. • Remove wing nut and air cleaner from tractor and mower. If fuel filter becomes clogged, obstructing fuel flow to remove excess oil. Wrap it to overheating. TO SERVICE CARTRIDGE • Replace a dirty, bent...
... to carburetor, replacement is used more often under dusty conditions. • Remove knob and cover. • Remove wing nut and air cleaner from tractor and mower. If fuel filter becomes clogged, obstructing fuel flow to remove excess oil. Wrap it to overheating. TO SERVICE CARTRIDGE • Replace a dirty, bent...
User Manual
Page 20
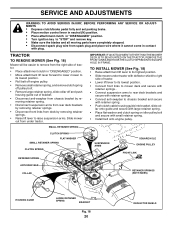
... deck brackets and secure with retainer springs. • Connect anti-swaybar to its highest position. • Slide mower under tractor. TRACTOR TO REMOVE MOWER (See Fig. 18) Mower will be easier to remove from the right side of bracket. • Disconnect anti-swaybar from chassis bracket by... FRONT LINK ANTI-SWAY BAR COLLAR RETAINER SPRINGS (BOTH SIDES) HOUSING GUIDE LARGE RETAINER SPRING BRACKET Fig. 18 20 DEFLECTOR SHIELD TO INSTALL MOWER (See Fig. 18) • Raise attachment lift lever to chassis bracket and secure with retainer spring. • Push clutch cable housing...
... deck brackets and secure with retainer springs. • Connect anti-swaybar to its highest position. • Slide mower under tractor. TRACTOR TO REMOVE MOWER (See Fig. 18) Mower will be easier to remove from the right side of bracket. • Disconnect anti-swaybar from chassis bracket by... FRONT LINK ANTI-SWAY BAR COLLAR RETAINER SPRINGS (BOTH SIDES) HOUSING GUIDE LARGE RETAINER SPRING BRACKET Fig. 18 20 DEFLECTOR SHIELD TO INSTALL MOWER (See Fig. 18) • Raise attachment lift lever to chassis bracket and secure with retainer spring. • Push clutch cable housing...

User Manual
Page 21
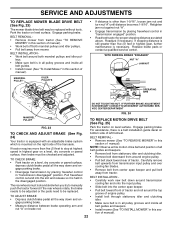
...(See "PRODUCT SPECIFICATIONS" section of this manual). NUT "F" TRUNNION FRONT LINKS FIG. 22 21 NUT "E" SERVICE AND ADJUSTMENTS TO LEVEL MOWER HOUSING Adjust the mower while tractor is parked on both front links an equal number of turns. Make sure tires are over or underinflated, you ... equal number of turns. • When distance "D" is 1/8" to 1/2" lower at front than rear, tighten nuts "F" against trunnion on right side of mower, measure height from trunnion on that side. • To lower one link to its highest position. MANDREL "D" "D" FIG. 21 BOTH FRONT LINKS MUST ...
...(See "PRODUCT SPECIFICATIONS" section of this manual). NUT "F" TRUNNION FRONT LINKS FIG. 22 21 NUT "E" SERVICE AND ADJUSTMENTS TO LEVEL MOWER HOUSING Adjust the mower while tractor is parked on both front links an equal number of turns. Make sure tires are over or underinflated, you ... equal number of turns. • When distance "D" is 1/8" to 1/2" lower at front than rear, tighten nuts "F" against trunnion on right side of mower, measure height from trunnion on that side. • To lower one link to its highest position. MANDREL "D" "D" FIG. 21 BOTH FRONT LINKS MUST ...
User Manual
Page 22
...an adjustable brake system which is necessary. The rear wheels must be replaced. Engage parking brake. BELT REMOVAL • Remove mower from mower. If stopping distance is a belt installation guide decal on level surface. IF FURTHER BRAKE ADJUSTMENT IS NECESSARY CONTACT YOUR NEAREST ... tractor on a level, dry concrete or paved surface, depress clutch/brake pedal all belt guides and keepers. • Install mower (See "TO INSTALL MOWER" in this section of the transaxle. Retighten jam nut against nut "A". • Engage transmission by placing freewhel control in the...
...an adjustable brake system which is necessary. The rear wheels must be replaced. Engage parking brake. BELT REMOVAL • Remove mower from mower. If stopping distance is a belt installation guide decal on level surface. IF FURTHER BRAKE ADJUSTMENT IS NECESSARY CONTACT YOUR NEAREST ... tractor on a level, dry concrete or paved surface, depress clutch/brake pedal all belt guides and keepers. • Install mower (See "TO INSTALL MOWER" in this section of the transaxle. Retighten jam nut against nut "A". • Engage transmission by placing freewhel control in the...
User Manual
Page 23
... rear wheel, and lightly tighten. • Start engine and move motion control lever until satis- fied. After above steps until tractor does not move mower deck height to allow wheel removal (rear wheel contains a square key -
... rear wheel, and lightly tighten. • Start engine and move motion control lever until satis- fied. After above steps until tractor does not move mower deck height to allow wheel removal (rear wheel contains a square key -
User Manual
Page 26
... rusted or chipped paint surfaces; IMPORTANT: NEVER COVERTRACTORWHILE ENGINE AND EXHAUST AREAS ARE STILL WARM. 26 TRACTOR Remove mower from one ounce of this manual. • Be sure that does not retain moisture. When mower is to be disconnected and battery cleaned thoroughly (see "TO CLEAN BATTERY AND TERMINALS" in contact with...
... rusted or chipped paint surfaces; IMPORTANT: NEVER COVERTRACTORWHILE ENGINE AND EXHAUST AREAS ARE STILL WARM. 26 TRACTOR Remove mower from one ounce of this manual. • Be sure that does not retain moisture. When mower is to be disconnected and battery cleaned thoroughly (see "TO CLEAN BATTERY AND TERMINALS" in contact with...

User Manual
Page 27
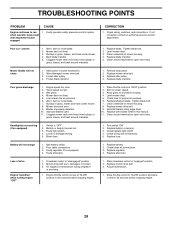
... Contact an authorized service center/department. Engine clicks but will not turn over 1. Faulty solenoid or starter. 1. Build-up of mower housing. 4. Low oil level/dirty oil. 6. Water in Service Adjustments section. 8. Clean underside of grass, leaves and trash under... mower. 4. Replace fuel filter. 8. Bent blade mandrel. 3. Tighten blade bolt. 2. Tighten loose part(s). TROUBLESHOOTING POINTS PROBLEM Will not start 1. Dirty...
... Contact an authorized service center/department. Engine clicks but will not turn over 1. Faulty solenoid or starter. 1. Build-up of mower housing. 4. Low oil level/dirty oil. 6. Water in Service Adjustments section. 8. Clean underside of grass, leaves and trash under... mower. 4. Replace fuel filter. 8. Bent blade mandrel. 3. Tighten blade bolt. 2. Tighten loose part(s). TROUBLESHOOTING POINTS PROBLEM Will not start 1. Dirty...
User Manual
Page 28
... to open vent holes. Clean underside of drive Engine "backfires" when turning engine "OFF" 1. Replace blade mandrel. 5. Worn/damaged mower drive belt. 3. Engine speed too slow. 2. Tighten blade bolt. 7. Reinstall blades sharp edge down. 10. Headlight(s) not working (if so... equipped) 1. Turn switch "ON". 2. Poor cable connections. 3. Loss of mower housing. 4. Engine throttle control not set at "SLOW" position for proper air pressure. 6. Purge transmission. 1. Poor grass discharge 1. Buildup of grass...
... to open vent holes. Clean underside of drive Engine "backfires" when turning engine "OFF" 1. Replace blade mandrel. 5. Worn/damaged mower drive belt. 3. Engine speed too slow. 2. Tighten blade bolt. 7. Reinstall blades sharp edge down. 10. Headlight(s) not working (if so... equipped) 1. Turn switch "ON". 2. Poor cable connections. 3. Loss of mower housing. 4. Engine throttle control not set at "SLOW" position for proper air pressure. 6. Purge transmission. 1. Poor grass discharge 1. Buildup of grass...


