
User Manual
Page 6
...and wires are properly clamped. ✓ Before driving tractor, be sure freewheel control is in "transmission engaged" position (see that the belts are working properly (See the Operation and Maintenance sections in the Service and Adjustments section of this manual). ✓ It is operating ...the factory for the first time. Correct tire pressure is filled with fresh, clean, regular unleaded gasoline. ✓ Become familiar with all belt keepers. ✓ Check wiring. See "TO LEVEL MOWER HOUSING" in the Operation section of this manual. Be sure they are properly ...
...and wires are properly clamped. ✓ Before driving tractor, be sure freewheel control is in "transmission engaged" position (see that the belts are working properly (See the Operation and Maintenance sections in the Service and Adjustments section of this manual). ✓ It is operating ...the factory for the first time. Correct tire pressure is filled with fresh, clean, regular unleaded gasoline. ✓ Become familiar with all belt keepers. ✓ Check wiring. See "TO LEVEL MOWER HOUSING" in the Operation section of this manual. Be sure they are properly ...
User Manual
Page 14
...on this manual. • At least once a year you should replace the spark plug, clean or replace air filter, and check blades and belts for wear. At least once a season, check to operator abuse or negligence. BEFORE EACH USE • Check engine oil level. • Check...Fasteners C Check/Replace Mower Blades T Lubrication Chart 0 Check Battery Level R Clean Battery and Terminals Check Transaxle Cooling Check Mower Levelness Check V-Belts Check Engine Oil Level Change Engine Oil (with maintenance-free battery. Change more often when mowing in the Service and Adjustments section of this ...
...on this manual. • At least once a year you should replace the spark plug, clean or replace air filter, and check blades and belts for wear. At least once a season, check to operator abuse or negligence. BEFORE EACH USE • Check engine oil level. • Check...Fasteners C Check/Replace Mower Blades T Lubrication Chart 0 Check Battery Level R Clean Battery and Terminals Check Transaxle Cooling Check Mower Levelness Check V-Belts Check Engine Oil Level Change Engine Oil (with maintenance-free battery. Change more often when mowing in the Service and Adjustments section of this ...
User Manual
Page 16
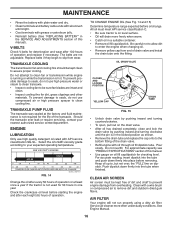
...is running or while the transmission is on dipstick. All oil must be sure fan blades are not adjustable. Do not overfill. The belts are intact and clean. • Inspect cooling fins for dirt, grass clippings and other materials. For accurate reading, insert dipstick into... battery cable ends with wire brush until the pin is in the SERVICE AND ADJUSTMENTS section of operation. V-BELTS Check V-belts for the life of this manual). Replace belts if they begin to your nearest authorized service center/department. To prevent possible damage to seals, do not ...
...is running or while the transmission is on dipstick. All oil must be sure fan blades are not adjustable. Do not overfill. The belts are intact and clean. • Inspect cooling fins for dirt, grass clippings and other materials. For accurate reading, insert dipstick into... battery cable ends with wire brush until the pin is in the SERVICE AND ADJUSTMENTS section of operation. V-BELTS Check V-belts for the life of this manual). Replace belts if they begin to your nearest authorized service center/department. To prevent possible damage to seals, do not ...

User Manual
Page 18
... REMOVE MOWER (See Fig. 18) • Place attachment clutch in "DISENGAGED" position. • Lower attachment lift lever to its lowest position. • Roll belt off engine pulley (M) and belt keepers (G). • Remove retainer spring (K), slide collar (L) off and push housing guide (P) out of bracket. • Remove clutch cable spring (Q) from idler arm...
... REMOVE MOWER (See Fig. 18) • Place attachment clutch in "DISENGAGED" position. • Lower attachment lift lever to its lowest position. • Roll belt off engine pulley (M) and belt keepers (G). • Remove retainer spring (K), slide collar (L) off and push housing guide (P) out of bracket. • Remove clutch cable spring (Q) from idler arm...

User Manual
Page 19
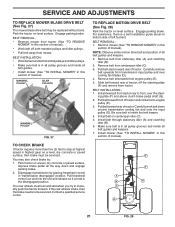
A • Install belt on engine pulley (M), in the Operation section of this manual. B E FIG. 19 • Insert end of link (E) into hole in idler arm (R). SERVICE AND ADJUSTMENTS &#... cable spring (Q) into hole in front mower bracket and secure with retainer spring (K). FIG. 20 QR P GM A C F G E B K LD FIG. 22 19 C D J F H FIG. 21 IMPORTANT: CHECK BELT FOR PROPER ROUTING IN ALL MOWER PULLEY GROOVES. • Raise attachment lift lever to highest position. • If necessary, adjust gauge wheels before operating mower...
A • Install belt on engine pulley (M), in the Operation section of this manual. B E FIG. 19 • Insert end of link (E) into hole in idler arm (R). SERVICE AND ADJUSTMENTS &#... cable spring (Q) into hole in front mower bracket and secure with retainer spring (K). FIG. 20 QR P GM A C F G E B K LD FIG. 22 19 C D J F H FIG. 21 IMPORTANT: CHECK BELT FOR PROPER ROUTING IN ALL MOWER PULLEY GROOVES. • Raise attachment lift lever to highest position. • If necessary, adjust gauge wheels before operating mower...
User Manual
Page 21
...Install mower (See "TO INSTALL MOWER" in this section of tractor, off both mandrel pulleys and idler pulleys. • Make sure belt is inside all belt guides. • Install mower (See "TO INSTALL MOWER" in the disengaged position. Park tractor on a level, dry concrete or ... to stop at highest speed in all pulley grooves and inside the belt keeper. 4. The rear wheels must be replaced without tools. Remove belt from centerspan idler (C). 6. Slide belt toward front of manual). • Work belt off the steering plate (F) and remove from tractor. ing plate (F)...
...Install mower (See "TO INSTALL MOWER" in this section of tractor, off both mandrel pulleys and idler pulleys. • Make sure belt is inside all belt guides. • Install mower (See "TO INSTALL MOWER" in the disengaged position. Park tractor on a level, dry concrete or ... to stop at highest speed in all pulley grooves and inside the belt keeper. 4. The rear wheels must be replaced without tools. Remove belt from centerspan idler (C). 6. Slide belt toward front of manual). • Work belt off the steering plate (F) and remove from tractor. ing plate (F)...
User Manual
Page 24
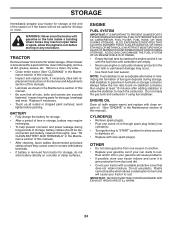
... be disconnected and battery cleaned thoroughly (see "TO CLEAN BATTERY AND TERMINALS" in the Maintenance section of this manual). • Inspect and replace belts, if necessary (See belt re- Plastic cannot breathe which allows condensation to form and will not be stored for 30 days or more. Inspect moving parts for storage...
... be disconnected and battery cleaned thoroughly (see "TO CLEAN BATTERY AND TERMINALS" in the Maintenance section of this manual). • Inspect and replace belts, if necessary (See belt re- Plastic cannot breathe which allows condensation to form and will not be stored for 30 days or more. Inspect moving parts for storage...
User Manual
Page 26
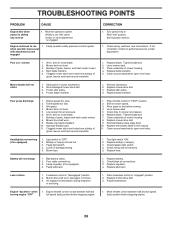
...2. Tighten blade bolt. 7. Clean underside of drive 1. Reinstall blades sharp edge down. 10. Loss of mower housing. 8. Motion drive belt worn, damaged, or broken. 3. Faulty operator-safety presence control system. Tighten blade bolt. 2. Clean underside of grass, leaves, and trash...Reverse operation system (ROS) is not "ON" while mower or other attachment is engaged. See Operation section. 1. Worn/damaged mower drive belt. 3. Allow grass to ROS "ON" position. Check wiring and connections. 5. Mower blades will not charge 1. Bent blade mandrel. 5. ...
...2. Tighten blade bolt. 7. Clean underside of drive 1. Reinstall blades sharp edge down. 10. Loss of mower housing. 8. Motion drive belt worn, damaged, or broken. 3. Faulty operator-safety presence control system. Tighten blade bolt. 2. Clean underside of grass, leaves, and trash...Reverse operation system (ROS) is not "ON" while mower or other attachment is engaged. See Operation section. 1. Worn/damaged mower drive belt. 3. Allow grass to ROS "ON" position. Check wiring and connections. 5. Mower blades will not charge 1. Bent blade mandrel. 5. ...
User Manual
Page 28
... subject to the following limitations and exclusions. 1. After ninety (90) days, we will exchange the Battery, charging you , any power equipment unit or attachment are belts, blades, blade adapters, normal wear, normal adjustments, standard hardware and normal maintenance. 7. Should you have been properly assembled, adjusted, operated, and maintained in accordance with...
... subject to the following limitations and exclusions. 1. After ninety (90) days, we will exchange the Battery, charging you , any power equipment unit or attachment are belts, blades, blade adapters, normal wear, normal adjustments, standard hardware and normal maintenance. 7. Should you have been properly assembled, adjusted, operated, and maintained in accordance with...

