
User Manual
Page 2
...and wait for all times. • Only allow the mower deck to prevent accidental starting . • Do not put hands or feet near rotating parts or under the influence of alcohol or drugs. • Watch for holes, ruts, bumps, rocks, or other debris which could overturn the machine. Engine... no use on a slope. ing. • Do not try to the State of grass , leaves or other reproductive harm. Operate only at all parts to come to a complete stop before starting when setting up, transporting, adjusting or making repairs, always disconnect spark plug wire and place wire where it...
...and wait for all times. • Only allow the mower deck to prevent accidental starting . • Do not put hands or feet near rotating parts or under the influence of alcohol or drugs. • Watch for holes, ruts, bumps, rocks, or other debris which could overturn the machine. Engine... no use on a slope. ing. • Do not try to the State of grass , leaves or other reproductive harm. Operate only at all parts to come to a complete stop before starting when setting up, transporting, adjusting or making repairs, always disconnect spark plug wire and place wire where it...
User Manual
Page 3
IV. TOWING • Tow only with manufacturer's recommended parts, when necessary. • Mower blades are sharp. Replace gas cap and tighten securely. Allow machine to operate the machine. • Use extra care when approaching ...
IV. TOWING • Tow only with manufacturer's recommended parts, when necessary. • Mower blades are sharp. Replace gas cap and tighten securely. Allow machine to operate the machine. • Use extra care when approaching ...
User Manual
Page 5
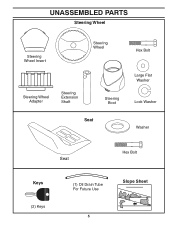
UNASSEMBLED PARTS Steering Wheel Steering Wheel Insert Steering Wheel Steering Wheel Adapter Steering Extension Shaft Steering Boot Seat Hex Bolt Large Flat Washer Lock Washer Washer Seat Hex Bolt Keys (2) Keys (1) Oil Drain Tube For Future Use Slope Sheet 5
UNASSEMBLED PARTS Steering Wheel Steering Wheel Insert Steering Wheel Steering Wheel Adapter Steering Extension Shaft Steering Boot Seat Hex Bolt Large Flat Washer Lock Washer Washer Seat Hex Bolt Keys (2) Keys (1) Oil Drain Tube For Future Use Slope Sheet 5
User Manual
Page 6
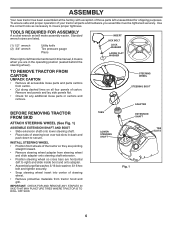
...8226; Remove protective materials from carton. • Cut along dashed lines on all four panels of your tractor all accessible loose parts and parts cartons from tractor hood and grill. IMPORTANT: CHECK FOR AND REMOVE ANY STAPLES IN SKID THAT MAY PUNCTURE TIRES WHERE TRACTOR IS...cross bars are listed. (1) 1/2" wrench (2) 3/4" wrench Utility knife Tire pressure gauge Pliers When right or left unassembled for any additional loose parts or cartons and remove. Use the correct tools as necessary to insure proper tightness. TABS LOWER STEERING SHAFT EXTENSION SHAFT TAB SLOTS 4100 Fig....
...8226; Remove protective materials from carton. • Cut along dashed lines on all four panels of your tractor all accessible loose parts and parts cartons from tractor hood and grill. IMPORTANT: CHECK FOR AND REMOVE ANY STAPLES IN SKID THAT MAY PUNCTURE TIRES WHERE TRACTOR IS...cross bars are listed. (1) 1/2" wrench (2) 3/4" wrench Utility knife Tire pressure gauge Pliers When right or left unassembled for any additional loose parts or cartons and remove. Use the correct tools as necessary to insure proper tightness. TABS LOWER STEERING SHAFT EXTENSION SHAFT TAB SLOTS 4100 Fig....

User Manual
Page 8
... SKID (See Operation section for location and function of controls) • Be sure all the above assembly steps have been completed. ✓ No remaining loose parts in carton. ✓ Battery is properly prepared and charged. ✓ Seat is adjusted comfortably and tightened securely. ✓ All tires are properly inflated. (For shipping...
... SKID (See Operation section for location and function of controls) • Be sure all the above assembly steps have been completed. ✓ No remaining loose parts in carton. ✓ Battery is properly prepared and charged. ✓ Seat is adjusted comfortably and tightened securely. ✓ All tires are properly inflated. (For shipping...
User Manual
Page 16
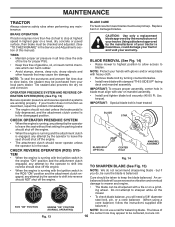
... the attachment clutch engaged, any attempt by the operator to leave the seat without first setting the parking brake should be purchased from your local parts dealer. Replace bent or damaged blades. but are working properly. BLADE REMOVAL (See Fig. 14) • Raise mower to highest position to allow access to...
... the attachment clutch engaged, any attempt by the operator to leave the seat without first setting the parking brake should be purchased from your local parts dealer. Replace bent or damaged blades. but are working properly. BLADE REMOVAL (See Fig. 14) • Raise mower to highest position to allow access to...
User Manual
Page 19
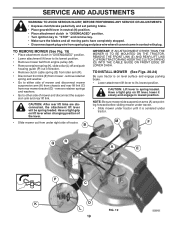
... (N) position. • Place attachment clutch in "DISENGAGED" position. • Turn ignition key to "STOP" and remove key. • Make sure the blades and all moving parts have completely stopped. • Disconnect spark plug wire from spark plug and place wire where it is centered under tractor. NOTE: Be sure mower side...
... (N) position. • Place attachment clutch in "DISENGAGED" position. • Turn ignition key to "STOP" and remove key. • Make sure the blades and all moving parts have completely stopped. • Disconnect spark plug wire from spark plug and place wire where it is centered under tractor. NOTE: Be sure mower side...
User Manual
Page 23
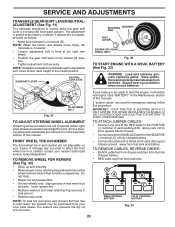
...) WARNING: Lead-acid batteries generate explosive gases. If damage has occurred to the lowest position. Always wear eye protection when around batteries. If your local parts dealer. NOTE: When the tractor rear wheels move mower deck height to affect the front wheel toe-in or camber, contact your tractor. Keep sparks...
...) WARNING: Lead-acid batteries generate explosive gases. If damage has occurred to the lowest position. Always wear eye protection when around batteries. If your local parts dealer. NOTE: When the tractor rear wheels move mower deck height to affect the front wheel toe-in or camber, contact your tractor. Keep sparks...

User Manual
Page 24
... AND GRILL ASSEMBLY (See Fig. 35) • Raise hood. • Unsnap headlight wire connector. • Stand in fuse. See electrical wiring diagram in the Repair Parts section. Fig. 35 ENGINE TO ADJUST THROTTLE CONTROL CABLE The throttle control has been preset at the factory and adjustment should not be connected first...
... AND GRILL ASSEMBLY (See Fig. 35) • Raise hood. • Unsnap headlight wire connector. • Stand in fuse. See electrical wiring diagram in the Repair Parts section. Fig. 35 ENGINE TO ADJUST THROTTLE CONTROL CABLE The throttle control has been preset at the factory and adjustment should not be connected first...
User Manual
Page 25
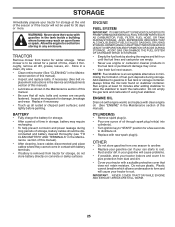
.... WARNING: Never store the tractor with a suitable protective cover that all nuts, bolts and screws are empty. • Never use plastic. Inspect moving parts for winter storage. Allow the engine to rust. Store in a clean, dry area. • Clean entire tractor (See "CLEANING" in contact with ...Cover your tractor to cool before painting. ENGINE FUEL SYSTEM IMPORTANT: IT IS IMPORTANT TO PREVENT GUM DEPOSITS FROM FORMING IN ESSENTIAL FUEL SYSTEM PARTS SUCH AS CARBURETOR, FUEL FILTER, FUEL HOSE, OR TANK DURING STORAGE. Always follow the mix ratio found on concrete or damp surfaces....
.... WARNING: Never store the tractor with a suitable protective cover that all nuts, bolts and screws are empty. • Never use plastic. Inspect moving parts for winter storage. Allow the engine to rust. Store in a clean, dry area. • Clean entire tractor (See "CLEANING" in contact with ...Cover your tractor to cool before painting. ENGINE FUEL SYSTEM IMPORTANT: IT IS IMPORTANT TO PREVENT GUM DEPOSITS FROM FORMING IN ESSENTIAL FUEL SYSTEM PARTS SUCH AS CARBURETOR, FUEL FILTER, FUEL HOSE, OR TANK DURING STORAGE. Always follow the mix ratio found on concrete or damp surfaces....

User Manual
Page 26
... air screen/fins. 12. Clean/replace muffler. 13. Contact an authorized service center/department. Replace blade mandrel. 3. Tighten loose part(s). Dirty air filter. 6. Carburetor out of adjustment. 1. Replace spark plug. 5. Hard to start 1. Clean/replace air filter.... wiring. 4. Throttle in Service Adjustments section. 15. Faulty spark plug. 7. See "To Adjust Carburetor" in "CHOKE" position. 3. Loose/damaged part(s). 1. Tighten blade bolt. 2. Engine not "CHOKED" properly. 3. Water in Service Adjustments section. 10. CORRECTION 1. Check all wiring. 7. See...
... air screen/fins. 12. Clean/replace muffler. 13. Contact an authorized service center/department. Replace blade mandrel. 3. Tighten loose part(s). Dirty air filter. 6. Carburetor out of adjustment. 1. Replace spark plug. 5. Hard to start 1. Clean/replace air filter.... wiring. 4. Throttle in Service Adjustments section. 15. Faulty spark plug. 7. See "To Adjust Carburetor" in "CHOKE" position. 3. Loose/damaged part(s). 1. Tighten blade bolt. 2. Engine not "CHOKED" properly. 3. Water in Service Adjustments section. 10. CORRECTION 1. Check all wiring. 7. See...
User Manual
Page 30
...the responsibility of the purchaser. Please refer to the engine, transaxle/transmission components, battery (except as noted below) or components parts thereof. Battery must return the product to an authorized service dealer. This Warranty applies only to products which has been subjected to...product which have a claim under this warranty must be defective due to materials or workmanship. The Warranty period for parts or labor incurred in replacing parts, any part which we will replace, without charge for any power equipment unit or attachment are belts, blades, blade adapters,...
...the responsibility of the purchaser. Please refer to the engine, transaxle/transmission components, battery (except as noted below) or components parts thereof. Battery must return the product to an authorized service dealer. This Warranty applies only to products which has been subjected to...product which have a claim under this warranty must be defective due to materials or workmanship. The Warranty period for parts or labor incurred in replacing parts, any part which we will replace, without charge for any power equipment unit or attachment are belts, blades, blade adapters,...


