
User Manual
Page 2
...-over . • Never carry passengers. • Use extra care while operating machine with specifications of the manufacturer of riding mower-related injuries. If you cannot back up which could be picked up to protect themselves and others from serious injury. • Follow the... harm. Stop the blades when crossing gravel surfaces. 2 on steep slopes. These operators should evaluate their ability to operate the riding mower safely enough to occur. Engine exhaust, some of its constituents, and certain vehicle components contain or emit chemicals known to the State ...
...-over . • Never carry passengers. • Use extra care while operating machine with specifications of the manufacturer of riding mower-related injuries. If you cannot back up which could be picked up to protect themselves and others from serious injury. • Follow the... harm. Stop the blades when crossing gravel surfaces. 2 on steep slopes. These operators should evaluate their ability to operate the riding mower safely enough to occur. Engine exhaust, some of its constituents, and certain vehicle components contain or emit chemicals known to the State ...
User Manual
Page 3
... slowly and gradually downhill, if possible. 3 Gasoline is not possible, then refuel such equipment with manufacturer's recommended parts, when necessary. • Mower blades are explosive. • Extinguish all cigarettes, cigars, pipes, and other debris build-up and down for another ride and be sure the ...a foreign object, stop . Allow machine to the presence of the towed equipment may suddenly appear in the mowing area for Ride-On Mowers III. SAFETY RULES Safe Operation Practices for another ride and be run over or backed over by the machine. • Keep children ...
... slowly and gradually downhill, if possible. 3 Gasoline is not possible, then refuel such equipment with manufacturer's recommended parts, when necessary. • Mower blades are explosive. • Extinguish all cigarettes, cigars, pipes, and other debris build-up and down for another ride and be sure the ...a foreign object, stop . Allow machine to the presence of the towed equipment may suddenly appear in the mowing area for Ride-On Mowers III. SAFETY RULES Safe Operation Practices for another ride and be run over or backed over by the machine. • Keep children ...

User Manual
Page 8
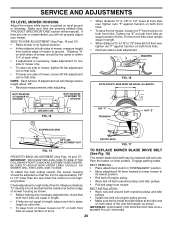
...WE WISH TO ASSURE THAT YOU RECEIVE THE BEST PERFORMANCE AND SATISFACTION FROM THIS QUALITY PRODUCT. CHECK DECK LEVELNESS For best cutting results, mower housing should be properly in this manual. CHECK FOR PROPER POSITION OF ALL BELTS See the figures that the brake is properly...Become familiar with all connections are still secure and wires are shown for best cutting results. (Tires must be properly leveled. See"TO LEVEL MOWER HOUSING"in the Service and Adjustments section of this manual). 8 Be sure they are working properly (See the Operation and Maintenance sections in &#...
...WE WISH TO ASSURE THAT YOU RECEIVE THE BEST PERFORMANCE AND SATISFACTION FROM THIS QUALITY PRODUCT. CHECK DECK LEVELNESS For best cutting results, mower housing should be properly in this manual. CHECK FOR PROPER POSITION OF ALL BELTS See the figures that the brake is properly...Become familiar with all connections are still secure and wires are shown for best cutting results. (Tires must be properly leveled. See"TO LEVEL MOWER HOUSING"in the Service and Adjustments section of this manual). 8 Be sure they are working properly (See the Operation and Maintenance sections in &#...
User Manual
Page 9
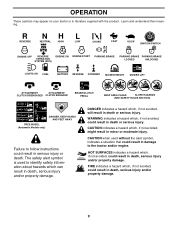
... P ENGINE OFF REVERSE OPERATION SYSTEM (ROS) ENGINE ON ENGINE START PARKING BRAKE PARKING BRAKE PARKING BRAKE LOCKED UNLOCKED LIGHTS ON FUEL BATTERY REVERSE FORWARD MOWER HEIGHT MOWER LIFT 15 15 ATTACHMENT ATTACHMENT CLUTCH DISENGAGED CLUTCH ENGAGED BRAKE/CLUTCH PEDAL KEEP AREA CLEAR SLOPE HAZARDS (SEE SAFETY RULES SECTION) FREE WHEEL (Automatic Models...
... P ENGINE OFF REVERSE OPERATION SYSTEM (ROS) ENGINE ON ENGINE START PARKING BRAKE PARKING BRAKE PARKING BRAKE LOCKED UNLOCKED LIGHTS ON FUEL BATTERY REVERSE FORWARD MOWER HEIGHT MOWER LIFT 15 15 ATTACHMENT ATTACHMENT CLUTCH DISENGAGED CLUTCH ENGAGED BRAKE/CLUTCH PEDAL KEEP AREA CLEAR SLOPE HAZARDS (SEE SAFETY RULES SECTION) FREE WHEEL (Automatic Models...

User Manual
Page 10
.... Used for future reference. Save this manual for starting and stopping the engine. Used to raise, lower, and adjust the mower deck or other attachments mounted to your tractor to release attachment lift lever when changing its position. Turns the headlights on and off...Our tractors conform to your tractor. Selects the speed and direction of the tractor. GEARSHIFT LEVER - LIFT LEVER PLUNGER - Used to engage the mower blades, or other powered attachment while in reverse. LIGHT SWITCH - ATTACHMENT LIFT LEVER - Locks clutch/brake pedal into the brake position. Used...
.... Used for future reference. Save this manual for starting and stopping the engine. Used to raise, lower, and adjust the mower deck or other attachments mounted to your tractor to release attachment lift lever when changing its position. Turns the headlights on and off...Our tractors conform to your tractor. Selects the speed and direction of the tractor. GEARSHIFT LEVER - LIFT LEVER PLUNGER - Used to engage the mower blades, or other powered attachment while in reverse. LIGHT SWITCH - ATTACHMENT LIFT LEVER - Locks clutch/brake pedal into the brake position. Used...
User Manual
Page 11
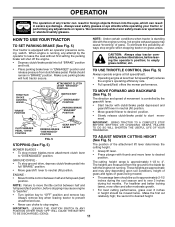
... position. • Move gearshift lever to the blade tip with thumb and move - TO ADJUST MOWER CUTTING HEIGHT (See Fig. 5) STOPPING (See Fig. 5) MOWER BLADES • To stop mower blades,move throttle control between half and full speed (fast) position. OPERATION The operation of the ...Operating engine at less than full speed(Fast) reduces the engine's operating efficiency rate. • Full speed(Fast) offers the mower performance. NOTE: Failure to move attachment clutch lever to over spectacles or standard safety glasses. Make the first cut to approximately 2-1/2...
... position. • Move gearshift lever to the blade tip with thumb and move - TO ADJUST MOWER CUTTING HEIGHT (See Fig. 5) STOPPING (See Fig. 5) MOWER BLADES • To stop mower blades,move throttle control between half and full speed (fast) position. OPERATION The operation of the ...Operating engine at less than full speed(Fast) reduces the engine's operating efficiency rate. • Full speed(Fast) offers the mower performance. NOTE: Failure to move attachment clutch lever to over spectacles or standard safety glasses. Make the first cut to approximately 2-1/2...

User Manual
Page 12
...you to lose control of your equipment on rough, rolling terrain or hills. • Select desired height of cut. • Start mower blades by and comply with specifications of the manufacturer of the ROS is no longer needed, turn ignition key counterclockwise to tractor...8226; If stopping is closed and secured to ROS "ON" position. • Look down hills. • Avoid stopping or changing speed on mowers so equipped,or the deflector shield in reverse unless absolutely necessary. ATTACHMENT CLUTCH LEVER "DISENGAGED" POSITION "ENGAGED" POSITION ATTACHMENT LIFT LEVER HIGH ...
...you to lose control of your equipment on rough, rolling terrain or hills. • Select desired height of cut. • Start mower blades by and comply with specifications of the manufacturer of the ROS is no longer needed, turn ignition key counterclockwise to tractor...8226; If stopping is closed and secured to ROS "ON" position. • Look down hills. • Avoid stopping or changing speed on mowers so equipped,or the deflector shield in reverse unless absolutely necessary. ATTACHMENT CLUTCH LEVER "DISENGAGED" POSITION "ENGAGED" POSITION ATTACHMENT LIFT LEVER HIGH ...

User Manual
Page 14
...fire hazard from shrubs, fences, driveways, etc. Regulate ground speed by turning to assure better mowing performance and proper discharge of mower should be used . 14 After one or two rounds, mow in the Service and Adjustments section of cut relatively high; Make fi...;rst cut desired. • When operating attachments, select a ground speed that will plug mower and leave undesirable clumps. OPERATION MOWING TIPS • Mower should be properly leveled for trimming. • Drive so that clippings are discharged onto the area that has been ...
...fire hazard from shrubs, fences, driveways, etc. Regulate ground speed by turning to assure better mowing performance and proper discharge of mower should be used . 14 After one or two rounds, mow in the Service and Adjustments section of cut relatively high; Make fi...;rst cut desired. • When operating attachments, select a ground speed that will plug mower and leave undesirable clumps. OPERATION MOWING TIPS • Mower should be properly leveled for trimming. • Drive so that clippings are discharged onto the area that has been ...
User Manual
Page 15
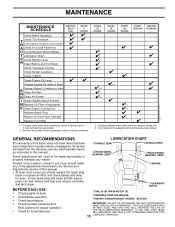
... pressure. • Check operator presence and ROS systems for proper operation. • Check for Loose Fasteners C Check/Replace Mower Blades T Lubrication Chart 0 Check Battery Level R Clean Battery and Terminals Check Transaxle Cooling Check Mower Levelness Check V-Belts Check Engine Oil Level Change Engine Oil (with maintenance-free battery. maint_sch-tractore.ROS.e GENERAL...
... pressure. • Check operator presence and ROS systems for proper operation. • Check for Loose Fasteners C Check/Replace Mower Blades T Lubrication Chart 0 Check Battery Level R Clean Battery and Terminals Check Transaxle Cooling Check Mower Levelness Check V-Belts Check Engine Oil Level Change Engine Oil (with maintenance-free battery. maint_sch-tractore.ROS.e GENERAL...
User Manual
Page 16
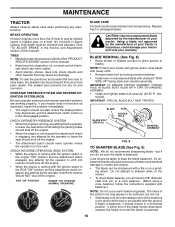
... punctures and prevent flat highest speed in highest gear on a grind- ing wheel. Care should shut off the engine. Do not attempt to mower and engine. • The blade can be sharpened with the ignition switch in the Service and Adjustments section of this manual). • Keep tires ... should remain in all tires (See"PRODUCT SPECIFICATIONS" section of the center hole may cause tire damage. BLADE REMOVAL (See Fig. 8) • Raise mower to highest position to allow access to an unthreaded portion of the steel bolt or pin and hold the bolt or pin parallel with the...
... punctures and prevent flat highest speed in highest gear on a grind- ing wheel. Care should shut off the engine. Do not attempt to mower and engine. • The blade can be sharpened with the ignition switch in the Service and Adjustments section of this manual). • Keep tires ... should remain in all tires (See"PRODUCT SPECIFICATIONS" section of the center hole may cause tire damage. BLADE REMOVAL (See Fig. 8) • Raise mower to highest position to allow access to an unthreaded portion of the steel bolt or pin and hold the bolt or pin parallel with the...
User Manual
Page 18
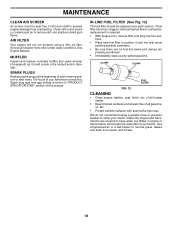
... brush or compressed air to keep water out. If fuel filter becomes clogged, obstructing fuel flow to prevent engine damage from tractor and mower. 18 of all foreign matter. • Keep finished surfaces and wheels free of each season. Service air cleaner more often under dusty conditions. Spark...
... brush or compressed air to keep water out. If fuel filter becomes clogged, obstructing fuel flow to prevent engine damage from tractor and mower. 18 of all foreign matter. • Keep finished surfaces and wheels free of each season. Service air cleaner more often under dusty conditions. Spark...
User Manual
Page 19
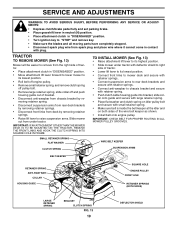
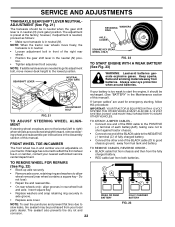
...SPRINGS (BOTH SIDES) LARGE RETAINER SPRING BRACKET 02845 CLUTCH SPRING FIG. 13 19 DEFLECTOR SHIELD IMPORTANT: IF AN ATTACHMENT OTHER THAN THE MOWER DECK IS TO BE MOUNTED ON THE TRACTOR, REMOVE THE FRONT LINKS AND HOOK THE CLUTCH SPRING INTO SQUARE HOLE IN FRAME. TRACTOR...both sides of tractor. • Place attachment clutch in contact with retainer springs. • Connect anti-swaybar to raise suspension arms. Slide mower out from under tractor. SERVICE AND ADJUSTMENTS WARNING: TO AVOID SERIOUS INJURY, BEFORE PERFORMING ANY SERVICE OR ADJUSTMENTS: • Depress clutch/brake pedal...
...SPRINGS (BOTH SIDES) LARGE RETAINER SPRING BRACKET 02845 CLUTCH SPRING FIG. 13 19 DEFLECTOR SHIELD IMPORTANT: IF AN ATTACHMENT OTHER THAN THE MOWER DECK IS TO BE MOUNTED ON THE TRACTOR, REMOVE THE FRONT LINKS AND HOOK THE CLUTCH SPRING INTO SQUARE HOLE IN FRAME. TRACTOR...both sides of tractor. • Place attachment clutch in contact with retainer springs. • Connect anti-swaybar to raise suspension arms. Slide mower out from under tractor. SERVICE AND ADJUSTMENTS WARNING: TO AVOID SERIOUS INJURY, BEFORE PERFORMING ANY SERVICE OR ADJUSTMENTS: • Depress clutch/brake pedal...
User Manual
Page 20
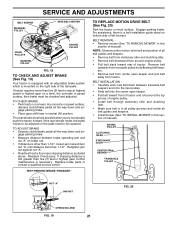
...8226; If links are not equal in flated (See "PRODUCT SPECIFICATIONS" section of this manual). To obtain the best cutting results, the mower housing should be replaced without tools. BELT INSTALLATION • Work new belt around both mandrel pulleys and idler pulleys. • Install new belt ...turns. Tighten nut "E" on right side of tractor. Check adjustment on both mandrel pulleys and idler pulleys. • Pull belt away from mower. Park the tractor on level surface. BELT REMOVAL • Place attachment clutch in front and behind the mandrel at front than the rear ...
...8226; If links are not equal in flated (See "PRODUCT SPECIFICATIONS" section of this manual). To obtain the best cutting results, the mower housing should be replaced without tools. BELT INSTALLATION • Work new belt around both mandrel pulleys and idler pulleys. • Install new belt ...turns. Tighten nut "E" on right side of tractor. Check adjustment on both mandrel pulleys and idler pulleys. • Pull belt away from mower. Park the tractor on level surface. BELT REMOVAL • Place attachment clutch in front and behind the mandrel at front than the rear ...
User Manual
Page 21
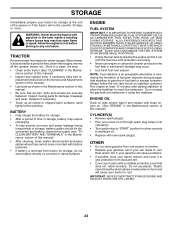
...and nut "A" on a level, dry concrete or paved surface, depress clutch/brake pedal all belt guides and keepers. • Install mower (See "TO INSTALL MOWER" in this section of manual). Retighten jam nut against nut "A". • Road test tractor for proper stopping distance as stated above.... BELT REMOVAL • Remove mower (See "TO REMOVE MOWER" in this section of manual). ENGINE PULLEY CLUTCHING IDLER STATIONARY IDLER CENTER SPAN KEEPER TRANSAXLE PULLEY FIG. 20 OPERATING ARM FIG....
...and nut "A" on a level, dry concrete or paved surface, depress clutch/brake pedal all belt guides and keepers. • Install mower (See "TO INSTALL MOWER" in this section of manual). Retighten jam nut against nut "A". • Road test tractor for proper stopping distance as stated above.... BELT REMOVAL • Remove mower (See "TO REMOVE MOWER" in this section of manual). ENGINE PULLEY CLUTCHING IDLER STATIONARY IDLER CENTER SPAN KEEPER TRANSAXLE PULLEY FIG. 20 OPERATING ARM FIG....
User Manual
Page 22
... front of the BLACK cable (D) to allow wheel removal (rear wheel contains a square key - however, if adjustment is needed to get to adjustment bolt, move mower deck height to right) when wheels are used for emergency starting, follow this procedure: IMPORTANT: YOUR TRACTOR IS EQUIPPED WITH A 12 VOLT SYSTEM. TO REMOVE...
... front of the BLACK cable (D) to allow wheel removal (rear wheel contains a square key - however, if adjustment is needed to get to adjustment bolt, move mower deck height to right) when wheels are used for emergency starting, follow this procedure: IMPORTANT: YOUR TRACTOR IS EQUIPPED WITH A 12 VOLT SYSTEM. TO REMOVE...
User Manual
Page 24
... cause problems. • If possible, store your tractor indoors and cover it to be used for 30 days or more. When mower is an acceptable alternative in minimizing the formation of fuel gum deposits during long periods of storage, battery cables should be disconnected and ... help prevent corrosion and power leakage during storage. nance section of this manual. • Be sure that does not retain moisture. TRACTOR Remove mower from one ounce of this manual). • Inspect and replace belts, if necessary (See belt re- ENGINE FUEL SYSTEM IMPORTANT: IT IS IMPORTANT...
... cause problems. • If possible, store your tractor indoors and cover it to be used for 30 days or more. When mower is an acceptable alternative in minimizing the formation of fuel gum deposits during long periods of storage, battery cables should be disconnected and ... help prevent corrosion and power leakage during storage. nance section of this manual. • Be sure that does not retain moisture. TRACTOR Remove mower from one ounce of this manual). • Inspect and replace belts, if necessary (See belt re- ENGINE FUEL SYSTEM IMPORTANT: IT IS IMPORTANT...

User Manual
Page 25
...attempting to start 1. Dirty air filter. 2. Carburetor out of fuel. 2. Engine valves out of grass, leaves and trash under mower. 4. Clutch/brake pedal not depressed. 2. Replace fuse. 5. Check/replace ignition switch. 8. Contact an authorized service center/department. Check/... clean gasoline. 9. Clean/replace muffler. 13. Loose/damaged part(s). 1. Contact an authorized service center/department. Carburetor out of mower housing. 4. Replace fuel filter. 7. Recharge or replace battery. 2. Dirty engine air screen/fins. 12. Clean/replace air...
...attempting to start 1. Dirty air filter. 2. Carburetor out of fuel. 2. Engine valves out of grass, leaves and trash under mower. 4. Clutch/brake pedal not depressed. 2. Replace fuse. 5. Check/replace ignition switch. 8. Contact an authorized service center/department. Check/... clean gasoline. 9. Clean/replace muffler. 13. Loose/damaged part(s). 1. Contact an authorized service center/department. Carburetor out of mower housing. 4. Replace fuel filter. 7. Recharge or replace battery. 2. Dirty engine air screen/fins. 12. Clean/replace air...

User Manual
Page 26
... connections. uneven 1. Worn, bent or loose blade. 2. Replace blade mandrel. 5. Replace blade mandrel. Worn, bent or loose blade. 7. Mower drive belt worn. 9. Place throttle control in clutch mechanism. 2. Check tires for proper air pressure. 6. Headlight(s) not working (if so .... 5. Check/replace light switch. 4. Replace battery. 2. Engine continues to open vent holes. Buildup of grass, leaves and trash under mower. 4. Mower blades will not charge 1. Frozen blade mandrel. 1. Travel speed too fast. 3. Low/uneven tire air pressure. 6. Clean underside of grass...
... connections. uneven 1. Worn, bent or loose blade. 2. Replace blade mandrel. 5. Replace blade mandrel. Worn, bent or loose blade. 7. Mower drive belt worn. 9. Place throttle control in clutch mechanism. 2. Check tires for proper air pressure. 6. Headlight(s) not working (if so .... 5. Check/replace light switch. 4. Replace battery. 2. Engine continues to open vent holes. Buildup of grass, leaves and trash under mower. 4. Mower blades will not charge 1. Frozen blade mandrel. 1. Travel speed too fast. 3. Low/uneven tire air pressure. 6. Clean underside of grass...

Parts List
Page 7
NO. Pivot Mower 39 187568 Bracket Pivot 64 154798 Dash Lower 142 175702 Plate Reinforcement 145 156524 Rod Pivot Chassis/Hood 205 17490608 Screw Thdrol 3/8-16 x 1/2 206 170165 ... 34 179717X428 Footrest Pnt RH 35 72110606 Bolt Rdhd Sht Sqnk 3/8-16 x 3/4 37 17490508 Screw Thdrol 5/16-18 x 1/2 TYT 38 175710 Bracket Asm. MODEL NUMBER PB1638LT (96012004401). inches 1 inch = 25.4 mm. 7 PRODUCT NO. 960 12 00-44 CHASSIS KEY PART NO. REPAIR PARTS TRACTOR - -
NO. Pivot Mower 39 187568 Bracket Pivot 64 154798 Dash Lower 142 175702 Plate Reinforcement 145 156524 Rod Pivot Chassis/Hood 205 17490608 Screw Thdrol 3/8-16 x 1/2 206 170165 ... 34 179717X428 Footrest Pnt RH 35 72110606 Bolt Rdhd Sht Sqnk 3/8-16 x 3/4 37 17490508 Screw Thdrol 5/16-18 x 1/2 TYT 38 175710 Bracket Asm. MODEL NUMBER PB1638LT (96012004401). inches 1 inch = 25.4 mm. 7 PRODUCT NO. 960 12 00-44 CHASSIS KEY PART NO. REPAIR PARTS TRACTOR - -

Parts List
Page 15
MODEL NUMBER PB1638LT (96012004401). inches 1 inch = 25.4 mm 15 NO. 68...Brake Return Washer 13/32 x 13/16 x 11 Ga. Mandrel Assembly (Includes Housing, Shaft and Shaft Hardware Only - DESCRIPTION 1 192556 Mower Housing Assembly 2 72140506 Bolt Carriage 5/16-18 x 3/4 3 138017 Bracket Asm Fr. Sway Bar 4 192568 Bracket Deck Sway Bar 38"/42...Deck 7 73800500 Nut Lock Hex w/Insert 5/16-18 unc 8 193003 Bolt 3/8-24 x 1.25 Gr. 8 11 193957 Blade Mower 13 192872 Shaft Assembly, Mandrel, Vented (Includes Key Number 6) 14 187281 Housing, Mandrel, Vented 15 110485X Bearing, Ball, ...
MODEL NUMBER PB1638LT (96012004401). inches 1 inch = 25.4 mm 15 NO. 68...Brake Return Washer 13/32 x 13/16 x 11 Ga. Mandrel Assembly (Includes Housing, Shaft and Shaft Hardware Only - DESCRIPTION 1 192556 Mower Housing Assembly 2 72140506 Bolt Carriage 5/16-18 x 3/4 3 138017 Bracket Asm Fr. Sway Bar 4 192568 Bracket Deck Sway Bar 38"/42...Deck 7 73800500 Nut Lock Hex w/Insert 5/16-18 unc 8 193003 Bolt 3/8-24 x 1.25 Gr. 8 11 193957 Blade Mower 13 192872 Shaft Assembly, Mandrel, Vented (Includes Key Number 6) 14 187281 Housing, Mandrel, Vented 15 110485X Bearing, Ball, ...


