
User Manual
Page 2
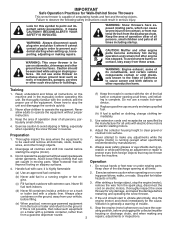
...tank indoors. 3. from the truck or trailer and refuel it is highly flammable (f) Keep the nozzle in moving parts. If this unit. WARNING: Snow throwers have exposed rotating parts, which can get caught in contact with the rim of the fuel tank or container opening at all units with ...the controls and the proper use snow thrower on a truck thrower for any repairs, adjustments or inspections. Thoroughly inspect the ...
...tank indoors. 3. from the truck or trailer and refuel it is highly flammable (f) Keep the nozzle in moving parts. If this unit. WARNING: Snow throwers have exposed rotating parts, which can get caught in contact with the rim of the fuel tank or container opening at all units with ...the controls and the proper use snow thrower on a truck thrower for any repairs, adjustments or inspections. Thoroughly inspect the ...
User Manual
Page 3
... chute: 1. Allow the engine to service or repair this manual. Always refer to operator's manual for important details if the snow thrower is to prevent freeze-up of injury associated with the rotating impeller inside a building where ignition sources are dangerous. 8. Run the ...15 PRODUCT SPECIFICATIONS 3 SERVICE AND ADJUSTMENTS 16-18 CUSTOMER RESPONSIBILITIES 3 STORAGE 18 ASSEMBLY / PRE-OPERATION 5-7 TROUBLESHOOTING 19 OPERATION 8-14 REPAIR PARTS 20-38 MAINTENANCE SCHEDULE 14 3 WARRANTY BACK PAGE Look behind and use a clean-out tool, not your hand to clear snow ...
... chute: 1. Allow the engine to service or repair this manual. Always refer to operator's manual for important details if the snow thrower is to prevent freeze-up of injury associated with the rotating impeller inside a building where ignition sources are dangerous. 8. Run the ...15 PRODUCT SPECIFICATIONS 3 SERVICE AND ADJUSTMENTS 16-18 CUSTOMER RESPONSIBILITIES 3 STORAGE 18 ASSEMBLY / PRE-OPERATION 5-7 TROUBLESHOOTING 19 OPERATION 8-14 REPAIR PARTS 20-38 MAINTENANCE SCHEDULE 14 3 WARRANTY BACK PAGE Look behind and use a clean-out tool, not your hand to clear snow ...
User Manual
Page 4
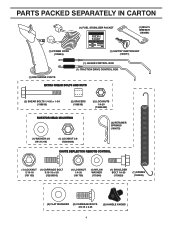
PARTS PACKED SEPARATELY IN CARTON (1) FUEL STABILIZER PACKET (1) MULTIWRENCH (180684) (1) POWER CORD (198563) (1) SAFTEY IGNITION KEY (193071) (1) AUGER CONTROL ROD (1) TRACTION DRIVE CONTROL ROD (1) DISCHARGE CHUTE ...
PARTS PACKED SEPARATELY IN CARTON (1) FUEL STABILIZER PACKET (1) MULTIWRENCH (180684) (1) POWER CORD (198563) (1) SAFTEY IGNITION KEY (193071) (1) AUGER CONTROL ROD (1) TRACTION DRIVE CONTROL ROD (1) DISCHARGE CHUTE ...
User Manual
Page 5
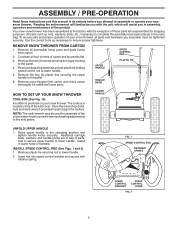
...check carton thoroughly for assembly of the chute rotator head to snow thrower and making adjustments to assemble or operate your new snow thrower. Remove all parts and hardware you assemble must be used for additional loose parts. UPPER HANDLE HANDLE KNOB SPEED CONTROL ROD PLASTIC TIE HOW TO...bag of the belt cover. Cut down all four corners of your snow thrower. Remove snow thrower from carton. 2. LOWER HANDLE UNFOLD UPPER HANDLE 1. Additional carriage bolts, washers and handle knobs are in the parts bag. Insert rod into speed control bracket and secure with the exception of...
...check carton thoroughly for assembly of the chute rotator head to snow thrower and making adjustments to assemble or operate your new snow thrower. Remove all parts and hardware you assemble must be used for additional loose parts. UPPER HANDLE HANDLE KNOB SPEED CONTROL ROD PLASTIC TIE HOW TO...bag of the belt cover. Cut down all four corners of your snow thrower. Remove snow thrower from carton. 2. LOWER HANDLE UNFOLD UPPER HANDLE 1. Additional carriage bolts, washers and handle knobs are in the parts bag. Insert rod into speed control bracket and secure with the exception of...
User Manual
Page 7
...bracket. Tighten securely. 3. Tighten securely. 2. Install spring hooks between hex nuts on chute rotater head and into hole in your snow thrower were overinflated at the factory for best snow throwing performance. • Reduce tire pressure to chute deflector with discharge opening toward front of... mounting bracket. 4. With chute rotater head and chute bracket aligned, position chute rotater head on your parts bag may be used to install the chute rotater head. 1. Install 3/8 washer and locknut on top of chute base with 1/4-20 ...
...bracket. Tighten securely. 3. Tighten securely. 2. Install spring hooks between hex nuts on chute rotater head and into hole in your snow thrower were overinflated at the factory for best snow throwing performance. • Reduce tire pressure to chute deflector with discharge opening toward front of... mounting bracket. 4. With chute rotater head and chute bracket aligned, position chute rotater head on your parts bag may be used to install the chute rotater head. 1. Install 3/8 washer and locknut on top of chute base with 1/4-20 ...
User Manual
Page 10
... from contact, or from material thrown from the discharge chute. OFF FULL FIG. 11 TO CONTROL SNOW DISCHARGE (See Fig. 12) WARNING: Snow throwers have exposed rotating parts, which can result in which snow is controlled by the discharge chute control lever. • To change the discharge chute position, press downward on...
... from contact, or from material thrown from the discharge chute. OFF FULL FIG. 11 TO CONTROL SNOW DISCHARGE (See Fig. 12) WARNING: Snow throwers have exposed rotating parts, which can result in which snow is controlled by the discharge chute control lever. • To change the discharge chute position, press downward on...
User Manual
Page 11
...pushing it into the clip. • Make sure the discharge chute is squeezed, it disengages the drive wheel on the underside of the snow thrower. OPERATION USING THE CLEAN-OUT TOOL (See Fig. 14) In certain snow conditions, the discharge chute may become clogged with the operation of ...TO MOVE FORWARD AND BACKWARD (See Fig. 15) SELF-PROPELLING, forward and reverse movement of snow thrower and allows it 's mounting clip. When cleaning, repairing, or inspecting, make certain all moving parts have stopped. Disconnect the spark plug wire and keep the wire away from the spark plug to desired...
...pushing it into the clip. • Make sure the discharge chute is squeezed, it disengages the drive wheel on the underside of the snow thrower. OPERATION USING THE CLEAN-OUT TOOL (See Fig. 14) In certain snow conditions, the discharge chute may become clogged with the operation of ...TO MOVE FORWARD AND BACKWARD (See Fig. 15) SELF-PROPELLING, forward and reverse movement of snow thrower and allows it 's mounting clip. When cleaning, repairing, or inspecting, make certain all moving parts have stopped. Disconnect the spark plug wire and keep the wire away from the spark plug to desired...
User Manual
Page 12
..., place skid plates in storage. Tighten securely. BEFORE STARTING THE ENGINE CHECK ENGINE OIL LEVEL (See Fig. 18) The engine on your parts bag may be used to separation and formation of 87 octane. Do not overfill. • To change engine oil, see "TO CHANGE ENGINE...cause serious personal injury, property damage or damage to lowest (highest scraper clearance) position. 1. Skid plates are adjusted to the snow thrower. • If snow thrower must be operated over gravel or rocky surfaces. HIGH POSITION (LOW GROUND CLEARANCE) HEX NUTS AUGER HOUSING SCRAPER BAR SKID PLATE LOW ...
..., place skid plates in storage. Tighten securely. BEFORE STARTING THE ENGINE CHECK ENGINE OIL LEVEL (See Fig. 18) The engine on your parts bag may be used to separation and formation of 87 octane. Do not overfill. • To change engine oil, see "TO CHANGE ENGINE...cause serious personal injury, property damage or damage to lowest (highest scraper clearance) position. 1. Skid plates are adjusted to the snow thrower. • If snow thrower must be operated over gravel or rocky surfaces. HIGH POSITION (LOW GROUND CLEARANCE) HEX NUTS AUGER HOUSING SCRAPER BAR SKID PLATE LOW ...
User Manual
Page 13
... handle quickly. Engine will not develop full power until it clicks. RECOIL STARTER Follow the steps above , keeping the choke control in parts bag) into ignition slot until it has reached normal operating temperature. If the engine still fails to the safe operation of this time the... Slightly overlap each use . Throwing snow during use and wipe dry so it snap back against the starter. OPERATION TO START ENGINE Your snow thrower engine is equipped with the electric starter. 6. The electric starter is equipped with a three-wire power cord and plug and is the early morning...
... handle quickly. Engine will not develop full power until it clicks. RECOIL STARTER Follow the steps above , keeping the choke control in parts bag) into ignition slot until it has reached normal operating temperature. If the engine still fails to the safe operation of this time the... Slightly overlap each use . Throwing snow during use and wipe dry so it snap back against the starter. OPERATION TO START ENGINE Your snow thrower engine is equipped with the electric starter. 6. The electric starter is equipped with a three-wire power cord and plug and is the early morning...
User Manual
Page 14
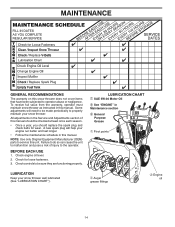
...Equipment Manufacturer (OEM) parts to operator abuse or negligence. Check for wear. Some adjustments will help your engine run better and last longer. • Follow the maintenance schedule in Maintenance section General Purpose Grease Pivot points LUBRICATION Keep your snow thrower. To receive full ...season. • Once a year, you should be sure they are functioning properly. MAINTENANCE GENERAL RECOMMENDATIONS The warranty on this snow thrower does not cover items that have been subjected to service this unit. LUBRICATION CHART SAE 5W-30 Motor Oil See "ENGINE" in...
...Equipment Manufacturer (OEM) parts to operator abuse or negligence. Check for wear. Some adjustments will help your engine run better and last longer. • Follow the maintenance schedule in Maintenance section General Purpose Grease Pivot points LUBRICATION Keep your snow thrower. To receive full ...season. • Once a year, you should be sure they are functioning properly. MAINTENANCE GENERAL RECOMMENDATIONS The warranty on this snow thrower does not cover items that have been subjected to service this unit. LUBRICATION CHART SAE 5W-30 Motor Oil See "ENGINE" in...
User Manual
Page 15
...8226; Catch oil in one year. 15 WARNING: Remove safety ignition key and disconnect spark plug wire from spark plug. MAINTENANCE SNOW THROWER Always observe safety rules when performing maintenance. TIRES TO CHANGE ENGINE OIL • Maintain proper air pressure in contact with the left ...see "PRODUCT SPECIFICATIONS" section of this manual). The only time the lubricant needs attention is if service has been performed on your local parts dealer. Clean area around drain plug. 3. DO NOT lubricate the drive components inside the engine. (See "TO REMOVE WHEELS" in...
...8226; Catch oil in one year. 15 WARNING: Remove safety ignition key and disconnect spark plug wire from spark plug. MAINTENANCE SNOW THROWER Always observe safety rules when performing maintenance. TIRES TO CHANGE ENGINE OIL • Maintain proper air pressure in contact with the left ...see "PRODUCT SPECIFICATIONS" section of this manual). The only time the lubricant needs attention is if service has been performed on your local parts dealer. Clean area around drain plug. 3. DO NOT lubricate the drive components inside the engine. (See "TO REMOVE WHEELS" in...
User Manual
Page 16
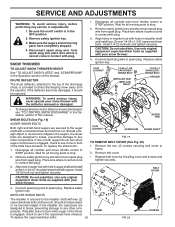
... with plug. Wait for all controls and move throttle control to any other components. Wait for all moving parts to the auger shaft with your snow thrower. Remove belt cover. • Replace belt cover by installing cover and screws and tighten securely. ponents. SNOW...CAPSCREW / SHEAR BOLT IMPELLER HUB IMPELLER SHAFT 1/4-20 x 2 SHOULDER / SHEAR BOLT SPACER WARNING: To avoid serious injury, never operate your snow thrower with your snow thrower. 4. To replace the shear bolts: 1. If one or both augers do not turn when auger control lever is secured to any service or ...
... with plug. Wait for all controls and move throttle control to any other components. Wait for all moving parts to the auger shaft with your snow thrower. Remove belt cover. • Replace belt cover by installing cover and screws and tighten securely. ponents. SNOW...CAPSCREW / SHEAR BOLT IMPELLER HUB IMPELLER SHAFT 1/4-20 x 2 SHOULDER / SHEAR BOLT SPACER WARNING: To avoid serious injury, never operate your snow thrower with your snow thrower. 4. To replace the shear bolts: 1. If one or both augers do not turn when auger control lever is secured to any service or ...

User Manual
Page 18
... attract moisture which is to be sure to use engine or carburetor cleaner products in the Maintenance section of this manual. 4. SNOW THROWER When snow thrower is factory set for damage, breakage and wear. Run engine at the end of oil through spark plug hole into cylinder. 3....hose, or tank during storage. Tire sealant also prevents tire dry rot and corrosion. Inspect moving parts for proper engine speed. IMPORTANT: When installing wheel, be stored for your snow thrower indoors and cover it to another. Engine performance should not be purchased from axle. Store in the...
... attract moisture which is to be sure to use engine or carburetor cleaner products in the Maintenance section of this manual. 4. SNOW THROWER When snow thrower is factory set for damage, breakage and wear. Run engine at the end of oil through spark plug hole into cylinder. 3....hose, or tank during storage. Tire sealant also prevents tire dry rot and corrosion. Inspect moving parts for proper engine speed. IMPORTANT: When installing wheel, be stored for your snow thrower indoors and cover it to another. Engine performance should not be purchased from axle. Store in the...
User Manual
Page 19
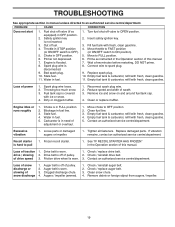
...position. 2. Stale fuel. 4. Move choke to ON position). 5. Empty fuel tank & carburetor, refill with fresh, clean gasoline. 4. Loose parts or damaged augers or impeller. 1. See "IF RECOIL STARTER HAS FROZEN" in the Operation section of snow discharge 1. Auger belt is in...remains, contact an authorized service centre/department. Check / replace drive belt. Clean snow chute. 4. Spark plug wire loose. 2. Replace damaged parts. of this manual. Check / reinstall auger belt. 2. Remove debris or foreign object from augers / impeller. 19 Safety ignition key is ...
...position. 2. Stale fuel. 4. Move choke to ON position). 5. Empty fuel tank & carburetor, refill with fresh, clean gasoline. 4. Loose parts or damaged augers or impeller. 1. See "IF RECOIL STARTER HAS FROZEN" in the Operation section of snow discharge 1. Auger belt is in...remains, contact an authorized service centre/department. Check / replace drive belt. Clean snow chute. 4. Spark plug wire loose. 2. Replace damaged parts. of this manual. Check / reinstall auger belt. 2. Remove debris or foreign object from augers / impeller. 19 Safety ignition key is ...
User Manual
Page 21
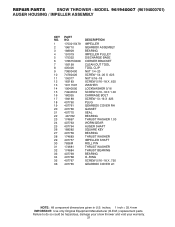
REPAIR PARTS SNOW THROWER - MODEL 961940007 (96194000701) AUGER HOUSING / IMPELLER ASSEMBLY KEY NO. 1 2 3 4 5 6 7 8 9 10 11 12 13 14 15 16 17 18 19 20 21 22 23 24 25 26 27 28 29 30 31 32 33 34 35 36 PART NO. 175321X479 196710 188909 191079 175322 178675X008 192199 405400 73800400 74780426 155377 163183 ...SCREW 5/16−18 X .750 GEARBOX COVER LH NOTE: All component dimensions given in U.S. inches. 1 inch = 25.4 mm IMPORTANT: Use only Original Equipment Manufacturer (O.E.M.) replacement parts. Failure to do so could be hazardous, damage your snow thrower and void your warranty. 21
REPAIR PARTS SNOW THROWER - MODEL 961940007 (96194000701) AUGER HOUSING / IMPELLER ASSEMBLY KEY NO. 1 2 3 4 5 6 7 8 9 10 11 12 13 14 15 16 17 18 19 20 21 22 23 24 25 26 27 28 29 30 31 32 33 34 35 36 PART NO. 175321X479 196710 188909 191079 175322 178675X008 192199 405400 73800400 74780426 155377 163183 ...SCREW 5/16−18 X .750 GEARBOX COVER LH NOTE: All component dimensions given in U.S. inches. 1 inch = 25.4 mm IMPORTANT: Use only Original Equipment Manufacturer (O.E.M.) replacement parts. Failure to do so could be hazardous, damage your snow thrower and void your warranty. 21
User Manual
Page 22
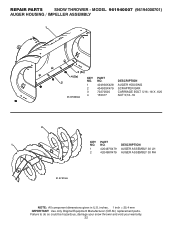
MODEL 961940007 (96194000701) AUGER HOUSING / IMPELLER ASSEMBLY 1 3 (5x) 4 (5x) 2 01.07.003-A KEY NO. 1 2 3 4 PART NO. 404930X428 404933X479 72270505 155377 DESCRIPTION AUGER HOUSING SCRAPPER BAR CARRIAGE BOLT 5/16−18 X .625 NUT 5/16−18 2 1 KEY NO. 1 2 PART NO. 420497X479 420498X479... DESCRIPTION AUGER ASSEMBLY 30 LH AUGER ASSEMBLY 30 RH 01.07.019-A NOTE: All component dimensions given in U.S. Failure to do so could be hazardous, damage your snow thrower and void your warranty. 22 REPAIR PARTS SNOW THROWER - inches. 1 inch...
MODEL 961940007 (96194000701) AUGER HOUSING / IMPELLER ASSEMBLY 1 3 (5x) 4 (5x) 2 01.07.003-A KEY NO. 1 2 3 4 PART NO. 404930X428 404933X479 72270505 155377 DESCRIPTION AUGER HOUSING SCRAPPER BAR CARRIAGE BOLT 5/16−18 X .625 NUT 5/16−18 2 1 KEY NO. 1 2 PART NO. 420497X479 420498X479... DESCRIPTION AUGER ASSEMBLY 30 LH AUGER ASSEMBLY 30 RH 01.07.019-A NOTE: All component dimensions given in U.S. Failure to do so could be hazardous, damage your snow thrower and void your warranty. 22 REPAIR PARTS SNOW THROWER - inches. 1 inch...

User Manual
Page 23
Failure to do so could be hazardous, damage your snow thrower and void your warranty. 23 inches. 1 inch = 25.4 mm IMPORTANT: Use only Original Equipment Manufacturer (O.E.M.) replacement parts. MODEL 961940007 (96194000701) AUGER HOUSING / IMPELLER ASSEMBLY 3 4 3 01.11.001-A 1 4 2 KEY NO. 1 2 3 4 PART NO. 174762X479 178777X479 72270506 751153 DESCRIPTION SKID PLATE LH SKID PLATE RH CARRIAGE BOLT...
Failure to do so could be hazardous, damage your snow thrower and void your warranty. 23 inches. 1 inch = 25.4 mm IMPORTANT: Use only Original Equipment Manufacturer (O.E.M.) replacement parts. MODEL 961940007 (96194000701) AUGER HOUSING / IMPELLER ASSEMBLY 3 4 3 01.11.001-A 1 4 2 KEY NO. 1 2 3 4 PART NO. 174762X479 178777X479 72270506 751153 DESCRIPTION SKID PLATE LH SKID PLATE RH CARRIAGE BOLT...
User Manual
Page 24
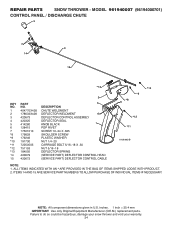
... only Original Equipment Manufacturer (O.E.M.) replacement parts. ALL ITEMS INDICATED WITH AN * ARE PROVIDED IN THE BAG OF ITEMS SHIPPED LOOSE WITH PRODUCT. 2. Failure to do so could be hazardous, damage your snow thrower and void your warranty. 24 MODEL 961940007 (96194000701) CONTROL PANEL / DISCHARGE CHUTE... 5 7 14 3 15 *13 KEY NO. 1 2 3 4 5 6 7 *8 *9 *10 *11 *12 *13 14 15 PART NO. 404770X428 178633X428 420673 420325 414280 128415 17501010 ...
... only Original Equipment Manufacturer (O.E.M.) replacement parts. ALL ITEMS INDICATED WITH AN * ARE PROVIDED IN THE BAG OF ITEMS SHIPPED LOOSE WITH PRODUCT. 2. Failure to do so could be hazardous, damage your snow thrower and void your warranty. 24 MODEL 961940007 (96194000701) CONTROL PANEL / DISCHARGE CHUTE... 5 7 14 3 15 *13 KEY NO. 1 2 3 4 5 6 7 *8 *9 *10 *11 *12 *13 14 15 PART NO. 404770X428 178633X428 420673 420325 414280 128415 17501010 ...
User Manual
Page 25
... AN * ARE LISTED AS REFERENCE FOR SERVICE PARTS ONLY. 2 1 KEY NO. 1 2 PART NO. 188303 74041024 01.15.005-A DESCRIPTION STEER CABLE SCREW 10−24 X 1.50 NOTE: All component dimensions given in U.S. inches. 1 inch = 25.4 mm IMPORTANT: Use only Original Equipment Manufacturer (O.E.M.) replacement parts. REPAIR PARTS SNOW THROWER - Failure to do so could be hazardous...
... AN * ARE LISTED AS REFERENCE FOR SERVICE PARTS ONLY. 2 1 KEY NO. 1 2 PART NO. 188303 74041024 01.15.005-A DESCRIPTION STEER CABLE SCREW 10−24 X 1.50 NOTE: All component dimensions given in U.S. inches. 1 inch = 25.4 mm IMPORTANT: Use only Original Equipment Manufacturer (O.E.M.) replacement parts. REPAIR PARTS SNOW THROWER - Failure to do so could be hazardous...
User Manual
Page 26
... so could be hazardous, damage your snow thrower and void your warranty. 26 REPAIR PARTS HANDLES SNOW THROWER - NO. DESCRIPTION 1 412675X004 INTERLOCK SPRING 32 3 414572 178831 INTERLOCK CAM TORSION SPRING 4 169675 RETAINER 5 17060410 SCREW 1/4−20 X .625 6 421252X004 INTERLOCK STOP 01.08.007-B NOTE: All component dimensions given in U.S. MODEL 961940007 (96194000701) 5 5 4 2 3 5 5 3 KEY PART 3 NO.
... so could be hazardous, damage your snow thrower and void your warranty. 26 REPAIR PARTS HANDLES SNOW THROWER - NO. DESCRIPTION 1 412675X004 INTERLOCK SPRING 32 3 414572 178831 INTERLOCK CAM TORSION SPRING 4 169675 RETAINER 5 17060410 SCREW 1/4−20 X .625 6 421252X004 INTERLOCK STOP 01.08.007-B NOTE: All component dimensions given in U.S. MODEL 961940007 (96194000701) 5 5 4 2 3 5 5 3 KEY PART 3 NO.


