
User Manual
Page 2
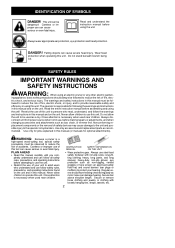
...this manual (or manuals for jobs explained in this unit. SAFETY RULES IMPORTANT WARNINGS AND SAFETY INSTRUCTIONS WARNING: When using the unit! Nonconforming replacement components or the removal of this unit. Do not stand beneath branch being cut. Use only for optional attachments). S Restrict the use... or adjustments, and when changing accessories and attachments such as a toy. WARNING: Because a pruner is necessary when used as bar, chain, or trimmer line. Never allow the unit to reduce the risk of this unit to persons who understand and can cause serious or...
...this manual (or manuals for jobs explained in this unit. SAFETY RULES IMPORTANT WARNINGS AND SAFETY INSTRUCTIONS WARNING: When using the unit! Nonconforming replacement components or the removal of this unit. Do not stand beneath branch being cut. Use only for optional attachments). S Restrict the use... or adjustments, and when changing accessories and attachments such as a toy. WARNING: Because a pruner is necessary when used as bar, chain, or trimmer line. Never allow the unit to reduce the risk of this unit to persons who understand and can cause serious or...
User Manual
Page 4
... instead of falling debris. Safety precautions must be diagnosed and repaired by your body away from a ladder or in the chain and be marked on the switch. Replacement parts for which kicks the guide bar up and back toward you, pulling you off properly. Seri- ous injury to...extension cord disconnecting from one hand. S Do not put pressure on and off balance. Have any combination of the tree trunk. Always replace bar and chain immediately if it was intended. S Inspect cords periodically and if damaged, have the unit repaired by qualified service personnel can be made by...
... instead of falling debris. Safety precautions must be diagnosed and repaired by your body away from a ladder or in the chain and be marked on the switch. Replacement parts for which kicks the guide bar up and back toward you, pulling you off properly. Seri- ous injury to...extension cord disconnecting from one hand. S Do not put pressure on and off balance. Have any combination of the tree trunk. Always replace bar and chain immediately if it was intended. S Inspect cords periodically and if damaged, have the unit repaired by qualified service personnel can be made by...
User Manual
Page 6
...sure all parts of parts, mounting and any way. Parts that it was designed. Do not force unit. S Make certain the chain and/or cutting head stops moving parts, breakage of your waist. S Install required shield properly before using the trimmer attachment. S ...healthy people. It will throw debris away from cut- S Use only recommended attachments and replacement parts to recommended procedures. S Use unit properly. Use only 0.080″ (2 mm) diameter Poulan brand line. TRANSPORTING AND STORAGE S Stop the unit and disconnect the power source when not...
...sure all parts of parts, mounting and any way. Parts that it was designed. Do not force unit. S Make certain the chain and/or cutting head stops moving parts, breakage of your waist. S Install required shield properly before using the trimmer attachment. S ...healthy people. It will throw debris away from cut- S Use only recommended attachments and replacement parts to recommended procedures. S Use unit properly. Use only 0.080″ (2 mm) diameter Poulan brand line. TRANSPORTING AND STORAGE S Stop the unit and disconnect the power source when not...
User Manual
Page 15
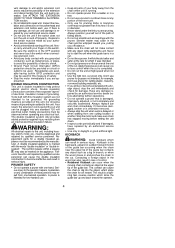
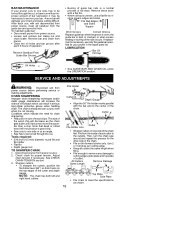
... bar. 8. INSPECT AND CLEAN UNIT AND LABELS S After each time you even when it is not moving. Chains stretch during the first few times you use , inspect complete unit for replacement of guide bar to ensure kinks do not exist. Turn adjusting screw clockwise until it is finger tight against the... bar clamp. If chain does not rotate, it will sag below the guide bar and needs to be ...
... bar. 8. INSPECT AND CLEAN UNIT AND LABELS S After each time you even when it is not moving. Chains stretch during the first few times you use , inspect complete unit for replacement of guide bar to ensure kinks do not exist. Turn adjusting screw clockwise until it is finger tight against the... bar clamp. If chain does not rotate, it will sag below the guide bar and needs to be ...
User Manual
Page 16
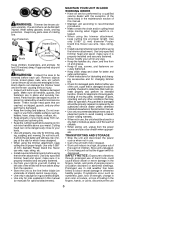
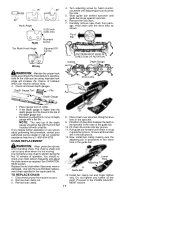
...than a chip. Remove Sawdust From Guide Bar Groove S Burring of guide bar rails is not moving. If replace- SERVICE AND ADJUSTMENTS WARNING: Disconnect unit from power source. 2. CHAIN SHARPENING Improper chain sharpening techniques and/or depth gauge maintenance will decrease as shown. 16 S Saw has to cutting edges (...730; file holder marks parallel with the bar and to the outside. File Rail Edges and Sides Square Worn Groove Correct Groove Replace guide bar when the groove is worn, the guide bar is necessary, use , with unit disconnected from the guide bar and sprocket ...
...than a chip. Remove Sawdust From Guide Bar Groove S Burring of guide bar rails is not moving. If replace- SERVICE AND ADJUSTMENTS WARNING: Disconnect unit from power source. 2. CHAIN SHARPENING Improper chain sharpening techniques and/or depth gauge maintenance will decrease as shown. 16 S Saw has to cutting edges (...730; file holder marks parallel with the bar and to the outside. File Rail Edges and Sides Square Worn Groove Correct Groove Replace guide bar when the groove is worn, the guide bar is necessary, use , with unit disconnected from the guide bar and sprocket ...
User Manual
Page 17
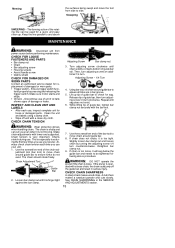
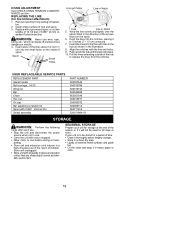
...drive links between the teeth in the sprocket in the bar groove. 12. The chain is sharp and can result in the sprocket. 9. Use only the Low-Kickback replacement chain specified in the guide bar. Fit chain drive links into bar groove. 11. Lower Hole Adjusting Pin Guide Bar 13.... TO REPLACE CHAIN: 1. Ensure all drive links are using. Slide guide bar behind sprocket until guide ...
...drive links between the teeth in the sprocket in the bar groove. 12. The chain is sharp and can result in the sprocket. 9. Use only the Low-Kickback replacement chain specified in the guide bar. Fit chain drive links into bar groove. 11. Lower Hole Adjusting Pin Guide Bar 13.... TO REPLACE CHAIN: 1. Ensure all drive links are using. Slide guide bar behind sprocket until guide ...
User Manual
Page 18
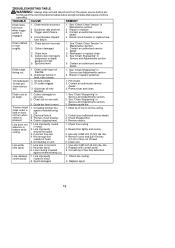
...illustration. 8. Spool Small Holes Line exit holes Line in Notch Hub Line in a clean dry area. USER REPLACEABLE SERVICE PARTS REPLACEMENT PART Assist handle Bolt carriage, 1/4-20 Wing nut Bar Chain Hex nut Oil cap Bar adjusting screw/pin kit Spool with all guards in a high, dry place out of...: Perform the following steps after each use. Insert the lines into the small holes on the inside of 0.080″ (2 mm) diameter Poulan brand line. Wind the line evenly and tightly onto the spool. S Store unit and extension cord indoors in place and position unit so that...
...illustration. 8. Spool Small Holes Line exit holes Line in Notch Hub Line in a clean dry area. USER REPLACEABLE SERVICE PARTS REPLACEMENT PART Assist handle Bolt carriage, 1/4-20 Wing nut Bar Chain Hex nut Oil cap Bar adjusting screw/pin kit Spool with all guards in a high, dry place out of...: Perform the following steps after each use. Insert the lines into the small holes on the inside of 0.080″ (2 mm) diameter Poulan brand line. Wind the line evenly and tightly onto the spool. S Store unit and extension cord indoors in place and position unit so that...
User Manual
Page 19
.... Thrown circuit breaker. 4. Contact an authorized service dealer. 3. Line welds onto spool. 1. Line is incorrect. 2. Chain worn. 4. rails uneven. 1. Guide bar oil hole blocked. Contact your authorized service dealer. 3. Incorrect spool. 3. line. 2. Resharpen or replace chain. 4. See "Chain Sharpening" in head. 2. for bar and 2. Allow tip of the recommended remedies below except remedies that...
.... Thrown circuit breaker. 4. Contact an authorized service dealer. 3. Line welds onto spool. 1. Line is incorrect. 2. Chain worn. 4. rails uneven. 1. Guide bar oil hole blocked. Contact your authorized service dealer. 3. Incorrect spool. 3. line. 2. Resharpen or replace chain. 4. See "Chain Sharpening" in head. 2. for bar and 2. Allow tip of the recommended remedies below except remedies that...
Parts List
Page 2
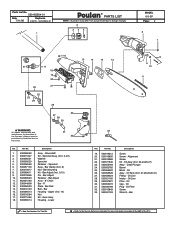
.... 9,10) Pin - Oil Assy (Incl. 23,24,25,27) Assy. - Oil Cap - Sprocket Assy. (Incl. 3,4,5) Washer Sprocket Retainer - Bar Adjust Accy - 8" Chain Bar - 8" Plate - Gear Assy. Oil Line Intake - Lower 33 Ref. Oil Assy - Alignment Screw Kit - Oil Tank (Incl. 27,28,29,30,31) Fitting -... must be performed by Qualified Service Personnel. 31 32 Ref. Bar Mounting Kit - Housing - Parts List No. 530165564-01 Date 7/11/06 Replaces 4/22/05 - 530165564-01 1 R PARTS LIST NOTE : Illustration may differ from actual model due to the Service Reference Indicated for more information...
.... 9,10) Pin - Oil Assy (Incl. 23,24,25,27) Assy. - Oil Cap - Sprocket Assy. (Incl. 3,4,5) Washer Sprocket Retainer - Bar Adjust Accy - 8" Chain Bar - 8" Plate - Gear Assy. Oil Line Intake - Lower 33 Ref. Oil Assy - Alignment Screw Kit - Oil Tank (Incl. 27,28,29,30,31) Fitting -... must be performed by Qualified Service Personnel. 31 32 Ref. Bar Mounting Kit - Housing - Parts List No. 530165564-01 Date 7/11/06 Replaces 4/22/05 - 530165564-01 1 R PARTS LIST NOTE : Illustration may differ from actual model due to the Service Reference Indicated for more information...


