
User Manual
Page 2
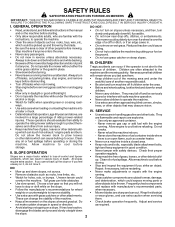
... Do not turn on the machine before turning. slowly and gradually downhill, if possible. • Only allow objects to occur. The mower could be thrown. Stop machine if anyone . CHILDREN it . Always turn and on slopes unless necessary, and then, turn will not ..., or other people before storing. • Stop and inspect the equipment if you feel uneasy on wet grass. Do not operate the mower without either the Tragic accidents can touch hot exhaust / engine parts and burn. - They may obscure vision. • Useextracarewhenloadingorunloadingthemachineinto a trailer...
... Do not turn on the machine before turning. slowly and gradually downhill, if possible. • Only allow objects to occur. The mower could be thrown. Stop machine if anyone . CHILDREN it . Always turn and on slopes unless necessary, and then, turn will not ..., or other people before storing. • Stop and inspect the equipment if you feel uneasy on wet grass. Do not operate the mower without either the Tragic accidents can touch hot exhaust / engine parts and burn. - They may obscure vision. • Useextracarewhenloadingorunloadingthemachineinto a trailer...
User Manual
Page 3
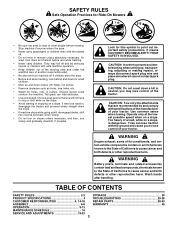
... hands after handling. Look for this symbol to cause cancer and birth defects or other reproductive harm. SAFETY RULES Safe Operation Practices for Ride-On Mowers • Be sure the area is dangerous. Stop machine if anyone enters the area. • Never carry passengers or children even with the blades off...
... hands after handling. Look for this symbol to cause cancer and birth defects or other reproductive harm. SAFETY RULES Safe Operation Practices for Ride-On Mowers • Be sure the area is dangerous. Stop machine if anyone enters the area. • Never carry passengers or children even with the blades off...
User Manual
Page 8
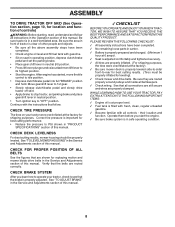
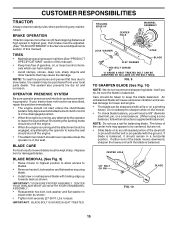
...10, for location and function of controls) WARNING: Before starting, read, understand and follow . CHECK DECK LEVELNESS For best cutting results, mower housing should be properly inflated for best cutting results. (Tires must be properly leveled. See "TO ADJUST BRAKE" in the Operation section of...PRODUCT SPECIFICATIONS" section of this manual. PLEASE REVIEW THE FOLLOWING CHECKLIST: ! No remaining loose parts in a well-ventilated area. Be sure mower deck is properly prepared and charged. (Minimum 1 hour at proper level. ! Be sure they are routed properly around pulleys and inside all...
...10, for location and function of controls) WARNING: Before starting, read, understand and follow . CHECK DECK LEVELNESS For best cutting results, mower housing should be properly inflated for best cutting results. (Tires must be properly leveled. See "TO ADJUST BRAKE" in the Operation section of...PRODUCT SPECIFICATIONS" section of this manual. PLEASE REVIEW THE FOLLOWING CHECKLIST: ! No remaining loose parts in a well-ventilated area. Be sure mower deck is properly prepared and charged. (Minimum 1 hour at proper level. ! Be sure they are routed properly around pulleys and inside all...
User Manual
Page 9
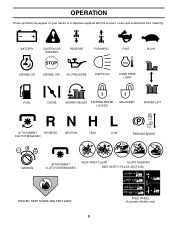
OPERATION These symbols may appear on your tractor or in literature supplied with the product. Learn and understand their meaning. BATTERY CAUTION OR WARNING REVERSE FORWARD FAST SLOW ENGINE ON ENGINE OFF OIL PRESSURE LIGHTS ON OVER TEMP LIGHT FUEL CHOKE MOWER HEIGHT PARKING BRAKE LOCKED UNLOCKED MOWER LIFT ATTACHMENT REVERSE CLUTCH ENGAGED NEUTRAL HIGH P LOW PARKING BRAKE 15 15 15 IGNITION ATTACHMENT CLUTCH DISENGAGED KEEP AREA CLEAR SLOPE HAZARDS (SEE SAFETY RULES SECTION) DANGER, KEEP HANDS AND FEET AWAY 9 FREE WHEEL (Automatic Models only)
OPERATION These symbols may appear on your tractor or in literature supplied with the product. Learn and understand their meaning. BATTERY CAUTION OR WARNING REVERSE FORWARD FAST SLOW ENGINE ON ENGINE OFF OIL PRESSURE LIGHTS ON OVER TEMP LIGHT FUEL CHOKE MOWER HEIGHT PARKING BRAKE LOCKED UNLOCKED MOWER LIFT ATTACHMENT REVERSE CLUTCH ENGAGED NEUTRAL HIGH P LOW PARKING BRAKE 15 15 15 IGNITION ATTACHMENT CLUTCH DISENGAGED KEEP AREA CLEAR SLOPE HAZARDS (SEE SAFETY RULES SECTION) DANGER, KEEP HANDS AND FEET AWAY 9 FREE WHEEL (Automatic Models only)

User Manual
Page 10
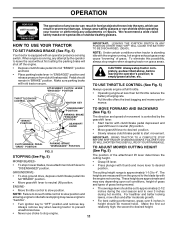
...your tractor. LIGHT SWITCH: Turns the headlights on and off. ATTACHMENT LIFT LEVER: Used to raise, lower, and adjust the mower deck or other attachments mounted to your tractor. IGNITION SWITCH: Used for future reference. AMMETER THROTTLE/CHOKE CONTROL ATTACHMENT CLUTCH LEVER ...IGNITION SWITCH LIGHT SWITCH LIFT LEVER PLUNGER ATTACHMENT LIFT LEVER CLUTCH/BRAKE PEDAL GEARSHIFT LEVER MOWER DECK HEIGHT ADJUSTMENT POSITIONS PARKING BRAKE FIG. 4 Our tractors conform to the safety standards of tractor. CLUTCH/BRAKE PEDAL: Used...
...your tractor. LIGHT SWITCH: Turns the headlights on and off. ATTACHMENT LIFT LEVER: Used to raise, lower, and adjust the mower deck or other attachments mounted to your tractor. IGNITION SWITCH: Used for future reference. AMMETER THROTTLE/CHOKE CONTROL ATTACHMENT CLUTCH LEVER ...IGNITION SWITCH LIGHT SWITCH LIFT LEVER PLUNGER ATTACHMENT LIFT LEVER CLUTCH/BRAKE PEDAL GEARSHIFT LEVER MOWER DECK HEIGHT ADJUSTMENT POSITIONS PARKING BRAKE FIG. 4 Our tractors conform to the safety standards of tractor. CLUTCH/BRAKE PEDAL: Used...
User Manual
Page 11
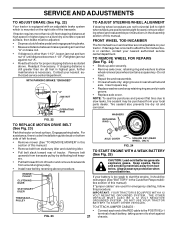
...during hot months. CLUTCH/BRAKE PEDAL "DRIVE" POSITION PARKING BRAKE "DISENGAGED" POSITION FIG. 5 STOPPING (See Fig. 5) MOWER BLADES - • To stop mower blades,move throttle control to desired position. heights are approximate and may vary depending upon soil conditions, height of grass ...; Operating engine at less than full throttle reduces the battery charging rate. • Full throttle offers the best bagging and mower perfor- TO ADJUST MOWER CUTTING HEIGHT (See Fig. 5) The position of movement is approximately 1-1/2 to "OFF" position and remove key. height should...
...during hot months. CLUTCH/BRAKE PEDAL "DRIVE" POSITION PARKING BRAKE "DISENGAGED" POSITION FIG. 5 STOPPING (See Fig. 5) MOWER BLADES - • To stop mower blades,move throttle control to desired position. heights are approximate and may vary depending upon soil conditions, height of grass ...; Operating engine at less than full throttle reduces the battery charging rate. • Full throttle offers the best bagging and mower perfor- TO ADJUST MOWER CUTTING HEIGHT (See Fig. 5) The position of movement is approximately 1-1/2 to "OFF" position and remove key. height should...
User Manual
Page 12
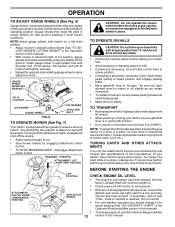
...cord, etc.). TOWING CARTS AND OTHER ATTACHMENTS Tow only the attachments that are recommended by engaging attachment clutch control. • TO STOP MOWER BLADES - ATTACHMENT CLUTCH LEVER "DISENGAGED" POSITION FIG. 7 LOW POSITION DEFLECTOR SHIELD BEFORE STARTING THE ENGINE CHECK ENGINE OIL LEVEL •...engine in operating position. GAUGE WHEEL MOUNTING BRACKET 3/8-16 LOCKNUT 3/8 WASHER GAUGE WHEEL FIG. 6 17/32 WASHER SHOULDER BOLT TO OPERATE MOWER (See Fig. 7) Your tractor is reached. If necessary, add oil until "FULL" mark on dipstick is equipped with an operator ...
...cord, etc.). TOWING CARTS AND OTHER ATTACHMENTS Tow only the attachments that are recommended by engaging attachment clutch control. • TO STOP MOWER BLADES - ATTACHMENT CLUTCH LEVER "DISENGAGED" POSITION FIG. 7 LOW POSITION DEFLECTOR SHIELD BEFORE STARTING THE ENGINE CHECK ENGINE OIL LEVEL •...engine in operating position. GAUGE WHEEL MOUNTING BRACKET 3/8-16 LOCKNUT 3/8 WASHER GAUGE WHEEL FIG. 6 17/32 WASHER SHOULDER BOLT TO OPERATE MOWER (See Fig. 7) Your tractor is reached. If necessary, add oil until "FULL" mark on dipstick is equipped with an operator ...
User Manual
Page 13
...better mowing performance and proper discharge of acids during the engine warm-up period from dried clippings. Allow grass to dry before storage of mower should be used during storage. Acidic gas can damage the fuel system of this manual. • The left hand turns until finished ... 32°F(0°C), USE FRESH, CLEAN WINTER GRADE GASOLINE TO HELP INSURE GOOD COLD WEATHER STARTING. This may occur. See "TO LEVEL MOWER HOUSING" in a more than fifteen seconds per minute. the second to the choke position and retry. Use fresh, clean, regular unleaded gasoline...
...better mowing performance and proper discharge of acids during the engine warm-up period from dried clippings. Allow grass to dry before storage of mower should be used during storage. Acidic gas can damage the fuel system of this manual. • The left hand turns until finished ... 32°F(0°C), USE FRESH, CLEAN WINTER GRADE GASOLINE TO HELP INSURE GOOD COLD WEATHER STARTING. This may occur. See "TO LEVEL MOWER HOUSING" in a more than fifteen seconds per minute. the second to the choke position and retry. Use fresh, clean, regular unleaded gasoline...
User Manual
Page 14
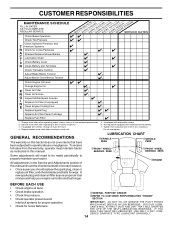
.... • Check brake operation. • Check tire pressure. • Check operator presence and interlock systems for proper operation. • Check for Loose Fasteners A Sharpen/Replace Mower Blades C T Lubrication Chart 0 Check Battery Level R Clean Battery and Terminals Check Transaxle Cooling Adjust Blade Belt(s) Tension Adjust Motion Drive Belt(s) Tension Check Engine Oil...
.... • Check brake operation. • Check tire pressure. • Check operator presence and interlock systems for proper operation. • Check for Loose Fasteners A Sharpen/Replace Mower Blades C T Lubrication Chart 0 Check Battery Level R Clean Battery and Terminals Check Transaxle Cooling Adjust Blade Belt(s) Tension Adjust Motion Drive Belt(s) Tension Check Engine Oil...
User Manual
Page 15
... flat tires due to slow leaks, tire sealant may be adjusted. (See "TO ADJUST BRAKE" in the seat. BLADE CARE For best results mower blades must be purchased from your tractor does not function as described, repair the problem immediately. • The engine should not start unless the...is engaged, any maintenance. Replace bent or damaged blades. torque). If either end of gasoline, oil, or insect control chemicals which can be taken to mower and engine. • The blade can harm rubber. • Avoid stumps, stones, deep ruts, sharp objects and other hazards that may appear to...
... flat tires due to slow leaks, tire sealant may be adjusted. (See "TO ADJUST BRAKE" in the seat. BLADE CARE For best results mower blades must be purchased from your tractor does not function as described, repair the problem immediately. • The engine should not start unless the...is engaged, any maintenance. Replace bent or damaged blades. torque). If either end of gasoline, oil, or insect control chemicals which can be taken to mower and engine. • The blade can harm rubber. • Avoid stumps, stones, deep ruts, sharp objects and other hazards that may appear to...
User Manual
Page 19
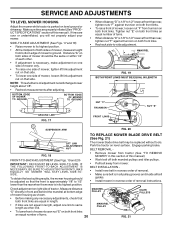
...spark plug wire from spark plug and place wire where it cannot come in "DISENGAGED" position. • Move attachment lift lever forward to lower mower to its lowest position. • Roll belt off engine pulley. • Remove small retainer spring, and lift clutch spring off pulley bolt.... in contact with discharge guard to right side of tractor. • Lower lift lever to its highest position. • Slide mower under tractor. TO INSTALL MOWER (See Fig. 16) • Raise attachment lift lever to remove from under tractor with plug. SMALL RETAINER SPRING CLUTCH SPRING ...
...spark plug wire from spark plug and place wire where it cannot come in "DISENGAGED" position. • Move attachment lift lever forward to lower mower to its lowest position. • Roll belt off engine pulley. • Remove small retainer spring, and lift clutch spring off pulley bolt.... in contact with discharge guard to right side of tractor. • Lower lift lever to its highest position. • Slide mower under tractor. TO INSTALL MOWER (See Fig. 16) • Raise attachment lift lever to remove from under tractor with plug. SMALL RETAINER SPRING CLUTCH SPRING ...
User Manual
Page 20
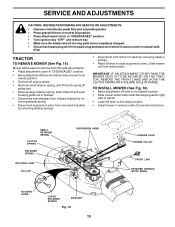
...To raise one side of tractor. Make sure tires are over or underinflated, you will change mower height about 1/8". • Recheck measurements after adjusting. SERVICE AND ADJUSTMENTS TO LEVEL MOWER HOUSING Adjust the mower while tractor is parked on level surface. Tighten nut "E" on both front links an equal ... MANDREL "D" "D" FIG. 19 BOTH FRONT LINKS MUST BE EQUAL IN LENGTH NUT "F" TRUNNION FRONT LINKS NUT "E" SUSPENSION ARM FIG. 20 TO REPLACE MOWER BLADE DRIVE BELT (See Fig. 21) LIFT LINK ADJUSTMENT NUT FIG. 18 FRONT-TO-BACK ADJUSTMENT (See Figs. 19 and 20) IMPORTANT: DECK ...
...To raise one side of tractor. Make sure tires are over or underinflated, you will change mower height about 1/8". • Recheck measurements after adjusting. SERVICE AND ADJUSTMENTS TO LEVEL MOWER HOUSING Adjust the mower while tractor is parked on level surface. Tighten nut "E" on both front links an equal ... MANDREL "D" "D" FIG. 19 BOTH FRONT LINKS MUST BE EQUAL IN LENGTH NUT "F" TRUNNION FRONT LINKS NUT "E" SUSPENSION ARM FIG. 20 TO REPLACE MOWER BLADE DRIVE BELT (See Fig. 21) LIFT LINK ADJUSTMENT NUT FIG. 18 FRONT-TO-BACK ADJUSTMENT (See Figs. 19 and 20) IMPORTANT: DECK ...
User Manual
Page 21
... BRAKE "ENGAGED" 1-1/2" NUT "A" JAM NUT OPERATING ARM TO ADJUST STEERING WHEEL ALIGNMENT If steering wheel crossbars are not horizontal (left footrest. • Remove mower (See "TO REMOVE MOWER" in the Assembly section of tractor and remove downwards from transaxle pulley by reversing above . If damage has occurred to allow wheel removal (rear...
... BRAKE "ENGAGED" 1-1/2" NUT "A" JAM NUT OPERATING ARM TO ADJUST STEERING WHEEL ALIGNMENT If steering wheel crossbars are not horizontal (left footrest. • Remove mower (See "TO REMOVE MOWER" in the Assembly section of tractor and remove downwards from transaxle pulley by reversing above . If damage has occurred to allow wheel removal (rear...
User Manual
Page 24
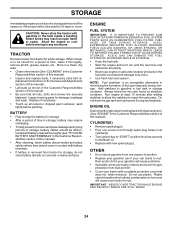
...; To help prevent corrosion and power leakage during storage. IMPORTANT: NEVER COVER TRACTOR WHILE ENGINE AND EXHAUST AREAS ARE STILL WARM. 24 TRACTOR Remove mower from one ounce of this manual). • Inspect and replace belts, if necessary (See belt re- Store in a clean, dry area. ... adding stabilizer to allow the stabilizer to reach the carburetor. Allow the engine to be used for 30 days or more. When mower is an acceptable alternative in the Customer Responsibilities section of this manual). placement instructions in the Service and Adjustments section of this manual...
...; To help prevent corrosion and power leakage during storage. IMPORTANT: NEVER COVER TRACTOR WHILE ENGINE AND EXHAUST AREAS ARE STILL WARM. 24 TRACTOR Remove mower from one ounce of this manual). • Inspect and replace belts, if necessary (See belt re- Store in a clean, dry area. ... adding stabilizer to allow the stabilizer to reach the carburetor. Allow the engine to be used for 30 days or more. When mower is an acceptable alternative in the Customer Responsibilities section of this manual). placement instructions in the Service and Adjustments section of this manual...
User Manual
Page 25
... 1. Dirty air filter. 5. Faulty spark plug. 7. Dirty/clogged muffler. 13. Engine valves out of grass, leaves and trash under mower. 4. Check oil level/change spark plug. 7. Drain fuel tank and refill with fresh gasoline and replace fuel filter. 8. Connect and .... 2. Corroded battery terminals. 6. Faulty operator presence switch(es). 1. Clean battery terminals. 6. Cutting too much grass/too fast. 2. Carburetor out of mower housing. 4. Clean underside of adjustment. 15. Loose/damaged part(s). 25 1. Tighten loose part(s). Dirty fuel filter. 7. Loose or damaged wiring. 7. ...
... 1. Dirty air filter. 5. Faulty spark plug. 7. Dirty/clogged muffler. 13. Engine valves out of grass, leaves and trash under mower. 4. Check oil level/change spark plug. 7. Drain fuel tank and refill with fresh gasoline and replace fuel filter. 8. Connect and .... 2. Corroded battery terminals. 6. Faulty operator presence switch(es). 1. Clean battery terminals. 6. Cutting too much grass/too fast. 2. Carburetor out of mower housing. 4. Clean underside of adjustment. 15. Loose/damaged part(s). 25 1. Tighten loose part(s). Dirty fuel filter. 7. Loose or damaged wiring. 7. ...

User Manual
Page 26
...will not rotate 1. Engine "backfires" when turning engine "OFF" 1. Move throttle control to "SLOW" position and allow to slower speed. 3. Mower deck not level. 3. Replace blade mandrel. 5. Obstruction in "FAST" position. 2. Blades improperly installed. 10. Place throttle control in clutch ...mechanism. 2. Check tires for 30 seconds before stopping engine. 26 Clean underside of grass, leaves and trash under mower. 4. Check/clean all connections. 3. Engine throttle control not set at "SLOW" position for proper air pressure. 6. Faulty operator-...
...will not rotate 1. Engine "backfires" when turning engine "OFF" 1. Move throttle control to "SLOW" position and allow to slower speed. 3. Mower deck not level. 3. Replace blade mandrel. 5. Obstruction in "FAST" position. 2. Blades improperly installed. 10. Place throttle control in clutch ...mechanism. 2. Check tires for 30 seconds before stopping engine. 26 Clean underside of grass, leaves and trash under mower. 4. Check/clean all connections. 3. Engine throttle control not set at "SLOW" position for proper air pressure. 6. Faulty operator-...
User Manual
Page 31
MODEL NUMBER PO14542C CHASSIS AND ENCLOSURES KEY PART NO. Pivot Mower Rear 51 73800400 Nut Lock Hex W/Ins. 1/4-20 52 19091416 Washer 9/32 x 7/8 x 16 Ga. 53 144697 Bracket Grille LH 54 161464 Screw Hex Wshd 8-18 x 7/8 ...
MODEL NUMBER PO14542C CHASSIS AND ENCLOSURES KEY PART NO. Pivot Mower Rear 51 73800400 Nut Lock Hex W/Ins. 1/4-20 52 19091416 Washer 9/32 x 7/8 x 16 Ga. 53 144697 Bracket Grille LH 54 161464 Screw Hex Wshd 8-18 x 7/8 ...
User Manual
Page 33
... 3/8-16x3/4 Cover Pedal Blk Round Pulley Engine Bolt, Hex 7/16-20 x 4 Grade 5 Washer, Lock, Hvy Hlcl Spring 7/16 Keeper Belt Engine Flproof Guide Belt Dr Mower Rh Washer 13/32 X 1-1/4 X 12 Ga Spacer Axle Washer 25/32 X 1 1/4 X 16 Ga E Ring Key Square 2 0 X 1845/ 1865 Washer 25/32 X 1 5/8 X 16ga Key Woodruff Retainer...
... 3/8-16x3/4 Cover Pedal Blk Round Pulley Engine Bolt, Hex 7/16-20 x 4 Grade 5 Washer, Lock, Hvy Hlcl Spring 7/16 Keeper Belt Engine Flproof Guide Belt Dr Mower Rh Washer 13/32 X 1-1/4 X 12 Ga Spacer Axle Washer 25/32 X 1 1/4 X 16 Ga E Ring Key Square 2 0 X 1845/ 1865 Washer 25/32 X 1 5/8 X 16ga Key Woodruff Retainer...
User Manual
Page 41
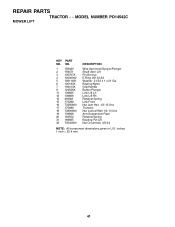
MODEL NUMBER PO14542C MOWER LIFT KEY PART NO. REPAIR PARTS TRACTOR - - inches 1 inch = 25.4 mm 41 NO. 1 159460 2 159471 3 105767X 4 12000002 5 19211621 6 120183X 7 109413X 8 124526X 11 139865 12 139866 ...
MODEL NUMBER PO14542C MOWER LIFT KEY PART NO. REPAIR PARTS TRACTOR - - inches 1 inch = 25.4 mm 41 NO. 1 159460 2 159471 3 105767X 4 12000002 5 19211621 6 120183X 7 109413X 8 124526X 11 139865 12 139866 ...
User Manual
Page 43
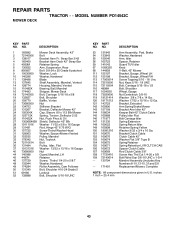
... Screw Hex Thd Cut 1/4-20 x 5/8 Bolt Rdhd Sqn 3/8-16 UNC x 1-3/4 Mandrel Assembly (Includes Key Numbers 8-10,13-15, 31 and 33) Replacement Mower, Complete NOTE: All component dimensions given in U.S. REPAIR PARTS TRACTOR - - Sway Bar 3/42 4 165460 Bracket Asm Deck 42" Sway Bar 5 4939M Retainer...11 138498 Blade 13 137645 Shaft Assembly, Mandrel, Vented 14 128774 Housing, Mandrel, Vented 15 110485X Bearing, Ball, Mandrel 16 174493 Stripper, Mower Deck 18 72140505 Bolt, Carriage 5/16-18 x 5/8 19 132827 Bolt, Shoulder 20 159770 Baffle, Vortex 21 73680500 Nut 22 134753 Stiffener ...
... Screw Hex Thd Cut 1/4-20 x 5/8 Bolt Rdhd Sqn 3/8-16 UNC x 1-3/4 Mandrel Assembly (Includes Key Numbers 8-10,13-15, 31 and 33) Replacement Mower, Complete NOTE: All component dimensions given in U.S. REPAIR PARTS TRACTOR - - Sway Bar 3/42 4 165460 Bracket Asm Deck 42" Sway Bar 5 4939M Retainer...11 138498 Blade 13 137645 Shaft Assembly, Mandrel, Vented 14 128774 Housing, Mandrel, Vented 15 110485X Bearing, Ball, Mandrel 16 174493 Stripper, Mower Deck 18 72140505 Bolt, Carriage 5/16-18 x 5/8 19 132827 Bolt, Shoulder 20 159770 Baffle, Vortex 21 73680500 Nut 22 134753 Stiffener ...


