DIY In-Ceiling and In-Wall Installation Guide
Page 2
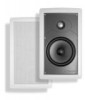
... that you choose walls or ceilings that are not covered with a comparable fire retardant material (available in small quantities at any home improvement center in a convenient aerosol can). • When cutting or stripping wires, or using sharp blades-slow down, make sure you familiar the following... doing this yourself. Section 1: Introduction To Installing In-Wall or In-Ceiling Polk Audio Speakers Installing your new Polk Audio in-ceiling or in-wall speakers is by step. DIY CI Tutorial 2 Installing your new Polk speakers can be sure to light the space safely. • Take your ...
... that you choose walls or ceilings that are not covered with a comparable fire retardant material (available in small quantities at any home improvement center in a convenient aerosol can). • When cutting or stripping wires, or using sharp blades-slow down, make sure you familiar the following... doing this yourself. Section 1: Introduction To Installing In-Wall or In-Ceiling Polk Audio Speakers Installing your new Polk Audio in-ceiling or in-wall speakers is by step. DIY CI Tutorial 2 Installing your new Polk speakers can be sure to light the space safely. • Take your ...

DIY In-Ceiling and In-Wall Installation Guide
Page 4
...center, and front right) are traditional free-standing speakers while the rear surround speakers are going to run in diameter). b. Cable vs. In this case the cabling would be run on a wall then we recommend "flat" style cable. Runs over 100' use 14 or 16 gauge cable. Section 2: Polk Audio... In-Wall and In-Ceiling Speaker Installation Guide Materials and Preparation Before cutting into your walls to install your new Polk Audio speakers, gather up all basic speaker applications you will need a minimum of 2 ...
...center, and front right) are traditional free-standing speakers while the rear surround speakers are going to run in diameter). b. Cable vs. In this case the cabling would be run on a wall then we recommend "flat" style cable. Runs over 100' use 14 or 16 gauge cable. Section 2: Polk Audio... In-Wall and In-Ceiling Speaker Installation Guide Materials and Preparation Before cutting into your walls to install your new Polk Audio speakers, gather up all basic speaker applications you will need a minimum of 2 ...

DIY In-Ceiling and In-Wall Installation Guide
Page 5
...is much easier to run of the speakers will be symmetrical once you have a good idea about where you want to channel. When your new Polk speakers, we suggest you have established where the joists and studs are three cable runs, the first is enough room for the speakers. Volume ...control with face plate: Rear view of all studs using your stud sensor. In home theater installations the cable lengths for Front Left, Center and Right channels should be about the same. Also check that the placement of speaker cables to each speaker within a room should be about the...
...is much easier to run of the speakers will be symmetrical once you have a good idea about where you want to channel. When your new Polk speakers, we suggest you have established where the joists and studs are three cable runs, the first is enough room for the speakers. Volume ...control with face plate: Rear view of all studs using your stud sensor. In home theater installations the cable lengths for Front Left, Center and Right channels should be about the same. Also check that the placement of speaker cables to each speaker within a room should be about the...

DIY In-Ceiling and In-Wall Installation Guide
Page 15
The simple install goes like your speakers: D I Y C I T u t o r i a l 15 Finally install the grill: Terminate the speaker cable to the binding post inserts and install like this: For a professional look we recommend terminating the cables near the receiver or amplifier with a wall plate, this : Install a single gang retrofit box: These are available at all home centers, cost about $3.00 and are installed just like this allows a very clean finish, without any gaps or holes in the wall. Your friends will think a professional did the install!
The simple install goes like your speakers: D I Y C I T u t o r i a l 15 Finally install the grill: Terminate the speaker cable to the binding post inserts and install like this: For a professional look we recommend terminating the cables near the receiver or amplifier with a wall plate, this : Install a single gang retrofit box: These are available at all home centers, cost about $3.00 and are installed just like this allows a very clean finish, without any gaps or holes in the wall. Your friends will think a professional did the install!