User Guide
Page 10
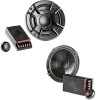
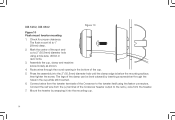
... it into the 2" (50.8mm) diameter hole until the clamp edge is 1" (26mm) deep. 2. Connect the red wire from the (+) terminal of the Crossover tweeter output to the tweeter itself using a hole saw, drill bit or razor knife. 3. DB 5252, DB 6502 Figure 10 Figure 10 Flush mount tweeter...the mounting surface, then tighten the screw. Press the assembly into the mounting cup. 14 Connect wires from the tweeter. 7. Mark the center of the Crossover to the red (+) wire from the tweeter terminals of the spot and cut a 2" (50.8mm) diameter hole using the faston connectors. Mount the tweeter...
... it into the 2" (50.8mm) diameter hole until the clamp edge is 1" (26mm) deep. 2. Connect the red wire from the (+) terminal of the Crossover tweeter output to the tweeter itself using a hole saw, drill bit or razor knife. 3. DB 5252, DB 6502 Figure 10 Figure 10 Flush mount tweeter...the mounting surface, then tighten the screw. Press the assembly into the mounting cup. 14 Connect wires from the tweeter. 7. Mark the center of the Crossover to the red (+) wire from the tweeter terminals of the spot and cut a 2" (50.8mm) diameter hole using the faston connectors. Mount the tweeter...
User Guide
Page 11
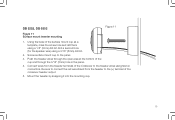
... tweeter by snapping it into the mounting cup. 19 Be sure to connect the red wire strand from the tweeter terminals of the Crossover to the (+) terminal of the crossover tweeter output. 5. Drill a second hole (for the speaker wire) using a 1/8" (3mm) drill bit. Push the tweeter wires through the 3/16" (5mm) hole...
... tweeter by snapping it into the mounting cup. 19 Be sure to connect the red wire strand from the tweeter terminals of the Crossover to the (+) terminal of the crossover tweeter output. 5. Drill a second hole (for the speaker wire) using a 1/8" (3mm) drill bit. Push the tweeter wires through the 3/16" (5mm) hole...