Vanishing Mini In-Ceiling Manual
Page 4
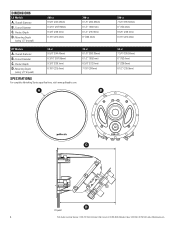
...1mm) 8 3/8" (212.7mm) 7 7/8" (200mm) A B 500-ls 7 3/4" (195.58mm) 6" (152.4mm) 9 3/8" (238.1mm) 8 7/8" (225.4mm) 50-rt 7 3/4" (195.58mm) 6" (152.4mm) 9" (228.6mm) 8 1/2" (215.9mm) C 4 D Drywall Polk Audio Customer Service: 1-800-377-7655 (Outside US & Canada: 410-358...-3600) Monday-Friday, 9:00 AM-5:30 PM EST, [email protected] Cutout Diameter C. Product Depth D. Mounting Depth (using 1/2" drywall) 900-ls 9 5/8" (244.48mm) 8 3/16" (207.95mm) 9 3/8" (238.1mm) 8 7/8" (225.4mm) 700-ls 8 1/8"...
...1mm) 8 3/8" (212.7mm) 7 7/8" (200mm) A B 500-ls 7 3/4" (195.58mm) 6" (152.4mm) 9 3/8" (238.1mm) 8 7/8" (225.4mm) 50-rt 7 3/4" (195.58mm) 6" (152.4mm) 9" (228.6mm) 8 1/2" (215.9mm) C 4 D Drywall Polk Audio Customer Service: 1-800-377-7655 (Outside US & Canada: 410-358...-3600) Monday-Friday, 9:00 AM-5:30 PM EST, [email protected] Cutout Diameter C. Product Depth D. Mounting Depth (using 1/2" drywall) 900-ls 9 5/8" (244.48mm) 8 3/16" (207.95mm) 9 3/8" (238.1mm) 8 7/8" (225.4mm) 700-ls 8 1/8"...
700LS_70RT Mounting Template
Page 1
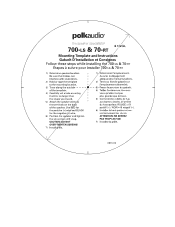
...-RT Mounting Template and Instruct ns Gabarit D'Installation et Consi nes Follow these steps while installing t 700-Ls & 70-RT Etapes a suivre pour installer 7 0-Ls & 70-RT 1) Determine speaker location. / 1) Determinez ('emplacement. OVER-TIGHTEN SCREWS! 7) Install grille. rez fermement les six vis. 6) Position the s aker and tighten ATTENTION: NE SERREZ ...
...-RT Mounting Template and Instruct ns Gabarit D'Installation et Consi nes Follow these steps while installing t 700-Ls & 70-RT Etapes a suivre pour installer 7 0-Ls & 70-RT 1) Determine speaker location. / 1) Determinez ('emplacement. OVER-TIGHTEN SCREWS! 7) Install grille. rez fermement les six vis. 6) Position the s aker and tighten ATTENTION: NE SERREZ ...