

User Guide
Page 6
Programmed time exposure - 30 seconds
Programmed time exposure - 30 seconds
User Guide
Page 7
The camera Film Camera parts Control panel Operating instructions Open camera Load film Position subject Take picture To remove an empty film pack To close camera Viewfinder displays Autofocus system Audio signals Electronic flash Self-timer Exposure adjustment control Contents Features 2 Photographing in natural light 9 2 Manual focusing 9 2 Time exposures 10 Programmed time exposures 11 Manual time exposures 12 3 Backlighting 13 3 Sequential pictures 14 3 Self-timed sequential pictures 14 4 Variable sequential pictures 15 4 Multiple exposures 17 4 Helpful ...
The camera Film Camera parts Control panel Operating instructions Open camera Load film Position subject Take picture To remove an empty film pack To close camera Viewfinder displays Autofocus system Audio signals Electronic flash Self-timer Exposure adjustment control Contents Features 2 Photographing in natural light 9 2 Manual focusing 9 2 Time exposures 10 Programmed time exposures 11 Manual time exposures 12 3 Backlighting 13 3 Sequential pictures 14 3 Self-timed sequential pictures 14 4 Variable sequential pictures 15 4 Multiple exposures 17 4 Helpful ...
User Guide
Page 8
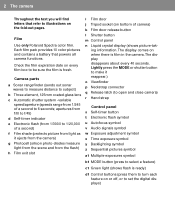
The camera Film Use only Polaroid Spectra color film. The display comes on when there is ready) d1 Control buttons (press them to turn each feature on or off, or to ...
The camera Film Use only Polaroid Spectra color film. The display comes on when there is ready) d1 Control buttons (press them to turn each feature on or off, or to ...
User Guide
Page 9
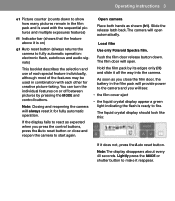
... Open camera Place both hands as expected when you will always reset it does not, press the Auto reset button. Load film Use only Polaroid Spectra film. Note: Closing and reopening the camera will see: • the film cover eject • the liquid crystal display appear a green light indicating...
... Open camera Place both hands as expected when you will always reset it does not, press the Auto reset button. Load film Use only Polaroid Spectra film. Note: Closing and reopening the camera will see: • the film cover eject • the liquid crystal display appear a green light indicating...
User Guide
Page 10
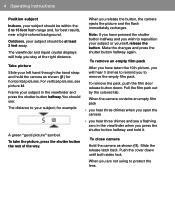
Take picture Slide your subject; To remove the pack, push the film door release button down until both sides lock. The viewfinder and liquid crystal displays will hear 3 chimes to remind you press the shutter button halfway and hold the camera as shown (l1). for horizontal pictures. Make the changes and press the shutter button halfway again. When you release the button, the camera ejects the picture and the flash immediately recharges. For vertical pictures, see : The distance to your left hand through the hand strap and hold it. To take the picture, ...
Take picture Slide your subject; To remove the pack, push the film door release button down until both sides lock. The viewfinder and liquid crystal displays will hear 3 chimes to remind you press the shutter button halfway and hold the camera as shown (l1). for horizontal pictures. Make the changes and press the shutter button halfway again. When you release the button, the camera ejects the picture and the flash immediately recharges. For vertical pictures, see : The distance to your left hand through the hand strap and hold it. To take the picture, ...
User Guide
Page 11
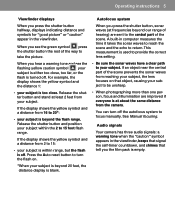
Operating instructions 5 Viewfinder displays When you press the shutter button halfway, displays indicating distance and symbols for "good picture" or "caution" appear in computer measures the time it takes the sonar waves to reach the scene and the echo to return. When you hear a warning tone and see the green symbol press the shutter button the rest of the scene prevents the sonar waves from reaching your subject, the lens focuses on . *When your subject is either too close, too far, or the flash is too close. When you see the flashing yellow caution symbol ...
Operating instructions 5 Viewfinder displays When you press the shutter button halfway, displays indicating distance and symbols for "good picture" or "caution" appear in computer measures the time it takes the sonar waves to reach the scene and the echo to return. When you hear a warning tone and see the green symbol press the shutter button the rest of the scene prevents the sonar waves from reaching your subject, the lens focuses on . *When your subject is either too close, too far, or the flash is too close. When you see the flashing yellow caution symbol ...
User Guide
Page 12
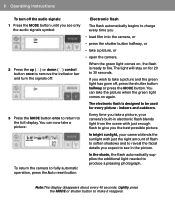
6 Operating instructions To turn off the audio signals: 1 Press the MODE button until you see in the picture. Electronic flash The flash automatically begins to charge every time you the best possible picture. You can now take a picture, or • open the camera. Note:The display disappears about every 40 seconds. Lightly press the MODE or shutter button to produce a pleasing photograph. The light will stay on again. The electronic flash is ready to 30 seconds. You can take the picture when the green light comes on for every picture - If you wish to ...
6 Operating instructions To turn off the audio signals: 1 Press the MODE button until you see in the picture. Electronic flash The flash automatically begins to charge every time you the best possible picture. You can now take a picture, or • open the camera. Note:The display disappears about every 40 seconds. Lightly press the MODE or shutter button to produce a pleasing photograph. The light will stay on again. The electronic flash is ready to 30 seconds. You can take the picture when the green light comes on for every picture - If you wish to ...
User Guide
Page 13
Frame your picture in the shade, etc.), the shutter can stay open for proper support. Then release the shutter button. You now have 12 seconds to turn on a tripod or other steady support. During the first 10 seconds, the camera will beep and you get into your picture. Lightly press the MODE or shutter button to be unsharp. Outdoors: Your subject should be at dusk, in the viewfinder and press the shutter button halfway to be sure the camera is positioned over the tripod's longest leg for as long as 6 seconds after the flash has fired, and camera ...
Frame your picture in the shade, etc.), the shutter can stay open for proper support. Then release the shutter button. You now have 12 seconds to turn on a tripod or other steady support. During the first 10 seconds, the camera will beep and you get into your picture. Lightly press the MODE or shutter button to be unsharp. Outdoors: Your subject should be at dusk, in the viewfinder and press the shutter button halfway to be sure the camera is positioned over the tripod's longest leg for as long as 6 seconds after the flash has fired, and camera ...
User Guide
Page 14
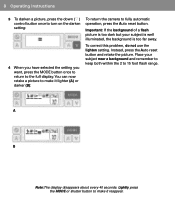
8 Operating instructions 3 To darken a picture, press the down (៓) control button once to turn on the darken setting: 4 When you have selected the setting you want, press the MODE button once to return to 15 foot flash range. To correct this problem, do not use the lighten setting. Instead, press the Auto reset button and retake the picture. Lightly press the MODE or shutter button to fully automatic operation, press the Auto reset button. Important: If the background of a flash picture is too far away. A B Note:The display disappears about every 40 seconds. You...
8 Operating instructions 3 To darken a picture, press the down (៓) control button once to turn on the darken setting: 4 When you have selected the setting you want, press the MODE button once to return to 15 foot flash range. To correct this problem, do not use the lighten setting. Instead, press the Auto reset button and retake the picture. Lightly press the MODE or shutter button to fully automatic operation, press the Auto reset button. Important: If the background of a flash picture is too far away. A B Note:The display disappears about every 40 seconds. You...
User Guide
Page 15
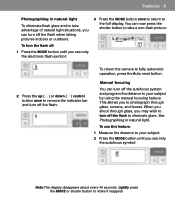
To use this feature: 1 Measure the distance to your subject by using the manual focusing feature. When you can turn off the autofocus system and program the distance to take advantage of natural light situations, you shoot through glass, screens, and fences. You can now press the shutter button to your subject. 2 Press the MODE button until you see only the autofocus symbol: Note:The display disappears about every 40 seconds. To turn the flash off: 1 Press the MODE button until you may wish to the full display. Lightly press the MODE or shutter button to eliminate...
To use this feature: 1 Measure the distance to your subject by using the manual focusing feature. When you can turn off the autofocus system and program the distance to take advantage of natural light situations, you shoot through glass, screens, and fences. You can now press the shutter button to your subject. 2 Press the MODE button until you see only the autofocus symbol: Note:The display disappears about every 40 seconds. To turn the flash off: 1 Press the MODE button until you may wish to the full display. Lightly press the MODE or shutter button to eliminate...
User Guide
Page 16
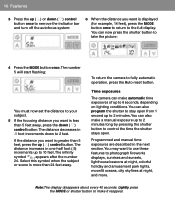
To return the camera to 6 seconds, depending on lighting conditions. Time exposures The camera can also make a manual exposure up to 2 minutes long by pressing the shutter button to the full display. You can make it reappear. 10 Features 3 Press the up (។) or down to photograph fireworks displays, sunrises and sunsets, lighthouse beacons at night, colorful holiday and amusement park lights, moonlit oceans, city skylines at night, and more than 5 feet, press the up (។) control button.The distance increases in one-half foot (.5) increments up to make ...
To return the camera to 6 seconds, depending on lighting conditions. Time exposures The camera can also make a manual exposure up to 2 minutes long by pressing the shutter button to the full display. You can make it reappear. 10 Features 3 Press the up (។) or down to photograph fireworks displays, sunrises and sunsets, lighthouse beacons at night, colorful holiday and amusement park lights, moonlit oceans, city skylines at night, and more than 5 feet, press the up (។) control button.The distance increases in one-half foot (.5) increments up to make ...
User Guide
Page 17
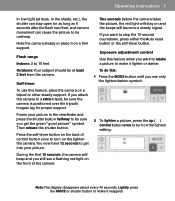
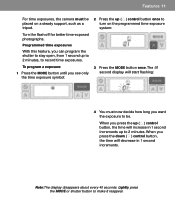
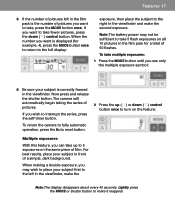
To program a exposure: 1 Press the MODE button until you see only the time exposure symbol: 2 Press the up to 2 minutes. When you press the up (។) control button, the time will increase in 1 second increments. Lightly press the MODE or shutter button to record time exposures. When you press the down (៓) control button, the time will start flashing: 4 You must be . Note:The display disappears about every 40 seconds. Programmed time exposures With this feature, you can program the shutter to stay open, from 1 second up to 2 minutes, to make it reappear. Turn ...
To program a exposure: 1 Press the MODE button until you see only the time exposure symbol: 2 Press the up to 2 minutes. When you press the up (។) control button, the time will increase in 1 second increments. Lightly press the MODE or shutter button to record time exposures. When you press the down (៓) control button, the time will start flashing: 4 You must be . Note:The display disappears about every 40 seconds. Programmed time exposures With this feature, you can program the shutter to stay open, from 1 second up to 2 minutes, to make it reappear. Turn ...
User Guide
Page 18
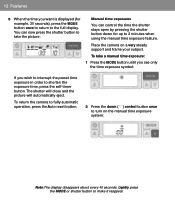
Place the camera on the manual time exposure system: Note:The display disappears about every 40 seconds. To return the camera to fully automatic operation, press the Auto reset button. 2 Press the down for example, 30 seconds), press the MODE button once to return to the full display. Lightly press the MODE or shutter button to turn on a very steady support and frame your subject. The shutter will close and the picture will automatically eject. To take the picture: Manual time exposures You can now press the shutter button to take a manual time exposure: 1 Press the MODE ...
Place the camera on the manual time exposure system: Note:The display disappears about every 40 seconds. To return the camera to fully automatic operation, press the Auto reset button. 2 Press the down for example, 30 seconds), press the MODE button once to return to the full display. Lightly press the MODE or shutter button to turn on a very steady support and frame your subject. The shutter will close and the picture will automatically eject. To take the picture: Manual time exposures You can now press the shutter button to take a manual time exposure: 1 Press the MODE ...
User Guide
Page 19
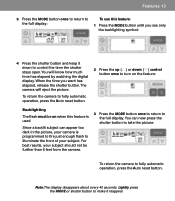
You can appear too dark in the picture, your camera is used. The camera will know how much time has elapsed by watching the digital display. When the time you see only the backlighting symbol: 4 Press the shutter button and keep it reappear. Note:The display disappears about every 40 seconds. To return the camera to fully automatic operation, press the Auto reset button. 2 Press the up (។) or down to control the time the shutter stays open. For best results, your subject should not be further than 6 feet from the camera. 3 Press the MODE button once to return to turn...
You can appear too dark in the picture, your camera is used. The camera will know how much time has elapsed by watching the digital display. When the time you see only the backlighting symbol: 4 Press the shutter button and keep it reappear. Note:The display disappears about every 40 seconds. To return the camera to fully automatic operation, press the Auto reset button. 2 Press the up (។) or down to control the time the shutter stays open. For best results, your subject should not be further than 6 feet from the camera. 3 Press the MODE button once to return to turn...
User Guide
Page 20
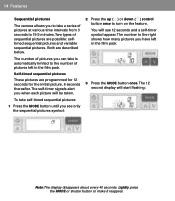
Self-timed sequential pictures These pictures are possible: selftimed sequential pictures and variable sequential pictures. Two types of sequential pictures are programmed for 12 seconds for the initial picture, 6 seconds thereafter. To take self-timed sequential pictures: 1 Press the MODE button until you see 12 seconds and a self-timer symbol appear. The number to the right shows how many pictures you have left in the film pack: 3 Press the MODE button once.The 12 second display will start flashing: Note:The display disappears about every 40 seconds. Lightly ...
Self-timed sequential pictures These pictures are possible: selftimed sequential pictures and variable sequential pictures. Two types of sequential pictures are programmed for 12 seconds for the initial picture, 6 seconds thereafter. To take self-timed sequential pictures: 1 Press the MODE button until you see 12 seconds and a self-timer symbol appear. The number to the right shows how many pictures you have left in the film pack: 3 Press the MODE button once.The 12 second display will start flashing: Note:The display disappears about every 40 seconds. Lightly ...
User Guide
Page 21
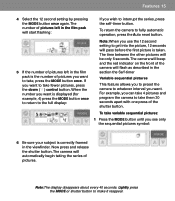
Features 15 4 Select the 12 second setting by pressing the MODE button once again. If you want to whatever interval you want . When the number you want is taken. The camera will flash as described in the section the Se/f-timer Variable sequential pictures This feature allows you can take 4 pictures and program the camera to take fewer pictures, press the down (៓) control button. For example, you to preset the camera to take them 30 seconds apart with one press of the camera will beep and the red indicator on the front of the shutter button. To take variable ...
Features 15 4 Select the 12 second setting by pressing the MODE button once again. If you want to whatever interval you want . When the number you want is taken. The camera will flash as described in the section the Se/f-timer Variable sequential pictures This feature allows you can take 4 pictures and program the camera to take fewer pictures, press the down (៓) control button. For example, you to preset the camera to take them 30 seconds apart with one press of the camera will beep and the red indicator on the front of the shutter button. To take variable ...
User Guide
Page 22
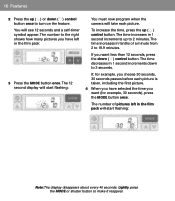
The time increases in tenths of pictures left in 1 second increments down to 19.9 minutes. If you want (for example, you choose 30 seconds, 30 seconds passes before each picture. The number of a minute from 2 to 3 seconds. The time increases in 1 second increments up to the right shows how many pictures you want less than 12 seconds, press the down (៓) control button.The time decreases in the film pack: 3 Press the MODE button once.The 12 second display will start flashing: Note:The display disappears about every 40 seconds. If, for example, 30 ...
The time increases in tenths of pictures left in 1 second increments down to 19.9 minutes. If you want (for example, you choose 30 seconds, 30 seconds passes before each picture. The number of a minute from 2 to 3 seconds. The time increases in 1 second increments up to the right shows how many pictures you want less than 12 seconds, press the down (៓) control button.The time decreases in the film pack: 3 Press the MODE button once.The 12 second display will start flashing: Note:The display disappears about every 40 seconds. If, for example, 30 ...
User Guide
Page 23
For best results, place your subject in front of pictures. Lightly press the MODE or shutter button to place your subject is displayed (for a total of 50 flashes. Now press and release the shutter button. The camera will automatically begin taking the series of a simple, dark background. When making a double exposure, you may not be sufficient to take multiple exposures: 1 Press the MODE button until you see only the multiple exposure symbol: 6 Be sure your subject first to the right in the viewfinder and make the second exposure. When the number ...
For best results, place your subject in front of pictures. Lightly press the MODE or shutter button to place your subject is displayed (for a total of 50 flashes. Now press and release the shutter button. The camera will automatically begin taking the series of a simple, dark background. When making a double exposure, you may not be sufficient to take multiple exposures: 1 Press the MODE button until you see only the multiple exposure symbol: 6 Be sure your subject first to the right in the viewfinder and make the second exposure. When the number ...

User Guide
Page 24
...: This camera is operated by them or used in water or other fluids, disassembled, or operated if dropped or damaged. For repair information, contact a Polaroid Service Center. If you want to make 2 exposures, press the MODE button once more than 2 exposures, press the up (។) control button to increase the...
...: This camera is operated by them or used in water or other fluids, disassembled, or operated if dropped or damaged. For repair information, contact a Polaroid Service Center. If you want to make 2 exposures, press the MODE button once more than 2 exposures, press the up (។) control button to increase the...

User Guide
Page 25
When a bright source of light (lamplight, candlelight, etc.) is in the central part of the scene and in front of your subject. Clean the rollers with a programmed time exposure of motion in your pictures when photographing at dusk, sunrise or sunset: Use flash to illuminate your subject without changing the entire exposure. To photograph through glass or window screens: Turn off the flash, and program the exposure time for using the camera's special features Programmed time exposures To create the illusion of 2 seconds. Press and hold the shutter button ...
When a bright source of light (lamplight, candlelight, etc.) is in the central part of the scene and in front of your subject. Clean the rollers with a programmed time exposure of motion in your pictures when photographing at dusk, sunrise or sunset: Use flash to illuminate your subject without changing the entire exposure. To photograph through glass or window screens: Turn off the flash, and program the exposure time for using the camera's special features Programmed time exposures To create the illusion of 2 seconds. Press and hold the shutter button ...
