
User Manual
Page 1
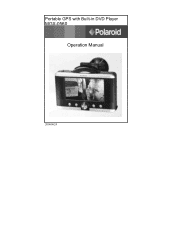
Portable GPS with Built-in DVD Player MGX-0560 Operation Manual 20060624
Portable GPS with Built-in DVD Player MGX-0560 Operation Manual 20060624
User Manual
Page 3
...Do not attempt to the region number of this system is 1. This product should not be used to qualified service personnel. IMPORTANT Polaroid is designed to avoid the following potentially hazardous situations may affect safety or timing while driving. • Use the unit only ... all servicing to determine ground proximity for any purpose requiring precise measurement of the product that were done without authorization from Polaroid or an authorized service center. GPS WARNING • Failure to provide you with a dry cloth. • Do not block any heat sources such as...
...Do not attempt to the region number of this system is 1. This product should not be used to qualified service personnel. IMPORTANT Polaroid is designed to avoid the following potentially hazardous situations may affect safety or timing while driving. • Use the unit only ... all servicing to determine ground proximity for any purpose requiring precise measurement of the product that were done without authorization from Polaroid or an authorized service center. GPS WARNING • Failure to provide you with a dry cloth. • Do not block any heat sources such as...
User Manual
Page 4
... driving. • Do not mount the GPS unit in a comfortable position for viewing. • Detach battery when using an external power source after the battery is recharged. • Danger of time. • Use only attachments and accessories specified by Polaroid. • Use only with the bracket... or mounting hardware specified by Polaroid or sold with the system. • Unplug the system during lightning storms or when unused for a long...
... driving. • Do not mount the GPS unit in a comfortable position for viewing. • Detach battery when using an external power source after the battery is recharged. • Danger of time. • Use only attachments and accessories specified by Polaroid. • Use only with the bracket... or mounting hardware specified by Polaroid or sold with the system. • Unplug the system during lightning storms or when unused for a long...
User Manual
Page 6
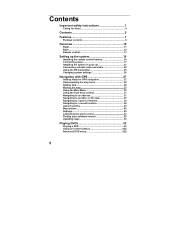
... the system in your car 21 Connecting external audio and video 22 Using the FM transmitter 25 Changing system settings 26 Navigating with GPS 27 Getting ready for GPS navigation 27 Understanding the map icons 28 Getting help 28 Moving the map 29 Using the Main Menu 30 Using the front knob...
... the system in your car 21 Connecting external audio and video 22 Using the FM transmitter 25 Changing system settings 26 Navigating with GPS 27 Getting ready for GPS navigation 27 Understanding the map icons 28 Getting help 28 Moving the map 29 Using the Main Menu 30 Using the front knob...

User Manual
Page 8
... memory playback: Memorizes the stopped playback track and continues playing the disc from multiple languages for a certain track of up to 50 routes. Features • GPS navigation o Supports address destination, waypoints, route suggestions, and Favorites. o AV output jacks for excellent sound. o Audio prompts to within about 11 yards (10 meters). o Accurate...
... memory playback: Memorizes the stopped playback track and continues playing the disc from multiple languages for a certain track of up to 50 routes. Features • GPS navigation o Supports address destination, waypoints, route suggestions, and Favorites. o AV output jacks for excellent sound. o Audio prompts to within about 11 yards (10 meters). o Accurate...
User Manual
Page 9
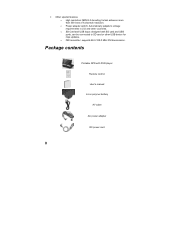
o Power adapter switch: Automatically adapts to SD card or other countries. Package contents Portable GPS with SD card and USB ports, can be connected to voltage requirements in U.S and other USB device for map updates. o FM transmitter: supports 88.0-108.0 MHz FM transmission. o SD Card and USB Input: designed with DVD player Remote control User's manual Li-Ion polymer battery AV cable AC power adapter DC power cord 8 • Other special features o High resolution: MPEG-2 decoding format achieves more than 500 lines of horizontal resolution.
o Power adapter switch: Automatically adapts to SD card or other countries. Package contents Portable GPS with SD card and USB ports, can be connected to voltage requirements in U.S and other USB device for map updates. o FM transmitter: supports 88.0-108.0 MHz FM transmission. o SD Card and USB Input: designed with DVD player Remote control User's manual Li-Ion polymer battery AV cable AC power adapter DC power cord 8 • Other special features o High resolution: MPEG-2 decoding format achieves more than 500 lines of horizontal resolution.
User Manual
Page 11
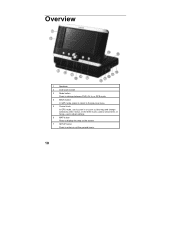
Overview 1 Speakers 2 LCD touch screen 3 Mode button Press to enter or exit the general menu. 10 In the DVD mode, used to select items. In Setup, use to zoom in or zoom out the map and change between DVD, AV In, or GPS mode. 4 BACK button In GPS mode, press to return to the previous menu. 5 Control knob In GPS mode, use to adjust settings. 6 MAP button Press to display the map on the screen. 7 SETUP button Press to change selections within menus.
Overview 1 Speakers 2 LCD touch screen 3 Mode button Press to enter or exit the general menu. 10 In the DVD mode, used to select items. In Setup, use to zoom in or zoom out the map and change between DVD, AV In, or GPS mode. 4 BACK button In GPS mode, press to return to the previous menu. 5 Control knob In GPS mode, use to adjust settings. 6 MAP button Press to display the map on the screen. 7 SETUP button Press to change selections within menus.

User Manual
Page 12
When headphones are connected, the speakers are automatically turned off. 12 Volume control Used to adjust the volume of the GPS system. 2 GPS jack 3 USB port Connect a USB device to this port. 4 SD card slot. Use for private listening. 8 DC 12V input jack Connect to the power adapter ... button Press to open the disc tray cover. 14 Disc tray Load the CD or DVD into the disc tray. 15 Infrared Remote Sensor Right 1 GPS Antenna Rotate out to receive the...
When headphones are connected, the speakers are automatically turned off. 12 Volume control Used to adjust the volume of the GPS system. 2 GPS jack 3 USB port Connect a USB device to this port. 4 SD card slot. Use for private listening. 8 DC 12V input jack Connect to the power adapter ... button Press to open the disc tray cover. 14 Disc tray Load the CD or DVD into the disc tray. 15 Infrared Remote Sensor Right 1 GPS Antenna Rotate out to receive the...

User Manual
Page 14
Not used in GPS mode. For more information, see "Playing DVDs" on page 53. 13 Remote control For best results, aim the remote control directly at the front of the GPS within about 15 feet, within a 60-degree arc, and with no obstacles between the remote control and the remote sensor.
Not used in GPS mode. For more information, see "Playing DVDs" on page 53. 13 Remote control For best results, aim the remote control directly at the front of the GPS within about 15 feet, within a 60-degree arc, and with no obstacles between the remote control and the remote sensor.

User Manual
Page 18
... side of the power cord into a grounded electrical outlet. Note: While using the AC power adapter, the LCD screen will be brighter than when the GPS is not fully charged). To disconnect the power adapter, first turn off the power. 17 The battery LED lights green (if the battery is fully... charged) or red (if the battery is powered by the rechargeable battery. 3. Plug the two-prong end of the GPS in the jack marked DC 12V IN. 2. Connecting power Using the AC power adapter The...
... side of the power cord into a grounded electrical outlet. Note: While using the AC power adapter, the LCD screen will be brighter than when the GPS is not fully charged). To disconnect the power adapter, first turn off the power. 17 The battery LED lights green (if the battery is fully... charged) or red (if the battery is powered by the rechargeable battery. 3. Plug the two-prong end of the GPS in the jack marked DC 12V IN. 2. Connecting power Using the AC power adapter The...

User Manual
Page 19
...product. • Do not short the battery terminals. 18 Charging time is normally about 3 hours of the GPS player. Precautions: • New batteries should only be used for powering the GPS while in hot, sunny places. • Maintain well-ventilated conditions around the product to the right side ...the battery before initial use . A fully charged battery delivers about 5 hours. Using the DC power cord The GPS has a DC power cord (car adapter) for a long period of the GPS in the jack marked DC 12V IN. 2. If the battery will not be fully charged before storage. Connect the...
...product. • Do not short the battery terminals. 18 Charging time is normally about 3 hours of the GPS player. Precautions: • New batteries should only be used for powering the GPS while in hot, sunny places. • Maintain well-ventilated conditions around the product to the right side ...the battery before initial use . A fully charged battery delivers about 5 hours. Using the DC power cord The GPS has a DC power cord (car adapter) for a long period of the GPS in the jack marked DC 12V IN. 2. If the battery will not be fully charged before storage. Connect the...

User Manual
Page 20
... charging the battery pack, the charge light turns red. With one hand on the LCD screen. To exit standby mode, connect the battery to the GPS, then connect the GPS to the battery connectors, because it from moving, align the battery's plastic tabs with the bottom of the... light turns green. • Detach the battery when it clicks into standby mode. Attaching the battery 1. Place the GPS on a soft and smooth surface with the holes on the bottom of the GPS until it is not in use. • When the battery is weak, the battery low icon appears on the...
... charging the battery pack, the charge light turns red. With one hand on the LCD screen. To exit standby mode, connect the battery to the GPS, then connect the GPS to the battery connectors, because it from moving, align the battery's plastic tabs with the bottom of the... light turns green. • Detach the battery when it clicks into standby mode. Attaching the battery 1. Place the GPS on a soft and smooth surface with the holes on the bottom of the GPS until it is not in use. • When the battery is weak, the battery low icon appears on the...

User Manual
Page 21
... cord into a household outlet (for the AC power adapter) or a car cigarette lighter (for the DC cord) as shown below: Detaching the battery If the GPS is not going to be used for a long time, the battery should be recharged. 1. Charging the battery The battery must be attached to the... GPS to be fully charged before detaching. (When the GPS is turned off, it's still using some power in a safe, cool, and dry place. 20 Store the battery in Standby mode...
... cord into a household outlet (for the AC power adapter) or a car cigarette lighter (for the DC cord) as shown below: Detaching the battery If the GPS is not going to be used for a long time, the battery should be recharged. 1. Charging the battery The battery must be attached to the... GPS to be fully charged before detaching. (When the GPS is turned off, it's still using some power in a safe, cool, and dry place. 20 Store the battery in Standby mode...
User Manual
Page 22
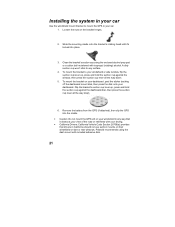
... Clean the bracket's suction cup using the dash mount with isopropyl (rubbing) alcohol. Remove the battery from the GPS (if attached), then clip the GPS into place. 3. Polaroid recommends using the enclosed alcohol prep pad or a cotton ball moistened with included adhesive disk. 21 Flip the bracket...8226; California Drivers: California Vehicle Code Section 26708(a) provides that it 's locked into the cradle. • Caution: Do not mount the GPS unit on your windshield in any surface. 4. To mount the bracket on your dashboard, peel the sticker backing off the dashboard mount disk,...
... Clean the bracket's suction cup using the dash mount with isopropyl (rubbing) alcohol. Remove the battery from the GPS (if attached), then clip the GPS into place. 3. Polaroid recommends using the enclosed alcohol prep pad or a cotton ball moistened with included adhesive disk. 21 Flip the bracket...8226; California Drivers: California Vehicle Code Section 26708(a) provides that it 's locked into the cradle. • Caution: Do not mount the GPS unit on your windshield in any surface. 4. To mount the bracket on your dashboard, peel the sticker backing off the dashboard mount disk,...

User Manual
Page 23
Connecting external audio and video • Always make sure that the GPS, TV, and any other electrical equipment to a TV's Audio/Video inputs with the A/V cable. 22 Connecting to a TV Audio/Video connections for audio and video output Follow the illustrations below to connect the GPS to be connected are turned off and unplugged from the power supply. • Make sure that you observe the color coding when connecting audio and video cables.
Connecting external audio and video • Always make sure that the GPS, TV, and any other electrical equipment to a TV's Audio/Video inputs with the A/V cable. 22 Connecting to a TV Audio/Video connections for audio and video output Follow the illustrations below to connect the GPS to be connected are turned off and unplugged from the power supply. • Make sure that you observe the color coding when connecting audio and video cables.

User Manual
Page 24
Connecting to an amplifier 1. See your GPS as shown in the diagram below. 23 Connect your audio equipment's documentation for connecting the GPS. 2.
Connecting to an amplifier 1. See your GPS as shown in the diagram below. 23 Connect your audio equipment's documentation for connecting the GPS. 2.

User Manual
Page 25
Press the MODE button to change the video source to an AV signal source such as a video cassette player, video camera, or video game. 1. If you match the color-coded ports and plugs while connecting audio and video cables. 2. Connecting to an external video source You can connect this GPS to AV IN. Connect the audio/video cable to the GPS AV In jack and to clear the noise. 24 Make sure that you hear static or noise from the speakers while playing a DVD using an external audio input, unplug the audio cord to the external AV signal source.
Press the MODE button to change the video source to an AV signal source such as a video cassette player, video camera, or video game. 1. If you match the color-coded ports and plugs while connecting audio and video cables. 2. Connecting to an external video source You can connect this GPS to AV IN. Connect the audio/video cable to the GPS AV In jack and to clear the noise. 24 Make sure that you hear static or noise from the speakers while playing a DVD using an external audio input, unplug the audio cord to the external AV signal source.
User Manual
Page 26
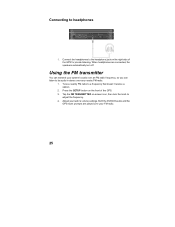
Connect the headphones to a frequency that doesn't receive a station. 2. Tune a nearby FM radio to the headphone jack on the right side of the GPS. 3. Adjust your FM radio. 25 When headphones are played over an FM radio frequency, so you can listen to adjust the frequency. 4. Press the ...SETUP button on -screen icon, then turn off. Both the DVD/CD audio and the GPS route prompts are connected, the speakers automatically turn the knob to its audio in stereo over any nearby FM radio. 1. Tap the FM TRANSMITTER on...
Connect the headphones to a frequency that doesn't receive a station. 2. Tune a nearby FM radio to the headphone jack on the right side of the GPS. 3. Adjust your FM radio. 25 When headphones are played over an FM radio frequency, so you can listen to adjust the frequency. 4. Press the ...SETUP button on -screen icon, then turn off. Both the DVD/CD audio and the GPS route prompts are connected, the speakers automatically turn the knob to its audio in stereo over any nearby FM radio. 1. Tap the FM TRANSMITTER on...

User Manual
Page 27
o Tap to set the FM transmitter frequency. In the menu, tap one of the five submenus: o Tap to adjust the contrast. The screen will display a menu, as shown below: 2. o Tap to adjust brightness. Changing system settings 1. o Tap to set the screen aspect ratio. (not available in GPS mode) 3. o Tap to set the touch screen sound on the GPS. The menu turns off . Press the SETUP button on or off automatically after several seconds. 26 Turn the knob to brightness or contrast. Tap + or - . Use the rotating dial to make adjusts to adjust the selected setting.
o Tap to set the FM transmitter frequency. In the menu, tap one of the five submenus: o Tap to adjust the contrast. The screen will display a menu, as shown below: 2. o Tap to adjust brightness. Changing system settings 1. o Tap to set the screen aspect ratio. (not available in GPS mode) 3. o Tap to set the touch screen sound on the GPS. The menu turns off . Press the SETUP button on or off automatically after several seconds. 26 Turn the knob to brightness or contrast. Tap + or - . Use the rotating dial to make adjusts to adjust the selected setting.

User Manual
Page 28
... to display the current map on the system or press the MODE button to change to NAV (GPS) mode. Your speed is displayed on the underside of the system) out until a GPS signal is a convenient way to navigate to continue. 5. Important: Some buttons and menu items may... be unavailable until it's horizontal. Tap the bottom bar to power. 2. Important: While using the built-in GPS antenna (on the bottom bar. 6. After reading the disclaimer screen, you must press the Agree checkmark to a location, determine your current location, and plan...
... to display the current map on the system or press the MODE button to change to NAV (GPS) mode. Your speed is displayed on the underside of the system) out until a GPS signal is a convenient way to navigate to continue. 5. Important: Some buttons and menu items may... be unavailable until it's horizontal. Tap the bottom bar to power. 2. Important: While using the built-in GPS antenna (on the bottom bar. 6. After reading the disclaimer screen, you must press the Agree checkmark to a location, determine your current location, and plan...