
User Guide
Page 1
User's Guide SCPH-90002 SCPH-90003 Before using this product, carefully read the supplied documentation. 02/03-UG1
User's Guide SCPH-90002 SCPH-90003 Before using this product, carefully read the supplied documentation. 02/03-UG1
User Guide
Page 2
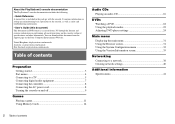
...playstation.com/manuals Australia: au.playstation.com/manuals New Zealand: nz.playstation.com/manuals Table of contents Preparation Getting started 3 Part names 4 Connecting to a TV 5 Connecting digital audio equipment 7 Connecting the controller 8 Connecting the AC power cord 8 Turning the console on and off 9 Games Playing a game...contains information on performing advanced operations on the console, technical specifications and other information. About the PlayStation®2 console documentation The PlayStation®2 console documentation includes the following: • Quick ...
...playstation.com/manuals Australia: au.playstation.com/manuals New Zealand: nz.playstation.com/manuals Table of contents Preparation Getting started 3 Part names 4 Connecting to a TV 5 Connecting digital audio equipment 7 Connecting the controller 8 Connecting the AC power cord 8 Turning the console on and off 9 Games Playing a game...contains information on performing advanced operations on the console, technical specifications and other information. About the PlayStation®2 console documentation The PlayStation®2 console documentation includes the following: • Quick ...
User Guide
Page 3
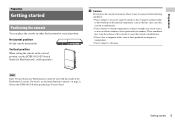
...locations where it may warp the exterior of the PlayStation®2 console. Preparation Preparation Getting started 3 Cigarette smoke residue or dust build-up on the internal components, such as the lens, may cause the console to malfunction. • Places subject to extreme temperatures... MEMORY CARD Vertical position When setting the console in either the horizontal or vertical position. Getting started Positioning the console You can place the console in the vertical position, use the SCPH-90110 E Vertical Stand (for PlayStation®2) cannot be exposed to the following...
...locations where it may warp the exterior of the PlayStation®2 console. Preparation Preparation Getting started 3 Cigarette smoke residue or dust build-up on the internal components, such as the lens, may cause the console to malfunction. • Places subject to extreme temperatures... MEMORY CARD Vertical position When setting the console in either the horizontal or vertical position. Getting started Positioning the console You can place the console in the vertical position, use the SCPH-90110 E Vertical Stand (for PlayStation®2) cannot be exposed to the following...
User Guide
Page 4
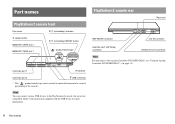
...®2)" ( page 13). 4 Part names Refer to the instructions supplied with the USB device for more information. PlayStation®2 console rear Rear vent NETWORK connector ~AC IN connector DIGITAL OUT (OPTICAL) connector AV MULTI OUT connector Hint For part names of ...the console. Part names PlayStation®2 console front Disc cover ]/1 (on/standby) indicator A (open) button MEMORY CARD slot 2 MEMORY CARD slot 1 ]/1 (on/standby)/RESET button...
...®2)" ( page 13). 4 Part names Refer to the instructions supplied with the USB device for more information. PlayStation®2 console rear Rear vent NETWORK connector ~AC IN connector DIGITAL OUT (OPTICAL) connector AV MULTI OUT connector Hint For part names of ...the console. Part names PlayStation®2 console front Disc cover ]/1 (on/standby) indicator A (open) button MEMORY CARD slot 2 MEMORY CARD slot 1 ]/1 (on/standby)/RESET button...
User Guide
Page 5
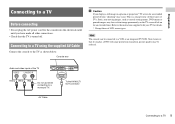
... turned off. Note, however, that the TV is a characteristic of these types of LCD screen types Hint The console can be reduced. Console rear Caution If you display a still image on for the console into the electrical outlet until you have made all other connections. • Check that if you play a DVD with... screen if left on a plasma or projection* TV screen for details. * Except those of TVs. Connecting to a TV using the supplied AV Cable Connect the console to a TV 5 AV Cable To the AV MULTI OUT connector Connecting to the TV as...
... turned off. Note, however, that the TV is a characteristic of these types of LCD screen types Hint The console can be reduced. Console rear Caution If you display a still image on for the console into the electrical outlet until you have made all other connections. • Check that if you play a DVD with... screen if left on a plasma or projection* TV screen for details. * Except those of TVs. Connecting to a TV using the supplied AV Cable Connect the console to a TV 5 AV Cable To the AV MULTI OUT connector Connecting to the TV as...
User Guide
Page 6
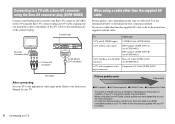
... depending on your TV's AV connection. If you match the colour-coded plugs of the AV Cable to the matching jacks of the connector plug. Console rear Euro-AV connector plug To Euro-AV connector To AV MULTI OUT connector AV Cable After connecting Set your TV to determine the best...-AV Cable, picture quality may be different. Connecting to a TV with a Euro-AV connector using the Euro-AV connector plug (SCPH-90003) Connect your PlayStation®2 console to the Euro-AV connector (SCART) on the TV using the Euro-AV connector plug and AV Cable, making sure you use a cable other than...
... depending on your TV's AV connection. If you match the colour-coded plugs of the AV Cable to the matching jacks of the connector plug. Console rear Euro-AV connector plug To Euro-AV connector To AV MULTI OUT connector AV Cable After connecting Set your TV to determine the best...-AV Cable, picture quality may be different. Connecting to a TV with a Euro-AV connector using the Euro-AV connector plug (SCPH-90003) Connect your PlayStation®2 console to the Euro-AV connector (SCART) on the TV using the Euro-AV connector plug and AV Cable, making sure you use a cable other than...
User Guide
Page 7
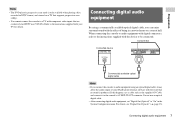
... or a concert hall. Connecting digital audio equipment 7 Console rear Connected device DIGITAL IN OPTICAL Commercially available optical digital cable Hints • If you can enjoy surround sound with the effect of some PlayStation®2 format software with the result that are exclusively ...for details. Connecting digital audio equipment By using a commercially available optical digital cable, you connect the console to audio equipment using an optical digital cable...
... or a concert hall. Connecting digital audio equipment 7 Console rear Connected device DIGITAL IN OPTICAL Commercially available optical digital cable Hints • If you can enjoy surround sound with the effect of some PlayStation®2 format software with the result that are exclusively ...for details. Connecting digital audio equipment By using a commercially available optical digital cable, you connect the console to audio equipment using an optical digital cable...
User Guide
Page 8
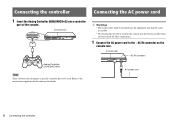
... accessible. • Do not plug the AC power cord for details. Refer to the instructions supplied with the software for the console into a controller port of the console. MEMORY CARD Console front MEMORY CARD MEMORY CARD Warnings • The socket-outlet shall be installed near the equipment and shall be used. Connecting the...
... accessible. • Do not plug the AC power cord for details. Refer to the instructions supplied with the software for the console into a controller port of the console. MEMORY CARD Console front MEMORY CARD MEMORY CARD Warnings • The socket-outlet shall be installed near the equipment and shall be used. Connecting the...
User Guide
Page 9
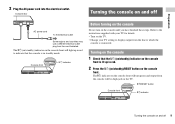
... with your TV setting to which the console is in red. 2 Press the =/1 (on/standby)/RESET button on the console front will be displayed on the TV. =/1/RESET button Console front MEMORY CARD MEMORY CARD =/1 indicator Turning the console on the console until you have finished these steps. Console front MEMORY CARD MEMORY CARD ]/1 indicator Before...
... with your TV setting to which the console is in red. 2 Press the =/1 (on/standby)/RESET button on the console front will be displayed on the TV. =/1/RESET button Console front MEMORY CARD MEMORY CARD =/1 indicator Turning the console on the console until you have finished these steps. Console front MEMORY CARD MEMORY CARD ]/1 indicator Before...
User Guide
Page 10
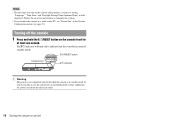
... for setting "Language", "Time Zone" and "Daylight Savings Time (Summer Time)" will turn red to indicate that the console has entered standby mode. =/1/RESET button Console front MEMORY CARD MEMORY CARD =/1 indicator Warning The power is in the System Configuration menu ( page 33). Follow the on-screen instructions ...8226; If you turn on and off Hints • The first time you connect the console to a wide-screen TV, set "Screen Size" in standby mode. If you do not plan to use the console for an extended period of time, unplug the AC power cord from the electrical outlet. ...
... for setting "Language", "Time Zone" and "Daylight Savings Time (Summer Time)" will turn red to indicate that the console has entered standby mode. =/1/RESET button Console front MEMORY CARD MEMORY CARD =/1 indicator Warning The power is in the System Configuration menu ( page 33). Follow the on-screen instructions ...8226; If you turn on and off Hints • The first time you connect the console to a wide-screen TV, set "Screen Size" in standby mode. If you do not plan to use the console for an extended period of time, unplug the AC power cord from the electrical outlet. ...
User Guide
Page 11
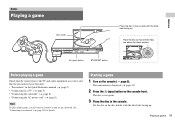
... the AC power cord" ( page 8) Hint To play online games, you first need to connect to a network" ( page 38) for details. See "Connecting to and set up . Playing a game 11 Starting a game 1 Turn on the console front. Games Games Playing a game Disc cover MEMORY CARD MEMORY CARD A (open ) button on... the console ( page 9). Place the disc so that all three tabs are correct and that...
... the AC power cord" ( page 8) Hint To play online games, you first need to connect to a network" ( page 38) for details. See "Connecting to and set up . Playing a game 11 Starting a game 1 Turn on the console front. Games Games Playing a game Disc cover MEMORY CARD MEMORY CARD A (open ) button on... the console ( page 9). Place the disc so that all three tabs are correct and that...
User Guide
Page 12
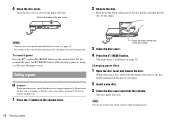
...and then lift the disc by the edges. 2 Insert a new disc. 3 Close the disc cover and reset the console. To reset a game Press the \/1 (on/standby)/RESET button on the console front. 4 Close the disc cover. Press the black centre part of the disc cover. 2 Remove the disc. The... ( page 31). Do not accidentally press the @/1/RESET button while playing a game, as doing so will start a game from the Browser screen ( page 31). • If you turn off the console when changing games. 12 Playing a game When removing a disc, hold down the black centre part of the disc holder...
...and then lift the disc by the edges. 2 Insert a new disc. 3 Close the disc cover and reset the console. To reset a game Press the \/1 (on/standby)/RESET button on the console front. 4 Close the disc cover. Press the black centre part of the disc cover. 2 Remove the disc. The... ( page 31). Do not accidentally press the @/1/RESET button while playing a game, as doing so will start a game from the Browser screen ( page 31). • If you turn off the console when changing games. 12 Playing a game When removing a disc, hold down the black centre part of the disc holder...

User Guide
Page 13
... to the appropriate mode for the START, SELECT, L3 and R3 buttons. • When playing a PlayStation® format software title, only the left and right analog sticks, or the L3 and R3 buttons... ON or OFF in digital mode, the left and right analog sticks once with the console turned on the software, the buttons for details. Do not twist the analog sticks, ... are pressed. Note, however, that some software titles make this adjustment automatically. Playing a game 13 Part names SELECT button L2 button L1 button Directional buttons Mode indicator ANALOG mode button START...
... to the appropriate mode for the START, SELECT, L3 and R3 buttons. • When playing a PlayStation® format software title, only the left and right analog sticks, or the L3 and R3 buttons... ON or OFF in digital mode, the left and right analog sticks once with the console turned on the software, the buttons for details. Do not twist the analog sticks, ... are pressed. Note, however, that some software titles make this adjustment automatically. Playing a game 13 Part names SELECT button L2 button L1 button Directional buttons Mode indicator ANALOG mode button START...
User Guide
Page 14
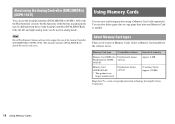
...delete game data or copy game data from those of copyright protection technology developed by Sony Corporation. 14 Using Memory Cards Hint Not all PlayStation®2 format software titles support the use the Analog Controller (DUALSHOCK®) (SCPH-110 E) with the PlayStation®2 console, ...but the functions of the buttons in analog mode. About using a Memory Card (sold separately). Select a Memory Card suitable for PlayStation®2 format PlayStation®2) (SCPH- About Memory Card types There ...
...delete game data or copy game data from those of copyright protection technology developed by Sony Corporation. 14 Using Memory Cards Hint Not all PlayStation®2 format software titles support the use the Analog Controller (DUALSHOCK®) (SCPH-110 E) with the PlayStation®2 console, ...but the functions of the buttons in analog mode. About using a Memory Card (sold separately). Select a Memory Card suitable for PlayStation®2 format PlayStation®2) (SCPH- About Memory Card types There ...
User Guide
Page 15
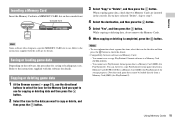
...copying or deleting is completed, press the button. You cannot save PlayStation® format game data to a Memory Card (8MB) (for storage purposes. Saving or loading game data Depending on the console front. Copying or deleting game data 1 At the Browser screen ( page 31), use the directional...want to use . Hints • To view information about a game data item, select the icon for details. You can, however, copy PlayStation® format game data from a Memory Card (8MB) (for details. Console front MEMORY CARD MEMORY CARD MEMORY CARD Hint Some software titles designate ...
...copying or deleting is completed, press the button. You cannot save PlayStation® format game data to a Memory Card (8MB) (for storage purposes. Saving or loading game data Depending on the console front. Copying or deleting game data 1 At the Browser screen ( page 31), use the directional...want to use . Hints • To view information about a game data item, select the icon for details. You can, however, copy PlayStation® format game data from a Memory Card (8MB) (for details. Console front MEMORY CARD MEMORY CARD MEMORY CARD Hint Some software titles designate ...
User Guide
Page 16
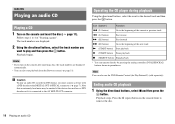
...the button. page 11). 2 Using the directional buttons, select the track number you turn on the console front to the beginning of "Starting a game". Press the A (open) button on the console after inserting a disc, the track numbers are displayed. Hint You can also start playback from the ...to remove the disc. 16 Playing an audio CD Operating the CD player during playback Using the directional buttons, select the icon for PlayStation®2) (sold separately). Hints • If you want to the AV MULTI OUT connector. Playback stops. Playback begins. Caution To...
...the button. page 11). 2 Using the directional buttons, select the track number you turn on the console front to the beginning of "Starting a game". Press the A (open) button on the console after inserting a disc, the track numbers are displayed. Hint You can also start playback from the ...to remove the disc. 16 Playing an audio CD Operating the CD player during playback Using the directional buttons, select the icon for PlayStation®2) (sold separately). Hints • If you want to the AV MULTI OUT connector. Playback stops. Playback begins. Caution To...
User Guide
Page 17
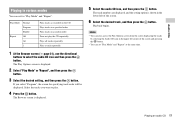
If you want to play the CD repeatedly Plays all tracks repeatedly Plays a track repeatedly 1 At the Browser screen ( page 31), use the directional buttons to select the audio CD icon and then press the button. The track numbers are displayed, and the setting option is displayed. 5 Select the audio CD icon, and then press the button. Select the tracks you select "Program", the screen for "Play Mode" and "Repeat". Playback begins. Audio CDs Playing in the upper left of the screen and pressing the button. • You can set "Play Mode" and "Repeat" at the same time. ...
If you want to play the CD repeatedly Plays all tracks repeatedly Plays a track repeatedly 1 At the Browser screen ( page 31), use the directional buttons to select the audio CD icon and then press the button. The track numbers are displayed, and the setting option is displayed. 5 Select the audio CD icon, and then press the button. Select the tracks you select "Program", the screen for "Play Mode" and "Repeat". Playback begins. Audio CDs Playing in the upper left of the screen and pressing the button. • You can set "Play Mode" and "Repeat" at the same time. ...
User Guide
Page 18
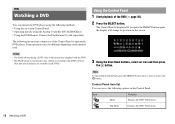
...depending on -screen Control Panel • Operating directly using the Analog Controller (DUALSHOCK®2) • Using the DVD Remote Control (for PlayStation®2) (sold separately) The following instructions assume use of the DVD ( page 20). 2 Press the SELECT button. Icon Function Menu ...displayed. Using the Control Panel 1 Start playback of the Control Panel to the instructions supplied with the DVD. • The PlayStation®2 console plays disc content as recorded in the Control Panel. Control Panel item list You can operate the DVD player using the following ...
...depending on -screen Control Panel • Operating directly using the Analog Controller (DUALSHOCK®2) • Using the DVD Remote Control (for PlayStation®2) (sold separately) The following instructions assume use of the DVD ( page 20). 2 Press the SELECT button. Icon Function Menu ...displayed. Using the Control Panel 1 Start playback of the Control Panel to the instructions supplied with the DVD. • The PlayStation®2 console plays disc content as recorded in the Control Panel. Control Panel item list You can operate the DVD player using the following ...
User Guide
Page 19
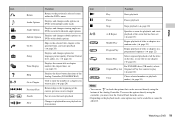
DVDs Icon O 0~9 ./> / / Return Audio Options Angle Options Subtitle Options Go To Setup Time Display Help Go to Chapter Previous/Next Function Returns to the previously selected screen within the DVD's menu Displays and changes audio options on DVDs with multiple audio tracks Displays and changes viewing angles on DVDs recorded with multi-angle options Displays and changes subtitle options on DVDs with subtitle options Skips to the selected title, chapter or the specified time, and starts playback ( page 20) Displays and changes options for playback, and starts playback of the scene that...
DVDs Icon O 0~9 ./> / / Return Audio Options Angle Options Subtitle Options Go To Setup Time Display Help Go to Chapter Previous/Next Function Returns to the previously selected screen within the DVD's menu Displays and changes audio options on DVDs with multiple audio tracks Displays and changes viewing angles on DVDs recorded with multi-angle options Displays and changes subtitle options on DVDs with subtitle options Skips to the selected title, chapter or the specified time, and starts playback ( page 20) Displays and changes options for playback, and starts playback of the scene that...

User Guide
Page 20
...the Control Panel ( page 18) and then press the button. 2 Select N, and then press the button. Hints • If you turn on the console front, and then remove the disc. Playback begins from the last stopping point (Resume Play) 1 During playback, select x in the Control Panel ( page... by chapter number 1 During playback, select the desired chapter number in the Control Panel ( page 18) and then press the button. Playback of "Starting a game". Follow steps 1 to play a chapter with a single digit number (i.e. 1-9), enter a leading zero. To clear Resume Play After step 1, select x and ...
...the Control Panel ( page 18) and then press the button. 2 Select N, and then press the button. Hints • If you turn on the console front, and then remove the disc. Playback begins from the last stopping point (Resume Play) 1 During playback, select x in the Control Panel ( page... by chapter number 1 During playback, select the desired chapter number in the Control Panel ( page 18) and then press the button. Playback of "Starting a game". Follow steps 1 to play a chapter with a single digit number (i.e. 1-9), enter a leading zero. To clear Resume Play After step 1, select x and ...