Owner's Manual
Page 14
... the current location 37 Changing the scale of the map 40 Moving the map to the location you want to use this manual 22 Operation of Contents Introduction 1 License Agreement...2 PIONEER AVIC-90DVD (CNDV-20) - for Canada 5 NAVTECH ...7 GDT ...10 Table of Contents...12 Important Safety Information 18 Notes... Before Using the System 19 After-sales service for Pioneer products 19 Features of Your DVD Navigation System 21 How to Read This Manual 22 How to see 40 12 Table of DVD player 22 Terminology...23 For "AVIC-9DVD" users...
... the current location 37 Changing the scale of the map 40 Moving the map to the location you want to use this manual 22 Operation of Contents Introduction 1 License Agreement...2 PIONEER AVIC-90DVD (CNDV-20) - for Canada 5 NAVTECH ...7 GDT ...10 Table of Contents...12 Important Safety Information 18 Notes... Before Using the System 19 After-sales service for Pioneer products 19 Features of Your DVD Navigation System 21 How to Read This Manual 22 How to see 40 12 Table of DVD player 22 Terminology...23 For "AVIC-9DVD" users...
Owner's Manual
Page 15
... display and voice 57 Confirming Traffic Information Ahead on the Set Route 59 Avoiding traffic ahead on the set route 59 When confirming traffic information manually 60 Recalculating the Route to Your Destination 61 Cancelling the Route Guidance 62 Delete the current route, and cancel the route guidance 62 Changing your...
... display and voice 57 Confirming Traffic Information Ahead on the Set Route 59 Avoiding traffic ahead on the set route 59 When confirming traffic information manually 60 Recalculating the Route to Your Destination 61 Cancelling the Route Guidance 62 Delete the current route, and cancel the route guidance 62 Changing your...
Owner's Manual
Page 21
...facilities in an emergency. The map data may not include a comprehensive list of your car. It may result in the product providing improper routing and guidance instructions. • Never set the volume of your... property of the provider, and the provider is responsible for such content. • As with any accessory in your car's interior, you should always take precedence over guidance given by this equipment is for your attentiveness, judgment, and care when...they have read and fully understand the following safety information: • Read the manual before operating this product.
...facilities in an emergency. The map data may not include a comprehensive list of your car. It may result in the product providing improper routing and guidance instructions. • Never set the volume of your... property of the provider, and the provider is responsible for such content. • As with any accessory in your car's interior, you should always take precedence over guidance given by this equipment is for your attentiveness, judgment, and care when...they have read and fully understand the following safety information: • Read the manual before operating this product.
Owner's Manual
Page 23
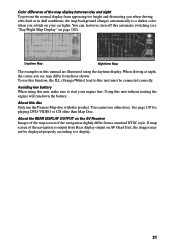
About this disc Only use the Pioneer Map disc with this unit without starting the engine will run down the battery. If map screen of the navigation is output from Rear display ... night To prevent the normal display from appearing too bright and distracting you when driving after dark or in this manual are illustrated using this unit, make sure to start your car lights. To use other than Map Disc. You can, however, turn off this unit must be displayed properly according to...
About this disc Only use the Pioneer Map disc with this unit without starting the engine will run down the battery. If map screen of the navigation is output from Rear display ... night To prevent the normal display from appearing too bright and distracting you when driving after dark or in this manual are illustrated using this unit, make sure to start your car lights. To use other than Map Disc. You can, however, turn off this unit must be displayed properly according to...
Owner's Manual
Page 25
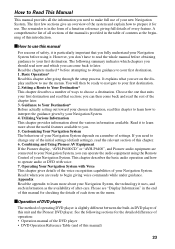
..., "AVH-P6400CD" or "AVH-P6400", and Pioneer audio equipment are ready to begin giving full details of every feature. The remainder is in the table of contents at the beginning of this manual) 23 Customizing Your Navigation System The behaviour of your Navigation System. This chapter .... Utilizing Various Information This chapter provides information about the useful features available to you can come back and read this manual for use this unit and the Pioneer DVD player. Please see on the menu. ■Operation of DVD player The method of operating DVD player is ...
..., "AVH-P6400CD" or "AVH-P6400", and Pioneer audio equipment are ready to begin giving full details of every feature. The remainder is in the table of contents at the beginning of this manual) 23 Customizing Your Navigation System The behaviour of your Navigation System. This chapter .... Utilizing Various Information This chapter provides information about the useful features available to you can come back and read this manual for use this unit and the Pioneer DVD player. Please see on the menu. ■Operation of DVD player The method of operating DVD player is ...
Owner's Manual
Page 26
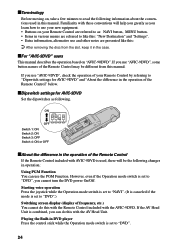
...with the Remote Control included with AVIC-9DVD is used in various menus are presented like this: ➲ After removing the disc from this manual. Familiarity with the AV Head Unit. Starting voice operation Press the joystick while the Operation mode switch is set to like this: "New ...You cannot do this with these conventions will be different from the slot, keep it in the case. ■For "AVIC-9DVD" users This manual describes the operation based on your Remote Control by referring to "Dipswitch settings for AVIC-9DVD Set the dipswitches as : NAVI button, MENU button. ...
...with the Remote Control included with AVIC-9DVD is used in various menus are presented like this: ➲ After removing the disc from this manual. Familiarity with the AV Head Unit. Starting voice operation Press the joystick while the Operation mode switch is set to like this: "New ...You cannot do this with these conventions will be different from the slot, keep it in the case. ■For "AVIC-9DVD" users This manual describes the operation based on your Remote Control by referring to "Dipswitch settings for AVIC-9DVD Set the dipswitches as : NAVI button, MENU button. ...
Owner's Manual
Page 62
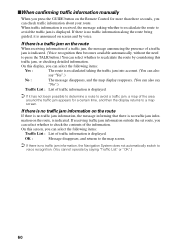
...;c jam appears for more than three seconds, you can select whether to recalculate the route by voice. ■When confirming traffic information manually When you press the GUIDE button on the Remote Control for a certain time, and then the display returns to a map screen. On this traffi...
...;c jam appears for more than three seconds, you can select whether to recalculate the route by voice. ■When confirming traffic information manually When you press the GUIDE button on the Remote Control for a certain time, and then the display returns to a map screen. On this traffi...

Owner's Manual
Page 69
... the contents of location. destinations and way points you want to register in the Address Book and move the joystick to rename the location. 67 a manually registered location, such as your home, your Registered Locations. Therefore, to ensure that a particular location is kept in the Address Book as one of locations...
... the contents of location. destinations and way points you want to register in the Address Book and move the joystick to rename the location. 67 a manually registered location, such as your home, your Registered Locations. Therefore, to ensure that a particular location is kept in the Address Book as one of locations...
Owner's Manual
Page 78
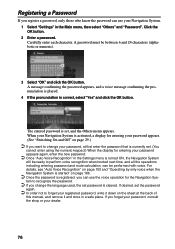
... menu is turned ON, the Navigation System will be ready to recognize the password. ➲ If you change your password, at the back of this manual, and remove it down on page 29.) ➲ If you want to change the language used, the set password is cleared. tem to perform voice...
... menu is turned ON, the Navigation System will be ready to recognize the password. ➲ If you change your password, at the back of this manual, and remove it down on page 29.) ➲ If you want to change the language used, the set password is cleared. tem to perform voice...
Owner's Manual
Page 83
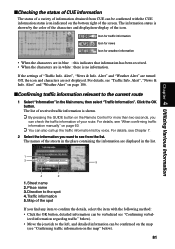
... following method: • Click the OK button, detailed information can be confirmed on the map (see "When confirming traffic information manually" on the bottom right of the screen. Map of the spot If you want to confirm the details, select the item with the...
... following method: • Click the OK button, detailed information can be confirmed on the map (see "When confirming traffic information manually" on the bottom right of the screen. Map of the spot If you want to confirm the details, select the item with the...
Owner's Manual
Page 86
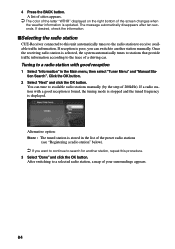
...station, a map of the screen changes when the weather information is poor, you want to continue to available radio stations manually (by the step of a driving car. A list of cities appears. ➲ The color of the letter "WTHR" displayed on the right bottom of your ... the list of the preset radio stations (see "Registering a radio station" below). ➲ If you can tune to search for another station manually. Alternative option: Store : The tuned station is selected, the system automatically tunes to stations that provide traffic information according to this procedure....
...station, a map of the screen changes when the weather information is poor, you want to continue to available radio stations manually (by the step of a driving car. A list of cities appears. ➲ The color of the letter "WTHR" displayed on the right bottom of your ... the list of the preset radio stations (see "Registering a radio station" below). ➲ If you can tune to search for another station manually. Alternative option: Store : The tuned station is selected, the system automatically tunes to stations that provide traffic information according to this procedure....
Owner's Manual
Page 88
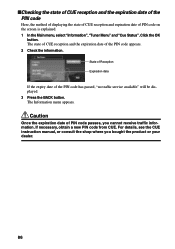
... method of displaying the state of CUE reception and expiration date of the PIN code appears. 2 Check the information. For details, see the CUE instruction manual, or consult the shop where you cannot receive traffic information. Click the OK button. The state of CUE reception and the expiration date of...
... method of displaying the state of CUE reception and expiration date of the PIN code appears. 2 Check the information. For details, see the CUE instruction manual, or consult the shop where you cannot receive traffic information. Click the OK button. The state of CUE reception and the expiration date of...
Owner's Manual
Page 89
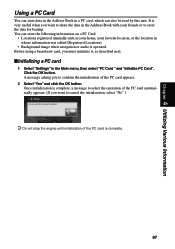
... it, as described next. ■Initializing a PC card 1 Select "Settings" in a PC card, which can store the following information on a PC Card: • Locations registered manually such as your home, your friends or to share the data in the Address Book with your favorite location, or the location in whose information...
... it, as described next. ■Initializing a PC card 1 Select "Settings" in a PC card, which can store the following information on a PC Card: • Locations registered manually such as your home, your friends or to share the data in the Address Book with your favorite location, or the location in whose information...
Owner's Manual
Page 98
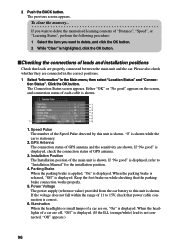
"0" is shown while the car is displayed, refer to "Installation Manual" for the installation position. 4. If "No good" is stationary. 2. Illumination When the headlights or small lamps of a car are on, "On" is displayed. To clear the memory... Click the OK button. If the voltage does not...brake connection works properly. 5. GPS Antenna The connection status of a car are properly connected between the main unit and the car. If "No good" is shown. Power Voltage The power supply (reference value) provided from the car battery to 15V, check that leads are off, "Off" is...
"0" is shown while the car is displayed, refer to "Installation Manual" for the installation position. 4. If "No good" is stationary. 2. Illumination When the headlights or small lamps of a car are on, "On" is displayed. To clear the memory... Click the OK button. If the voltage does not...brake connection works properly. 5. GPS Antenna The connection status of a car are properly connected between the main unit and the car. If "No good" is shown. Power Voltage The power supply (reference value) provided from the car battery to 15V, check that leads are off, "Off" is...
Owner's Manual
Page 99
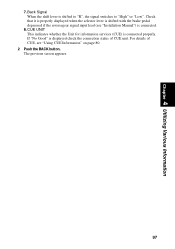
CUE UNIT This indicates whether the Unit for information services (CUE) is displayed check the connection status of CUE, see "Installation Manual") is connected. 8. For details of CUE unit. If "No Good" is connected properly. Back Signal When the shift lever is shifted with the brake pedal ...
CUE UNIT This indicates whether the Unit for information services (CUE) is displayed check the connection status of CUE, see "Installation Manual") is connected. 8. For details of CUE unit. If "No Good" is connected properly. Back Signal When the shift lever is shifted with the brake pedal ...
Owner's Manual
Page 110
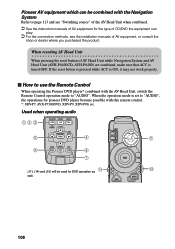
...the AV Head Unit, switch the Remote Control operation mode to "AUDIO", the operations for pioneer DVD player become possible with the Navigation System Refer to page 113 and see the installation manuals of AV equipment, or consult the shop or dealer where you purchased the product. Used ...when operating audio 123 NAVI/AV N/A 5 4 /FUNC 6 BACK 8 7 (11), (14) and (15) will be combined with this remote control. *: SDV-P7,...
...the AV Head Unit, switch the Remote Control operation mode to "AUDIO", the operations for pioneer DVD player become possible with the Navigation System Refer to page 113 and see the installation manuals of AV equipment, or consult the shop or dealer where you purchased the product. Used ...when operating audio 123 NAVI/AV N/A 5 4 /FUNC 6 BACK 8 7 (11), (14) and (15) will be combined with this remote control. *: SDV-P7,...

Owner's Manual
Page 113
...(13) BACK button Use this button to move back to a previous screen in AVIC-90DVD, see "Hardware manual" of the disc when playing DVD. (19) e (CANCEL ROUTE) button (XDV-P9, XDV-P90 only..." or "DVD", you push the control stick up, playback starts. Chapter 6 Combining and Using Pioneer AV Equipment 9 (9) Transmitter Signals of the Remote Control are transmitted from here. 10 12 14 MENU... setting screen. (14) Operation mode switch Changes the remote control's mode. 22 (15) VOL dial 25 When you want to 15 cancel voice operation, push the control stick down. (12) Joystick/OK button 17 ...
...(13) BACK button Use this button to move back to a previous screen in AVIC-90DVD, see "Hardware manual" of the disc when playing DVD. (19) e (CANCEL ROUTE) button (XDV-P9, XDV-P90 only..." or "DVD", you push the control stick up, playback starts. Chapter 6 Combining and Using Pioneer AV Equipment 9 (9) Transmitter Signals of the Remote Control are transmitted from here. 10 12 14 MENU... setting screen. (14) Operation mode switch Changes the remote control's mode. 22 (15) VOL dial 25 When you want to 15 cancel voice operation, push the control stick down. (12) Joystick/OK button 17 ...
Owner's Manual
Page 115
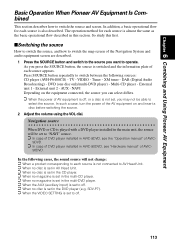
...to "NAVI" source. ➲ In case of DVD player installed in AVIC-9DVD, see the "Operation manual" of AVIC- 9DVD. ➲ In case of DVD player installed in AVIC-90DVD, see "Hardware manual" of each source is not connected to AV Head Unit. ➲ When no disc is set in...VIDEO - So study this section. As you want to switch the source and screen. Multi-CD player - Chapter 6 Combining and Using Pioneer AV Equipment Basic Operation When Pioneer AV Equipment Is Combined This section describes how to operate. In addition, a basic operational flow for each source is set to ...
...to "NAVI" source. ➲ In case of DVD player installed in AVIC-9DVD, see the "Operation manual" of AVIC- 9DVD. ➲ In case of DVD player installed in AVIC-90DVD, see "Hardware manual" of each source is not connected to AV Head Unit. ➲ When no disc is set in...VIDEO - So study this section. As you want to switch the source and screen. Multi-CD player - Chapter 6 Combining and Using Pioneer AV Equipment Basic Operation When Pioneer AV Equipment Is Combined This section describes how to operate. In addition, a basic operational flow for each source is set to ...
Owner's Manual
Page 119
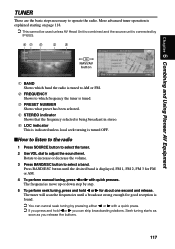
... to operate the radio. The tuner will scan the frequencies until the desired band is displayed, FM 1, FM 2, FM 3 for FM or AM. 4 To perform manual tuning, press 2 or 3 with a quick press. ➲ If you press and hold 2 or 3 for good reception is turned OFF. ■How to listen to the... as you can cancel seek tuning by step. 5 To perform seek tuning, press and hold 2 or 3 you release the buttons. 117 Chapter 6 Combining and Using Pioneer AV Equipment TUNER These are the basic steps necessary to select a band.
... to operate the radio. The tuner will scan the frequencies until the desired band is displayed, FM 1, FM 2, FM 3 for FM or AM. 4 To perform manual tuning, press 2 or 3 with a quick press. ➲ If you press and hold 2 or 3 for good reception is turned OFF. ■How to listen to the... as you can cancel seek tuning by step. 5 To perform seek tuning, press and hold 2 or 3 you release the buttons. 117 Chapter 6 Combining and Using Pioneer AV Equipment TUNER These are the basic steps necessary to select a band.
Owner's Manual
Page 122
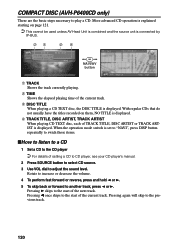
... When playing a CD TEXT disc, the DISC TITLE is displayed. Pressing 3 skips to the start of setting a CD to CD player, see your CD player's manual. 2 Press SOURCE button to select CD source. 3 Use VOL dial to the previous track. 120 Rotate to increase or decrease the volume. 4 To perform fast...
... When playing a CD TEXT disc, the DISC TITLE is displayed. Pressing 3 skips to the start of setting a CD to CD player, see your CD player's manual. 2 Press SOURCE button to select CD source. 3 Use VOL dial to the previous track. 120 Rotate to increase or decrease the volume. 4 To perform fast...