Owner's Manual
Page 1
Digital cordless surround headphone Casque d'écoute numérique ambiophonique sans fil Auricular Surround Digital Sin Cordón Operating Instructions Mode d'emploi Manual de instrucciones
Digital cordless surround headphone Casque d'écoute numérique ambiophonique sans fil Auricular Surround Digital Sin Cordón Operating Instructions Mode d'emploi Manual de instrucciones

Owner's Manual
Page 6
... you start Features 7 What's in the box 8 Controls and displays 9 Transmitter (top 9 Transmitter (front 10 Transmitter (rear 11 Headphones 12 02 Getting started Loading the batteries 13 Charging the batteries 13 Notes on battery charging 14 Setting up 15 Connecting up 17 Connecting ... to digital sources 17 Connecting the transmitter to analog sources 18 Plugging in 19 03 Operation Using the system 20 Dolby Headphone 22 Dolby Pro Logic II 22 Listening with additional headphones ...... 23 04 Additional information Troubleshooting 24 Precautions 26 Specifications 27 6 En
... you start Features 7 What's in the box 8 Controls and displays 9 Transmitter (top 9 Transmitter (front 10 Transmitter (rear 11 Headphones 12 02 Getting started Loading the batteries 13 Charging the batteries 13 Notes on battery charging 14 Setting up 15 Connecting up 17 Connecting ... to digital sources 17 Connecting the transmitter to analog sources 18 Plugging in 19 03 Operation Using the system 20 Dolby Headphone 22 Dolby Pro Logic II 22 Listening with additional headphones ...... 23 04 Additional information Troubleshooting 24 Precautions 26 Specifications 27 6 En

Owner's Manual
Page 7
...DVD, TV, VCR, game console and PC. ! Dolby Headphone technology allows you start Features High performance and quality ! Easy to power the headphones. ! Operation is maintained. ! 40mm driver units in the headphones deliver dynamic sound. * Manufactured under license from any kind ... D/A conversion and digital processing ensures sound quality is simplified with jersey cover. 7 En Large volume control knob on the headphones makes for corded headphones. ! Rechargeable nickel-metal hydride batteries (included) or dry-cell batteries (sold separately) can be used to use ! Before...
...DVD, TV, VCR, game console and PC. ! Dolby Headphone technology allows you start Features High performance and quality ! Easy to power the headphones. ! Operation is maintained. ! 40mm driver units in the headphones deliver dynamic sound. * Manufactured under license from any kind ... D/A conversion and digital processing ensures sound quality is simplified with jersey cover. 7 En Large volume control knob on the headphones makes for corded headphones. ! Rechargeable nickel-metal hydride batteries (included) or dry-cell batteries (sold separately) can be used to use ! Before...

Owner's Manual
Page 8
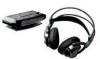
01 Before you start What's in the box Check that all of the components and accessories are included before setting up the system. Transmitter Headphones Vertical stand AC power adaptor Rechargeable nickel-metal hydride batteries (2) Coaxial digital cable Operating instructions and Warranty card 8 En
01 Before you start What's in the box Check that all of the components and accessories are included before setting up the system. Transmitter Headphones Vertical stand AC power adaptor Rechargeable nickel-metal hydride batteries (2) Coaxial digital cable Operating instructions and Warranty card 8 En

Owner's Manual
Page 9
... in standby. The indicator is unlit when the transmitter is on. 3 CHARGE indicator Lights when the rechargeable batteries are fully charged. 4 DOLBY HEADPHONE button Press to select the Dolby Headphone mode (DH1 / DH2 / DH3 / OFF). 5 DOLBY PRO LOGIC II button Press to select the Dolby Pro Logic II mode (AUTO / MOVIE / MUSIC... / OFF). 6 INPUT button Press to select the source input (DIGITAL 1 / DIGITAL 2 / ANALOG). 7 VOLUME control Use to adjust volume level of headphones (sold separately) connected to recharge the supplied rechargeable batteries. 9 En
... in standby. The indicator is unlit when the transmitter is on. 3 CHARGE indicator Lights when the rechargeable batteries are fully charged. 4 DOLBY HEADPHONE button Press to select the Dolby Headphone mode (DH1 / DH2 / DH3 / OFF). 5 DOLBY PRO LOGIC II button Press to select the Dolby Pro Logic II mode (AUTO / MOVIE / MUSIC... / OFF). 6 INPUT button Press to select the source input (DIGITAL 1 / DIGITAL 2 / ANALOG). 7 VOLUME control Use to adjust volume level of headphones (sold separately) connected to recharge the supplied rechargeable batteries. 9 En

Owner's Manual
Page 10
...Use for the current source: 2D: Dolby Digital 2PL II: Dolby Pro Logic II decoding of the unit. DTS: DTS 3 DOLBY HEADPHONE mode indicators Light to show the Dolby Headphone mode (DH1 / DH2 / DH3). 4 DOLBY PRO LOGIC II mode indicators Light to show the Dolby Pro Logic II mode (...AUTO / MOVIE / MUSIC). 5 INPUT mode indicators The corresponding indicator lights up to indicate the automatic decoding mode for connecting corded headphones. 10 En 01 Before you start Transmitter (front) 1 Infrared transmitters Infrared transmitters are located on either side of analog or digital source.
...Use for the current source: 2D: Dolby Digital 2PL II: Dolby Pro Logic II decoding of the unit. DTS: DTS 3 DOLBY HEADPHONE mode indicators Light to show the Dolby Headphone mode (DH1 / DH2 / DH3). 4 DOLBY PRO LOGIC II mode indicators Light to show the Dolby Pro Logic II mode (...AUTO / MOVIE / MUSIC). 5 INPUT mode indicators The corresponding indicator lights up to indicate the automatic decoding mode for connecting corded headphones. 10 En 01 Before you start Transmitter (front) 1 Infrared transmitters Infrared transmitters are located on either side of analog or digital source.
Owner's Manual
Page 12
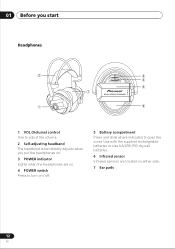
Use with the supplied rechargeable batteries or size AA/LR6 (R6) dry-cell batteries. 6 Infrared sensor Infrared sensors are on. 4 POWER switch Press to open the cover. 01 Before you start Headphones 1 VOL (Volume) control Use to adjust the volume. 2 Self-adjusting headband The headband automatically adjusts when you put the headphones on. 3 POWER indicator Lights when the headphones are located on / off. 5 Battery compartment Press and slide where indicated to turn on either side. 7 Ear pads 12 En
Use with the supplied rechargeable batteries or size AA/LR6 (R6) dry-cell batteries. 6 Infrared sensor Infrared sensors are on. 4 POWER switch Press to open the cover. 01 Before you start Headphones 1 VOL (Volume) control Use to adjust the volume. 2 Self-adjusting headband The headband automatically adjusts when you put the headphones on. 3 POWER indicator Lights when the headphones are located on / off. 5 Battery compartment Press and slide where indicated to turn on either side. 7 Ear pads 12 En

Owner's Manual
Page 13
...batteries Replace the batteries when the POWER indicator on the top of the same kind. Usage time may vary according to power the headphones. About batteries Use the supplied rechargeable batteries or size AA/LR6 (R6) dry-cell batteries to the temperature and other conditions. ... rechargeable batteries, see Charging the batteries below. Note ! Plug the adaptor into the wall outlet. 2 Open the battery compartment on the headphones no longer lights and there is as follows: Supplied rechargeable batteries (fully-charged Approx. 16 hours Size AA/LR6 alkaline batteries Approx. 27...
...batteries Replace the batteries when the POWER indicator on the top of the same kind. Usage time may vary according to power the headphones. About batteries Use the supplied rechargeable batteries or size AA/LR6 (R6) dry-cell batteries to the temperature and other conditions. ... rechargeable batteries, see Charging the batteries below. Note ! Plug the adaptor into the wall outlet. 2 Open the battery compartment on the headphones no longer lights and there is as follows: Supplied rechargeable batteries (fully-charged Approx. 16 hours Size AA/LR6 alkaline batteries Approx. 27...

Owner's Manual
Page 14
...! If the charging indicator light switches off once the batteries are insufficiently charged, the POWER indicator does not light and the headphones will not charge. When the batteries are fully charged. The rechargeable batteries take about 10 hours to 35 degrees celcius. ! ...rechargeable batteries and dry-cell batteries cannot be charged. ! Using other conditions. Rechargeable batteries should be ordered from your nearest Pioneer service center. The charging indicator will go off five seconds after recharging. Batteries are already fully charged. ! Only the ...
...! If the charging indicator light switches off once the batteries are insufficiently charged, the POWER indicator does not light and the headphones will not charge. When the batteries are fully charged. The rechargeable batteries take about 10 hours to 35 degrees celcius. ! ...rechargeable batteries and dry-cell batteries cannot be charged. ! Using other conditions. Rechargeable batteries should be ordered from your nearest Pioneer service center. The charging indicator will go off five seconds after recharging. Batteries are already fully charged. ! Only the ...

Owner's Manual
Page 15
Approx. 3m Approx. 8m Transmitter Approx. 3m Infrared signals 15 En When the headphones are out of range they will automatically mute. Set up The diagram below shows the approximate infrared transmission area from the transmitter. Getting started 02 English Setting up the transmitter so that your listening position falls within this range, with no obstacles between the transmitter and headphones.
Approx. 3m Approx. 8m Transmitter Approx. 3m Infrared signals 15 En When the headphones are out of range they will automatically mute. Set up The diagram below shows the approximate infrared transmission area from the transmitter. Getting started 02 English Setting up the transmitter so that your listening position falls within this range, with no obstacles between the transmitter and headphones.

Owner's Manual
Page 16
... two screws to fix the transmitter to the stand. 16 En Set the transmitter in a location where there are no obstructions between the transmitter and headphones when used. !
... two screws to fix the transmitter to the stand. 16 En Set the transmitter in a location where there are no obstructions between the transmitter and headphones when used. !

Owner's Manual
Page 18
Note that has only a mini jack headphone output, such as a personal CD player, use a commercially available stereo mini plug to RCA/pin plug x 2 cable. Be sure to 0dB if the volume is ...
Note that has only a mini jack headphone output, such as a personal CD player, use a commercially available stereo mini plug to RCA/pin plug x 2 cable. Be sure to 0dB if the volume is ...
Owner's Manual
Page 20
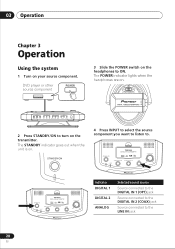
The POWER indicator lights when the headphones are on. 2 Press STANDBY/ON to turn on . 4 Press INPUT to select the source component you want to listen to. The STANDBY indicator goes out ... En DVD player or other source component 3 Slide the POWER switch on your source component. 03 Operation Chapter 3 Operation Using the system 1 Turn on the headphones to ON.
The POWER indicator lights when the headphones are on. 2 Press STANDBY/ON to turn on . 4 Press INPUT to select the source component you want to listen to. The STANDBY indicator goes out ... En DVD player or other source component 3 Slide the POWER switch on your source component. 03 Operation Chapter 3 Operation Using the system 1 Turn on the headphones to ON.

Owner's Manual
Page 21
...! Press repeatedly to on the source. 5 Start playback of you through headphones. Stereo source DH mode Dolby Headphone playback, for surround sound. Dolby Pro Logic II DH mode Dolby Headphone playback, for stereo sources, with Dolby Pro Logic II decoding for stereo ...setting creates 5.1 channel (front left/right, center, surround left /right and subwoofer) playback through headphones. Indicator Output mode (Surround effect) Multi-channel source DH mode Dolby Headphone playback for multichannel Dolby Digital or DTS sources. This setting recreates 5.1 channel (front left/right,...
...! Press repeatedly to on the source. 5 Start playback of you through headphones. Stereo source DH mode Dolby Headphone playback, for surround sound. Dolby Pro Logic II DH mode Dolby Headphone playback, for stereo sources, with Dolby Pro Logic II decoding for stereo ...setting creates 5.1 channel (front left/right, center, surround left /right and subwoofer) playback through headphones. Indicator Output mode (Surround effect) Multi-channel source DH mode Dolby Headphone playback for multichannel Dolby Digital or DTS sources. This setting recreates 5.1 channel (front left/right,...

Owner's Manual
Page 22
...impact on sound quality and creates a very natural surround sound effect. 22 En Dolby Headphone allows you in front of multichannel sources). About Dolby Headphone effects Music and movie soundtracks through headphones more natural for the listener. Dolby Pro Logic II Dolby Pro Logic II is achieved.... Surround sound from stereo sources is a decoding technology for playing two-channel sources in a room, thereby making the sound through headphones can choose between three room types: DH1: Mixing room with both multichannel sources, such as Dolby Digital and DTS DVDs, and stereo sources...
...impact on sound quality and creates a very natural surround sound effect. 22 En Dolby Headphone allows you in front of multichannel sources). About Dolby Headphone effects Music and movie soundtracks through headphones more natural for the listener. Dolby Pro Logic II Dolby Pro Logic II is achieved.... Surround sound from stereo sources is a decoding technology for playing two-channel sources in a room, thereby making the sound through headphones can choose between three room types: DH1: Mixing room with both multichannel sources, such as Dolby Digital and DTS DVDs, and stereo sources...

Owner's Manual
Page 23
MOVIE mode is close in quality to discrete 5.1 channel surround. Your headphones Note ! MOVIE This mode is suitable for all music sources and reproduces the sound field of a listening room with Dolby Surround. The effect is selected ... II surround effects AUTO (default setting) This mode automatically selects the MOVIE or MUSIC mode according to enjoy the surround sound experience. Listening with additional headphones Connect your wired headphones to the PHONES jack to the input source. When unplugging headphones from the PHONES jack, pull out the plug holding the plug body.
MOVIE mode is close in quality to discrete 5.1 channel surround. Your headphones Note ! MOVIE This mode is suitable for all music sources and reproduces the sound field of a listening room with Dolby Surround. The effect is selected ... II surround effects AUTO (default setting) This mode automatically selects the MOVIE or MUSIC mode according to enjoy the surround sound experience. Listening with additional headphones Connect your wired headphones to the PHONES jack to the input source. When unplugging headphones from the PHONES jack, pull out the plug holding the plug body.

Owner's Manual
Page 24
... the AC power adaptor and the wall outlet. ! The headphones are trying to analog. 04 Additional information Chapter 4 Additional information Troubleshooting If you run into any problem persist, consult your nearest Pioneer service center or your hands and hair do not cover the... infrared sensor on the headphones. ! Sound intermittent. ! Check the connection between the system and the AV components. ...
... the AC power adaptor and the wall outlet. ! The headphones are trying to analog. 04 Additional information Chapter 4 Additional information Troubleshooting If you run into any problem persist, consult your nearest Pioneer service center or your hands and hair do not cover the... infrared sensor on the headphones. ! Sound intermittent. ! Check the connection between the system and the AV components. ...

Owner's Manual
Page 25
...Symptom Cause and remedy DIGITAL input Indicator flashing. ! Quiet sound. ! If you connected your source component to this system from the headphone output, lower the volume level of the connected source component for DTS compatibility. effect is non-stereo Dolby Digital encoded. ! The ...sources. 2Dindicator does not light up. ! The source is not DTS encoded. ! If this system from the headphone output, raise the volume level of your nearest Pioneer service center. 25 En This system supports 44.1kHz and 48kHz digital audio. Distorted sound (or noise). ! Set...
...Symptom Cause and remedy DIGITAL input Indicator flashing. ! Quiet sound. ! If you connected your source component to this system from the headphone output, lower the volume level of the connected source component for DTS compatibility. effect is non-stereo Dolby Digital encoded. ! The ...sources. 2Dindicator does not light up. ! The source is not DTS encoded. ! If this system from the headphone output, raise the volume level of your nearest Pioneer service center. 25 En This system supports 44.1kHz and 48kHz digital audio. Distorted sound (or noise). ! Set...

Owner's Manual
Page 26
... information Precautions Listening at high volume Listening to take both the headphones and transmitter. 26 En When taking the system to Pioneer service center, be careful not to direct sunlight, in hearing damage. Please be sure to headphones at high volume for an extended period can result in a ...car with the product, or if a foreign object gets inside the unit, immediately turn off the power and consult your nearest Pioneer service center. ! Ear pads The color of ...
... information Precautions Listening at high volume Listening to take both the headphones and transmitter. 26 En When taking the system to Pioneer service center, be careful not to direct sunlight, in hearing damage. Please be sure to headphones at high volume for an extended period can result in a ...car with the product, or if a foreign object gets inside the unit, immediately turn off the power and consult your nearest Pioneer service center. ! Ear pads The color of ...

Owner's Manual
Page 27
... system DQPSK Secondary carrier wave frequency... 3.75MHz Transmission distance Approx. 8m to change without notice. Copyright © 2004 Pioneer Corporation. Approx. 250g (excluding batteries) Accessories AC power adaptor (9V 800mA 1 Rechargeable nickel-metal hydride battery (size AA...Power source DC 9V ........ (from the supplied AC power adaptor) Dimensions....... 209 (W) x 50 (H) x 104 (D) mm Mass Approx. 520g Headphones SE-DHP800 Playback frequency range......... 12Hz - 22kHz Power source DC 2.4V (supplied rechargeable battery x 2 DC 3V (size AA/LR6 (R6) dry cell battery x...
... system DQPSK Secondary carrier wave frequency... 3.75MHz Transmission distance Approx. 8m to change without notice. Copyright © 2004 Pioneer Corporation. Approx. 250g (excluding batteries) Accessories AC power adaptor (9V 800mA 1 Rechargeable nickel-metal hydride battery (size AA...Power source DC 9V ........ (from the supplied AC power adaptor) Dimensions....... 209 (W) x 50 (H) x 104 (D) mm Mass Approx. 520g Headphones SE-DHP800 Playback frequency range......... 12Hz - 22kHz Power source DC 2.4V (supplied rechargeable battery x 2 DC 3V (size AA/LR6 (R6) dry cell battery x...


