Operating Instructions
Page 5
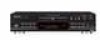
... Before You Start Automatically recording and finalizing a disc 21 Feature of the PDR-609 CD recorder 6 Manual recording 22 Checking what's in the box 6 Setting the digital recording level 23 Using this manual 6 Setting the analog recording level 24 Hints on installation 6 Setting the ...compatible components 10 Setting the fade length 34 Connecting up for analog playback & recording 11 Recording a fade in 34 Connecting other Pioneer Î components 11 Recording a fade out 34 3 Controls and Displays Recording blank sections 35 Front panel 12 Checking what's...
... Before You Start Automatically recording and finalizing a disc 21 Feature of the PDR-609 CD recorder 6 Manual recording 22 Checking what's in the box 6 Setting the digital recording level 23 Using this manual 6 Setting the analog recording level 24 Hints on installation 6 Setting the ...compatible components 10 Setting the fade length 34 Connecting up for analog playback & recording 11 Recording a fade in 34 Connecting other Pioneer Î components 11 Recording a fade out 34 3 Controls and Displays Recording blank sections 35 Front panel 12 Checking what's...
Operating Instructions
Page 6
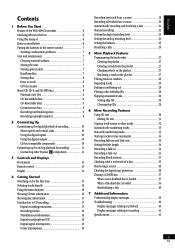
...as you may experience on an unstable surface, or one that came with the analog line inputs, suitable for the PDR-609 CD Recorder. The final part of the manual provides reference information $ Use near radiators and other place where the player will which starts here, shows you start ... your stereo system that you can make them the edge in an excessively dusty or damp environment. Using this instruction manual. second takes you to enjoy using the PDR-609 for years to come, so please bear in mind the following supplied accessories with the rest of your stereo system....
...as you may experience on an unstable surface, or one that came with the analog line inputs, suitable for the PDR-609 CD Recorder. The final part of the manual provides reference information $ Use near radiators and other place where the player will which starts here, shows you start ... your stereo system that you can make them the edge in an excessively dusty or damp environment. Using this instruction manual. second takes you to enjoy using the PDR-609 for years to come, so please bear in mind the following supplied accessories with the rest of your stereo system....
Operating Instructions
Page 11
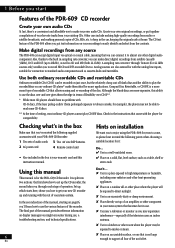
... with your amplifier/receiver. Note: Make sure that they are switched off and disconnected from any other for a replacement. Check the instruction manual that came with your amplifier or receiver for analog playback & recording Before you start, make sure that came with other object on ..... Never make recordings from the wall outlet. Check the power cord once in the cord or tie it damaged, ask your nearest Pioneer authorized service center or your amplifier/receiver using its remote as this could cause a short circuit or electric shock. Next, connect this...
... with your amplifier/receiver. Note: Make sure that they are switched off and disconnected from any other for a replacement. Check the instruction manual that came with your amplifier or receiver for analog playback & recording Before you start, make sure that came with other object on ..... Never make recordings from the wall outlet. Check the power cord once in the cord or tie it damaged, ask your nearest Pioneer authorized service center or your amplifier/receiver using its remote as this could cause a short circuit or electric shock. Next, connect this...
Operating Instructions
Page 12
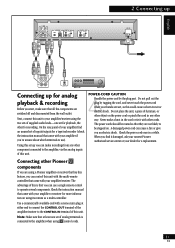
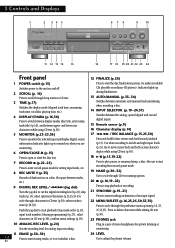
WRITE AUTO MANUAL MONITOR INPUT SELECTOR COMPACT DISC DIGITAL RECORDER 6 78 9 10 DIGITAL REC LEVEL ANALOG REC LEVEL ANALOG L ...artist name, track title) (p.16), and between upper- Plug in CD text (p.30); input track numbers (during finalization. 13 AUTO/MANUAL (p.33-34) Switches between automatic and manual track numbering when recording a disc. 14 INPUT SELECTOR (p.19-24,37) Switches between tracks, etc.) 9 DIGITAL REC LEVEL / ... recording on ordinary CD players). 3 Controls and Displays 1 2 34 5 ◊ÛB->?/ SCROLL ERASE TIME FINALIZE AUTO MANUAL TRACK NO.
WRITE AUTO MANUAL MONITOR INPUT SELECTOR COMPACT DISC DIGITAL RECORDER 6 78 9 10 DIGITAL REC LEVEL ANALOG REC LEVEL ANALOG L ...artist name, track title) (p.16), and between upper- Plug in CD text (p.30); input track numbers (during finalization. 13 AUTO/MANUAL (p.33-34) Switches between automatic and manual track numbering when recording a disc. 14 INPUT SELECTOR (p.19-24,37) Switches between tracks, etc.) 9 DIGITAL REC LEVEL / ... recording on ordinary CD players). 3 Controls and Displays 1 2 34 5 ◊ÛB->?/ SCROLL ERASE TIME FINALIZE AUTO MANUAL TRACK NO.
Operating Instructions
Page 13
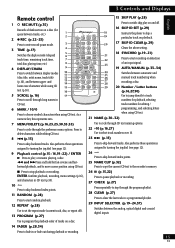
... fast-reverse and fast- 25 NAME CLIP (p.32) forward playback, and to move cursor position using CD 15 text (p.30). 16 AUTO/ • REC SYNCHRO MANUAL TIME DISPLAY /CHARA 1 GHI 4 ABC 2 JKL 5 SCROLL MENU/ DELETE PQRS 7 MARK 10/0 TUV 8 >10 4 CURSOR 3 DEF 3 MNO 6 WXYZ 9 NAME ¢ 1 ENTER ¡.... 29 INPUT SELECTOR (p.19-24,37) Switches between upper- Use to program the playback order of an input signal. 19 AUTO/MANUAL (p.33-34) Switches between automatic and manual track numbering when recording a disc. 20 Number / Letter buttons (p.16,27,30) 5 SCROLL (p.16) 17 Use to jump...
... fast-reverse and fast- 25 NAME CLIP (p.32) forward playback, and to move cursor position using CD 15 text (p.30). 16 AUTO/ • REC SYNCHRO MANUAL TIME DISPLAY /CHARA 1 GHI 4 ABC 2 JKL 5 SCROLL MENU/ DELETE PQRS 7 MARK 10/0 TUV 8 >10 4 CURSOR 3 DEF 3 MNO 6 WXYZ 9 NAME ¢ 1 ENTER ¡.... 29 INPUT SELECTOR (p.19-24,37) Switches between upper- Use to program the playback order of an input signal. 19 AUTO/MANUAL (p.33-34) Switches between automatic and manual track numbering when recording a disc. 20 Number / Letter buttons (p.16,27,30) 5 SCROLL (p.16) 17 Use to jump...
Operating Instructions
Page 14
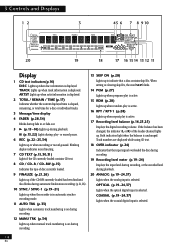
... TRK SKIP ON RPT-1 PGM dB RDM 20 19 18 17 16 1514 13 12 11 Display 1 CD text indicators(p.16) DISC Lights up when manual track numbering is active. 17 Recording level balance (p.16,23,25) Displays the digital recording volume.
... TRK SKIP ON RPT-1 PGM dB RDM 20 19 18 17 16 1514 13 12 11 Display 1 CD text indicators(p.16) DISC Lights up when manual track numbering is active. 17 Recording level balance (p.16,23,25) Displays the digital recording volume.
Operating Instructions
Page 15
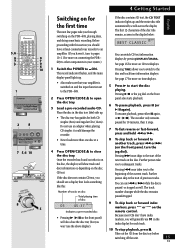
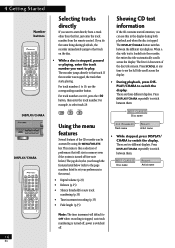
... 6 or the jog dial on the remote control. Pressing ¢ once skips to the start of the next track on connecting the PDR- 609 to _ON. 5,6 8 7 9 AUTO/ • REC SYNCHRO MANUAL TIME DISPLAY /CHARA 1 GHI 4 ABC 2 JKL 5 SCROLL MENU/ DELETE PQRS 7 MARK 10/0 TUV 8 >10 4 CURSOR 3 DEF 3 MNO 6 WXYZ 9 NAME ¢...track. See page 16 for more on the disc. Before proceeding with this : Number of tracks on and the input function set to the PDR-609. 2 Press OPEN/CLOSE 0 to start the disc playing. Place the disc in your amplifier is on the disc, the display will show ...
... 6 or the jog dial on the remote control. Pressing ¢ once skips to the start of the next track on connecting the PDR- 609 to _ON. 5,6 8 7 9 AUTO/ • REC SYNCHRO MANUAL TIME DISPLAY /CHARA 1 GHI 4 ABC 2 JKL 5 SCROLL MENU/ DELETE PQRS 7 MARK 10/0 TUV 8 >10 4 CURSOR 3 DEF 3 MNO 6 WXYZ 9 NAME ¢...track. See page 16 for more on the disc. Before proceeding with this : Number of tracks on and the input function set to the PDR-609. 2 Press OPEN/CLOSE 0 to start the disc playing. Place the disc in your amplifier is on the disc, the display will show ...
Operating Instructions
Page 16
... stopped; There are three different displays. Press DISPLAY/CHARA repeatedly to OFF when: recording is turned off ; 4 Getting Started Number buttons AUTO/ • REC SYNCHRO MANUAL TIME DISPLAY /CHARA 1 GHI 4 ABC 2 JKL 5 SCROLL MENU/ DELETE PQRS 7 MARK 10/0 TUV 8 >10 4 CURSOR 3 DEF 3 MNO 6 WXYZ 9 NAME &#... PROGRAM CHECK CLEAR SKIP PLAY SKIP ID INPUT SELECTER SET CLEAR Î DISPLAY/CHARA ◊ÛB->?/ SCROLL ERASE TIME FINALIZE AUTO MANUAL TRACK NO. If you do the same thing during both playback and when the disc is turned off (see note below).The ...
... stopped; There are three different displays. Press DISPLAY/CHARA repeatedly to OFF when: recording is turned off ; 4 Getting Started Number buttons AUTO/ • REC SYNCHRO MANUAL TIME DISPLAY /CHARA 1 GHI 4 ABC 2 JKL 5 SCROLL MENU/ DELETE PQRS 7 MARK 10/0 TUV 8 >10 4 CURSOR 3 DEF 3 MNO 6 WXYZ 9 NAME &#... PROGRAM CHECK CLEAR SKIP PLAY SKIP ID INPUT SELECTER SET CLEAR Î DISPLAY/CHARA ◊ÛB->?/ SCROLL ERASE TIME FINALIZE AUTO MANUAL TRACK NO. If you do the same thing during both playback and when the disc is turned off (see note below).The ...
Operating Instructions
Page 17
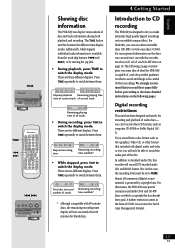
...REC LEVEL ANALOG REC LEVEL ANALOG L REC BALANCE R TEXT PUSH ENTER MENU/ DELETE SYNCHRO CD TEXT Legato Link Conversion Showing disc information The PDR-609 can 't record other CD formats, such as CD+graphics, Video-CD, or other format that includes both playback and recording. Press TIME ...video or text, you make extremely high quality digital recordings onto recordable compact discs. TIME ◊ÛB->?/ SCROLL ERASE TIME FINALIZE AUTO MANUAL TRACK NO. Press TIME repeatedly to switch the display mode. you record from the track skip buttons (4 and ¢), or by ...
...REC LEVEL ANALOG REC LEVEL ANALOG L REC BALANCE R TEXT PUSH ENTER MENU/ DELETE SYNCHRO CD TEXT Legato Link Conversion Showing disc information The PDR-609 can 't record other CD formats, such as CD+graphics, Video-CD, or other format that includes both playback and recording. Press TIME ...video or text, you make extremely high quality digital recordings onto recordable compact discs. TIME ◊ÛB->?/ SCROLL ERASE TIME FINALIZE AUTO MANUAL TRACK NO. Press TIME repeatedly to switch the display mode. you record from the track skip buttons (4 and ¢), or by ...
Operating Instructions
Page 18
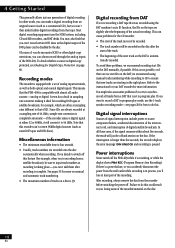
...there are starting in the right places. This means that copy. Since CDs are slightly after recording is complete. Digital recording from that the PDR-609 is compatible with a set to record a DAT in sampling rate converter making it ideal for recording DAT tapes or satellite broadcasts, for ...has a built in program play . Note that new tracks are no start IDs on manual and automatic track numbering. • The maximum number of digital recording. If you decide to switch off the PDR-609 while it to input track markers as some of CD. If the interruption is longer ...
...there are starting in the right places. This means that copy. Since CDs are slightly after recording is complete. Digital recording from that the PDR-609 is compatible with a set to record a DAT in sampling rate converter making it ideal for recording DAT tapes or satellite broadcasts, for ...has a built in program play . Note that new tracks are no start IDs on manual and automatic track numbering. • The maximum number of digital recording. If you decide to switch off the PDR-609 while it to input track markers as some of CD. If the interruption is longer ...

Operating Instructions
Page 19
In this case, we recommend using manual recording (see the troubleshooting section on the disc for what you want to record just a ...further tracks, simply repeat steps 3 to record CD text information, you 'll get a perfect digital copy of the track. WRITE AUTO MANUAL MONITOR INPUT SELECTOR 2 6 AUTO/ • REC SYNCHRO MANUAL TIME DISPLAY /CHARA 1 GHI 4 ABC 2 JKL 5 SCROLL MENU/ DELETE PQRS 7 MARK 10/0 TUV 8 >10 4 CURSOR 3... DELETE SYNCHRO CD TEXT Legato Link Conversion 63 ◊ÛB->?/ SCROLL ERASE TIME FINALIZE AUTO MANUAL TRACK NO. If you want to 5.
In this case, we recommend using manual recording (see the troubleshooting section on the disc for what you want to record just a ...further tracks, simply repeat steps 3 to record CD text information, you 'll get a perfect digital copy of the track. WRITE AUTO MANUAL MONITOR INPUT SELECTOR 2 6 AUTO/ • REC SYNCHRO MANUAL TIME DISPLAY /CHARA 1 GHI 4 ABC 2 JKL 5 SCROLL MENU/ DELETE PQRS 7 MARK 10/0 TUV 8 >10 4 CURSOR 3... DELETE SYNCHRO CD TEXT Legato Link Conversion 63 ◊ÛB->?/ SCROLL ERASE TIME FINALIZE AUTO MANUAL TRACK NO. If you want to 5.

Operating Instructions
Page 20
... the all tracks from a DAT in program play if you are recording from a noisy analog source, such as a vinyl record, or from a source, use manual track numbering (see page 33). 1 Load a CD-R or CD-RW disc. After pressing 7, the display shows PMA REC while it will start . 4 Play... ANALOG L REC BALANCE R TEXT PUSH ENTER MENU/ DELETE SYNCHRO CD TEXT Legato Link Conversion 63 ◊ÛB->?/ SCROLL ERASE TIME FINALIZE AUTO MANUAL TRACK NO. After the recorder encounters about five seconds of continuous silence, it may not recognize the end of the source has been reached and...
... the all tracks from a DAT in program play if you are recording from a noisy analog source, such as a vinyl record, or from a source, use manual track numbering (see page 33). 1 Load a CD-R or CD-RW disc. After pressing 7, the display shows PMA REC while it will start . 4 Play... ANALOG L REC BALANCE R TEXT PUSH ENTER MENU/ DELETE SYNCHRO CD TEXT Legato Link Conversion 63 ◊ÛB->?/ SCROLL ERASE TIME FINALIZE AUTO MANUAL TRACK NO. After the recorder encounters about five seconds of continuous silence, it may not recognize the end of the source has been reached and...

Operating Instructions
Page 21
...REC BALANCE R TEXT PUSH ENTER MENU/ DELETE SYNCHRO CD TEXT Legato Link Conversion 3 ◊ÛB->?/ SCROLL ERASE TIME FINALIZE AUTO MANUAL TRACK NO. SYNC-FINAL CD-R FINALIZE SYNC The display shows all -track synchro recording on page 33 to choose an input. ... TEXT indicator will not finalize the disc-see the troubleshooting section on the source, the recorder starts finalizing the disc. WRITE AUTO MANUAL MONITOR INPUT SELECTOR 2 AUTO/ • REC SYNCHRO MANUAL TIME DISPLAY /CHARA 1 GHI 4 ABC 2 JKL 5 SCROLL MENU/ DELETE PQRS 7 MARK 10/0 TUV 8 >10 4 CURSOR 3 ...
...REC BALANCE R TEXT PUSH ENTER MENU/ DELETE SYNCHRO CD TEXT Legato Link Conversion 3 ◊ÛB->?/ SCROLL ERASE TIME FINALIZE AUTO MANUAL TRACK NO. SYNC-FINAL CD-R FINALIZE SYNC The display shows all -track synchro recording on page 33 to choose an input. ... TEXT indicator will not finalize the disc-see the troubleshooting section on the source, the recorder starts finalizing the disc. WRITE AUTO MANUAL MONITOR INPUT SELECTOR 2 AUTO/ • REC SYNCHRO MANUAL TIME DISPLAY /CHARA 1 GHI 4 ABC 2 JKL 5 SCROLL MENU/ DELETE PQRS 7 MARK 10/0 TUV 8 >10 4 CURSOR 3 ...

Operating Instructions
Page 22
... REC BALANCE R TEXT PUSH ENTER MENU/ DELETE SYNCHRO CD TEXT Legato Link Conversion 57 ◊ÛB->?/ SCROLL ERASE TIME FINALIZE AUTO MANUAL TRACK NO. After pressing 7, the display shows PMA REC while it records the track information to check it detects a sound after... CURSOR ¢ 3 1 ENTER ¡ 7 REPEAT RANDOM NAMECLIP 8 FADER PROGRAM CHECK CLEAR SKIP PLAY SKIP ID INPUT SELECTER SET CLEAR 5 2 Manual recording Use the manual recording method with a noisy analog source, such as a vinyl record, or from either case, you want to record. 2 Press INPUT SELECTOR to ...
... REC BALANCE R TEXT PUSH ENTER MENU/ DELETE SYNCHRO CD TEXT Legato Link Conversion 57 ◊ÛB->?/ SCROLL ERASE TIME FINALIZE AUTO MANUAL TRACK NO. After pressing 7, the display shows PMA REC while it records the track information to check it detects a sound after... CURSOR ¢ 3 1 ENTER ¡ 7 REPEAT RANDOM NAMECLIP 8 FADER PROGRAM CHECK CLEAR SKIP PLAY SKIP ID INPUT SELECTER SET CLEAR 5 2 Manual recording Use the manual recording method with a noisy analog source, such as a vinyl record, or from either case, you want to record. 2 Press INPUT SELECTOR to ...
Operating Instructions
Page 23
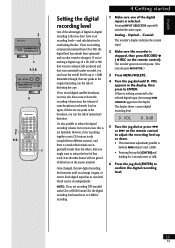
... DIN UNLOCK appears in the display, then press to +20dB. 2 ◊ÛB->?/ SCROLL ERASE TIME FINALIZE AUTO MANUAL TRACK NO. WRITE AUTO MANUAL MONITOR INPUT SELECTOR 1 4,5,6 DIGITAL REC LEVEL ANALOG REC LEVEL ANALOG L REC BALANCE R TEXT PUSH ENTER MENU/ DELETE... SYNCHRO CD TEXT Legato Link Conversion 3 3 5 4,6 AUTO/ • REC SYNCHRO MANUAL TIME DISPLAY /CHARA 1 GHI 4 ABC 2 JKL 5 SCROLL MENU/ DELETE PQRS 7 MARK 10/0 TUV 8 >10 4 CURSOR 3 DEF 3 MNO 6 WXYZ 9 NAME ...
... DIN UNLOCK appears in the display, then press to +20dB. 2 ◊ÛB->?/ SCROLL ERASE TIME FINALIZE AUTO MANUAL TRACK NO. WRITE AUTO MANUAL MONITOR INPUT SELECTOR 1 4,5,6 DIGITAL REC LEVEL ANALOG REC LEVEL ANALOG L REC BALANCE R TEXT PUSH ENTER MENU/ DELETE... SYNCHRO CD TEXT Legato Link Conversion 3 3 5 4,6 AUTO/ • REC SYNCHRO MANUAL TIME DISPLAY /CHARA 1 GHI 4 ABC 2 JKL 5 SCROLL MENU/ DELETE PQRS 7 MARK 10/0 TUV 8 >10 4 CURSOR 3 DEF 3 MNO 6 WXYZ 9 NAME ...

Operating Instructions
Page 24
...2 0 OVER The maximum recording level should be in this area. Pressing INPUT SELECTOR repeatedly switches the active input: Analog - WRITE AUTO MANUAL MONITOR INPUT SELECTOR 1 2 4 DIGITAL REC LEVEL ANALOG REC LEVEL ANALOG L REC BALANCE R TEXT PUSH ENTER MENU/ DELETE SYNCHRO CD ...TEXT Legato Link Conversion ANALOG REC LEVEL 2 AUTO/ • REC SYNCHRO MANUAL TIME DISPLAY /CHARA 1 GHI 4 ABC 2 JKL 5 SCROLL MENU/ DELETE PQRS 7 MARK 10/0 TUV 8 >10 4 CURSOR 3 DEF 3 MNO 6 WXYZ 9...
...2 0 OVER The maximum recording level should be in this area. Pressing INPUT SELECTOR repeatedly switches the active input: Analog - WRITE AUTO MANUAL MONITOR INPUT SELECTOR 1 2 4 DIGITAL REC LEVEL ANALOG REC LEVEL ANALOG L REC BALANCE R TEXT PUSH ENTER MENU/ DELETE SYNCHRO CD ...TEXT Legato Link Conversion ANALOG REC LEVEL 2 AUTO/ • REC SYNCHRO MANUAL TIME DISPLAY /CHARA 1 GHI 4 ABC 2 JKL 5 SCROLL MENU/ DELETE PQRS 7 MARK 10/0 TUV 8 >10 4 CURSOR 3 DEF 3 MNO 6 WXYZ 9...

Operating Instructions
Page 25
...You can adjust the balance from 0dB (default) to around 5dB in the display, then press to choose an input. Optical - WRITE AUTO MANUAL MONITOR INPUT SELECTOR 1 4,6 DIGITAL REC LEVEL ANALOG REC LEVEL ANALOG L REC BALANCE R TEXT PUSH ENTER MENU/ DELETE SYNCHRO CD TEXT Legato ...Link Conversion 5 3 3 5 4,6 AUTO/ • REC SYNCHRO MANUAL TIME DISPLAY /CHARA 1 GHI 4 ABC 2 JKL 5 SCROLL MENU/ DELETE PQRS 7 MARK 10/0 TUV 8 >10 4 CURSOR 3 DEF 3 MNO 6 WXYZ 9 NAME ...
...You can adjust the balance from 0dB (default) to around 5dB in the display, then press to choose an input. Optical - WRITE AUTO MANUAL MONITOR INPUT SELECTOR 1 4,6 DIGITAL REC LEVEL ANALOG REC LEVEL ANALOG L REC BALANCE R TEXT PUSH ENTER MENU/ DELETE SYNCHRO CD TEXT Legato ...Link Conversion 5 3 3 5 4,6 AUTO/ • REC SYNCHRO MANUAL TIME DISPLAY /CHARA 1 GHI 4 ABC 2 JKL 5 SCROLL MENU/ DELETE PQRS 7 MARK 10/0 TUV 8 >10 4 CURSOR 3 DEF 3 MNO 6 WXYZ 9 NAME ...

Operating Instructions
Page 26
... 10 minutes, you can abort the operation by pressing 7 . None of minutes. Caution! For a CD-RW, the finalize indicator lights in the display. WRITE AUTO MANUAL MONITOR INPUT SELECTOR 3 DIGITAL REC LEVEL ANALOG REC LEVEL ANALOG L REC BALANCE R TEXT PUSH ENTER MENU/ DELETE SYNCHRO CD TEXT Legato Link Conversion Finalizing a disc... Before you can play a CD-R on the player or the remote have any effect during finalization. 4 Getting started 2 ◊ÛB->?/ SCROLL ERASE TIME FINALIZE AUTO MANUAL TRACK NO.
... 10 minutes, you can abort the operation by pressing 7 . None of minutes. Caution! For a CD-RW, the finalize indicator lights in the display. WRITE AUTO MANUAL MONITOR INPUT SELECTOR 3 DIGITAL REC LEVEL ANALOG REC LEVEL ANALOG L REC BALANCE R TEXT PUSH ENTER MENU/ DELETE SYNCHRO CD TEXT Legato Link Conversion Finalizing a disc... Before you can play a CD-R on the player or the remote have any effect during finalization. 4 Getting started 2 ◊ÛB->?/ SCROLL ERASE TIME FINALIZE AUTO MANUAL TRACK NO.

Operating Instructions
Page 27
... a track; 2 DIGITAL REC LEVEL ANALOG REC LEVEL ANALOG L REC BALANCE R TEXT PUSH ENTER MENU/ DELETE SYNCHRO CD TEXT Legato Link Conversion 1 AUTO/ • REC SYNCHRO MANUAL TIME DISPLAY /CHARA 1 GHI 4 ABC 2 JKL 5 SCROLL MENU/ DELETE PQRS 7 MARK 10/0 TUV 8 >10 4 CURSOR 3 DEF 3 MNO 6 WXYZ 9 NAME ¢ 1 ENTER ¡ 7 REPEAT RANDOM NAMECLIP...
... a track; 2 DIGITAL REC LEVEL ANALOG REC LEVEL ANALOG L REC BALANCE R TEXT PUSH ENTER MENU/ DELETE SYNCHRO CD TEXT Legato Link Conversion 1 AUTO/ • REC SYNCHRO MANUAL TIME DISPLAY /CHARA 1 GHI 4 ABC 2 JKL 5 SCROLL MENU/ DELETE PQRS 7 MARK 10/0 TUV 8 >10 4 CURSOR 3 DEF 3 MNO 6 WXYZ 9 NAME ¢ 1 ENTER ¡ 7 REPEAT RANDOM NAMECLIP...

Operating Instructions
Page 28
..., look for the SKIP ON indicator in the display and random playback starts. • Pressing 7 cancels random play. 5 More playback features AUTO/ • REC SYNCHRO MANUAL TIME DISPLAY /CHARA 1 GHI 4 ABC 2 JKL 5 SCROLL MENU/ DELETE PQRS 7 MARK 10/0 TUV 8 >10 4 CURSOR 3 DEF 3 MNO 6 WXYZ 9 .... You can only hear the fades through the analog outputs. 1 Press FADER during playback or when the disc is canceled. FADER AUTO/ • REC SYNCHRO MANUAL TIME DISPLAY /CHARA 1 GHI 4 ABC 2 JKL 5 SCROLL MENU/ DELETE PQRS 7 MARK 10/0 TUV 8 >10 4 CURSOR 3 DEF 3 MNO 6 WXYZ 9 ...
..., look for the SKIP ON indicator in the display and random playback starts. • Pressing 7 cancels random play. 5 More playback features AUTO/ • REC SYNCHRO MANUAL TIME DISPLAY /CHARA 1 GHI 4 ABC 2 JKL 5 SCROLL MENU/ DELETE PQRS 7 MARK 10/0 TUV 8 >10 4 CURSOR 3 DEF 3 MNO 6 WXYZ 9 .... You can only hear the fades through the analog outputs. 1 Press FADER during playback or when the disc is canceled. FADER AUTO/ • REC SYNCHRO MANUAL TIME DISPLAY /CHARA 1 GHI 4 ABC 2 JKL 5 SCROLL MENU/ DELETE PQRS 7 MARK 10/0 TUV 8 >10 4 CURSOR 3 DEF 3 MNO 6 WXYZ 9 ...


