Owner's Manual
Page 3
... you to lead, a chemical known to the State of the product, and to dripping, splashing, rain or moisture. Do not defeat the safety purpose of a set-top box. WARNING: Slots and openings in a secure area. Digital premium cable television programming and certain advanced and interactive digital cable service such as the...
... you to lead, a chemical known to the State of the product, and to dripping, splashing, rain or moisture. Do not defeat the safety purpose of a set-top box. WARNING: Slots and openings in a secure area. Digital premium cable television programming and certain advanced and interactive digital cable service such as the...
Owner's Manual
Page 4
...Setting Orbiter 36 Displaying the Full White screen 36...Setting the Plasma Display On Time 37 Setting... 20 Setting MTS/...Setting up TV channels 24 Scanning Channels Automatically 24 Setting up Analog Channels Manually 24 Setting...Setting the voluntary movie rating system (MPAA 28 Setting the TV Ratings 28 4 En Setting up the Canadian rating systems 29 Setting...Settings 33 Using the Noise Reduction Feature 33 Setting the Color Temperature 33 Selecting the Sound Effect 34 Customizing the Sound Settings 34 Adjusting the Volume Automatically 34 Setting the Surround Sound 35 Setting...
...Setting Orbiter 36 Displaying the Full White screen 36...Setting the Plasma Display On Time 37 Setting... 20 Setting MTS/...Setting up TV channels 24 Scanning Channels Automatically 24 Setting up Analog Channels Manually 24 Setting...Setting the voluntary movie rating system (MPAA 28 Setting the TV Ratings 28 4 En Setting up the Canadian rating systems 29 Setting...Settings 33 Using the Noise Reduction Feature 33 Setting the Color Temperature 33 Selecting the Sound Effect 34 Customizing the Sound Settings 34 Adjusting the Volume Automatically 34 Setting the Surround Sound 35 Setting...
Owner's Manual
Page 5
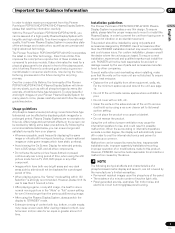
...a game, the "Game" mode setting within "AV Selection" is poor. • Do not cover with top, bottom, or side masks may cause the internal temperature to cool the internal electronics and prevent a hazardous occurrence. With the Pioneer PureVision PDP-5016HD/PDP-4216HD, you can be held responsible...its lowest suction setting. • Do not place the product on the screen can be caused by the manufacturer's limited warranties: • Permanent residual images upon the phosphors of the panel. • The existence of a minute number of the Pioneer PDP-5016HD/PDP-4216HD Plasma ...
...a game, the "Game" mode setting within "AV Selection" is poor. • Do not cover with top, bottom, or side masks may cause the internal temperature to cool the internal electronics and prevent a hazardous occurrence. With the Pioneer PureVision PDP-5016HD/PDP-4216HD, you can be held responsible...its lowest suction setting. • Do not place the product on the screen can be caused by the manufacturer's limited warranties: • Permanent residual images upon the phosphors of the panel. • The existence of a minute number of the Pioneer PDP-5016HD/PDP-4216HD Plasma ...
Owner's Manual
Page 7
... the same image on the Plasma Display continuously over several days, a permanent after displaying still images for several hours, or for long periods should be set to the remaining electric load. DO NOT PLACE THIS PRODUCT ON AN UNSTABLE CART, STAND, TRIPOD, BRACKET, OR TABLE. USE ONLY WITH A CART, STAND, TRIPOD...
... the same image on the Plasma Display continuously over several days, a permanent after displaying still images for several hours, or for long periods should be set to the remaining electric load. DO NOT PLACE THIS PRODUCT ON AN UNSTABLE CART, STAND, TRIPOD, BRACKET, OR TABLE. USE ONLY WITH A CART, STAND, TRIPOD...
Owner's Manual
Page 12
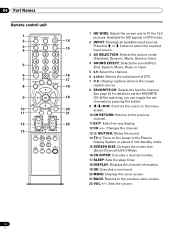
...places it into standby mode. 15 SCREEN SIZE: Changes the screen size (Zoom/Cinema/Full/4:3/Wide). 16 CH ENTER: Executes a channel number. 17 SLEEP: Sets the sleep timer. 18 DISPLAY: Displays the channel information. 19 OK: Executes a command. 20 MENU: Displays the menu screen. 21 BACK: Returns to ... favorite channel. LIST CH DELETE 1 HD WIDE: Adjust the screen size to the previous menu screen. 22 VOL +/-: Sets the volume. 12 En While watching, you can toggle the set the FAVORITE CH. 04 Part Names Remote control unit 1 TV INPUT HD WIDE 2 14 AV SELECTION SOUND EFFECT SCREEN ...
...places it into standby mode. 15 SCREEN SIZE: Changes the screen size (Zoom/Cinema/Full/4:3/Wide). 16 CH ENTER: Executes a channel number. 17 SLEEP: Sets the sleep timer. 18 DISPLAY: Displays the channel information. 19 OK: Executes a command. 20 MENU: Displays the menu screen. 21 BACK: Returns to ... favorite channel. LIST CH DELETE 1 HD WIDE: Adjust the screen size to the previous menu screen. 22 VOL +/-: Sets the volume. 12 En While watching, you can toggle the set the FAVORITE CH. 04 Part Names Remote control unit 1 TV INPUT HD WIDE 2 14 AV SELECTION SOUND EFFECT SCREEN ...
Owner's Manual
Page 18
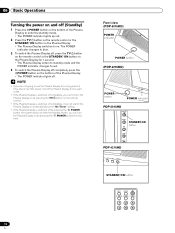
... and off by pressing the POWER button the next time. 18 En Front view (PDP-5016HD) POWER indicator POWER button (PDP-4216HD) POWER button POWER indicator PDP-5016HD STANDBY /ON INPUT STANDBY/ON button OK MENU VOL+ PDP-4216HD OK INPUT STANDBY/ON STANDBY/ON button TV INPUT HD WIDE AV SELECTION SOUND...the remote control. • If the Plasma Display is switched off completely, it cannot switch the Plasma Display on automatically by the "On Timer" setting. • If the Plasma Display is switched off (Standby) 1 Press the POWER button on the bottom of the Plasma Display to enter the...
... and off by pressing the POWER button the next time. 18 En Front view (PDP-5016HD) POWER indicator POWER button (PDP-4216HD) POWER button POWER indicator PDP-5016HD STANDBY /ON INPUT STANDBY/ON button OK MENU VOL+ PDP-4216HD OK INPUT STANDBY/ON STANDBY/ON button TV INPUT HD WIDE AV SELECTION SOUND...the remote control. • If the Plasma Display is switched off completely, it cannot switch the Plasma Display on automatically by the "On Timer" setting. • If the Plasma Display is switched off (Standby) 1 Press the POWER button on the bottom of the Plasma Display to enter the...

Owner's Manual
Page 19
Basic Operations Watching TV channels Unless you set up TV channels" on page 24. • When watching a digital TV program, you cannot tune in the channel more quickly. • To return to 9. For ... 10-1, press 1, 0, •(dot), then 1. • To select subchannel 10-15, press 1, 0, •(dot), 1, then 5. • After entering a channel or subchannel number, you may see "Setting up TV channels that you can watch a TV program, first select "ANALOG CH" or "DIGITAL CH" by TV stations as CH +/- FAVORITE CH SLEEP DISPLAY...
Basic Operations Watching TV channels Unless you set up TV channels" on page 24. • When watching a digital TV program, you cannot tune in the channel more quickly. • To return to 9. For ... 10-1, press 1, 0, •(dot), then 1. • To select subchannel 10-15, press 1, 0, •(dot), 1, then 5. • After entering a channel or subchannel number, you may see "Setting up TV channels that you can watch a TV program, first select "ANALOG CH" or "DIGITAL CH" by TV stations as CH +/- FAVORITE CH SLEEP DISPLAY...
Owner's Manual
Page 20
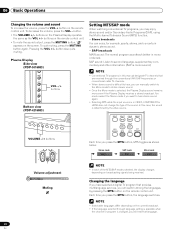
...mode is mono sound.) MENU VOL+ VOLCH+ CH- buttons on the Plasma Display operates the same as shown below. Plasma Display Side view (PDP-5016HD) Setting MTS/SAP mode When watching conventional TV programs, you want to second language, supplementary commentary and other information. (SAP is selected, the Plasma...switch among the languages by the video source. Changing the language If you have selected a digital TV program that are received through language setting is available when the channel or program is in VIDEO, COMPONENT or HDMI does not change the type of the MTS/SAP modes ...
...mode is mono sound.) MENU VOL+ VOLCH+ CH- buttons on the Plasma Display operates the same as shown below. Plasma Display Side view (PDP-5016HD) Setting MTS/SAP mode When watching conventional TV programs, you want to second language, supplementary commentary and other information. (SAP is selected, the Plasma...switch among the languages by the video source. Changing the language If you have selected a digital TV program that are received through language setting is available when the channel or program is in VIDEO, COMPONENT or HDMI does not change the type of the MTS/SAP modes ...
Owner's Manual
Page 21
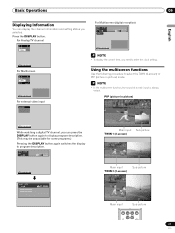
... (digital reception) DTV xx-01 DTV VIDEO 1 am 8 : 30 While watching a digital TV channel, you can display the channel information and setting status you need to enter the clock setting. PIP (picture in picture) mode. • In the multiscreen function, the sound of a main input is always output. Press the DISPLAY button...
... (digital reception) DTV xx-01 DTV VIDEO 1 am 8 : 30 While watching a digital TV channel, you can display the channel information and setting status you need to enter the clock setting. PIP (picture in picture) mode. • In the multiscreen function, the sound of a main input is always output. Press the DISPLAY button...
Owner's Manual
Page 22
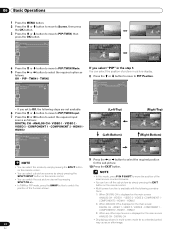
... to select the required input source as follows: Off - TWIN2 PIP/TWIN PIP/TWIN Mode PIP/TWIN Input PIP Position PIP DIGITAL CH If you set to Off, the following combinations: 1) When DIGITAL CH is displayed on the main screen ANALOG CH - PIP/TWIN PIP/TWIN Mode PIP/TWIN Input PIP...
... to select the required input source as follows: Off - TWIN2 PIP/TWIN PIP/TWIN Mode PIP/TWIN Input PIP Position PIP DIGITAL CH If you set to Off, the following combinations: 1) When DIGITAL CH is displayed on the main screen ANALOG CH - PIP/TWIN PIP/TWIN Mode PIP/TWIN Input PIP...

Owner's Manual
Page 23
... Temp Sound Effect Bass Treble Balance Auto Volume Level SRS TruSurround XT Digital Audio Out Screen Screen Size PIP/TWIN Screen Saver System Language Clock Setting Parental Control Closed Caption Display Analog CC DTV CC Page 24 24 25 25 32 33 33 33 33 33 33 33 34 34 34... 35 35 35 21, 22 36 36 31 26 - 30 30, 31 30, 31 30, 31 Menu operations The following describes the typical procedure for setting up the menus. FAVORITE CH SLEEP DISPLAY OK CH RETURN EXIT BACK MENU CH MUTING VOL 1 Press the MENU button. 2 Press c or d to select a menu...
... Temp Sound Effect Bass Treble Balance Auto Volume Level SRS TruSurround XT Digital Audio Out Screen Screen Size PIP/TWIN Screen Saver System Language Clock Setting Parental Control Closed Caption Display Analog CC DTV CC Page 24 24 25 25 32 33 33 33 33 33 33 33 34 34 34... 35 35 35 21, 22 36 36 31 26 - 30 30, 31 30, 31 30, 31 Menu operations The following describes the typical procedure for setting up the menus. FAVORITE CH SLEEP DISPLAY OK CH RETURN EXIT BACK MENU CH MUTING VOL 1 Press the MENU button. 2 Press c or d to select a menu...
Owner's Manual
Page 24
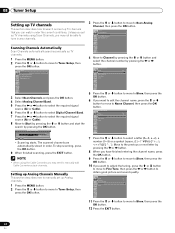
... to tune in order. Tuner Setup Scan Channels Scan Analog Channel Scan Digital Channel Edit Channel List Scanning Channels Automatically Scan Channels automatically searches and sets up TV channels. 1 Press the MENU button. 2 Press the c or d button to move to Store, then press the OK button. 12 Press the.... 5 Press the c or d button to move to Store, then press the OK button. 6 If you can watch under the current conditions. Unless you set up TV channels using the Cable Converter, you may need to manually add Cable Converter output channels. Scan Channels 70% ATV Found CH : 0 DTV Found...
... to tune in order. Tuner Setup Scan Channels Scan Analog Channel Scan Digital Channel Edit Channel List Scanning Channels Automatically Scan Channels automatically searches and sets up TV channels. 1 Press the MENU button. 2 Press the c or d button to move to Store, then press the OK button. 12 Press the.... 5 Press the c or d button to move to Store, then press the OK button. 6 If you can watch under the current conditions. Unless you set up TV channels using the Cable Converter, you may need to manually add Cable Converter output channels. Scan Channels 70% ATV Found CH : 0 DTV Found...
Owner's Manual
Page 25
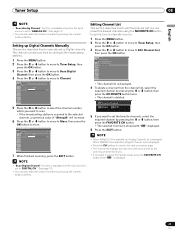
... Digital Channel Channel Store 6 - 1 Strength DTV 6 30% 5 Press the [ or \ button to select the channel number which you want to set to scan. • If the broadcasting station is deleted. Editing Channel List This section describes how to Edit Channel List, then press the OK button...press the FAVORITE CH button while " FAV " is displayed. • "Scan Digital Channel" function is available only the input source is set the favorite channels, select the required channel by pressing the numeric buttons directly. 25 En The channel numbers are fixed according to the broadcasting ...
... Digital Channel Channel Store 6 - 1 Strength DTV 6 30% 5 Press the [ or \ button to select the channel number which you want to set to scan. • If the broadcasting station is deleted. Editing Channel List This section describes how to Edit Channel List, then press the OK button...press the FAVORITE CH button while " FAV " is displayed. • "Scan Digital Channel" function is available only the input source is set the favorite channels, select the required channel by pressing the numeric buttons directly. 25 En The channel numbers are fixed according to the broadcasting ...
Owner's Manual
Page 26
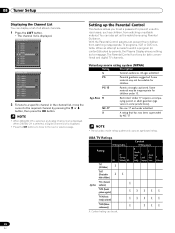
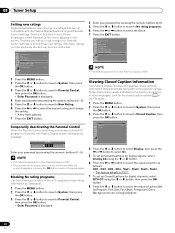
...channel list is made to watch a program (or content) blocked by parents, the Plasma Display shows nothing but a message. You can also set up the Parental Control This feature allows you to prevent unauthorized users, such as children, from watching inappropriate TV programs, VCR or DVD contents.... When an attempt is displayed. Some material may be set a password to set . Under 17 requires accompanying parent or adult guardian (age varies in the channel list, move to the required channel by NC-17...
...channel list is made to watch a program (or content) blocked by parents, the Plasma Display shows nothing but a message. You can also set up the Parental Control This feature allows you to prevent unauthorized users, such as children, from watching inappropriate TV programs, VCR or DVD contents.... When an attempt is displayed. Some material may be set a password to set . Under 17 requires accompanying parent or adult guardian (age varies in the channel list, move to the required channel by NC-17...
Owner's Manual
Page 27
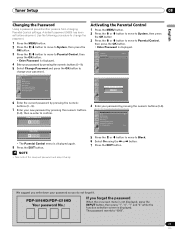
... again. 8 Press the EXIT button. 5 Press the c or d button to move to confirm. New Password 4 Enter your password. PDP-5016HD/PDP-4216HD Your password No.: If you do not forget it handy. Parental Control Change Password Block MPAA Ratings USA TV Rating New Rating Canadian English...6 Select On using the [ or \ button. 7 Press the EXIT button. • Take note of the newly set before shipment. A default password (0000) has been set password and keep it . Tuner Setup 08 English Changing the Password Using a password prevents other persons from changing Parental Control...
... again. 8 Press the EXIT button. 5 Press the c or d button to move to confirm. New Password 4 Enter your password. PDP-5016HD/PDP-4216HD Your password No.: If you do not forget it handy. Parental Control Change Password Block MPAA Ratings USA TV Rating New Rating Canadian English...6 Select On using the [ or \ button. 7 Press the EXIT button. • Take note of the newly set before shipment. A default password (0000) has been set password and keep it . Tuner Setup 08 English Changing the Password Using a password prevents other persons from changing Parental Control...
Owner's Manual
Page 28
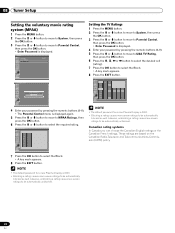
... or the Canadian French ratings. Likewise, unblocking a rating causes less severe ratings to be automatically unblocked. 28 En System Language Clock Setting Parental Control English Parental Control Setting the TV Ratings 1 Press the MENU button. 2 Press the c or d button to move to System, then press the OK...the desired cell (rating). 7 Press the OK button to select the Block. • A key mark appears. 8 Press the EXIT button. 08 Tuner Setup Setting the voluntary movie rating system (MPAA) 1 Press the MENU button. 2 Press the c or d button to move to System, then press the OK button...
... or the Canadian French ratings. Likewise, unblocking a rating causes less severe ratings to be automatically unblocked. 28 En System Language Clock Setting Parental Control English Parental Control Setting the TV Ratings 1 Press the MENU button. 2 Press the c or d button to move to System, then press the OK...the desired cell (rating). 7 Press the OK button to select the Block. • A key mark appears. 8 Press the EXIT button. 08 Tuner Setup Setting the voluntary movie rating system (MPAA) 1 Press the MENU button. 2 Press the c or d button to move to System, then press the OK button...
Owner's Manual
Page 29
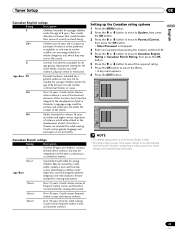
... contain scenes disturbing to children under eight who cannot distinguish between imaginary and real situations. Likewise, unblocking a rating causes less severe ratings to resolve conflict; Setting up the Canadian rating systems 1 Press the MENU button. 2 Press the c or d button to move to System, then press the OK button. 3 Press the c or...
... contain scenes disturbing to children under eight who cannot distinguish between imaginary and real situations. Likewise, unblocking a rating causes less severe ratings to resolve conflict; Setting up the Canadian rating systems 1 Press the MENU button. 2 Press the c or d button to move to System, then press the OK button. 3 Press the c or...
Owner's Manual
Page 30
... screen disappears, pressing the OK button causes it to Closed Caption, then press the OK button. CC3 - When you must change the setting. • A key mark appears. 7 Press the EXIT button. Otherwise, ratings you had previously blocked may become unblocked. Closed Caption ... Parental Control, then press the OK button. • Enter Password is broadcast along with the Plasma Display System's original Parental Control settings. Parental Control Change Password Block MPAA Ratings USA TV Rating New Rating Canadian English Rating Canadian French Rating No rating programs On View ...
... screen disappears, pressing the OK button causes it to Closed Caption, then press the OK button. CC3 - When you must change the setting. • A key mark appears. 7 Press the EXIT button. Otherwise, ratings you had previously blocked may become unblocked. Closed Caption ... Parental Control, then press the OK button. • Enter Password is broadcast along with the Plasma Display System's original Parental Control settings. Parental Control Change Password Block MPAA Ratings USA TV Rating New Rating Canadian English Rating Canadian French Rating No rating programs On View ...
Owner's Manual
Page 31
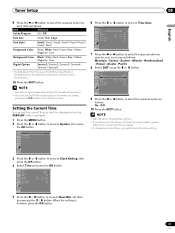
... 9 Press the [ or \ button to select the required option for your local area as follows: On - Alaska - button on the broadcasting service. • You can set time is cleared. • To display the correct time, you disconnect the power cord from the power outlet or power blackout occurs, the...)/ Font4(Arial)/ Font5(Dom)/ Font6(Coronet)/ Font7(Gothic) 10 Press the EXIT button. 6 Press the c or d button to move to Hour/Min, set them by simply pressing the C.C. Clock Setting Time Time Zone DST On Timer Off Timer Auto Power Off Sleep Timer am 9 : 30 Hawaii On On am 7 : 00 On am...
... 9 Press the [ or \ button to select the required option for your local area as follows: On - Alaska - button on the broadcasting service. • You can set time is cleared. • To display the correct time, you disconnect the power cord from the power outlet or power blackout occurs, the...)/ Font4(Arial)/ Font5(Dom)/ Font6(Coronet)/ Font7(Gothic) 10 Press the EXIT button. 6 Press the c or d button to move to Hour/Min, set them by simply pressing the C.C. Clock Setting Time Time Zone DST On Timer Off Timer Auto Power Off Sleep Timer am 9 : 30 Hawaii On On am 7 : 00 On am...

Owner's Manual
Page 32
... move to select the preset time interval as follows: Off - 10 min - 20 min - 30 min - 60 min - 120 min 180 min - 240 min Clock Setting Time Time Zone DST On Timer Off Timer Auto Power Off Sleep Timer am 9 : 30 Hawaii On On am 7 : 00 On am 11 : 00 On... d button to move to Picture, then press the OK button. 3 Press the c or d button to move to AV Selection. 4 Press the b or a button to customize setting as desired. User Picture AV Selection Brightness Contrast Sharpness Color Tint Noise Reduction Color Temp Standard 30 30 30 30 30 Off Item Standard Description...
... move to select the preset time interval as follows: Off - 10 min - 20 min - 30 min - 60 min - 120 min 180 min - 240 min Clock Setting Time Time Zone DST On Timer Off Timer Auto Power Off Sleep Timer am 9 : 30 Hawaii On On am 7 : 00 On am 11 : 00 On... d button to move to Picture, then press the OK button. 3 Press the c or d button to move to AV Selection. 4 Press the b or a button to customize setting as desired. User Picture AV Selection Brightness Contrast Sharpness Color Tint Noise Reduction Color Temp Standard 30 30 30 30 30 Off Item Standard Description...


