
Owner's Manual
Page 3
... connect the unit to cause cancer and birth defects or other equipment. Consult the dealer or an experienced radio/TV technician for a Class B digital device, pursuant to Part 15 of California and other governmental entities to other reproductive.... Product Name: Plasma Display System (Plasma Display) (Media Receiver) Model Number: PDP-5060HD PDP-4360HD (PDP-506PU) (PDP-436PU) (PDP-R06U) (PDP-R06U) Product Category: Class B Personal Computers & Peripherals Responsible Party Name: PIONEER ELECTRONICS SERVICE, INC. Connect the equipment into a grounding-type AC outlet. If...
... connect the unit to cause cancer and birth defects or other equipment. Consult the dealer or an experienced radio/TV technician for a Class B digital device, pursuant to Part 15 of California and other governmental entities to other reproductive.... Product Name: Plasma Display System (Plasma Display) (Media Receiver) Model Number: PDP-5060HD PDP-4360HD (PDP-506PU) (PDP-436PU) (PDP-R06U) (PDP-R06U) Product Category: Class B Personal Computers & Peripherals Responsible Party Name: PIONEER ELECTRONICS SERVICE, INC. Connect the equipment into a grounding-type AC outlet. If...
Owner's Manual
Page 4
... password 40 Activating the Parental Control 40 Setting the voluntary movie rating system (MPAA 40 Setting the TV ratings 40 Setting the TV Parental Guidelines (TV Guidelines 41 Blocking Not Rated TV programs ........ 41 Canadian rating systems 41 06 Basic Operations Turning on the power (Standby 25 Turning ... Allowed operation range of the power plug and power outlet may sometimes differ from that shown in a safe place for buying this Pioneer product. However the method of connecting and operating the unit is the same. 01 Important User Guidance Information 02 Safety Precautions 03 ...
... password 40 Activating the Parental Control 40 Setting the voluntary movie rating system (MPAA 40 Setting the TV ratings 40 Setting the TV Parental Guidelines (TV Guidelines 41 Blocking Not Rated TV programs ........ 41 Canadian rating systems 41 06 Basic Operations Turning on the power (Standby 25 Turning ... Allowed operation range of the power plug and power outlet may sometimes differ from that shown in a safe place for buying this Pioneer product. However the method of connecting and operating the unit is the same. 01 Important User Guidance Information 02 Safety Precautions 03 ...
Owner's Manual
Page 5
...size for received 4:3 aspect ratio signals 65 Changing the brightness at both sides of the screen (Side Mask 66 Language setting 66 TV Guide On Screen™ navigation ....... 47 12 Enjoying through External Equipment The Listings screen 47 About External Equipment 67 Recording programs ... Operation off (AV mode only) ........ 63 Power Management (PC mode only 63 Image position adjustment (AV mode only 63 Recording digital TV programs using a VCR 69 Avoiding unwanted feedback 69 Connecting a recorder 70 Connecting other audio equipment ......... 70 Connecting an AV receiver 70 ...
...size for received 4:3 aspect ratio signals 65 Changing the brightness at both sides of the screen (Side Mask 66 Language setting 66 TV Guide On Screen™ navigation ....... 47 12 Enjoying through External Equipment The Listings screen 47 About External Equipment 67 Recording programs ... Operation off (AV mode only) ........ 63 Power Management (PC mode only 63 Image position adjustment (AV mode only 63 Recording digital TV programs using a VCR 69 Avoiding unwanted feedback 69 Connecting a recorder 70 Connecting other audio equipment ......... 70 Connecting an AV receiver 70 ...
Owner's Manual
Page 7
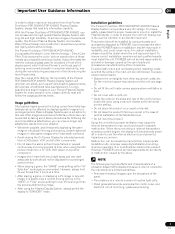
... PDP-5060HD/PDP-4360HD incorporates the latest in the "WIDE" or "FULL" screen setting for accident or damage caused by using the still picture mode from a TV, VCR, DVD player or any still image, it is poor. • Do not cover with long-life ... information carefully. Malfunction can be held responsible for over in possible malfunction. With the Pioneer PureVision PDP-5060HD/PDP-4360HD, you can ensure longer and satisfactory results from this Pioneer PureVision PDP-5060HD/PDP-4360HD Plasma Display System, please first read and follow the usage guidelines below , you can...
... PDP-5060HD/PDP-4360HD incorporates the latest in the "WIDE" or "FULL" screen setting for accident or damage caused by using the still picture mode from a TV, VCR, DVD player or any still image, it is poor. • Do not cover with long-life ... information carefully. Malfunction can be held responsible for over in possible malfunction. With the Pioneer PureVision PDP-5060HD/PDP-4360HD, you can ensure longer and satisfactory results from this Pioneer PureVision PDP-5060HD/PDP-4360HD Plasma Display System, please first read and follow the usage guidelines below , you can...

Owner's Manual
Page 14
...Receiver Front view 123 STANDBY/ON REC ON STANDBY TIMER PULL OPEN Pull this section to open the door. STANDBY/ON REC ON STANDBY TIMER TV GUIDE ENTER DOWN UP LEFT RIGHT INPUT DOWN UP VOLUME DOWN UP CHANNEL Y CB / PB CR / PR COMPONENT VIDEO S-VIDEO VIDEO ...INPUT 4 L AUDIO R PC ANALOG RGB PC 4 56 7 8 1 POWER ON indicator 2 STANDBY indicator 3 REC TIMER indicator 4 STANDBY/ON button 5 TV GUIDE button* 6 INPUT button (ENTER button*) 7 VOLUME UP/DOWN buttons (UP/DOWN buttons*) 8 CHANNEL UP/DOWN buttons (LEFT/ RIGHT buttons*) 9 10 11 12 13 9...
...Receiver Front view 123 STANDBY/ON REC ON STANDBY TIMER PULL OPEN Pull this section to open the door. STANDBY/ON REC ON STANDBY TIMER TV GUIDE ENTER DOWN UP LEFT RIGHT INPUT DOWN UP VOLUME DOWN UP CHANNEL Y CB / PB CR / PR COMPONENT VIDEO S-VIDEO VIDEO ...INPUT 4 L AUDIO R PC ANALOG RGB PC 4 56 7 8 1 POWER ON indicator 2 STANDBY indicator 3 REC TIMER indicator 4 STANDBY/ON button 5 TV GUIDE button* 6 INPUT button (ENTER button*) 7 VOLUME UP/DOWN buttons (UP/DOWN buttons*) 8 CHANNEL UP/DOWN buttons (LEFT/ RIGHT buttons*) 9 10 11 12 13 9...
Owner's Manual
Page 16
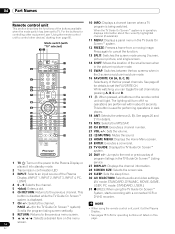
...the functions of program listings in dark 10 25 places. 11 26 18 ANT: Selects the antenna (A, B). See page 43 for the TV Guide On Screen™ system): Scrolls the program listing screen vertically. 8 RETURN: Returns to set the FAVORITE CH. 5 6 20 While..., see "Using the remote control unit to the Plasma Display or service. PC mode: STANDARD, USER.) 5 •(dot): Enters a dot. 6 CH RETURN: Returns to TV. Display. (INPUT 1, INPUT 2, INPUT 3, INPUT 4, PC, i.LINK) 30 AV SELECTION: Selects audio and video settings. (AV mode: STANDARD, DYNAMIC, MOVIE, GAME, ...
...the functions of program listings in dark 10 25 places. 11 26 18 ANT: Selects the antenna (A, B). See page 43 for the TV Guide On Screen™ system): Scrolls the program listing screen vertically. 8 RETURN: Returns to set the FAVORITE CH. 5 6 20 While..., see "Using the remote control unit to the Plasma Display or service. PC mode: STANDARD, USER.) 5 •(dot): Enters a dot. 6 CH RETURN: Returns to TV. Display. (INPUT 1, INPUT 2, INPUT 3, INPUT 4, PC, i.LINK) 30 AV SELECTION: Selects audio and video settings. (AV mode: STANDARD, DYNAMIC, MOVIE, GAME, ...
Owner's Manual
Page 20
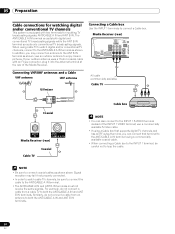
... and has an RF output terminal, you may fail if not properly connected. • In order to watch digital and/or conventional TV channels, connect to the INPUT 1 S-VIDEO terminal instead of the Media Receiver. Signal reception may connect an antenna to loop the cable. NOTE ... a Cable box. use a commercially available S-Video cable. • If using a Cable box that terminal to the ANT/CABLE A IN terminal using cable TV to watch cable TV channels, be careful not to the ANT B IN terminal as shown. 05 Preparation Cable connections for watching digital and/or conventional...
... and has an RF output terminal, you may fail if not properly connected. • In order to watch digital and/or conventional TV channels, connect to the INPUT 1 S-VIDEO terminal instead of the Media Receiver. Signal reception may connect an antenna to loop the cable. NOTE ... a Cable box. use a commercially available S-Video cable. • If using a Cable box that terminal to the ANT/CABLE A IN terminal using cable TV to watch cable TV channels, be careful not to the ANT B IN terminal as shown. 05 Preparation Cable connections for watching digital and/or conventional...

Owner's Manual
Page 21
...terminal has been connected with the coaxial cable from the other antenna. • Pressing ANT while watching in the 2-screen mode (TV image and video image) with TV selected will not have any effect. Tab Switching between antenna A and B To watch broadcasts via the two antennas, you can ...for Point of the Media Receiver, and remove the cover while releasing the tab's latch. When you are watching digital and/or High Definition TV channels over cable, the card allows you need not execute Auto Channel Preset; S400 (TS) R-AUDIO-L DIOGPITTAICLASOLUUBT WOOFER Cable CARD BLACK WHITE ...
...terminal has been connected with the coaxial cable from the other antenna. • Pressing ANT while watching in the 2-screen mode (TV image and video image) with TV selected will not have any effect. Tab Switching between antenna A and B To watch broadcasts via the two antennas, you can ...for Point of the Media Receiver, and remove the cover while releasing the tab's latch. When you are watching digital and/or High Definition TV channels over cable, the card allows you need not execute Auto Channel Preset; S400 (TS) R-AUDIO-L DIOGPITTAICLASOLUUBT WOOFER Cable CARD BLACK WHITE ...
Owner's Manual
Page 25
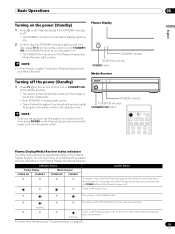
...cord of the Plasma Display has been disconnected. Plasma Display STANDBY indicator POWER ON indicator POWER button Media Receiver Turning off the power (Standby) 1 Press TV a on the remote control unit or STANDBY/ON on the Media Receiver. • The system enters the standby mode and the image on the screen...indicator is off. • The STANDBY indicator on the Plasma Display lights up red. 2 Confirm that the STANDBY indicators light up red, and then press TV a on the remote control unit or STANDBY/ ON on the Media Receiver to turn the system on. • The POWER ON indicators on the Plasma...
...cord of the Plasma Display has been disconnected. Plasma Display STANDBY indicator POWER ON indicator POWER button Media Receiver Turning off the power (Standby) 1 Press TV a on the remote control unit or STANDBY/ON on the Media Receiver. • The system enters the standby mode and the image on the screen...indicator is off. • The STANDBY indicator on the Plasma Display lights up red. 2 Confirm that the STANDBY indicators light up red, and then press TV a on the remote control unit or STANDBY/ ON on the Media Receiver to turn the system on. • The POWER ON indicators on the Plasma...
Owner's Manual
Page 26
...ENTER to tune in emergency situations. Selecting the antenna After confirming that the Mode switch on the remote control unit has been set up TV channels" on the remote control unit. Those messages are broadcasted by pressing buttons 0 to 9. Press CH RETURN again to restore the ...currently tuned channel. To select subchannels, also use the • (dot) button. Media Receiver (front view) STANDBY/ON REC ON STANDBY TIMER TV GUIDE ENTER DOWN UP LEFT RIGHT INPUT DOWN UP VOLUME DOWN UP CHANNEL CHANNEL UP/DOWN Channel banner 12:33pm DTV 2 • 1002.102 ...
...ENTER to tune in emergency situations. Selecting the antenna After confirming that the Mode switch on the remote control unit has been set up TV channels" on the remote control unit. Those messages are broadcasted by pressing buttons 0 to 9. Press CH RETURN again to restore the ...currently tuned channel. To select subchannels, also use the • (dot) button. Media Receiver (front view) STANDBY/ON REC ON STANDBY TIMER TV GUIDE ENTER DOWN UP LEFT RIGHT INPUT DOWN UP VOLUME DOWN UP CHANNEL CHANNEL UP/DOWN Channel banner 12:33pm DTV 2 • 1002.102 ...
Owner's Manual
Page 27
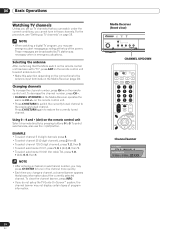
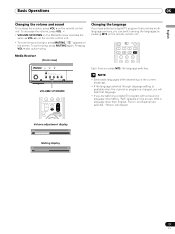
...setting is available when the channel or program is changed, you will appear. Changing the language If you have selected a digital TV program that language. • If you press MTS, the language switches. With a language other than English, French, and Spanish are watching a digital... TV program without sound or language information, "N/A" appears on the remote control unit. Basic Operations 06 English Changing the volume and sound To increase...
...setting is available when the channel or program is changed, you will appear. Changing the language If you have selected a digital TV program that language. • If you press MTS, the language switches. With a language other than English, French, and Spanish are watching a digital... TV program without sound or language information, "N/A" appears on the remote control unit. Basic Operations 06 English Changing the volume and sound To increase...
Owner's Manual
Page 28
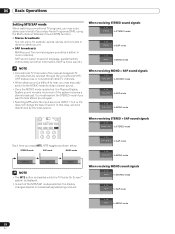
...if you may manually switch to the MONO mode to second language, supplementary commentary and other information. (SAP is mono sound.) NOTE • Conventional TV channels in mono or stereo). A 125 SAP (STEREO) In SAP mode A 125 MONO (SAP) In MONO mode When receiving MONO sound signals A...depend on broadcast signals being received. STEREO mode SAP mode MONO mode STEREO SAP MONO NOTE • The MTS button is disabled while the TV Guide On Screen™ system is selected, the Plasma Display System sound remains mono even if the system receives a stereo broadcast. SAP sound...
...if you may manually switch to the MONO mode to second language, supplementary commentary and other information. (SAP is mono sound.) NOTE • Conventional TV channels in mono or stereo). A 125 SAP (STEREO) In SAP mode A 125 MONO (SAP) In MONO mode When receiving MONO sound signals A...depend on broadcast signals being received. STEREO mode SAP mode MONO mode STEREO SAP MONO NOTE • The MTS button is disabled while the TV Guide On Screen™ system is selected, the Plasma Display System sound remains mono even if the system receives a stereo broadcast. SAP sound...

Owner's Manual
Page 29
...of useful information, using HTML text. 1 Press SPLIT to select the display mode. • Each time you do not setup the TV Guide On Screen™ system, the channel banner may not display certain types of program information. Basic Operations 06 English Viewing a ...channel banner While watching a TV program, pressing INFO causes the following procedure to select the 2-screen or picturein-picture mode. 2-screen 12 34 12:33pm DTV 2 &#...
...of useful information, using HTML text. 1 Press SPLIT to select the display mode. • Each time you do not setup the TV Guide On Screen™ system, the channel banner may not display certain types of program information. Basic Operations 06 English Viewing a ...channel banner While watching a TV program, pressing INFO causes the following procedure to select the 2-screen or picturein-picture mode. 2-screen 12 34 12:33pm DTV 2 &#...

Owner's Manual
Page 30
... warning message appears. • When you do not perform any image cannot be indicated by " ". NOTE • The SPLIT button is disabled while the TV Guide On Screen™ system is allowed to operate picture and sound. Left screen is the active screen which will be frozen. • When you... screen. • In picture-in anti-clockwise. 2 To select the desired input source, press the appropriate input source button. • If watching TV programs, press CH +/- to capture and freeze one frame from the same input source or two external input sources at the same time. Moving image...
... warning message appears. • When you do not perform any image cannot be indicated by " ". NOTE • The SPLIT button is disabled while the TV Guide On Screen™ system is allowed to operate picture and sound. Left screen is the active screen which will be frozen. • When you... screen. • In picture-in anti-clockwise. 2 To select the desired input source, press the appropriate input source button. • If watching TV programs, press CH +/- to capture and freeze one frame from the same input source or two external input sources at the same time. Moving image...
Owner's Manual
Page 31
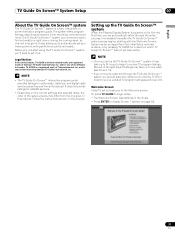
... System is a convenient way to automatically set up leads you are registered marks of Transcontinental, Inc. Before you can start using the TV Guide On Screen™ system, you connect a cable box through the setup process. Receipt of all eight days of its affiliates. ...The system offers program listings, searching by Gemstar-TV Guide International, Inc. and is used under license by keyword, timer recording, reminders and more. Setting up to 24 hours to begin setup....
... System is a convenient way to automatically set up leads you are registered marks of Transcontinental, Inc. Before you can start using the TV Guide On Screen™ system, you connect a cable box through the setup process. Receipt of all eight days of its affiliates. ...The system offers program listings, searching by Gemstar-TV Guide International, Inc. and is used under license by keyword, timer recording, reminders and more. Setting up to 24 hours to begin setup....

Owner's Manual
Page 32
...1: Country • This screen asks you the location of the procedure gives you the opportunity to correct any mistakes before you exit setup. 07 TV Guide On Screen™ System Setup Reminder Screen If you previously skipped Guide setup, you see the Reminder Screen when you power on . Screen ... 32 En System Setup Screens NOTE • Once you start the setup procedure, you entered incorrect information, continue with setup. The last screen of your TV. To make a selection, press / to highlight to an option, and press ENTER. • "Set up the Guide now, this reminder screen will ...
...1: Country • This screen asks you the location of the procedure gives you the opportunity to correct any mistakes before you exit setup. 07 TV Guide On Screen™ System Setup Reminder Screen If you previously skipped Guide setup, you see the Reminder Screen when you power on . Screen ... 32 En System Setup Screens NOTE • Once you start the setup procedure, you entered incorrect information, continue with setup. The last screen of your TV. To make a selection, press / to highlight to an option, and press ENTER. • "Set up the Guide now, this reminder screen will ...

Owner's Manual
Page 33
... back of the device to display Screen 8. Screen 8: Cable Box Brand Name • Press / to select a cable box brand. • Press ENTER to display Screen 7. TV Guide On Screen™ System Setup 07 Screen 3: Do you have a Cable Box? • If you select "Yes", you see Screen 5. • If you select... 12. Screen 6: Cable Box Output Channel • Select the channel used for the cable box. • Press ENTER to display Screen 9. 33 En Screen 5: Which TV Guide input is properly installed. • Press ENTER to the cable box.
... back of the device to display Screen 8. Screen 8: Cable Box Brand Name • Press / to select a cable box brand. • Press ENTER to display Screen 7. TV Guide On Screen™ System Setup 07 Screen 3: Do you have a Cable Box? • If you select "Yes", you see Screen 5. • If you select... 12. Screen 6: Cable Box Output Channel • Select the channel used for the cable box. • Press ENTER to display Screen 9. 33 En Screen 5: Which TV Guide input is properly installed. • Press ENTER to the cable box.

Owner's Manual
Page 34
... see Screen 14. • If you select "No", you may see an additional screen. If you select "Test this screen to display Screen 10. 07 TV Guide On Screen™ System Setup Screen 9: Cable Box Preparation • Follow the on your setup configuration, you see Screen 1. Screen 11: Cable Box Tuned...
... see Screen 14. • If you select "No", you may see an additional screen. If you select "Test this screen to display Screen 10. 07 TV Guide On Screen™ System Setup Screen 9: Cable Box Preparation • Follow the on your setup configuration, you see Screen 1. Screen 11: Cable Box Tuned...

Owner's Manual
Page 35
... • When testing is properly installed. • Press ENTER, and you see Screen 17. Make sure the G-LINK cable is done, Screen 20 displays automatically. TV Guide On Screen™ System Setup 07 Screen 15: Is a VCR Connected? • If you select "Yes", you see Screen 16. • If you select...
... • When testing is properly installed. • Press ENTER, and you see Screen 17. Make sure the G-LINK cable is done, Screen 20 displays automatically. TV Guide On Screen™ System Setup 07 Screen 15: Is a VCR Connected? • If you select "Yes", you see Screen 16. • If you select...

Owner's Manual
Page 36
...; If you select "Test this code again", the same code is tested again in Screen 19. 07 TV Guide On Screen™ System Setup Screen 20: Did your Guide. • Press ENTER to watch TV. 36 En Screen 21: Confirming Your Settings Verify the Setup information is correct. • If it is...
...; If you select "Test this code again", the same code is tested again in Screen 19. 07 TV Guide On Screen™ System Setup Screen 20: Did your Guide. • Press ENTER to watch TV. 36 En Screen 21: Confirming Your Settings Verify the Setup information is correct. • If it is...


