
Owner's Manual
Page 4
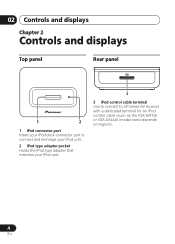
02 Controls and displays Chapter 2 Controls and displays Top panel Rear panel 1 2 1 iPod connector port Insert your iPod dock connector port to connect and recharge your iPod unit. 2 iPod type adapter pocket Holds the iPod type adapter that matches your iPod unit. 3 3 iPod control cable terminal Use to connect to a Pioneer AV receiver with a dedicated terminal for an iPod control cable (such as the VSX-84TXSi or VSX-AX4ASi (model name depends on region)). 4 En
02 Controls and displays Chapter 2 Controls and displays Top panel Rear panel 1 2 1 iPod connector port Insert your iPod dock connector port to connect and recharge your iPod unit. 2 iPod type adapter pocket Holds the iPod type adapter that matches your iPod unit. 3 3 iPod control cable terminal Use to connect to a Pioneer AV receiver with a dedicated terminal for an iPod control cable (such as the VSX-84TXSi or VSX-AX4ASi (model name depends on region)). 4 En
Owner's Manual
Page 5
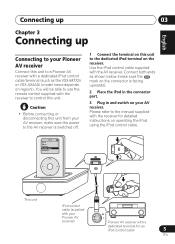
... remote control supplied with the receiver to control this unit to a Pioneer AV receiver with the receiver for an iPod control cable 5 En Please refer to the manual supplied with a dedicated iPod control cable terminal (such as shown below (make sure the power to the ... Nederlands Español Connecting up 03 Chapter 3 Connecting up Connecting to your Pioneer AV receiver Connect this unit. iPod Music > Extras > Settings iPod > Shuffle Songs Backlight MENU MENU This unit iPod control cable (supplied with your AV receiver, make sure the mark on the connector is ...
... remote control supplied with the receiver to control this unit to a Pioneer AV receiver with the receiver for an iPod control cable 5 En Please refer to the manual supplied with a dedicated iPod control cable terminal (such as shown below (make sure the power to the ... Nederlands Español Connecting up 03 Chapter 3 Connecting up Connecting to your Pioneer AV receiver Connect this unit. iPod Music > Extras > Settings iPod > Shuffle Songs Backlight MENU MENU This unit iPod control cable (supplied with your AV receiver, make sure the mark on the connector is ...