Owner's Manual
Page 1
DVD PLAYER DV-533 DV-533K DV-440 Operating Instructions
DVD PLAYER DV-533 DV-533K DV-440 Operating Instructions

Owner's Manual
Page 2
We are sure you will be fully satisfied with the DVD player. Please read through these operating instructions so you will know how to operate your support. Thank you have finished reading the instructions, put them away in a safe place for future reference. 2 • This player is on the leading edge of DVD research for your model properly. Pioneer is not suitable for commercial use. After you for consumer products and this unit incorporates the latest technological developments. En CONGRATULATIONS ON YOUR PURCHASE OF THIS FINE PIONEER PRODUCT.
We are sure you will be fully satisfied with the DVD player. Please read through these operating instructions so you will know how to operate your support. Thank you have finished reading the instructions, put them away in a safe place for future reference. 2 • This player is on the leading edge of DVD research for your model properly. Pioneer is not suitable for commercial use. After you for consumer products and this unit incorporates the latest technological developments. En CONGRATULATIONS ON YOUR PURCHASE OF THIS FINE PIONEER PRODUCT.

Owner's Manual
Page 3
This is for home and other limited viewing uses only unless otherwise authorized by Macrovision Corporation, and is protected by Macrovision Corporation and other intellectual property rights owned by ...
This is for home and other limited viewing uses only unless otherwise authorized by Macrovision Corporation, and is protected by Macrovision Corporation and other intellectual property rights owned by ...
Owner's Manual
Page 4
... the file extension ".mp3" or ".MP3". • This player is not compatible with the software publisher for recording your MP3 files. For more information on PIONEER DVD players. Super VCD 12 cm (5 in.)/ single-sided Super VCD single 8 cm (3 in.)/ single-sided VIDEO CD 12 cm (5 in order to play because...
... the file extension ".mp3" or ".MP3". • This player is not compatible with the software publisher for recording your MP3 files. For more information on PIONEER DVD players. Super VCD 12 cm (5 in.)/ single-sided Super VCD single 8 cm (3 in.)/ single-sided VIDEO CD 12 cm (5 in order to play because...
Owner's Manual
Page 5
... discs. 24-bit/192kHz compatible DAC delivers higher-than 1 W of Dolby Laboratories. MP3 compatibility This player is a registered trademark of Digital Theater Systems, Inc. *4 TruSurround and the ® symbol are trademarks of energy when this may not be recorded. Below are Audio1 A2 Video1 V2...Laboratories. "Dolby" and the double-D symbol are trademarks of DVD viewing options Multi-Angle (page 33) You can memorize up and adjusting the system easy to use when watching DVDs TV Screen - 4:3(Letter Box) 4:3(Pan&Scan) 16:9(Wide) in this player output Dolby*2 Digital, DTS...
... discs. 24-bit/192kHz compatible DAC delivers higher-than 1 W of Dolby Laboratories. MP3 compatibility This player is a registered trademark of Digital Theater Systems, Inc. *4 TruSurround and the ® symbol are trademarks of energy when this may not be recorded. Below are Audio1 A2 Video1 V2...Laboratories. "Dolby" and the double-D symbol are trademarks of DVD viewing options Multi-Angle (page 33) You can memorize up and adjusting the system easy to use when watching DVDs TV Screen - 4:3(Letter Box) 4:3(Pan&Scan) 16:9(Wide) in this player output Dolby*2 Digital, DTS...
Owner's Manual
Page 6
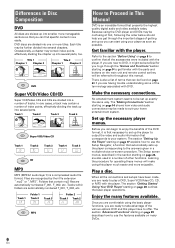
...page 9 to get familiar with the player. Play a disc. Once you are comfortable using this player have been made to suit your home entertainment system. DVD discs are divided into a number of tracks. Occassionally, a chapter may contain a number of index points, effectively dividing the track ... starting on page 24, are also used in a number of other functions. There is also a list of terms that can start using your system. The section 'Advanced Functions' starting on page 17 explains how to use the features available on many features available. Title 1 Chapter 1 Chapter 2...
...page 9 to get familiar with the player. Play a disc. Once you are comfortable using this player have been made to suit your home entertainment system. DVD discs are divided into a number of tracks. Occassionally, a chapter may contain a number of index points, effectively dividing the track ... starting on page 24, are also used in a number of other functions. There is also a list of terms that can start using your system. The section 'Advanced Functions' starting on page 17 explains how to use the features available on many features available. Title 1 Chapter 1 Chapter 2...
Owner's Manual
Page 7
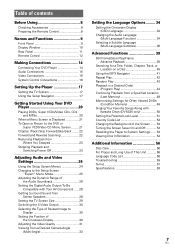
... 11 Remote Control 12 Making Connections 14 Connecting Your DVD Player 14 Audio Connections 15 Video Connections 16 System Control Connections 16 Setting Up the Player 17 Setting the TV System 17 Using the Setup Navigator 17 Getting Started Using Your DVD Player 20 Playing DVDs, Super VCDs/Video...51 Country Code List 53 Changing the Background of the Screen ....... 53 Turning the Screen Saver On and Off 53 Resetting the Player to System Settings ....... 53 Viewing Disc Information 54 Additional Information 56 Disc Care 56 For Proper and Long Use of This Unit 56 Language Code ...
... 11 Remote Control 12 Making Connections 14 Connecting Your DVD Player 14 Audio Connections 15 Video Connections 16 System Control Connections 16 Setting Up the Player 17 Setting the TV System 17 Using the Setup Navigator 17 Getting Started Using Your DVD Player 20 Playing DVDs, Super VCDs/Video...51 Country Code List 53 Changing the Background of the Screen ....... 53 Turning the Screen Saver On and Off 53 Resetting the Player to System Settings ....... 53 Viewing Disc Information 54 Additional Information 56 Disc Care 56 For Proper and Long Use of This Unit 56 Language Code ...
Owner's Manual
Page 8
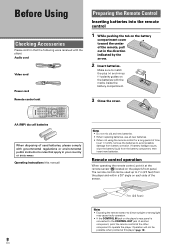
Make sure to match the plus (+) and minus (-) polarity guides on the player's rear panel is connected to the CONTROL OUT jack of time (over 1 month), remove the batteries to avoid possible damage from the battery component, then insert new batteries. Operation will not be used batteries, please comply with governmental regulations or environmental public instruction's rules that the following were received with the marks inside the battery compartment. 3 Close the cover. 5 5 5 OPEN/ LAST CONDITION CLOSE MEMORY MEMORY AUDIO SUB TITLE ANGLE REPEAT SETUP DISPLAY PREV 4 ¶ &#...
Make sure to match the plus (+) and minus (-) polarity guides on the player's rear panel is connected to the CONTROL OUT jack of time (over 1 month), remove the batteries to avoid possible damage from the battery component, then insert new batteries. Operation will not be used batteries, please comply with governmental regulations or environmental public instruction's rules that the following were received with the marks inside the battery compartment. 3 Close the cover. 5 5 5 OPEN/ LAST CONDITION CLOSE MEMORY MEMORY AUDIO SUB TITLE ANGLE REPEAT SETUP DISPLAY PREV 4 ¶ &#...
Owner's Manual
Page 9
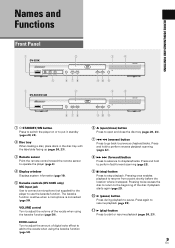
... label side facing up (pages 20, 23). 3 Remote sensor Point the remote control toward the remote sensor to operate the player (page 8). 4 Display window Displays system information (page 10). 5 Karaoke controls (DV-533K only) MIC input jack Use to connect a microphone (not supplied) to the player to resume from a point shortly...
... label side facing up (pages 20, 23). 3 Remote sensor Point the remote control toward the remote sensor to operate the player (page 8). 4 Display window Displays system information (page 10). 5 Karaoke controls (DV-533K only) MIC input jack Use to connect a microphone (not supplied) to the player to resume from a point shortly...

Owner's Manual
Page 10
TOTAL REMAIN = ~! 1 DTS indicator Indicates DTS audio playback. 2 GUI indicator Indicates an on-screen menu operation is being performed (pages 17, 24). 3 indicator Indicates Multi-Angle playback is in progress (page 33). 4 TITLE indicator Indicates a title number is being displayed. 5 indicator Indicates that TruSurround is selected (page 28). 6 TRK indicator Indicates a track number is being displayed. 7 CHP indicator Indicates a chapter number is being displayed. 8 LAST indicator Indicates the Last Memory location is recorded in memory for the currently loaded DVD (page 49). 0...
TOTAL REMAIN = ~! 1 DTS indicator Indicates DTS audio playback. 2 GUI indicator Indicates an on-screen menu operation is being performed (pages 17, 24). 3 indicator Indicates Multi-Angle playback is in progress (page 33). 4 TITLE indicator Indicates a title number is being displayed. 5 indicator Indicates that TruSurround is selected (page 28). 6 TRK indicator Indicates a track number is being displayed. 7 CHP indicator Indicates a chapter number is being displayed. 8 LAST indicator Indicates the Last Memory location is recorded in memory for the currently loaded DVD (page 49). 0...

Owner's Manual
Page 11
...the player to the audio stereo inputs on discs. You can output the digital signal via the coaxial output jack to another component bearing the Pioneer Î mark. This lets you are then performed by pointing the remote control at the component that has both digital and analog input ...jacks for DVD player connection, it were a component in a system. You can switch between [S1] and [S2] S-video output from the Setup menu (page 30). 6 VIDEO OUT jack Connect to the video input on...
...the player to the audio stereo inputs on discs. You can output the digital signal via the coaxial output jack to another component bearing the Pioneer Î mark. This lets you are then performed by pointing the remote control at the component that has both digital and analog input ...jacks for DVD player connection, it were a component in a system. You can switch between [S1] and [S2] S-video output from the Setup menu (page 30). 6 VIDEO OUT jack Connect to the video input on...
Owner's Manual
Page 12
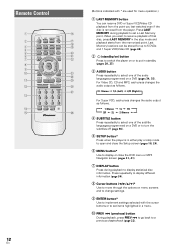
For Video CD, CD and MP3, each press changes the audio output as follows. = Stereo = 1/L (Left) = 2/R (Right) For Super VCD, each press changes the audio output as follows. = 1 Stereo = 1L = 1R 2R + 2L + 2 Stereo + 4 SUBTITLE button Press repeatedly to select one of the audio languages programmed on a DVD or to a previous chapter/track (page 22). Press repeatedly to display different information (page 54). 8 Cursor buttons (2/3/5/∞)* Use to move through the options on menu screens and to change settings. 9 ENTER button* Use to implement settings selected with * are used for up to 5 ...
For Video CD, CD and MP3, each press changes the audio output as follows. = Stereo = 1/L (Left) = 2/R (Right) For Super VCD, each press changes the audio output as follows. = 1 Stereo = 1L = 1R 2R + 2L + 2 Stereo + 4 SUBTITLE button Press repeatedly to select one of the audio languages programmed on a DVD or to a previous chapter/track (page 22). Press repeatedly to display different information (page 54). 8 Cursor buttons (2/3/5/∞)* Use to move through the options on menu screens and to change settings. 9 ENTER button* Use to implement settings selected with * are used for up to 5 ...
Owner's Manual
Page 13
Press ANGLE repeatedly to display different camera angles (page 33). ^ REPEAT button Use to set the repeat mode (page 42). & REPEAT A-B button Press at a time (DVD only) (page 39). ~ Number buttons (1-9, 0, +10)* Use to perform direct title and chapter/track searches, and to perform a title/folder, chapter/track or elapsed time search (page 40). 13 En Depending on the DVD. When a CD or MP3 is loaded, audio scanning is performed (page 22). ™ CLEAR button Works in conjunction with various camera angle playback options. Pressing twice causes the disc to return to view slow ...
Press ANGLE repeatedly to display different camera angles (page 33). ^ REPEAT button Use to set the repeat mode (page 42). & REPEAT A-B button Press at a time (DVD only) (page 39). ~ Number buttons (1-9, 0, +10)* Use to perform direct title and chapter/track searches, and to perform a title/folder, chapter/track or elapsed time search (page 40). 13 En Depending on the DVD. When a CD or MP3 is loaded, audio scanning is performed (page 22). ™ CLEAR button Works in conjunction with various camera angle playback options. Pressing twice causes the disc to return to view slow ...
Owner's Manual
Page 14
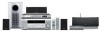
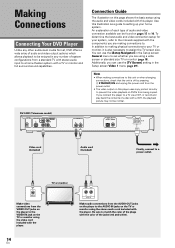
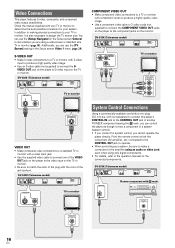
... which allows playback to be normal. Making Connections Connecting Your DVD Player Unlike any number of system configurations from the power outlet. • The video output on this player uses copy protect ... the power cord from a standard TV with stereo audio input to a home theater system with a TV or monitor and full surround sound capabilities. Be sure to . In addition to making...use the [Setup Navigator] in the Setup screen General menu to setting up your home system. Use this illustration as a guide to set whether you are using a wide screen or standard size TV ...
... which allows playback to be normal. Making Connections Connecting Your DVD Player Unlike any number of system configurations from the power outlet. • The video output on this player uses copy protect ... the power cord from a standard TV with stereo audio input to a home theater system with a TV or monitor and full surround sound capabilities. Be sure to . In addition to making...use the [Setup Navigator] in the Setup screen General menu to setting up your home system. Use this illustration as a guide to set whether you are using a wide screen or standard size TV ...
Owner's Manual
Page 15
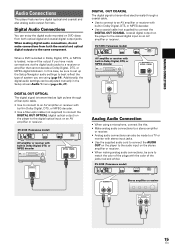
... if you are using a microphone, connect like this case, be sure to set up the Setup Navigator audio settings to best reflect the type of system you have made to a TV or monitor with built-in Dolby Digital, DTS, or MPEG decoder DIGITAL OUT OPTICAL COAXIAL AC IN DIGITAL OUT OPTICAL...
... if you are using a microphone, connect like this case, be sure to set up the Setup Navigator audio settings to best reflect the type of system you have made to a TV or monitor with built-in Dolby Digital, DTS, or MPEG decoder DIGITAL OUT OPTICAL COAXIAL AC IN DIGITAL OUT OPTICAL...
Owner's Manual
Page 16
...COMPONENT VIDEO OUT PB PR AUDIO OUT R L DIGITAL OUT OPTICAL COAXIAL AC IN CONTROL IN Pioneer component with a mini plug (3.5 mm dia. CONTROL OUT VIDEO IN 16 En In addition to making physical connections to your system. S-VIDEO OUT • Make S-video connections to a TV or monitor with S-video ...IN VIDEO OUT • Make composite video connections to a standard TV or monitor with the color of another PIONEER component bearing the Î mark, you can control the player as a system, be sure to make a connection to the amplifier using an audio or video cord, even when using a...
...COMPONENT VIDEO OUT PB PR AUDIO OUT R L DIGITAL OUT OPTICAL COAXIAL AC IN CONTROL IN Pioneer component with a mini plug (3.5 mm dia. CONTROL OUT VIDEO IN 16 En In addition to making physical connections to your system. S-VIDEO OUT • Make S-video connections to a TV or monitor with S-video ...IN VIDEO OUT • Make composite video connections to a standard TV or monitor with the color of another PIONEER component bearing the Î mark, you can control the player as a system, be sure to make a connection to the amplifier using an audio or video cord, even when using a...
Owner's Manual
Page 17
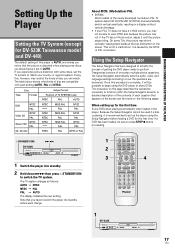
... the picture stops rolling. Using the Setup Navigator The Setup Navigator has been designed to simplify the process of the newly developed countdown PAL TV system detect 50 Hz (PAL)/60 Hz (NTSC) and automatically switch vertical amplitude, resulting in the player. A detailed description of the contents of each ...function within the Setup Navigator screens. About MOD. (Modulation) PAL • SHRINK Most models of getting the DVD player ready to set the TV system to match your PAL TV does not have to switch the player into standby. 2 Hold down ¡¢ then press STANDBY/ON to switch...
... the picture stops rolling. Using the Setup Navigator The Setup Navigator has been designed to simplify the process of the newly developed countdown PAL TV system detect 50 Hz (PAL)/60 Hz (NTSC) and automatically switch vertical amplitude, resulting in the player. A detailed description of the contents of each ...function within the Setup Navigator screens. About MOD. (Modulation) PAL • SHRINK Most models of getting the DVD player ready to set the TV system to match your PAL TV does not have to switch the player into standby. 2 Hold down ¡¢ then press STANDBY/ON to switch...
Owner's Manual
Page 18
Please proceed to the next step. • If you do not want to set at a later time in manual Setup screen menu operation (page 24). 4 Press ENTER. To change the audio or subtitle language to a different language, make changes in the Setup Navigator, the letter box screen format is 16:9. If you are going to use the cursor button (∞) to select [Auto Start Off] at this time. When [Standard (4:3)] is selected in the Setup screen Video 1 menu [TV Screen] setting (page 28). To switch the preference to the pan & scan format, make changes in menus and on -screen display ...
Please proceed to the next step. • If you do not want to set at a later time in manual Setup screen menu operation (page 24). 4 Press ENTER. To change the audio or subtitle language to a different language, make changes in the Setup Navigator, the letter box screen format is 16:9. If you are going to use the cursor button (∞) to select [Auto Start Off] at this time. When [Standard (4:3)] is selected in the Setup screen Video 1 menu [TV Screen] setting (page 28). To switch the preference to the pan & scan format, make changes in menus and on -screen display ...

Owner's Manual
Page 19
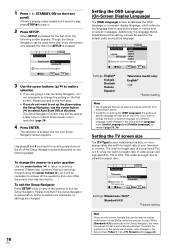
... external AV component as determined in previous screens. Yes Select if the connected AV component can process an audio signal with a sampling rate of the system settings. Audio1 A2 Video1 V2 Language General Setup Navigator Exit Setup Navigator Changes are uncertain whether the connected AV component can be decoded. Audio1 A2...
... external AV component as determined in previous screens. Yes Select if the connected AV component can process an audio signal with a sampling rate of the system settings. Audio1 A2 Video1 V2 Language General Setup Navigator Exit Setup Navigator Changes are uncertain whether the connected AV component can be decoded. Audio1 A2...
Owner's Manual
Page 20
..., one of the file structure. When an operation is loaded: Use the number buttons to perform an operation, but for the player to match your home system. During this time, "Please wait a moment" is prohibited by the player. The operation is displayed. • Depending on the screen. Load a disc with the cursor...
..., one of the file structure. When an operation is loaded: Use the number buttons to perform an operation, but for the player to match your home system. During this time, "Please wait a moment" is prohibited by the player. The operation is displayed. • Depending on the screen. Load a disc with the cursor...