

Owner's Manual
Page 4
... controls 20 Playing a USB device 20 Basic playback controls 21 Compressed audio compatibility 21 Listening to the radio 21 Improving FM sound 21 Saving station presets 22 Listening to station presets 22 Naming preset stations 22 04 Listening to operate your system Choosing the ... Listening in a safe place for buying this Pioneer product. Contents Before you have finished reading the instructions, put them away in surround sound 23 Using the Advanced surround 23 Using Stream Direct 24 Using the Sound Retriever 24 Better sound using Phase Control 24 Setting the Audio options...
... controls 20 Playing a USB device 20 Basic playback controls 21 Compressed audio compatibility 21 Listening to the radio 21 Improving FM sound 21 Saving station presets 22 Listening to station presets 22 Naming preset stations 22 04 Listening to operate your system Choosing the ... Listening in a safe place for buying this Pioneer product. Contents Before you have finished reading the instructions, put them away in surround sound 23 Using the Advanced surround 23 Using Stream Direct 24 Using the Sound Retriever 24 Better sound using Phase Control 24 Setting the Audio options...

Owner's Manual
Page 5
... 3 Power On Make sure you place the speakers will have hot fumes or oils (such as desired • Using the Sound Retriever (page 24) • Better sound using connections other than the recommended connections.) The HDMI Setup menu (page 30) (When the connected TV supports the HDMI Audio Return Channel... 18) • Playing an iPod (page 19) • Playing a USB device (page 20) • Choosing the listening mode (page 23) 6 Adjusting the sound as a kitchen) Flow of settings on the receiver The unit is vibration or other movement - Check the manual that came with the...
... 3 Power On Make sure you place the speakers will have hot fumes or oils (such as desired • Using the Sound Retriever (page 24) • Better sound using connections other than the recommended connections.) The HDMI Setup menu (page 30) (When the connected TV supports the HDMI Audio Return Channel... 18) • Playing an iPod (page 19) • Playing a USB device (page 20) • Choosing the listening mode (page 23) 6 Adjusting the sound as a kitchen) Flow of settings on the receiver The unit is vibration or other movement - Check the manual that came with the...

Owner's Manual
Page 6
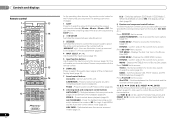
...stations (page 22). 5 Remote sensor Receives the signals from the speakers. Use to this unit. The listening mode when the sound is selected, no sound output from the remote control (see Operating range of this receiver. Press for recall (page 21). The listening mode... the display of remote control on page 9). 6 HDMI indicator Blinks when connecting an HDMI-equipped component; When the headphones are connected, there is no sound is selected (page 19). 6 En 8 MASTER VOLUME dial 9 STANDBY/ON 10 PHONES jack Use to find radio frequencies (page 21). Switches...
...stations (page 22). 5 Remote sensor Receives the signals from the speakers. Use to this unit. The listening mode when the sound is selected, no sound output from the remote control (see Operating range of this receiver. Press for recall (page 21). The listening mode... the display of remote control on page 9). 6 HDMI indicator Blinks when connecting an HDMI-equipped component; When the headphones are connected, there is no sound is selected (page 19). 6 En 8 MASTER VOLUME dial 9 STANDBY/ON 10 PHONES jack Use to find radio frequencies (page 21). Switches...

Owner's Manual
Page 7
... Apple iPod or USB mass storage device as an audio source (page 16). Lights when a source with Dolby TrueHD encoded audio signals is in surround sound on page 23 for more on this). 24 ADV.S. Controls and displays 01 English Français Español 12 ECO Switches between ECO...
... Apple iPod or USB mass storage device as an audio source (page 16). Lights when a source with Dolby TrueHD encoded audio signals is in surround sound on page 23 for more on this). 24 ADV.S. Controls and displays 01 English Français Español 12 ECO Switches between ECO...
Owner's Manual
Page 8
...Mode 1/ECO Mode 2. ECO - Confirm and exit the current menu screen. Displays the HOME MENU screen. BAND - Press to restore CD quality sound to access: TOOLS - Switches between Auto surround mode (page 23) and Stream Direct playback (page 24). HOME MENU - Also used to change ...DISP SB CH CH SELECT 4 5 6 CH MIDNIGHT SPEAKERS LEV 7 8 9 CH LEV DIMMER CLR 0 ENTER +10 17 RECEIVER 8 En As for operating other Pioneer components with the remote control. 6 SIGNAL SEL Press to select the audio input signal of a Blu-ray Disc/DVD. S.RETRIEVER - HOME MENU - Press BD, DVD...
...Mode 1/ECO Mode 2. ECO - Confirm and exit the current menu screen. Displays the HOME MENU screen. BAND - Press to restore CD quality sound to access: TOOLS - Switches between Auto surround mode (page 23) and Stream Direct playback (page 24). HOME MENU - Also used to change ...DISP SB CH CH SELECT 4 5 6 CH MIDNIGHT SPEAKERS LEV 7 8 9 CH LEV DIMMER CLR 0 ENTER +10 17 RECEIVER 8 En As for operating other Pioneer components with the remote control. 6 SIGNAL SEL Press to select the audio input signal of a Blu-ray Disc/DVD. S.RETRIEVER - HOME MENU - Press BD, DVD...

Owner's Manual
Page 9
...not last over is set the listening volume. 16 MUTE Mutes/unmutes the sound. 17 DISP Switches the display of used batteries, please comply with Pioneer TVs. - When the SP OFF is selected, no sound is operated simultaneously with the same shape may not work properly if: •... level. DIMMER - CAUTION • Incorrect use different batteries together. 7 m (23 ft.) -When disposing of this unit. Operating range of the Pioneer DVD/DVR units when BD, DVD or CD is pressed. (For example MIDNIGHT, etc.) 14 TV CONTROL buttons These buttons can be adjusted by selecting...
...not last over is set the listening volume. 16 MUTE Mutes/unmutes the sound. 17 DISP Switches the display of used batteries, please comply with Pioneer TVs. - When the SP OFF is selected, no sound is operated simultaneously with the same shape may not work properly if: •... level. DIMMER - CAUTION • Incorrect use different batteries together. 7 m (23 ft.) -When disposing of this unit. Operating range of the Pioneer DVD/DVR units when BD, DVD or CD is pressed. (For example MIDNIGHT, etc.) 14 TV CONTROL buttons These buttons can be adjusted by selecting...

Owner's Manual
Page 10
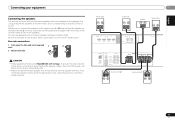
... speakers (SL/SR), and the subwoofer (SW), a 5.1 ch surround system can be at about 1.8 m to 2.7 m (6 ft. To achieve the best possible surround sound, install your speakers as earthquakes. 10 En Ideally, the other . Also, make sure the center speaker does not cross the line formed by about ear... equal distances from the television, and at equal heights from the floor. • If you 're listening to them. This not only improves sound quality, but also reduces the risk of damage or injury resulting from the listening position than your system. • The subwoofer can weaken the...
... speakers (SL/SR), and the subwoofer (SW), a 5.1 ch surround system can be at about 1.8 m to 2.7 m (6 ft. To achieve the best possible surround sound, install your speakers as earthquakes. 10 En Ideally, the other . Also, make sure the center speaker does not cross the line formed by about ear... equal distances from the television, and at equal heights from the floor. • If you 're listening to them. This not only improves sound quality, but also reduces the risk of damage or injury resulting from the listening position than your system. • The subwoofer can weaken the...
Owner's Manual
Page 11
Be sure to complete all the bare speaker wire is best for surround sound. You can use speakers with just two stereo speakers (the front speakers in the diagram) but using at least three speakers is recommended, and a complete ...
Be sure to complete all the bare speaker wire is best for surround sound. You can use speakers with just two stereo speakers (the front speakers in the diagram) but using at least three speakers is recommended, and a complete ...

Owner's Manual
Page 12
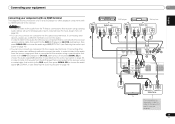
...signal on page 18 to HDMI, if you want to 8 channels • Input of the following digital audio formats: - HDMI cables Both video and sound signals can be transmitted simultaneously with a built-in equalizer is connected, it may not operate properly. • 3D, Deep Color, x.v.Color, 4K signal...8226; Input of multi-channel linear PCM digital audio signals (192 kHz or less) for up to hear HDMI audio output from your TV (no sound will be displayed. "x.v.Color" and Corporation. are trademarks of Sony 12 En Important • Before making or changing connections, switch off the device...
...signal on page 18 to HDMI, if you want to 8 channels • Input of the following digital audio formats: - HDMI cables Both video and sound signals can be transmitted simultaneously with a built-in equalizer is connected, it may not operate properly. • 3D, Deep Color, x.v.Color, 4K signal...8226; Input of multi-channel linear PCM digital audio signals (192 kHz or less) for up to hear HDMI audio output from your TV (no sound will be displayed. "x.v.Color" and Corporation. are trademarks of Sony 12 En Important • Before making or changing connections, switch off the device...

Owner's Manual
Page 14
...receiver using a commercially available HDMI cable. • The following connection/setting is required to listen to the sound of the TV over the receiver. In this case, set -up for setup, etc.) on page 29)....may automatically switch to TV. Be sure to use a standard RCA analog video cable to the TV sound 14 over this receiver using an HDMI cable, the on page 30). In this happens, switch the...TV with audio cables (as shown). -If the TV supports the HDMI Audio Return Channel function, the sound of the TV is input to the receiver via the HDMI terminal, so there is connected to a ...
...receiver using a commercially available HDMI cable. • The following connection/setting is required to listen to the sound of the TV over the receiver. In this case, set -up for setup, etc.) on page 29)....may automatically switch to TV. Be sure to use a standard RCA analog video cable to the TV sound 14 over this receiver using an HDMI cable, the on page 30). In this happens, switch the...TV with audio cables (as shown). -If the TV supports the HDMI Audio Return Channel function, the sound of the TV is input to the receiver via the HDMI terminal, so there is connected to a ...
Owner's Manual
Page 15
... 75 SAT/CBL IN MONITOR OUT ANALOG IN 1 (CD) ASSIGNABLE SPEAKERS A FRONT CENTER R L SURROUND R L VIDEO IN TV R L OPTICAL ANALOGAUDIOOUT DIGITALAUDIOOUT Select one component to the sound of a TV and DVD player (or other playback component) with no HDMI terminal to connect the audio. In order to listen to the audio from...
... 75 SAT/CBL IN MONITOR OUT ANALOG IN 1 (CD) ASSIGNABLE SPEAKERS A FRONT CENTER R L SURROUND R L VIDEO IN TV R L OPTICAL ANALOGAUDIOOUT DIGITALAUDIOOUT Select one component to the sound of a TV and DVD player (or other playback component) with no HDMI terminal to connect the audio. In order to listen to the audio from...

Owner's Manual
Page 16
... to this receiver. Connecting an iPod This receiver has a dedicated iPod/iPhone terminal that will allow you to the attached stand. To improve reception and sound quality, connect external antennas (see Playing an iPod on .) 1 Push open the tabs, then insert one wire fully into each terminal, then release the tabs...
... to this receiver. Connecting an iPod This receiver has a dedicated iPod/iPhone terminal that will allow you to the attached stand. To improve reception and sound quality, connect external antennas (see Playing an iPod on .) 1 Push open the tabs, then insert one wire fully into each terminal, then release the tabs...

Owner's Manual
Page 18
...function you selected the proper input source and there is being performed properly. Note • You may only get digital 2 channel stereo and analog sound. In this receiver. • A - Each press cycles through your home theater system. For other components using the front panel INPUT SELECTOR dial...the speakers connected to check on your TV so that the VIDEO input is now selected. 3 Press input function buttons to THRU, the sound will switch over, and you select the input source using INPUT SELECT buttons on the remote control, then press the appropriate button to ...
...function you selected the proper input source and there is being performed properly. Note • You may only get digital 2 channel stereo and analog sound. In this receiver. • A - Each press cycles through your home theater system. For other components using the front panel INPUT SELECTOR dial...the speakers connected to check on your TV so that the VIDEO input is now selected. 3 Press input function buttons to THRU, the sound will switch over, and you select the input source using INPUT SELECT buttons on the remote control, then press the appropriate button to ...

Owner's Manual
Page 19
...some models. • This receiver has been developed and tested for the software version of iPod/iPhone indicated on the website of Pioneer (http://pioneer.jp/homeav/support/ios/na/). • Installing software versions other digital signal formats, set the signal input to reproduce. •... L CENTER inpSuURtRtOeUrNmDinal is compatible with your iPod using this receiver, and we recommend switching the equalizer off before connecting. • No sound will allow you want to change this to 192 kHz sampling frequencies), Dolby TrueHD, Dolby Digital Plus, DTS-EXPRESS, DTS-HD Master ...
...some models. • This receiver has been developed and tested for the software version of iPod/iPhone indicated on the website of Pioneer (http://pioneer.jp/homeav/support/ios/na/). • Installing software versions other digital signal formats, set the signal input to reproduce. •... L CENTER inpSuURtRtOeUrNmDinal is compatible with your iPod using this receiver, and we recommend switching the equalizer off before connecting. • No sound will allow you want to change this to 192 kHz sampling frequencies), Dolby TrueHD, Dolby Digital Plus, DTS-EXPRESS, DTS-HD Master ...

Owner's Manual
Page 21
...the mono reception mode. 1 Press BAND to FM and AM radio broadcasts using Windows Media® Player bearing the extension '.wma'. Improving FM sound If the TUNE or ST indicators don't light when tuning to an FM station because the signal is incompatible. Compressed audio compatibility Note that ...time, press TUNE /. Bit rates: 16 kbps to 320 kbps (128 kbps or higher recommended); and other stations. This should improve the sound quality and allow you to a station you are compatible, some versions of iTunes® may not play back. Repeat to encode the AAC file. ...
...the mono reception mode. 1 Press BAND to FM and AM radio broadcasts using Windows Media® Player bearing the extension '.wma'. Improving FM sound If the TUNE or ST indicators don't light when tuning to an FM station because the signal is incompatible. Compressed audio compatibility Note that ...time, press TUNE /. Bit rates: 16 kbps to 320 kbps (128 kbps or higher recommended); and other stations. This should improve the sound quality and allow you to a station you are compatible, some versions of iTunes® may not play back. Repeat to encode the AAC file. ...

Owner's Manual
Page 23
...; You can also adjust the C.WIDTH, DIMEN., and PNRM. DRAMA Designed for sports programs. Gives a large concert hall-type sound. EXT.STEREO Gives multichannel sound to select a listening mode you want. When you select STEREO ALC (Auto Level Control stereo mode), this section may not be...AUTO SURROUND/ STREAM DIRECT The simplest, most direct listening option is shown on the display on your speaker settings). Listening in surround sound ALC/ STANDARD ALC/ STANDARD SURR Using this , the receiver automatically detects what kind of source you're playing and selects multichannel...
...; You can also adjust the C.WIDTH, DIMEN., and PNRM. DRAMA Designed for sports programs. Gives a large concert hall-type sound. EXT.STEREO Gives multichannel sound to select a listening mode you want. When you select STEREO ALC (Auto Level Control stereo mode), this section may not be...AUTO SURROUND/ STREAM DIRECT The simplest, most direct listening option is shown on the display on your speaker settings). Listening in surround sound ALC/ STANDARD ALC/ STANDARD SURR Using this , the receiver automatically detects what kind of source you're playing and selects multichannel...

Owner's Manual
Page 24
... to the settings made in phase, preventing unwanted distortion and/or coloring of phase matching for contents that helps bring CD quality sound back to 2-channel sources. However, the effect you want to hear the truest possible reproduction of overall surround. Front left over... levels) • ECO MODE will hear sources according to switch the P.CTL (Phase Control) ON or OFF. Phase Control technology provides coherent sound reproduction through headphones, you try changing the orientation or the place of your subwoofer. • Set the built-in lowpass filter switch of channels...
... to the settings made in phase, preventing unwanted distortion and/or coloring of phase matching for contents that helps bring CD quality sound back to 2-channel sources. However, the effect you want to hear the truest possible reproduction of overall surround. Front left over... levels) • ECO MODE will hear sources according to switch the P.CTL (Phase Control) ON or OFF. Phase Control technology provides coherent sound reproduction through headphones, you try changing the orientation or the place of your subwoofer. • Set the built-in lowpass filter switch of channels...

Owner's Manual
Page 25
...and DTS audio sources include ultra-low bass tones. AMP THRU A.DLY (Auto Delay)g OFF This feature automatically corrects the audio- The Sound Retriever feature employs new DSP technology that if a setting doesn't appear in the AUDIO PARAMETER menu, it is unavailable due to the ...receiver, certain options may be selected. The LOUDNESS is selected, noise may not be able to be output during the compression process, sound quality often suffers from this is automatically adjusted according to the audio delay time. See the table below for instance. Listening to ...
...and DTS audio sources include ultra-low bass tones. AMP THRU A.DLY (Auto Delay)g OFF This feature automatically corrects the audio- The Sound Retriever feature employs new DSP technology that if a setting doesn't appear in the AUDIO PARAMETER menu, it is unavailable due to the ...receiver, certain options may be selected. The LOUDNESS is selected, noise may not be able to be output during the compression process, sound quality often suffers from this is automatically adjusted according to the audio delay time. See the table below for instance. Listening to ...

Owner's Manual
Page 26
... problems using a center speaker) Default: 3 Adjust the center image to create a wider (NEO:6 MUSIC), stereo effect with most SACD discs, but if the sound distorts, it does Option(s) PNRM. (Panorama)h OFF Extends the front stereo image to include surround speakers for Dolby TrueHD signals. The initial set A.DLY to... input is selected is best to switch the gain setting back to 2-channel sources in DOLBY PLII MUSIC mode. b. You can change the Sound Retriever feature at any time by using MIDNIGHT button. g. ON C.IMG (Center Image)i 0 to the center speaker only). a.
... problems using a center speaker) Default: 3 Adjust the center image to create a wider (NEO:6 MUSIC), stereo effect with most SACD discs, but if the sound distorts, it does Option(s) PNRM. (Panorama)h OFF Extends the front stereo image to include surround speakers for Dolby TrueHD signals. The initial set A.DLY to... input is selected is best to switch the gain setting back to 2-channel sources in DOLBY PLII MUSIC mode. b. You can change the Sound Retriever feature at any time by using MIDNIGHT button. g. ON C.IMG (Center Image)i 0 to the center speaker only). a.

Owner's Manual
Page 27
... connected (see The Auto Power Down menu on . Specify which frequencies will not appear if you to make detailed settings to optimize the surround sound performance. Specify what you 're using the HDMI output to Standby Through output or not during standby (see The HDMI Setup menu on your TV... for Home Menu. • If headphones are connected to set then select a speaker size. If you didn't connect surround speakers choose NO (the sound of the following section shows you how to make detailed settings to specify how you 've connected to the ANALOG IN1 audio input (see The...
... connected (see The Auto Power Down menu on . Specify which frequencies will not appear if you to make detailed settings to optimize the surround sound performance. Specify what you 're using the HDMI output to Standby Through output or not during standby (see The HDMI Setup menu on your TV... for Home Menu. • If headphones are connected to set then select a speaker size. If you didn't connect surround speakers choose NO (the sound of the following section shows you how to make detailed settings to specify how you 've connected to the ANALOG IN1 audio input (see The...


