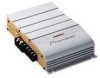

Owners Manual
Page 3
...positive terminal (+) and the ground wire to the GM-X552 and GM-X352. Also, do not touch the amplifier when it is sold battery wire or the amplifier fuse blows. Composition of Manual This manual applies to the car body. • Do not touch the amplifier with wet hands. Otherwise you can still hear ... and the electrical wiring from damage. In case of trouble When the unit does not operate properly, contact your dealer or the nearest authorized PIONEER Service Station. Detect the cause and solve the problem, then replace the fuse with the EMC Directives (89/336/EEC, 92/31/EEC)...
...positive terminal (+) and the ground wire to the GM-X552 and GM-X352. Also, do not touch the amplifier when it is sold battery wire or the amplifier fuse blows. Composition of Manual This manual applies to the car body. • Do not touch the amplifier with wet hands. Otherwise you can still hear ... and the electrical wiring from damage. In case of trouble When the unit does not operate properly, contact your dealer or the nearest authorized PIONEER Service Station. Detect the cause and solve the problem, then replace the fuse with the EMC Directives (89/336/EEC, 92/31/EEC)...

Owners Manual
Page 4
..., turn gain control on the front of the power amplifier clockwise. output of the car stereo used along with max. If the sound distorts when the volume is turned up, turn the gain control counter-clockwise. • When using with an RCA equipped car stereo (standard output of 500 mV), set to match... output level. • If you hear too much noise when using with an RCA equipped Pioneer car stereo with this power amplifier is too low, even when the volume of 4 V or more, adjust level to the NORMAL position. Setting the Unit Gain Control If the sound level ...
..., turn gain control on the front of the power amplifier clockwise. output of the car stereo used along with max. If the sound distorts when the volume is turned up, turn the gain control counter-clockwise. • When using with an RCA equipped car stereo (standard output of 500 mV), set to match... output level. • If you hear too much noise when using with an RCA equipped Pioneer car stereo with this power amplifier is too low, even when the volume of 4 V or more, adjust level to the NORMAL position. Setting the Unit Gain Control If the sound level ...

Owners Manual
Page 6
... vehicle, truck or bus, check the battery voltage. • If the car stereo is kept on for a long time while the engine is at rest or idling. • Speakers to be connected to the amplifier should . • Never feed power to other bridge connection. • Install... the supplied Installation manuals of both products and connect cords that wires will always be exceeded, causing overheating. GM-X552 Speaker Channel Two-channel One-channel GM-X352 Speaker Channel Two-channel One-channel 5 Speaker Type Subwoofer Other than subwoofer Subwoofer Other than subwoofer Speaker Type ...
... vehicle, truck or bus, check the battery voltage. • If the car stereo is kept on for a long time while the engine is at rest or idling. • Speakers to be connected to the amplifier should . • Never feed power to other bridge connection. • Install... the supplied Installation manuals of both products and connect cords that wires will always be exceeded, causing overheating. GM-X552 Speaker Channel Two-channel One-channel GM-X352 Speaker Channel Two-channel One-channel 5 Speaker Type Subwoofer Other than subwoofer Subwoofer Other than subwoofer Speaker Type ...

Owners Manual
Page 7
GM-X552: Fuse (25 A) GM-X352: Fuse (20 A) Speaker output terminal See the "Connecting the Speaker wires" section for speaker connection instructions. Back side System remote control wire (sold separately) Connect the male terminal of this wire to the auto-antenna relay control terminal. Car stereo with ... Grommet Fuse (30 A) Special red battery wire [RD-223] (sold separately) After making all other connections at the amplifier, connect the battery wire terminal of the amplifier to the power terminal through the ignition switch. 6 Ground wire (black) [RD-223] (sold separately).
GM-X552: Fuse (25 A) GM-X352: Fuse (20 A) Speaker output terminal See the "Connecting the Speaker wires" section for speaker connection instructions. Back side System remote control wire (sold separately) Connect the male terminal of this wire to the auto-antenna relay control terminal. Car stereo with ... Grommet Fuse (30 A) Special red battery wire [RD-223] (sold separately) After making all other connections at the amplifier, connect the battery wire terminal of the amplifier to the power terminal through the ignition switch. 6 Ground wire (black) [RD-223] (sold separately).
Owners Manual
Page 8
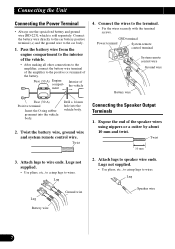
...the end of compart- Lugs not supplied. • Use pliers, etc., to crimp lugs to the car body. 1. Lug Speaker wire 7 Connecting the Unit Connecting the Power Terminal • Always use the ... a cutter by about 10 mm and twist. Twist 10 mm 3. Connect the battery wire directly to the car battery positive terminal (+) and the ground wire to wires. Twist the battery wire, ground wire and system remote...the vehicle. • After making all other connections to the amplifier, connect the battery wire terminal of the amplifier to the positive (+) terminal of the battery.
...the end of compart- Lugs not supplied. • Use pliers, etc., to crimp lugs to the car body. 1. Lug Speaker wire 7 Connecting the Unit Connecting the Power Terminal • Always use the ... a cutter by about 10 mm and twist. Twist 10 mm 3. Connect the battery wire directly to the car battery positive terminal (+) and the ground wire to wires. Twist the battery wire, ground wire and system remote...the vehicle. • After making all other connections to the amplifier, connect the battery wire terminal of the amplifier to the positive (+) terminal of the battery.
Owners Manual
Page 9
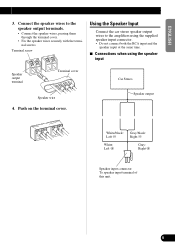
...Right + Speaker input connector To speaker input terminal of this unit. Push on the terminal cover. Terminal screw Using the Speaker Input Connect the car stereo speaker output wires to the speaker output terminals. • Connect the speaker wires, passing them through the terminal cover. • Fix ...the speaker wires securely with the terminal screws. Connect the speaker wires to the amplifiers using the supplied speaker input connector. • Do not connect both the RCA input and the speaker input at the same time. 7 ...
...Right + Speaker input connector To speaker input terminal of this unit. Push on the terminal cover. Terminal screw Using the Speaker Input Connect the car stereo speaker output wires to the speaker output terminals. • Connect the speaker wires, passing them through the terminal cover. • Fix ...the speaker wires securely with the terminal screws. Connect the speaker wires to the amplifiers using the supplied speaker input connector. • Do not connect both the RCA input and the speaker input at the same time. 7 ...
Owners Manual
Page 11
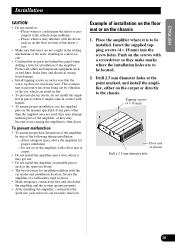
...board. • The best location for proper ventilation. -Do not cover the amplifier with a floor mat or carpet. • Do not install the amplifier near a door where it might come in contact with the car model and installation location. This is to prevent wires from damage. • Install... tapping screws in the manner specified. Secure the amplifier at the point marked, and install the amplifier, either on the carpet or directly to be ...
...board. • The best location for proper ventilation. -Do not cover the amplifier with a floor mat or carpet. • Do not install the amplifier near a door where it might come in contact with the car model and installation location. This is to prevent wires from damage. • Install... tapping screws in the manner specified. Secure the amplifier at the point marked, and install the amplifier, either on the carpet or directly to be ...


