
Owner's Manual
Page 1
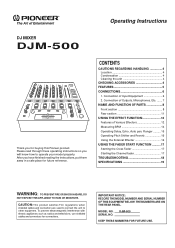
.... Please read through these operating instructions so you for buying this Pioneer product. Connection of Outputs, Microphones, Etc. ....... 7 NAME AND FUNCTION OF PARTS 8 Front section 8 Rear section 11 USING THE EFFECT FUNCTION 12 Features of Input Equipment 6 2. DJM-500 KEEP THESE NUMBERS FOR FUTURE USE. After you have finished reading the instructions, put them away...
.... Please read through these operating instructions so you for buying this Pioneer product. Connection of Outputs, Microphones, Etc. ....... 7 NAME AND FUNCTION OF PARTS 8 Front section 8 Rear section 11 USING THE EFFECT FUNCTION 12 Features of Input Equipment 6 2. DJM-500 KEEP THESE NUMBERS FOR FUTURE USE. After you have finished reading the instructions, put them away...
Owner's Manual
Page 2
...of important operating and maintenance (servicing) instructions in the literature accompanying the appliance. This is equipped with care. The appliance should be used for future reference. POWER LINES - SERVICING - The user should be cleaned only with respect to proper grounding of the mast and ...a built-in a wet basement, or near water - LOCATION - If an outside antenna is grounded so as marked on or pinched by a Pioneer authorized service center or qualified service personnel when: ÷ The power-supply cord or the plug has been damaged. ÷ Objects have fallen...
...of important operating and maintenance (servicing) instructions in the literature accompanying the appliance. This is equipped with care. The appliance should be used for future reference. POWER LINES - SERVICING - The user should be cleaned only with respect to proper grounding of the mast and ...a built-in a wet basement, or near water - LOCATION - If an outside antenna is grounded so as marked on or pinched by a Pioneer authorized service center or qualified service personnel when: ÷ The power-supply cord or the plug has been damaged. ÷ Objects have fallen...
Owner's Manual
Page 3
... can radiate radio frequency energy and, if not installed and used in accordance with the limits for a lifetime. If this by setting your hearing adapts. This manufacturer and the Electronic Industries Association's Consumer Electronics Group want...truck, chain saw, pneumatic drill 120 Rock band concert in a particular installation. This list of the Deafness Research Foundation. We Want You Listening For A Lifetime Used wisely, your sensitive hearing. Since hearing damage from that lets the sound come through loud and clear without annoying blaring or distortion-and, most out...
... can radiate radio frequency energy and, if not installed and used in accordance with the limits for a lifetime. If this by setting your hearing adapts. This manufacturer and the Electronic Industries Association's Consumer Electronics Group want...truck, chain saw, pneumatic drill 120 Rock band concert in a particular installation. This list of the Deafness Research Foundation. We Want You Listening For A Lifetime Used wisely, your sensitive hearing. Since hearing damage from that lets the sound come through loud and clear without annoying blaring or distortion-and, most out...
Owner's Manual
Page 4
... wax or cleaners. • Never use thinners, benzene, insecticide sprays or other chemicals on or near this unit is exposed to direct rays of the unit in a damp or dusty environment ... plug (four) These are very dirty, wipe with a soft cloth dipped in a malfunction or accident. (Avoid installation near stoves or radiators. Cleaning the unit • Use a polishing cloth to wipe off dust and dirt. • When the surfaces are inserted in a well-ventilated location where it will not be able to...
... wax or cleaners. • Never use thinners, benzene, insecticide sprays or other chemicals on or near this unit is exposed to direct rays of the unit in a damp or dusty environment ... plug (four) These are very dirty, wipe with a soft cloth dipped in a malfunction or accident. (Avoid installation near stoves or radiators. Cleaning the unit • Use a polishing cloth to wipe off dust and dirt. • When the surfaces are inserted in a well-ventilated location where it will not be able to...
Owner's Manual
Page 5
...to -20 dB. The attenuation level also serves as delay, echo, auto pan, flanger, reverb, and pitch shifter can be used only when the Pioneer CD player CDJ-500 series is equipped with 15-bit LED indicators for the external effectors. 5 Key changes by increasing the level of the cross .... The beat can be checked visually. BPM Level Display (Beat meter display) Displays the level of Effector Loads the master tempo incorporated in Pioneer CD players. This counter can be enjoyed. FEATURES BPM Counter The auto BPM counter provided allows the tempo of songs to be switched between ...
...to -20 dB. The attenuation level also serves as delay, echo, auto pan, flanger, reverb, and pitch shifter can be used only when the Pioneer CD player CDJ-500 series is equipped with 15-bit LED indicators for the external effectors. 5 Key changes by increasing the level of the cross .... The beat can be checked visually. BPM Level Display (Beat meter display) Displays the level of Effector Loads the master tempo incorporated in Pioneer CD players. This counter can be enjoyed. FEATURES BPM Counter The auto BPM counter provided allows the tempo of songs to be switched between ...
Owner's Manual
Page 6
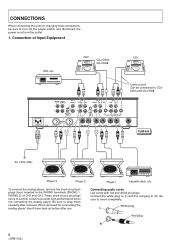
... 1 CD 2 / LINE CH - 1 LINE CD 1 L L R R R MASTER LEVEL ATT. When removed for connecting the analog player, insert them carefully after use. Be sure to (R). To connect the analog player, remove the short-circuit pin plugs (four) inserted in the PHONO terminals (PHONO 1, PHONO 2) of Input Equipment... CH - 2 CH - 1 PLAYER CONTROL ~AC IN R MASTER OUT 2 R LR LR L CH - 4 L MASTER OUT 3 SEND (MONO) RETURN (MONO) SUBMIC DJM-500 L R L R L R L R L R AC 120V, 60Hz Player 3 Player 2 Player 1 Cassette deck, etc. These short-circuit pin plugs serve to cut fine noises...
... 1 CD 2 / LINE CH - 1 LINE CD 1 L L R R R MASTER LEVEL ATT. When removed for connecting the analog player, insert them carefully after use. Be sure to (R). To connect the analog player, remove the short-circuit pin plugs (four) inserted in the PHONO terminals (PHONO 1, PHONO 2) of Input Equipment... CH - 2 CH - 1 PLAYER CONTROL ~AC IN R MASTER OUT 2 R LR LR L CH - 4 L MASTER OUT 3 SEND (MONO) RETURN (MONO) SUBMIC DJM-500 L R L R L R L R L R AC 120V, 60Hz Player 3 Player 2 Player 1 Cassette deck, etc. These short-circuit pin plugs serve to cut fine noises...
Owner's Manual
Page 7
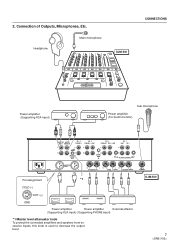
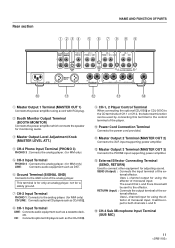
Headphone Main microphone DJM-500 CONNECTIONS Power amplifier (Supporting RCA input) Sub microphone Power amplifier (For booth monitor) R L L R MASTER BOOTH OUT 1 MONITOR L CH - 4 PHONO 3 CH - 3 PHONO 2 LINE L.... R SIGNAL GND R CH - 2 CH - 1 PLAYER CONTROL ~AC IN R MASTER OUT 2 R LR LR L CH - 4 L MASTER OUT 3 SEND (MONO) RETURN (MONO) SUBMIC Pin assignment *1 DJM-500 COLD (-) 23 1 HOT (+) GND Power amplifier Power amplifier External effector (Supporting XLR input) (Supporting PHONE input) *1 Master level attenuator knob To protect the connected amplifiers...
Headphone Main microphone DJM-500 CONNECTIONS Power amplifier (Supporting RCA input) Sub microphone Power amplifier (For booth monitor) R L L R MASTER BOOTH OUT 1 MONITOR L CH - 4 PHONO 3 CH - 3 PHONO 2 LINE L.... R SIGNAL GND R CH - 2 CH - 1 PLAYER CONTROL ~AC IN R MASTER OUT 2 R LR LR L CH - 4 L MASTER OUT 3 SEND (MONO) RETURN (MONO) SUBMIC Pin assignment *1 DJM-500 COLD (-) 23 1 HOT (+) GND Power amplifier Power amplifier External effector (Supporting XLR input) (Supporting PHONE input) *1 Master level attenuator knob To protect the connected amplifiers...

Owner's Manual
Page 9
... level holding it could not be displayed properly. 9 If it could be measured. Flat at center click. When BPM is selected using the effect selector and the effect switch is turned on, the beat monitor function will be displayed blinking. When several buttons are selected...to 4 MIC MASTER: Displays the effect source. When the button is pressed another time, the selection is canceled. • When BPM is selected using the effect channel selector (() is converted to hours and displayed on . 3 Master Output Monaural/Stereo Selection Switch (MONO/STEREO) NAME AND FUNCTION OF ...
... level holding it could not be displayed properly. 9 If it could be measured. Flat at center click. When BPM is selected using the effect selector and the effect switch is turned on, the beat monitor function will be displayed blinking. When several buttons are selected...to 4 MIC MASTER: Displays the effect source. When the button is pressed another time, the selection is canceled. • When BPM is selected using the effect channel selector (() is converted to hours and displayed on . 3 Master Output Monaural/Stereo Selection Switch (MONO/STEREO) NAME AND FUNCTION OF ...
Owner's Manual
Page 10
... the master volume and master balance. = Headphone Terminal (PHONES) ~ Channel Fader Volume Used for adjusting the headphone monitor volume. FLANGER: Produces periodic sound change effects by the master... also correspond to CH4. ! Effective when the cross fader switch ($) is used to start automatic playing of the CD player using the channel fader or cross fader. # Cross Fader Volume (CROSS FADER) ...) (Refer to Page 17.) When the optional CD player (CDJ-500G or CDJ-500 ) is connected to the unit using the control cord, this ON/OFF switch is on and off . Assign Switch (ASSIGN A, ...
... the master volume and master balance. = Headphone Terminal (PHONES) ~ Channel Fader Volume Used for adjusting the headphone monitor volume. FLANGER: Produces periodic sound change effects by the master... also correspond to CH4. ! Effective when the cross fader switch ($) is used to start automatic playing of the CD player using the channel fader or cross fader. # Cross Fader Volume (CROSS FADER) ...) (Refer to Page 17.) When the optional CD player (CDJ-500G or CDJ-500 ) is connected to the unit using the control cord, this ON/OFF switch is on and off . Assign Switch (ASSIGN A, ...
Owner's Manual
Page 11
... ! RETURN (Input) : Connects the output terminal of the ex- Uses L channel output for MM only) CD/LINE : Connects optional CD players such as CDJ-500 . 8 CH-1 Input Terminal LINE : Connects audio equipment such as a cassette deck, etc. Uses L channel input for MM only) LINE : Connects audio equipment such... as the CDJ-500 . 9 CH-1, 2 Player Control Terminal When connecting the optional CDJ-500 or CDJ-500G to the CD terminals of CH-1 or CH-2, the...
... ! RETURN (Input) : Connects the output terminal of the ex- Uses L channel output for MM only) CD/LINE : Connects optional CD players such as CDJ-500 . 8 CH-1 Input Terminal LINE : Connects audio equipment such as a cassette deck, etc. Uses L channel input for MM only) LINE : Connects audio equipment such... as the CDJ-500 . 9 CH-1, 2 Player Control Terminal When connecting the optional CDJ-500 or CDJ-500G to the CD terminals of CH-1 or CH-2, the...
Owner's Manual
Page 12
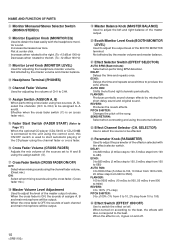
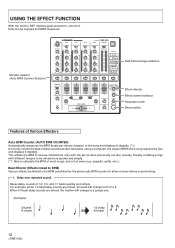
...different tempos to be enjoyed and BPM measured. Monitor selector (Auto BPM Counter Selector) MIC CH-1 CD 1/LINE LINE PROFESSIONAL CH-2 CH-3 DJ MIXER DJM-500 CH-4 MASTER CD 2/LINE PHONO 1 LINE PHONO 2 SUB MIC PHONO 3 MONO STEREO POWER MIC LEVEL -∞ 0dB HI -12dB +12dB MID ... are mixed, the rhythm will change to a jumpy one repeated sound) Mixes delay sounds of 1/2, 3/4, and 1/1 beats quickly and simply. USING THE EFFECT FUNCTION With the built-in DSP (digital signal processor), sound effects can be mixed more quickly and simply. (*1: Able to calculate the...
...different tempos to be enjoyed and BPM measured. Monitor selector (Auto BPM Counter Selector) MIC CH-1 CD 1/LINE LINE PROFESSIONAL CH-2 CH-3 DJ MIXER DJM-500 CH-4 MASTER CD 2/LINE PHONO 1 LINE PHONO 2 SUB MIC PHONO 3 MONO STEREO POWER MIC LEVEL -∞ 0dB HI -12dB +12dB MID ... are mixed, the rhythm will change to a jumpy one repeated sound) Mixes delay sounds of 1/2, 3/4, and 1/1 beats quickly and simply. USING THE EFFECT FUNCTION With the built-in DSP (digital signal processor), sound effects can be mixed more quickly and simply. (*1: Able to calculate the...
Owner's Manual
Page 13
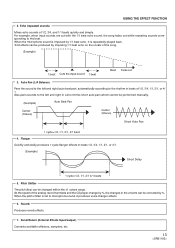
... ±1 octave range. Pitch Shifter The pitch (key) can be performed manually. (Example) Auto Beat Pan Center (Stereo) Center (Stereo) Short Auto Pan 1 cycle=1/2, 1/1, 2/1, 4/1 beat 4. USING THE EFFECT FUNCTION 2. Auto Pan (L-R Balance) Pans the sound to the left and right in a short time (short auto pan) which cannot be corrected by...
... ±1 octave range. Pitch Shifter The pitch (key) can be performed manually. (Example) Auto Beat Pan Center (Stereo) Center (Stereo) Short Auto Pan 1 cycle=1/2, 1/1, 2/1, 4/1 beat 4. USING THE EFFECT FUNCTION 2. Auto Pan (L-R Balance) Pans the sound to the left and right in a short time (short auto pan) which cannot be corrected by...
Owner's Manual
Page 14
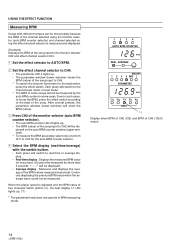
... be measured for more than 5 seconds, "- - -" will be mixed easily because the BPM of the channel selected using the monitor selector (auto BPM counter selector) and channel selected using the effect channel selector is adjusted and the BPM value of two channels match (within ±1), the beat display 1/1 ...played on the auto BPM counter window (upper window). * To measure the BPM accurately, select only one from CH1 to CH4 for every beat. USING THE EFFECT FUNCTION Measuring BPM Songs with the switch button. • Each press will switch to the beat meter, press the effect switch. When...
... be measured for more than 5 seconds, "- - -" will be mixed easily because the BPM of the channel selected using the monitor selector (auto BPM counter selector) and channel selected using the effect channel selector is adjusted and the BPM value of two channels match (within ±1), the beat display 1/1 ...played on the auto BPM counter window (upper window). * To measure the BPM accurately, select only one from CH1 to CH4 for every beat. USING THE EFFECT FUNCTION Measuring BPM Songs with the switch button. • Each press will switch to the beat meter, press the effect switch. When...
Owner's Manual
Page 15
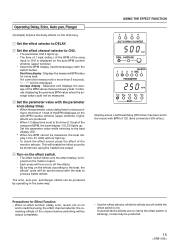
.... • When 1/2 delay time is set to the music with BPM of 120 (time conversion 500 mSec.) Precautions for Effect Function • When an effect function (delay, echo, reverb, etc.) is on and is switched using the headphone output. 4 Turn on the effect switch. • The effect switch blinks and the... effect (delay) is blinking), noises may be produced by operating in the same way. If used while the effects are on (while the effect switch is imposed on the master output. If it cannot be measured for every beat. This will...
.... • When 1/2 delay time is set to the music with BPM of 120 (time conversion 500 mSec.) Precautions for Effect Function • When an effect function (delay, echo, reverb, etc.) is on and is switched using the headphone output. 4 Turn on the effect switch. • The effect switch blinks and the... effect (delay) is blinking), noises may be produced by operating in the same way. If used while the effects are on (while the effect switch is imposed on the master output. If it cannot be measured for every beat. This will...
Owner's Manual
Page 16
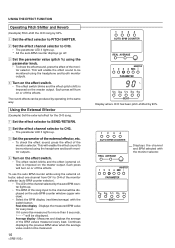
...effect switch. • The effect switch blinks and the effect (external effect) is imposed on or off . 3 Set the parameter value (pitch %) using the headphone and booth monitor outputs. 4 Turn on the effect switch. • The effect switch blinks and the effect (pitch shift) is imposed on ... auto BPM counter window (upper window). • Select the BPM display (real-time/average) with the monitor selector. This will be monitored using the parameter knob. • To check the effect sound, press the effect of the BPM values measured every beat. Continues displaying the previous...
...effect switch. • The effect switch blinks and the effect (external effect) is imposed on or off . 3 Set the parameter value (pitch %) using the headphone and booth monitor outputs. 4 Turn on the effect switch. • The effect switch blinks and the effect (pitch shift) is imposed on ... auto BPM counter window (upper window). • Select the BPM display (real-time/average) with the monitor selector. This will be monitored using the parameter knob. • To check the effect sound, press the effect of the BPM values measured every beat. Continues displaying the previous...
Owner's Manual
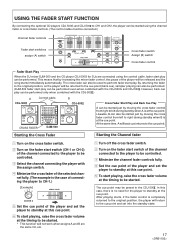
Page 17
...start playing, raise the cross fader volume at the timing to be started . * This function will not work when assigns A and B are connected using the channel fader or cross fader controls. (The control cable must be connected.) Channel fader controls Fader start switches assign (A) switch MONITOR MONO STEREO ... time, A will return to the cue point and set the player to the cue point (back cue), sampler playing can also be performed. (DJM-500 fader start play can also be released and the song starts immediately automatically. In this cue point. 5 To start play. This means that by ...
...start playing, raise the cross fader volume at the timing to be started . * This function will not work when assigns A and B are connected using the channel fader or cross fader controls. (The control cable must be connected.) Channel fader controls Fader start switches assign (A) switch MONITOR MONO STEREO ... time, A will return to the cue point and set the player to the cue point (back cue), sampler playing can also be performed. (DJM-500 fader start play can also be released and the song starts immediately automatically. In this cue point. 5 To start play. This means that by ...
Owner's Manual
Page 18
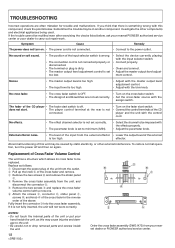
... is not set to minimum (MIN). • Select the channel to be caused by static electricity, or other components and electrical appliances being used. To restore normal operation, turn on the cross fader switch. • The Assign A and B switches are often mistaken for trouble and ... . External effector noise. • The level of the input from your nearest dealer or PIONEER authorized service center. Replace as this component, check the points below , ask your nearest PIONEER authorized service center or your hand inside the unit. 18 Order the cross fader assembly (DWG1473...
... is not set to minimum (MIN). • Select the channel to be caused by static electricity, or other components and electrical appliances being used. To restore normal operation, turn on the cross fader switch. • The Assign A and B switches are often mistaken for trouble and ... . External effector noise. • The level of the input from your nearest dealer or PIONEER authorized service center. Replace as this component, check the points below , ask your nearest PIONEER authorized service center or your hand inside the unit. 18 Order the cross fader assembly (DWG1473...

