Operating Instructions
Page 3
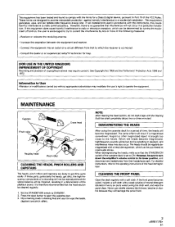
..., benzine or alcohol because they will not occur in accordance with a soft cloth. NOTE: After cleaning the head section, do not load a tape until the cleaning fluid has dried eomplete/y (about two or three minutes). The same effect will occur if a magnetized screwdriver, magnet or other ...jack. When demagnetizing the heads, make sure that the STANDBY/ON switch of the cassette deck is no guarantee that to radio communications. CLEANING THE FRONT PANEL I DEMAGNETIZING THE HEADS ] After using the cassette deck for a Class B digital device, pursuant to Part 15 of the FCC Rules. if...
..., benzine or alcohol because they will not occur in accordance with a soft cloth. NOTE: After cleaning the head section, do not load a tape until the cleaning fluid has dried eomplete/y (about two or three minutes). The same effect will occur if a magnetized screwdriver, magnet or other ...jack. When demagnetizing the heads, make sure that the STANDBY/ON switch of the cassette deck is no guarantee that to radio communications. CLEANING THE FRONT PANEL I DEMAGNETIZING THE HEADS ] After using the cassette deck for a Class B digital device, pursuant to Part 15 of the FCC Rules. if...
Operating Instructions
Page 4
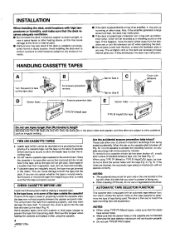
... erasure prevention _Tab remove... _" for Side A _ _Tab for Side B Erasure prevention tabs E_ Sensor holes TYPE IV (Metal) tape TYPE 11 (High/CrO2) tape Cadohversivweith tape I This cassette deck [s equipped with a plastic or thick paper stopper to prevent the tape from beginning to end, to keep internal parts cool. To prevent this happens, move the...
... erasure prevention _Tab remove... _" for Side A _ _Tab for Side B Erasure prevention tabs E_ Sensor holes TYPE IV (Metal) tape TYPE 11 (High/CrO2) tape Cadohversivweith tape I This cassette deck [s equipped with a plastic or thick paper stopper to prevent the tape from beginning to end, to keep internal parts cool. To prevent this happens, move the...
Operating Instructions
Page 5
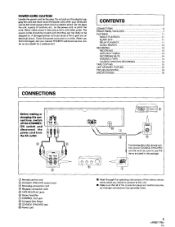
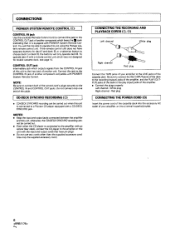
...fire or give you an electrical shock, Check the power cord once in a while, When you find it damaged, ask your nearest PIONEER authorized service center or your hands are not likely to this unit. • Make sure that all of the connection plugs are inserted...11 RELAY PLAYBACK 11 MUSIC SEARCH 12 RECORDING 13" RECORDING 13 AUTO BLE TUNING 13 RECORDING MUTE 14 ERASING A TAPE 14 CD.DECK SYNCHRO RECORDING 14 TAPE COPYING 15 LAST MEMORY FEATURE 15 TROUBLESHOOIING 16 SPECIFICATIONS 18 CONNECTIONS Before making or changing the con- POWER-CORD ...
...fire or give you an electrical shock, Check the power cord once in a while, When you find it damaged, ask your nearest PIONEER authorized service center or your hands are not likely to this unit. • Make sure that all of the connection plugs are inserted...11 RELAY PLAYBACK 11 MUSIC SEARCH 12 RECORDING 13" RECORDING 13 AUTO BLE TUNING 13 RECORDING MUTE 14 ERASING A TAPE 14 CD.DECK SYNCHRO RECORDING 14 TAPE COPYING 15 LAST MEMORY FEATURE 15 TROUBLESHOOIING 16 SPECIFICATIONS 18 CONNECTIONS Before making or changing the con- POWER-CORD ...
Operating Instructions
Page 6
...unit. NOTE: Besure to the CONTROL IN jack of another component compatible with a remote control unit which was not designed for deck 1 and deck 1|, or a selection button to operate this jack to connect bothof the controlcord'splugs securelyto the CONTROL/N and CONTROL OUTjecks, ...not connectonly one endof the cable. I CD.DECK SYNCHRO RECORDING ( You will only operate deck 11.To operate deck 1 with PIONEER System Remote Control. or deck 11,the buttons will then be able to choose deck ! Connect this unit using the Pioneer system remote control unit. If the remote control...
...unit. NOTE: Besure to the CONTROL IN jack of another component compatible with a remote control unit which was not designed for deck 1 and deck 1|, or a selection button to operate this jack to connect bothof the controlcord'splugs securelyto the CONTROL/N and CONTROL OUTjecks, ...not connectonly one endof the cable. I CD.DECK SYNCHRO RECORDING ( You will only operate deck 11.To operate deck 1 with PIONEER System Remote Control. or deck 11,the buttons will then be able to choose deck ! Connect this unit using the Pioneer system remote control unit. If the remote control...
Operating Instructions
Page 7
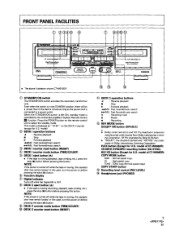
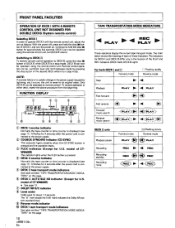
Press the POWER button on the DECK II counter, (except for U.S. When the STANDBY/ON switch is left ON, standby mode is connected to select the standby mode. This mode is displayed ... STANDBY position, there will be a power flow to the deck's circuits as long as " ST-BY " on the remote control unit to a power outlet. model) (_ DECK I operation buttons _1 : Reverse playback • : Stop : Forward playback FRONT PANEL FACILITIES ® • The above illustration shows CT-W616DR. (_ STANDBY/ON switch The STANDBY/ON switch activates...
Press the POWER button on the DECK II counter, (except for U.S. When the STANDBY/ON switch is left ON, standby mode is connected to select the standby mode. This mode is displayed ... STANDBY position, there will be a power flow to the deck's circuits as long as " ST-BY " on the remote control unit to a power outlet. model) (_ DECK I operation buttons _1 : Reverse playback • : Stop : Forward playback FRONT PANEL FACILITIES ® • The above illustration shows CT-W616DR. (_ STANDBY/ON switch The STANDBY/ON switch activates...
Operating Instructions
Page 8
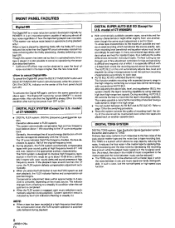
...tapes with conventional AUTO BLE. Half of CT-W606DR) • DIGITAL FLEX system: DIGITAL Frequency Level ,_.,_ander system. (hereafter abbreviated to FLEX system) This system automatically compensates high and low frequency level balance above 1 kHz according to maximize the tape's recording capability. In many conventional tape decks...cancel its operation by PIONEER. Though this system has been set accordingly for the switching procedure. • Since this system checks the tape's recording capability by approx. Also note that it is activated every time a tape is played, it ...
...tapes with conventional AUTO BLE. Half of CT-W606DR) • DIGITAL FLEX system: DIGITAL Frequency Level ,_.,_ander system. (hereafter abbreviated to FLEX system) This system automatically compensates high and low frequency level balance above 1 kHz according to maximize the tape's recording capability. In many conventional tape decks...cancel its operation by PIONEER. Though this system has been set accordingly for the switching procedure. • Since this system checks the tape's recording capability by approx. Also note that it is activated every time a tape is played, it ...
Operating Instructions
Page 9
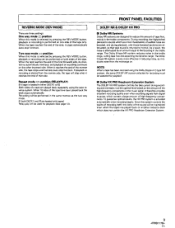
...this mode is selected by pressing the REV MODE button, playback or recording is loaded in either DECK I :n The Dolby B-type NR system reduces noise in the treble range, cutting tape hiss and expanding the dynamic range. During recording, the highpitched pianissimo sounds which contain a large ... recording must be performed on both DECK I and II are played back on another cassette deck which does not contain the HXPRO Headroom Extension System, 9 I or [l] Both sides of a tape are played back repeatedly using the auto reverse system. When the tape reaches the end of the first ...
...this mode is selected by pressing the REV MODE button, playback or recording is loaded in either DECK I :n The Dolby B-type NR system reduces noise in the treble range, cutting tape hiss and expanding the dynamic range. During recording, the highpitched pianissimo sounds which contain a large ... recording must be performed on both DECK I and II are played back on another cassette deck which does not contain the HXPRO Headroom Extension System, 9 I or [l] Both sides of a tape are played back repeatedly using the auto reverse system. When the tape reaches the end of the first ...
Operating Instructions
Page 10
...DECK 11,press the stop (m) button of CT-W606DR) (Except for U.S. • See page 13. (_) DOLBY NR BIC indicator (_ Level meter Holds peak for about 1.3 seconds. Continue to its original state. counter indicator Normally the tape ...page 11). The "e" mark beside the 0 dB mark indicates the Dolby NR system standard level. (_) Reverse mode indicator (_ DECK ! TORS" on this page. (_ DECK [I ] tape transport mode indicators See table entitled "TAPE TRANSPORTATION MODE INDICA- Fast reverse _-_'_ _ _ _'DI_ Fmuosicrwseaarrcdh _ ,,\ g /.. , ,_ ,qJ, - - ._._.., ...
...DECK 11,press the stop (m) button of CT-W606DR) (Except for U.S. • See page 13. (_) DOLBY NR BIC indicator (_ Level meter Holds peak for about 1.3 seconds. Continue to its original state. counter indicator Normally the tape ...page 11). The "e" mark beside the 0 dB mark indicates the Dolby NR system standard level. (_) Reverse mode indicator (_ DECK ! TORS" on this page. (_ DECK [I ] tape transport mode indicators See table entitled "TAPE TRANSPORTATION MODE INDICA- Fast reverse _-_'_ _ _ _'DI_ Fmuosicrwseaarrcdh _ ,,\ g /.. , ,_ ,qJ, - - ._._.., ...
Operating Instructions
Page 11
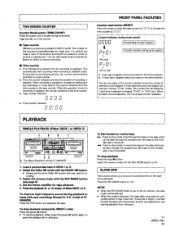
... I'_ i'_. During fast-forwarding/rewinding, the counter automatically switches to the tape counter. I_l LJ PLAYBACK SINGLE PLAYBACK (Either DECK [ or DECK 1[) 1 5 5 1 II ! 32 The above illustration shows CT-W616DR. 1. Set the stereo amplifier for DECK 1 and 1|. Tape counter _ Time counter • Tape counter Different counters are provided for tape playback. 5. ing, rewinding, or music search, the counter switches from...
... I'_ i'_. During fast-forwarding/rewinding, the counter automatically switches to the tape counter. I_l LJ PLAYBACK SINGLE PLAYBACK (Either DECK [ or DECK 1[) 1 5 5 1 II ! 32 The above illustration shows CT-W616DR. 1. Set the stereo amplifier for DECK 1 and 1|. Tape counter _ Time counter • Tape counter Different counters are provided for tape playback. 5. ing, rewinding, or music search, the counter switches from...
Operating Instructions
Page 12
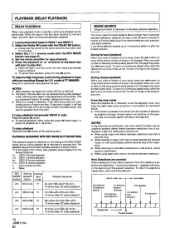
PLAYBACK (RELAY PLAYBACK) RELAY PLAYBACK When relay playback mode is selected, continuous playback can be performed. Select the Dolby NR mode with the REV MODE button (see page 9), 4, Set the stereo amplifier for recording, 3. Select the I c-._ ) reverse mode with the DOLBY NR button. • Always set the switch to the same positions that were used for tape playback, E. Press the playback 11_or and DECK ]L 2. Load prerecorded tapes in the first deck reaches its end and stops, the other deck will automatically begin playback. 1. When the tape in DECK !
PLAYBACK (RELAY PLAYBACK) RELAY PLAYBACK When relay playback mode is selected, continuous playback can be performed. Select the Dolby NR mode with the REV MODE button (see page 9), 4, Set the stereo amplifier for recording, 3. Select the I c-._ ) reverse mode with the DOLBY NR button. • Always set the switch to the same positions that were used for tape playback, E. Press the playback 11_or and DECK ]L 2. Load prerecorded tapes in the first deck reaches its end and stops, the other deck will automatically begin playback. 1. When the tape in DECK !
Operating Instructions
Page 13
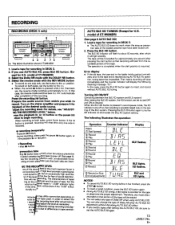
...recording will stop (la) button. RECORDING L RECORDING (DECK 11only) _'=, .... If you wish to determine the proper adjustment, Therefore, any type of CT-W606DR) (See page 8 AUTO BLE XD) 1. Turn on the setting of the loaded cassette tape have been broken off. 2, Press the BLE XD ... or the pause (11) _Jtton to differences in DECK 11. 2. or I 43 2 7 • The above illustration shows CT-W616OR 1. m¢ r _ecor and adjust the level as desired• When the BLE XO button is recorded. BLElights. Load a tape for approximately one side only,set the AUTO BLE ...
...recording will stop (la) button. RECORDING L RECORDING (DECK 11only) _'=, .... If you wish to determine the proper adjustment, Therefore, any type of CT-W606DR) (See page 8 AUTO BLE XD) 1. Turn on the setting of the loaded cassette tape have been broken off. 2, Press the BLE XD ... or the pause (11) _Jtton to differences in DECK 11. 2. or I 43 2 7 • The above illustration shows CT-W616OR 1. m¢ r _ecor and adjust the level as desired• When the BLE XO button is recorded. BLElights. Load a tape for approximately one side only,set the AUTO BLE ...


