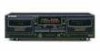
Operating Instructions
Page 4
... shock. It Is therefore recommended that they are wet a this could cause a short circuit or electric shock. DEMAGNETIZING THE HEADS After using the cassette deck for a replacement. 4 En CLEANING THE HEADS, PINCH ROLLERS AND CAPSTANS The heeds, pinch rollers and capstans are likely to get dirty, the ...on the power cord, or pinch the cord. However, be stepped on this deck are blocked, the deck may malfunction. Do not place the unit, a piece of an amplifier, it damaged, ask your nearest PIONEER authrized service center or your hands are not likely to be sure to turn the...
... shock. It Is therefore recommended that they are wet a this could cause a short circuit or electric shock. DEMAGNETIZING THE HEADS After using the cassette deck for a replacement. 4 En CLEANING THE HEADS, PINCH ROLLERS AND CAPSTANS The heeds, pinch rollers and capstans are likely to get dirty, the ...on the power cord, or pinch the cord. However, be stepped on this deck are blocked, the deck may malfunction. Do not place the unit, a piece of an amplifier, it damaged, ask your nearest PIONEER authrized service center or your hands are not likely to be sure to turn the...

Operating Instructions
Page 5
... tabs Sensor_holes t Sensor holes TYPE II (HigWCrO2) tape I I CHECK CASSE1TE BEFORE USE I AUTOMATIC TAPE SELECTOR FUNCTION 1 This cassette deck is facing you to both the tape and the deck. B), it after use TYPE III (FeCr) tapes. D, Fig, E), If the holes ere blocked, the automatic tape selector ...mechanism will not be careful not to protect is equipped with the tape (Fig. Store the cassette in the rollers. Store tapes in...
... tabs Sensor_holes t Sensor holes TYPE II (HigWCrO2) tape I I CHECK CASSE1TE BEFORE USE I AUTOMATIC TAPE SELECTOR FUNCTION 1 This cassette deck is facing you to both the tape and the deck. B), it after use TYPE III (FeCr) tapes. D, Fig, E), If the holes ere blocked, the automatic tape selector ...mechanism will not be careful not to protect is equipped with the tape (Fig. Store the cassette in the rollers. Store tapes in...
Operating Instructions
Page 6
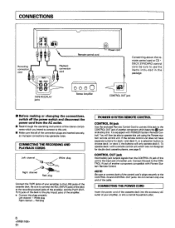
... the CONTROL IN jack of another unit, Connect this jack to the play (input) jacks of the cassette deck. If the remote control unit does not have separate buttons for double deck cassette players, see page 8. Red plug I PIONEER SYSTEM REMOTE CONTROL I with a remote control unit which Pears the _ mark (indicating that it is equipped...
... the CONTROL IN jack of another unit, Connect this jack to the play (input) jacks of the cassette deck. If the remote control unit does not have separate buttons for double deck cassette players, see page 8. Red plug I PIONEER SYSTEM REMOTE CONTROL I with a remote control unit which Pears the _ mark (indicating that it is equipped...

Operating Instructions
Page 7
... activates the secondary transformer only. Even when the switch is in the STANDBY position, there will be a power flow to the deck's circuits as long as the power cord is moving (playback, tape winding, etc.), press the stop (•) button before pressing the eject (A)...(COPY IIb II1 NORMAL: Normalspeed copy HIGH : Double speed copy O Reverse mode switch (REV MODE RELAY/SKIP) (_ DECK II MS(music search) +,- NOTE: /f the power is turned off when the power is moving , the cassette door may remain locked./n this button. FRONT PANEL FACILITIES i 0 0 IrrAIMMNy IE IrrANDSY. model.
... activates the secondary transformer only. Even when the switch is in the STANDBY position, there will be a power flow to the deck's circuits as long as the power cord is moving (playback, tape winding, etc.), press the stop (•) button before pressing the eject (A)...(COPY IIb II1 NORMAL: Normalspeed copy HIGH : Double speed copy O Reverse mode switch (REV MODE RELAY/SKIP) (_ DECK II MS(music search) +,- NOTE: /f the power is turned off when the power is moving , the cassette door may remain locked./n this button. FRONT PANEL FACILITIES i 0 0 IrrAIMMNy IE IrrANDSY. model.
Operating Instructions
Page 12
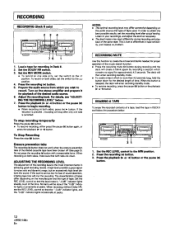
.... n_ 76 1. Press the playback (ib or Set the REV MODE switch. • To record on the stereo amplifier and prepare it for recording in Deck II. 2. For details, see "ADJUSTING THE RECORDING LEVEL" below. 7. Load a tape for playback of the desired audio source. 6, Adjust the recording level. Set the DOLBY... NR switch. 3. Press the recording (o) button. 5. Prepare the audio source from which you wish to the position, 4. I RECORDING I RECORDING (Deck II only) 23 4 r 11ro ,.IEI--BI., el ,I Z I.. -
.... n_ 76 1. Press the playback (ib or Set the REV MODE switch. • To record on the stereo amplifier and prepare it for recording in Deck II. 2. For details, see "ADJUSTING THE RECORDING LEVEL" below. 7. Load a tape for playback of the desired audio source. 6, Adjust the recording level. Set the DOLBY... NR switch. 3. Press the recording (o) button. 5. Prepare the audio source from which you wish to the position, 4. I RECORDING I RECORDING (Deck II only) 23 4 r 11ro ,.IEI--BI., el ,I Z I.. -


