Leaflet
Page 1
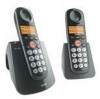
Ease of Use • Large, well spaced keys • Visual call alert • Large Caller ID display Simple convenience • Three main memory keys • Simple volume control All the features of communication, all the complexity and difficults have been avoided. Philips XL Cordless telephone XL3402B Simplicity at its best More comfortable and easier to 100% greater battery life • Ultra private calls • Virtually interference free By concentrating on the essentials of DECT • Up to use than ever before, the XL series makes using the phone simple and convenient.
Ease of Use • Large, well spaced keys • Visual call alert • Large Caller ID display Simple convenience • Three main memory keys • Simple volume control All the features of communication, all the complexity and difficults have been avoided. Philips XL Cordless telephone XL3402B Simplicity at its best More comfortable and easier to 100% greater battery life • Ultra private calls • Virtually interference free By concentrating on the essentials of DECT • Up to use than ever before, the XL series makes using the phone simple and convenient.

User manual
Page 3
...For your safety 6 2.2 Telephone connection 6 2.3 Need help? 6 2.4 Conformity 6 2.5 Safety precautions 6 2.6 Digital security system 6 3 Your phone 7 3.1 What's in the box 7 3.2 Overview of the phone 8 3.3 Overview of the base 9 3.4 Display icons 9 4 Getting started 10 4.1 Connect the charger 10 4.2 Insert the batteries in the ... 10 4.3 Charge batteries 10 4.4 Standby mode 11 4.5 Verify the signal 11 5 Using your phone 12 5.1 Call 12 5.2 Answer a call 12 5.3 Loudspeaker phone 12 5.4 Adjust the audio volume 12 5.5 End a call 12 5.6 Make a second call ...
...For your safety 6 2.2 Telephone connection 6 2.3 Need help? 6 2.4 Conformity 6 2.5 Safety precautions 6 2.6 Digital security system 6 3 Your phone 7 3.1 What's in the box 7 3.2 Overview of the phone 8 3.3 Overview of the base 9 3.4 Display icons 9 4 Getting started 10 4.1 Connect the charger 10 4.2 Insert the batteries in the ... 10 4.3 Charge batteries 10 4.4 Standby mode 11 4.5 Verify the signal 11 5 Using your phone 12 5.1 Call 12 5.2 Answer a call 12 5.3 Loudspeaker phone 12 5.4 Adjust the audio volume 12 5.5 End a call 12 5.6 Make a second call ...
User manual
Page 4
...11.13 Do not attempt to repair or modify this equipment 26 20 11.14 The RBRC® seal 26 8 Quick reference table for phone 12 Index 27 menus 21 9 Technical data 22 10 Frequently asked questions 23 11 Appendix 24 11.1 Equipment approval Information 24 11.2 Notification ...to the local telephone company 24 11.3 Notes 24 11.4 Rights of the Phone Company 24 11.5 Interference Information 24 11.6 Noise 25 11.7 FCC RF Radiation Exposure Statement 25 11.8 Hearing Aid Compatibility (HAC) 25 11.9...
...11.13 Do not attempt to repair or modify this equipment 26 20 11.14 The RBRC® seal 26 8 Quick reference table for phone 12 Index 27 menus 21 9 Technical data 22 10 Frequently asked questions 23 11 Appendix 24 11.1 Equipment approval Information 24 11.2 Notification ...to the local telephone company 24 11.3 Notes 24 11.4 Rights of the Phone Company 24 11.5 Interference Information 24 11.6 Noise 25 11.7 FCC RF Radiation Exposure Statement 25 11.8 Hearing Aid Compatibility (HAC) 25 11.9...
User manual
Page 7
...this telephone. The only way to observe the local regulations regarding the disposal of your packaging materials, exhausted batteries and old phone and where possible promote their own protection that the electrical ground connections of the power utility, telephone lines and internal metallic...of power failure, the communication can be used near intensive care medical equipment, nor by persons with pacemakers. • Your phone can seriously damage the unit. Incorrect adapter polarity or voltage can interfere with the applicable waste disposal regulations. This certification means that...
...this telephone. The only way to observe the local regulations regarding the disposal of your packaging materials, exhausted batteries and old phone and where possible promote their own protection that the electrical ground connections of the power utility, telephone lines and internal metallic...of power failure, the communication can be used near intensive care medical equipment, nor by persons with pacemakers. • Your phone can seriously damage the unit. Incorrect adapter polarity or voltage can interfere with the applicable waste disposal regulations. This certification means that...

User manual
Page 8
...any battery type other relevant provisions of the countries mentioned on www.philips.com/support 2.5 Safety precautions • Do not allow the charging contacts or the batteries to your phone line. A financial contribution has been paid to the analogue telephone networks...registration may not have a dialing tone. 2.3 Need help : www.philips.com/support • Troubleshooting: see page 23 2.4 Conformity Hereby, Philips declares that the XL340 is recyclable. 2.6 Digital security system Your cordless phone uses a digital security system to protect against false ringing, unauthorized ...
...any battery type other relevant provisions of the countries mentioned on www.philips.com/support 2.5 Safety precautions • Do not allow the charging contacts or the batteries to your phone line. A financial contribution has been paid to the analogue telephone networks...registration may not have a dialing tone. 2.3 Need help : www.philips.com/support • Troubleshooting: see page 23 2.4 Conformity Hereby, Philips declares that the XL340 is recyclable. 2.6 Digital security system Your cordless phone uses a digital security system to protect against false ringing, unauthorized ...
User manual
Page 9
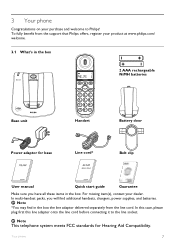
...item(s), contact your purchase and welcome to the line socket. Note *You may find additional handsets, chargers, power supplies, and batteries. Your phone 7 In multi-handset packs, you have all these items in the box the line adaptor delivered separately from the line cord. Note This ...box. In this case, please plug first this line adapter onto the line cord before connecting it to Philips! To fully benefit from the support that Philips offers, register your product at www.philips.com/ welcome. 3.1 What's in the box 2 AAA rechargeable NiMH batteries Base unit Handset Battery door...
...item(s), contact your purchase and welcome to the line socket. Note *You may find additional handsets, chargers, power supplies, and batteries. Your phone 7 In multi-handset packs, you have all these items in the box the line adaptor delivered separately from the line cord. Note This ...box. In this case, please plug first this line adapter onto the line cord before connecting it to Philips! To fully benefit from the support that Philips offers, register your product at www.philips.com/ welcome. 3.1 What's in the box 2 AAA rechargeable NiMH batteries Base unit Handset Battery door...
User manual
Page 10
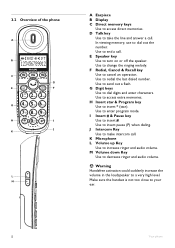
3.2 Overview of the phone L M A Earpiece B Display C Direct memory keys Use to insert * (star). H Insert star & Program key Use to access direct memories. I Insert # & Pause key Use to decrease ringer ... to access extra memories. Use to enter program mode. Make sure the handset is not too close to end a call . Use to your ear. 8 Your phone K Microphone L Volume up Key Use to make intercom call . J Intercom Key Use to increase ringer and audio volume.
3.2 Overview of the phone L M A Earpiece B Display C Direct memory keys Use to insert * (star). H Insert star & Program key Use to access direct memories. I Insert # & Pause key Use to decrease ringer ... to access extra memories. Use to enter program mode. Make sure the handset is not too close to end a call . Use to your ear. 8 Your phone K Microphone L Volume up Key Use to make intercom call . J Intercom Key Use to increase ringer and audio volume.
User manual
Page 11
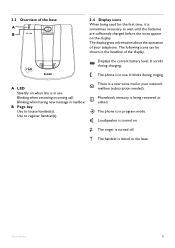
A LED Steadily on . The following icons can be shown in use . It scrolls during ringing. It blinks during charging. The phone is in mailbox. Your phone 9 Blinking when having new message in program mode. 3.3 Overview of the base A B 3.4 Display icons When being reviewed or edited.... The ringer is linked to wait until the batteries are sufficiently charged before the icons appear on the display. The phone is a new voice mail in use . There is in the headline of your network mailbox (subscription needed). Displays the current battery ...
A LED Steadily on . The following icons can be shown in use . It scrolls during ringing. It blinks during charging. The phone is in mailbox. Your phone 9 Blinking when having new message in program mode. 3.3 Overview of the base A B 3.4 Display icons When being reviewed or edited.... The ringer is linked to wait until the batteries are sufficiently charged before the icons appear on the display. The phone is a new voice mail in use . There is in the headline of your network mailbox (subscription needed). Displays the current battery ...
User manual
Page 12
.... Warning Verify the batteries polarity when inserting the batteries. USE RECOMMENDED TYPE SUPPLIED WITH THIS PRODUCT. The only way to power down this phone, you need an RJ11C (CA11A) type modular telephone jack, which might look like the one installed. 2 Connect output plug of the charger... Ensure the electrical outlet is always easily accessible. 4.3 Insert the batteries in use this product is classified as dangerous according to the phone socket on the bottom of base unit. Warning RISK OF EXPLOSION IF BATTERY IS REPLACED BY AN INCORRECT TYPE. Place handset on the...
.... Warning Verify the batteries polarity when inserting the batteries. USE RECOMMENDED TYPE SUPPLIED WITH THIS PRODUCT. The only way to power down this phone, you need an RJ11C (CA11A) type modular telephone jack, which might look like the one installed. 2 Connect output plug of the charger... Ensure the electrical outlet is always easily accessible. 4.3 Insert the batteries in use this product is classified as dangerous according to the phone socket on the bottom of base unit. Warning RISK OF EXPLOSION IF BATTERY IS REPLACED BY AN INCORRECT TYPE. Place handset on the...
User manual
Page 13
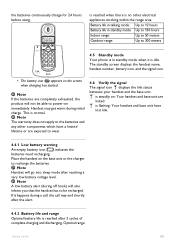
... to recharge the batteries. is idle. Note Handset will also inform you that the handset has to be able to 300 meters 4.5 Standby mode Your phone is in standby mode: Up to 150 hours Indoor range: Up to 50 meters Outdoor range: Up to power-on : Your handset and base unit...
... to recharge the batteries. is idle. Note Handset will also inform you that the handset has to be able to 300 meters 4.5 Standby mode Your phone is in standby mode: Up to 150 hours Indoor range: Up to 50 meters Outdoor range: Up to power-on : Your handset and base unit...
User manual
Page 14
... Answer a call . It is dialed. When you to talk to answer the call in the first hour. Press to the caller without holding onto the phone. It also allows others in the room to join in hours and minutes (HH:MM). 5.1.3 Preparatory dialing (Pre-Dial) With pre-dial, you receive ... and will flash on display and is shown in minutes and seconds (MM:SS) in handsfree mode The handsfree feature enables you receive a call , the phone will ring and will flash on display. Note You can see "Phonebook memory", page 15. 5.1.1 Make a call to delete an incorrect digit. 5.2 Answer...
... Answer a call . It is dialed. When you to talk to answer the call in the first hour. Press to the caller without holding onto the phone. It also allows others in the room to join in hours and minutes (HH:MM). 5.1.3 Preparatory dialing (Pre-Dial) With pre-dial, you receive ... and will flash on display and is shown in minutes and seconds (MM:SS) in handsfree mode The handsfree feature enables you receive a call , the phone will ring and will flash on display. Note You can see "Phonebook memory", page 15. 5.1.1 Make a call to delete an incorrect digit. 5.2 Answer...
User manual
Page 15
... call is answered, you can press to toggle between these 2 calls. 5.8 Conference call 5.8.1 Join a conversation During a call to. 3 Press to answer the intercom when the phone is ringing. Note Only the handsets that are registered to the same base station can use this feature. 5.8.2 Exit from Conference call During a conference call... the original handset to write "Peter" 1 Press once: P 2 Press once: P 3 Press twice: Pe 4 Press once: Pet 5 Press twice: Pete 6 Press three times: Peter Using your phone 13
... call is answered, you can press to toggle between these 2 calls. 5.8 Conference call 5.8.1 Join a conversation During a call to. 3 Press to answer the intercom when the phone is ringing. Note Only the handsets that are registered to the same base station can use this feature. 5.8.2 Exit from Conference call During a conference call... the original handset to write "Peter" 1 Press once: P 2 Press once: P 3 Press twice: Pe 4 Press once: Pet 5 Press twice: Pete 6 Press three times: Peter Using your phone 13
User manual
Page 16
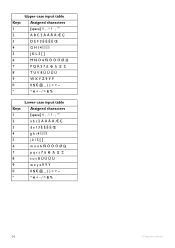
Upper case input table Keys Assigned characters 1 [space] 1 2 A B C 2 3 D E F 3 4 G H I 4 Ì Í Î Ï 5 J K L 5 [ ] 6 M N O 6 7 PQRS7 8 T U V 8 Ù Ú Û Ü 9 W X Y Z 9 Ý Ÿ 0 0 * Lower case input table Keys Assigned characters 1 [space] 1 2 a b c 2 3 d e f 3 4 g h i 4 Ì Í Î Ï 5 j k l 5 [ ] 6 m n o 6 7 pqrs7 8 t u v 8 Ù Ú Û Ü 9 w x y z 9 Ý Ÿ 0 0 * 14 Using your phone
Upper case input table Keys Assigned characters 1 [space] 1 2 A B C 2 3 D E F 3 4 G H I 4 Ì Í Î Ï 5 J K L 5 [ ] 6 M N O 6 7 PQRS7 8 T U V 8 Ù Ú Û Ü 9 W X Y Z 9 Ý Ÿ 0 0 * Lower case input table Keys Assigned characters 1 [space] 1 2 a b c 2 3 d e f 3 4 g h i 4 Ì Í Î Ï 5 j k l 5 [ ] 6 m n o 6 7 pqrs7 8 t u v 8 Ù Ú Û Ü 9 w x y z 9 Ý Ÿ 0 0 * 14 Using your phone
User manual
Page 17
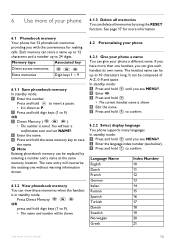
... Direct Memory ( ). • The number is shown. 4 Edit the name. 5 Press and hold to confirm. 6.2.2 Select display language You phone supports many languages. If you have more than one without warning information shown. 6.1.2 View phonebook memory You can be replaced by using the RESET function...1 ~ 9 6.1.1 Save phonebook memory In standby mode: 1 Enter the number. The new entry will be shown. 6.2 Personalizing your phone 6.2.1 Give your phone a name You can be up to 24 digits. See page 17 for making calls. Note Existing phonebook memory can give each handset ...
... Direct Memory ( ). • The number is shown. 4 Edit the name. 5 Press and hold to confirm. 6.2.2 Select display language You phone supports many languages. If you have more than one without warning information shown. 6.1.2 View phonebook memory You can be replaced by using the RESET function...1 ~ 9 6.1.1 Save phonebook memory In standby mode: 1 Enter the number. The new entry will be shown. 6.2 Personalizing your phone 6.2.1 Give your phone a name You can be up to 24 digits. See page 17 for making calls. Note Existing phonebook memory can give each handset ...
User manual
Page 18
...; The new setting is being used. You don't need to press . You don't need to press . Additional handsets must be lit when the phone is shown. 6.2.4 Auto Pick-up Auto Pick-up gives you see MENU?. 2 Enter 44. 3 Press and hold until you the convenience of answering...charging cradle. You don't need to confirm. • The new setting is shown. 6.3 Advanced features 6.3.1 Register a handset If you have inadvertently unregistered your phone In standby mode: 1 Press and hold until you see MENU?. 2 Enter 43. 3 Press and hold to confirm. • The new setting is shown....
...; The new setting is being used. You don't need to press . You don't need to press . Additional handsets must be lit when the phone is shown. 6.2.4 Auto Pick-up Auto Pick-up gives you see MENU?. 2 Enter 44. 3 Press and hold until you the convenience of answering...charging cradle. You don't need to confirm. • The new setting is shown. 6.3 Advanced features 6.3.1 Register a handset If you have inadvertently unregistered your phone In standby mode: 1 Press and hold until you see MENU?. 2 Enter 43. 3 Press and hold to confirm. • The new setting is shown....
User manual
Page 19
...DELETED. 6.3.4 Reset your handset will use. It cannot unregister itself. Press and hold to factory settings. Press and hold until you can reset your phone to confirm. • If successful, handset will turn on the LED for 3 seconds. • The base will show the selected base. ...want to the same base station. Repeat the above procedures and try again. 6.3.2 Select a base If your handset is successful, your phone You can select which base the handset will show REGISTERED. The default value of your country network and therefore you can un-register ...
...DELETED. 6.3.4 Reset your handset will use. It cannot unregister itself. Press and hold to factory settings. Press and hold until you can reset your phone to confirm. • If successful, handset will turn on the LED for 3 seconds. • The base will show the selected base. ...want to the same base station. Repeat the above procedures and try again. 6.3.2 Select a base If your handset is successful, your phone You can select which base the handset will show REGISTERED. The default value of your country network and therefore you can un-register ...
User manual
Page 20
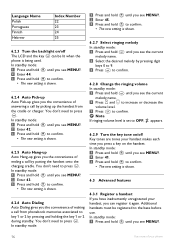
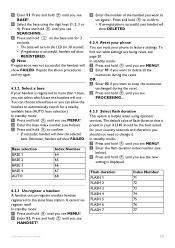
... you should not need to change it. Pause duration PAUSE 1 PAUSE 2 Index Number 78 79 6.3.7 Select dial mode (country dependent) The default value of your phone For example, you set temporary tone dialing. • d will be on the display if you have new message in your mailbox, but it is displayed...
... you should not need to change it. Pause duration PAUSE 1 PAUSE 2 Index Number 78 79 6.3.7 Select dial mode (country dependent) The default value of your phone For example, you set temporary tone dialing. • d will be on the display if you have new message in your mailbox, but it is displayed...
User manual
Page 21
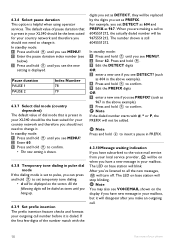
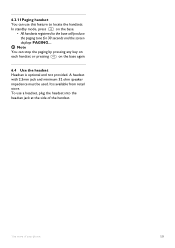
... screen displays PAGING.... Use more of the handset. Note You can use a headset, plug the headset into the headset jack at the side of your phone 19 A headset with 2.5mm jack and minimum 32 ohm speaker impedence must be used. 6.3.11Paging handset You can stop the paging by pressing any key...
... screen displays PAGING.... Use more of the handset. Note You can use a headset, plug the headset into the headset jack at the side of your phone 19 A headset with 2.5mm jack and minimum 32 ohm speaker impedence must be used. 6.3.11Paging handset You can stop the paging by pressing any key...
User manual
Page 22
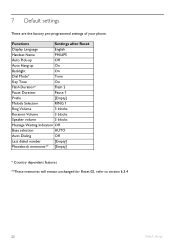
7 Default settings These are the factory pre-programmed settings of your phone. Functions Settings after Reset Display Language English Handset Name PHILIPS Auto Pick-up Off Auto Hang-up On Backlight On Dial Mode* Tone Key Tone On Flash Duration* Flash 2 Pause Duration Pause 1 Prefix [Empty] Melody ...
7 Default settings These are the factory pre-programmed settings of your phone. Functions Settings after Reset Display Language English Handset Name PHILIPS Auto Pick-up Off Auto Hang-up On Backlight On Dial Mode* Tone Key Tone On Flash Duration* Flash 2 Pause Duration Pause 1 Prefix [Empty] Melody ...
User manual
Page 23
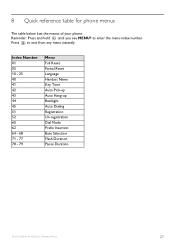
Index Number 01 02 10 - 25 40 41 42 43 44 45 51 52 60 62 64 - 68 71 - 77 78 - 79 Menu Full Reset Partial Reset Language Handset Name Key Tone Auto Pick-up Auto Hang-up Backlight Auto Dialing Registration Un-registration Dial Mode Prefix Insertion Base Selection Flash Duration Pause Duration Quick reference table for phone menus The table below lists the menus of your phone. Press to enter the menu index number. Reminder: Press and hold until you see MENU? to exit from any menu instantly. 8 Quick reference table for phone menus 21
Index Number 01 02 10 - 25 40 41 42 43 44 45 51 52 60 62 64 - 68 71 - 77 78 - 79 Menu Full Reset Partial Reset Language Handset Name Key Tone Auto Pick-up Auto Hang-up Backlight Auto Dialing Registration Un-registration Dial Mode Prefix Insertion Base Selection Flash Duration Pause Duration Quick reference table for phone menus The table below lists the menus of your phone. Press to enter the menu index number. Reminder: Press and hold until you see MENU? to exit from any menu instantly. 8 Quick reference table for phone menus 21


