Leaflet
Page 1
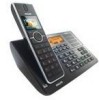
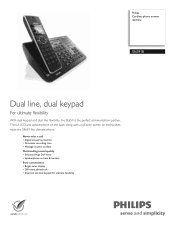
Philips Cordless phone answer machine SE6591B Dual line, dual keypad For ultimate flexibility With dual keypad and dual line flexibility, the SE659 is the perfect communication partner. The full LCD and speakerphone on the base, along with a full color screen on base & handset Pure convenience • Bright color display • 200-name phonebook • Dual line...; Digital answering machine • 30-minute recording time • Message-counter on Base Outstanding sound quality • Enhanced High Def Voice • Speakerphone on the handset, make the SE659 the ultimate phone.
Philips Cordless phone answer machine SE6591B Dual line, dual keypad For ultimate flexibility With dual keypad and dual line flexibility, the SE659 is the perfect communication partner. The full LCD and speakerphone on the base, along with a full color screen on base & handset Pure convenience • Bright color display • 200-name phonebook • Dual line...; Digital answering machine • 30-minute recording time • Message-counter on Base Outstanding sound quality • Enhanced High Def Voice • Speakerphone on the handset, make the SE659 the ultimate phone.

Leaflet
Page 2
...: 2 per handset • Standby time: Up to 150 hours • Talk time: Up to 12 hours Accessories • Detachable belt-clip • SE6591B/17 Highlights Enhanced Hi Def Voice Enjoy high quality conversation, with a level of clarity rarely heard before. Cordless phone answer machine Specifications...base, Integrated on handset • Dialing: Tone, Pulse Operator Requirements • Name and Caller ID • Caller ID on call is not around. Issue date 2010-12-21 Version: 2.1.8 12 NC: 8670 000 38062 UPC: 6 09585 14518 4 © 2010 Koninklijke Philips Electronics N.V. For a...
...: 2 per handset • Standby time: Up to 150 hours • Talk time: Up to 12 hours Accessories • Detachable belt-clip • SE6591B/17 Highlights Enhanced Hi Def Voice Enjoy high quality conversation, with a level of clarity rarely heard before. Cordless phone answer machine Specifications...base, Integrated on handset • Dialing: Tone, Pulse Operator Requirements • Name and Caller ID • Caller ID on call is not around. Issue date 2010-12-21 Version: 2.1.8 12 NC: 8670 000 38062 UPC: 6 09585 14518 4 © 2010 Koninklijke Philips Electronics N.V. For a...

User manual
Page 1
Register your product and get support at www.philips.com/welcome SE659 US-EN Telephone Answering Machine Warning Use only rechargeable batteries. Charge the handset for 24 hours before use.
Register your product and get support at www.philips.com/welcome SE659 US-EN Telephone Answering Machine Warning Use only rechargeable batteries. Charge the handset for 24 hours before use.
User manual
Page 3
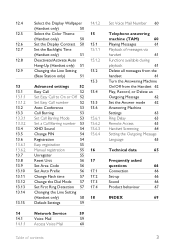
...EMF") 12 8.1.5 3.3 Recycle your batteries 12 8.1.6 4 The RBRC® seal 12 8.1.7 4.1 Service Centers 13 8.1.8 5 Your phone 14 8.2 5.1 What's in the box 14 8.2.1 5.2 Overview of your handset 15 Table of contents Display icons and Messages 18 Overview of the base station 20 Base station display 22 Conventions Used... Charge battery 25 Remove/Attach belt clip 26 Install optional headset 26 Power up 26 Using multipacks 27 Handset menu structure 28 Using your phone 33 Make a call 33 Predialling 33 Direct dialling 33 Call from redial list 33 Call from the...
...EMF") 12 8.1.5 3.3 Recycle your batteries 12 8.1.6 4 The RBRC® seal 12 8.1.7 4.1 Service Centers 13 8.1.8 5 Your phone 14 8.2 5.1 What's in the box 14 8.2.1 5.2 Overview of your handset 15 Table of contents Display icons and Messages 18 Overview of the base station 20 Base station display 22 Conventions Used... Charge battery 25 Remove/Attach belt clip 26 Install optional headset 26 Power up 26 Using multipacks 27 Handset menu structure 28 Using your phone 33 Make a call 33 Predialling 33 Direct dialling 33 Call from redial list 33 Call from the...
User manual
Page 4
... 44 8.5.5 Delete all redial numbers 37 10.4 Select phonebook melody (Handset only) 44 9 Use more of your 10.5 Delete a phonebook entry 45 phone 38 10.6 Delete all phonebook 9.1 Switch the handset off/on 38 entries 45 9.2 Handset keypad lock/ 10.7 Direct Access Memory 45 unlock 38 10.7.1 Add...or speaker volume 39 11 Using the Call log 46 9.5.2 Mute/Unmute microphone 39 11.1 Access the Call log 46 9.5.3 Activate/Deactivate handset 11.1.1 To choose the format for call loudspeaker mode 39 log display 47 9.6 Chain dialing 39 11.2 Save call list entry into the...
... 44 8.5.5 Delete all redial numbers 37 10.4 Select phonebook melody (Handset only) 44 9 Use more of your 10.5 Delete a phonebook entry 45 phone 38 10.6 Delete all phonebook 9.1 Switch the handset off/on 38 entries 45 9.2 Handset keypad lock/ 10.7 Direct Access Memory 45 unlock 38 10.7.1 Add...or speaker volume 39 11 Using the Call log 46 9.5.2 Mute/Unmute microphone 39 11.1 Access the Call log 46 9.5.3 Activate/Deactivate handset 11.1.1 To choose the format for call loudspeaker mode 39 log display 47 9.6 Chain dialing 39 11.2 Save call list entry into the...
User manual
Page 5
... Area Code 56 Set Auto Prefix 56 Change Flash time 57 Change the Dial Mode 57 Set First Ring Detection 57 Changing the Line Setting (Handset only) 58 Default Settings 59 14.1.2 15 15.1 15.1.1 15.1.2 15.2 15.3 15.4 15.5 15.6 15.6.1 15.6.2 15.6.3 15.6.4 16 17 17.1 17.2 ...Play, Record, or Delete an Outgoing Message 62 Set the Answer mode 62 Answering Machine Settings 63 Ring Delay 63 Remote Access 63 Handset Screening 64 Setting the Outgoing Message Language 65 Technical data 65 Frequently asked questions 66 Connection 66 Set-up 66 Sound 66 Product behaviour...
... Area Code 56 Set Auto Prefix 56 Change Flash time 57 Change the Dial Mode 57 Set First Ring Detection 57 Changing the Line Setting (Handset only) 58 Default Settings 59 14.1.2 15 15.1 15.1.1 15.1.2 15.2 15.3 15.4 15.5 15.6 15.6.1 15.6.2 15.6.3 15.6.4 16 17 17.1 17.2 ...Play, Record, or Delete an Outgoing Message 62 Set the Answer mode 62 Answering Machine Settings 63 Ring Delay 63 Remote Access 63 Handset Screening 64 Setting the Outgoing Message Language 65 Technical data 65 Frequently asked questions 66 Connection 66 Set-up 66 Sound 66 Product behaviour...
User manual
Page 6
Use a damp cloth for ventilation, to your home, consult your particular product; Immersion of the telephone or handset in water could result in installation unless proper ventilation is provided. 6 This product should always be abused by persons walking on it. 8 Do not overload ... the product. 10 To reduce the risk of electric shock, do not disassemble this product, but take it from overheating.These openings must not be operated only from the wall outlet before cleaning. Opening or removing covers may not apply to your dealer or local power company. 7 Do not allow anything...
Use a damp cloth for ventilation, to your home, consult your particular product; Immersion of the telephone or handset in water could result in installation unless proper ventilation is provided. 6 This product should always be abused by persons walking on it. 8 Do not overload ... the product. 10 To reduce the risk of electric shock, do not disassemble this product, but take it from overheating.These openings must not be operated only from the wall outlet before cleaning. Opening or removing covers may not apply to your dealer or local power company. 7 Do not allow anything...
User manual
Page 8
... requirements This product requires an electrical supply of 120 volts, single phase alternating current, excluding IT installations defined in standard UL 60950. 2.3 Battery requirements The handset requires power source of two rechargeable NiMH batteries, size AAA 1.2V 600mAh (Hr11/45). Batteries that are stored in a freezer or refrigerator for the purpose... centre or retail shop. 2.4 Telephone connection The voltage on the network is not designed for making emergency telephone calls when the power fails. Use only Philips Multi-Life 600mAh rechargeable NimH batteries.
... requirements This product requires an electrical supply of 120 volts, single phase alternating current, excluding IT installations defined in standard UL 60950. 2.3 Battery requirements The handset requires power source of two rechargeable NiMH batteries, size AAA 1.2V 600mAh (Hr11/45). Batteries that are stored in a freezer or refrigerator for the purpose... centre or retail shop. 2.4 Telephone connection The voltage on the network is not designed for making emergency telephone calls when the power fails. Use only Philips Multi-Life 600mAh rechargeable NimH batteries.
User manual
Page 9
... progress is recommended that you position the base unit at least one meter from the phone wall socket during a storm. • Because the phone works by sending radio signals between the base unit and the handset, wearers of hearing aids may be used near intensive care medical equipment, nor by ...the USB socket and the phone line from such appliances. Caution Use only the mains adapter supplied with this telephone. Caution Users should not be particularly important in the form of the charger or the battery to high voltages. • Do not allow the handset to come into contact ...
... progress is recommended that you position the base unit at least one meter from the phone wall socket during a storm. • Because the phone works by sending radio signals between the base unit and the handset, wearers of hearing aids may be used near intensive care medical equipment, nor by ...the USB socket and the phone line from such appliances. Caution Use only the mains adapter supplied with this telephone. Caution Users should not be particularly important in the form of the charger or the battery to high voltages. • Do not allow the handset to come into contact ...
User manual
Page 13
...you could suddenly increase the volume in the earpiece to a very high level: make sure the handset is not too close to your ear. • This equipment is not designed to make ...Do not allow the charging contacts or the battery to come into contact with the product. About operating and storage temperatures: • Operate in a place where temperature is always between 0 and 35º C (32 to 95...8226; Do not allow objects to fall on your phone. • Do not use any other battery than the one delivered with the product or recommended by Philips: risk of explosion. • Always use the...
...you could suddenly increase the volume in the earpiece to a very high level: make sure the handset is not too close to your ear. • This equipment is not designed to make ...Do not allow the charging contacts or the battery to come into contact with the product. About operating and storage temperatures: • Operate in a place where temperature is always between 0 and 35º C (32 to 95...8226; Do not allow objects to fall on your phone. • Do not use any other battery than the one delivered with the product or recommended by Philips: risk of explosion. • Always use the...
User manual
Page 16
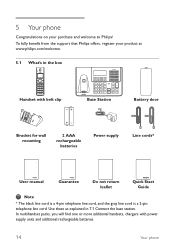
To fully benefit from the support that Philips offers, register your purchase and welcome to Philips! Use these as explained in the box Handset with power supply units and additional rechargeable batteries. 14 Your phone In multihandset packs, you will find one or more additional handsets, chargers with belt clip Base Station Battery ...Start Guide Note * The black line cord is a 4-pin telephone line cord, and the gray line cord is a 2-pin telephone line cord. 5 Your phone Congratulations on your product at www.philips.com/welcome. 5.1 What's in 7.1 Connect the base station.
To fully benefit from the support that Philips offers, register your purchase and welcome to Philips! Use these as explained in the box Handset with power supply units and additional rechargeable batteries. 14 Your phone In multihandset packs, you will find one or more additional handsets, chargers with belt clip Base Station Battery ...Start Guide Note * The black line cord is a 4-pin telephone line cord, and the gray line cord is a 2-pin telephone line cord. 5 Your phone Congratulations on your product at www.philips.com/welcome. 5.1 What's in 7.1 Connect the base station.
User manual
Page 17
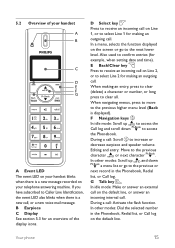
... clear (delete) a character or number, or long press to Caller Line Identification, the event LED also blinks when there is a new message recorded on your handset blinks when there is a new call : Scroll n to access the Phonebook. During a call , or a new voice mail message. F Navigation keys n In idle mode: ...the previous or next record in the Phonebook, Redial list, or Call log on Line 2, or to confirm entries (for making an outgoing call . Your phone 15 If you have subscribed to clear all. D Select key o Press to receive an incoming call on Line 1, or to select Line 1 for an...
... clear (delete) a character or number, or long press to Caller Line Identification, the event LED also blinks when there is a new message recorded on your handset blinks when there is a new call : Scroll n to access the Phonebook. During a call , or a new voice mail message. F Navigation keys n In idle mode: ...the previous or next record in the Phonebook, Redial list, or Call log on Line 2, or to confirm entries (for making an outgoing call . Your phone 15 If you have subscribed to clear all. D Select key o Press to receive an incoming call on Line 1, or to select Line 1 for an...
User manual
Page 18
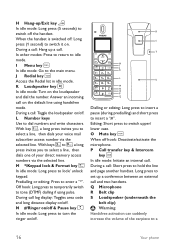
... other modes: Press to return to dial numbers and write characters. M */Keypad lock & Format key * In idle mode: Long press to a 16 Your phone H Hang-up/Exit key h In idle mode: Long press (5 seconds) to switch off hook: Deactivate/activate the microphone. I J K L U M N O P ... key l In idle mode: Turn on . P Call transfer key & Intercom key i In idle mode: Initiate an internal call and two handsets. Q Microphone R Belt clip S Loudspeaker (underneath the belt clip) Warning Handsfree activation can suddenly increase the volume of your voice mail subscriber access...
... other modes: Press to return to dial numbers and write characters. M */Keypad lock & Format key * In idle mode: Long press to a 16 Your phone H Hang-up/Exit key h In idle mode: Long press (5 seconds) to switch off hook: Deactivate/activate the microphone. I J K L U M N O P ... key l In idle mode: Turn on . P Call transfer key & Intercom key i In idle mode: Initiate an internal call and two handsets. Q Microphone R Belt clip S Loudspeaker (underneath the belt clip) Warning Handsfree activation can suddenly increase the volume of your voice mail subscriber access...

User manual
Page 19
very high level. T Headset jack U Battery door Your phone 17 Make sure the handset is not too close to your ear.
very high level. T Headset jack U Battery door Your phone 17 Make sure the handset is not too close to your ear.
User manual
Page 20
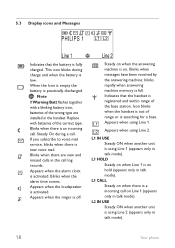
...is empty the battery is activated. Steady On during charge and when the battery is on hold (appears only in talk mode). 18 Your phone blinks rapidly when answering machine memory is searching for a base. Blinks when there are installed in talk mode). L1 CALL Steady on when ...there is on Line 1 (appears only in the call . Steady on when the answering machine is a incoming call . Icon blinks when the handset is out of the correct type. L2 Appears when using Line 1. Replace with a blinking battery icon, batteries of the wrong type are new and missed...
...is empty the battery is activated. Steady On during charge and when the battery is on hold (appears only in talk mode). 18 Your phone blinks rapidly when answering machine memory is searching for a base. Blinks when there are installed in talk mode). L1 CALL Steady on when ...there is on Line 1 (appears only in the call . Steady on when the answering machine is a incoming call . Icon blinks when the handset is out of the correct type. L2 Appears when using Line 1. Replace with a blinking battery icon, batteries of the wrong type are new and missed...
User manual
Page 22
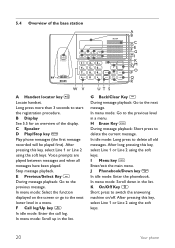
...mode: Scroll down in the list. In menu mode: Scroll up in the list. C Speaker D Play/Stop key p Play phone messages (the first message recorded will be played first). Voice prompts are played between messages and when all old messages. In menu ... more than 3 seconds to the next message. G Back/Clear Key c During message playback: Go to start the registration procedure. I K M PO Q R WV UT S A Handset locator key a Locate handset. B Display See 5.5 for an overview of the base station A B D F C E G H J L N I Menu key m Enter/exit the main menu. E Previous...
...mode: Scroll down in the list. In menu mode: Scroll up in the list. C Speaker D Play/Stop key p Play phone messages (the first message recorded will be played first). Voice prompts are played between messages and when all old messages. In menu ... more than 3 seconds to the next message. G Back/Clear Key c During message playback: Go to start the registration procedure. I K M PO Q R WV UT S A Handset locator key a Locate handset. B Display See 5.5 for an overview of the base station A B D F C E G H J L N I Menu key m Enter/exit the main menu. E Previous...
User manual
Page 23
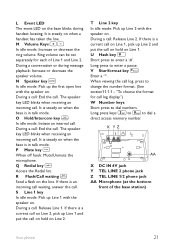
... idle mode: Initiate an internal call . R Flash/Call waiting t Send a flash on when a handset has taken the line. V Star/format key * Enter a '*'. X YZ AA X DC IN 6V jack Y TEL LINE 2 phone jack Z TEL LINE 1/2 phone jack AA Microphone (at the bottom front of Line 1 and Line 2. It is steady on ....M Volume Keys +In idle mode: Increase or decrease the ring volume. If there is in talk mode. When viewing the call . During a conversation or during handset locating. During a call: End the call log, press to enter a '#'. T Line 2 key In idle mode: Pick up Line 2 and put the call...
... idle mode: Initiate an internal call . R Flash/Call waiting t Send a flash on when a handset has taken the line. V Star/format key * Enter a '*'. X YZ AA X DC IN 6V jack Y TEL LINE 2 phone jack Z TEL LINE 1/2 phone jack AA Microphone (at the bottom front of Line 1 and Line 2. It is steady on ....M Volume Keys +In idle mode: Increase or decrease the ring volume. If there is in talk mode. When viewing the call . During a conversation or during handset locating. During a call: End the call log, press to enter a '#'. T Line 2 key In idle mode: Pick up Line 2 and put the call...
User manual
Page 24
... menu mode: Displays the options in Main Display Area L1 is for Line 1 and L2 is receiving a call log of the messages in use by handset. • The line is set to off. G Message Counter Shows the number of the line. • The line is in hold mode or in answering... answering mode. D L1 and L2 in the menu. Blinks when there are shown on the handset or base display screen. • Handset and Base Station Keys Except where indicated otherwise, basic operation is the same for both the handset and base station of the line is set to zero. See below. The icon comes...
... menu mode: Displays the options in Main Display Area L1 is for Line 1 and L2 is receiving a call log of the messages in use by handset. • The line is set to off. G Message Counter Shows the number of the line. • The line is in hold mode or in answering... answering mode. D L1 and L2 in the menu. Blinks when there are shown on the handset or base display screen. • Handset and Base Station Keys Except where indicated otherwise, basic operation is the same for both the handset and base station of the line is set to zero. See below. The icon comes...
User manual
Page 25
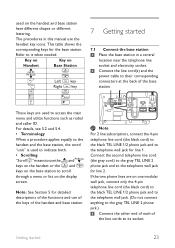
...unit" is used to indicate both. • Scrolling "Scroll n" means to use the handset key icons. used on one modular wall jack, connect only the 4-pin telephone line cord (the black cord) to the black TEL LINE 1/2 phone jack and to the telephone wall jack. (Do not connect anything to the gray... TEL LINE 2 phone jack.) 3 Connect the other end of each of the handset and base station. Getting started 7.1 Connect the base station 1 Place the base...
...unit" is used to indicate both. • Scrolling "Scroll n" means to use the handset key icons. used on one modular wall jack, connect only the 4-pin telephone line cord (the black cord) to the black TEL LINE 1/2 phone jack and to the telephone wall jack. (Do not connect anything to the gray... TEL LINE 2 phone jack.) 3 Connect the other end of each of the handset and base station. Getting started 7.1 Connect the base station 1 Place the base...
User manual
Page 27
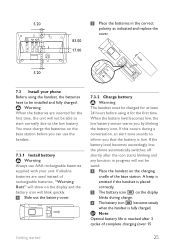
...battery sensor warns you can use the handset. 7.3.1 Install battery Warning Always use AAA rechargeable batteries supplied with your phone Before using it for the first time, the unit will not be saved. 1 Place the handset on the base station before using the handset, the batteries have to be able to... start normally due to the low battery. A beep is emitted if the handset is placed correctly....
...battery sensor warns you can use the handset. 7.3.1 Install battery Warning Always use AAA rechargeable batteries supplied with your phone Before using it for the first time, the unit will not be saved. 1 Place the handset on the base station before using the handset, the batteries have to be able to... start normally due to the low battery. A beep is emitted if the handset is placed correctly....


